This manual focuses on openLCA 2, our latest version of the software. It elaborates on the new features and explains how to carry out the first steps in working with openLCA such as installation and importing databases. Further, this document provides an overview of openLCA operations and features including descriptions of how to use them.
This manual is generated with mdBook and allows you to navigate through the book chapters:
The left sidebar displays all chapters. Clicking on a chapter title loads to that specific page. The sub-chapters are collapsible, click on the arrow on the chapter title's right to display all of them. You can also browse them on the Table of Content.
The sidebar may not automatically appear if the display window is too narrow, especially on mobile screens. In this case, you can tap the menu icon (three horizontal bars) at the top-left corner to open and close the sidebar.
You can use the arrows buttons at the bottom of the page to navigate to the previous or next chapter. Additionally, the left and right arrow keys on your keyboard serve the same purpose.
To enhance your reading and learning experience, we made the manual sections collapsible, allowing a customized exploration of topics based on your preferences.
The top menu bar presents icons for interacting with the book. The icons displayed will depend on the book’s generation setting.
Icon
Description
Opens and closes the chapter listing sidebar.
Opens a picker to choose a different color theme.
Opens a search bar for searching within the book.
Instructs the web browser to print the entire book.
►
Opens the collapsible sections
Tapping the top bar will scroll the page to the top.
In some chapters we use collapse sections. You can open them by clicking on the respective icon ▶.
We started developing openLCA in 2007; a super-long German startup incubation project preparation in the end led to nothing (we needed to specify the number of trainings we will have five years after the project start, per quarter, etc., and were then offered half a million € but only as a loan, to the same conditions as if obtained from a bank, which we declined). But we also had submitted an abstract to the ecobalance conference in Japan, where we presented the idea, and mentioned that we are looking for budget to start. To our surprise, after the presentation, CEOs of PRé and of ecoinvent came and asked how much we need. We did not ask for much, but this funding enabled us to start, initially with a format converter but then also with an LCA software.
Why we started openLCA is contained in this early presentation, and is still valid today:
Slide 4 of the presentation.
Every sustainability ("sust.") life cycle assessment decision is based on results obtained from a model, which in turn uses data. Software is responsible for taking data, feeding it to a model, and for producing a result from the model.
So, software is fundamental for decision support.
Software has influence on:
What models can be built;
How models can be built;
Which methods can be applied (for calculation; impact assessment; data quality assessment; uncertainty assessment; interpretation; …);
Which results are easily and not so easily accessible; and on
How results are presented
Having written other Life Cycle Assessment (LCA) software before, we thought that writing a new LCA software is something we can do. It should not be a cheap and simplified software, however, but a high performance, flexible software, able to model any LCA, not limited to one sector or product type. And it should be open source, for one to offer something different, but also, to overcome a true bottleneck of LCA: with the specialised software being really expensive, apart from promotional licenses for universities, many could not afford using dedicated LCA software, and many thus could not apply LCA.
First release of the format converter was 2007, first release of the openLCA LCA software was 2008. Open Source license was Mozilla, so a quite soft, unaggressive license. Andreas Ciroth designed the logo and icons, Michael Srocka led the software development.
The first format converter logo and splash screen looked like this:
the first openlca lca software ("openlca framework") looked like this:
Since its start, openLCA has seen a lot of modifications, extensions, and revisions. In May 2023, after about 15 previous releases, we decided to call the new version "2.0" due to its major improvements, lots of new features, and changes, in usability and design.
openLCA today is a best-in-class LCA software, still open source, most widely used, worldwide. The format conversion feature, initially a separate tool, has been integrated into the import and export of openLCA, which now supports a wide variety of import and export formats. For LCA modelling, openLCA offers all features a sophisticated LCA model will need, being large or small. Economic and social assessments over the life cycle are possible as well, making openLCA a Life Cycle Sustainability Assessment software.
An API with extensive documentation allows connection with and integration into other IT systems. openLCA supports in-application scripts, as SQL or Python, for automating modelling and data routines. Validation procedures in the software check for flaws in data and models.
And further, openLCA today is not only the desktop application, but also the LCA Collaboration Server, which supports collaboration in teams, using openLCA, and the server version, which allows deployment in cloud systems. All three work nicely together.
Some things remain, since the beginning, and the biggest constant is probably the idea of an independent, aware user that does not need to be patronized. openLCA is flexible. Unlike SimaPro, e.g., we do not have hardwired top categories, we do not require users to always (pretend to) have complete supply chains, we allow using different reference flow nomenclatures, we allow importing also incomplete and imperfect data. The openLCA desktop version is a powerful tool, and not a "press a button" software for half-informed users.
With scripts, it is possible to change data.
But, in recent versions and especially in version 2, extensive validation routines point users to potential issues in data, and further, entire databases and models can be turned into write-protected libraries. And even, to round off openLCA’s use cases, the server version with webtool offers the possibility of a "click a button" software for half-informed users, with a preconfigured openLCA model.
There are only a few aspects openLCA requires. openLCA always requires that a flow that connects two processes in a life cycle is identical, meaning that you cannot, as it is possible e.g. in the software fka GaBi, connect apples with oranges. openLCA also requires a quantitative reference for each process.
One thing, however, developed differently than planned; we had thought, that a community of software developers will emerge "around" openLCA. While there were some attempts, so far, our own development was more focused and faster than other contributions; we also did not spend a lot of effort on community hackathons – focus is development and maintenance of a superior software. Here, our friends from brightway have followed a slightly different approach. We are very open for good contributions from others, however, if you are interested.
In a nutshell, openLCA is a tool for modelling and assessing life cycles, performing Life Cycle Assessments (LCAs). This covers modelling the life cycle in a narrow sense, by connecting processes visually or via tables, assessing them, regarding environmental, economic or social impacts, and analysing these results for the identification of hotspots. Also comparisons of products are possible, and also assessments and comparisons of organisations.
Many different "variants" of life cycle models are possible in openLCA, for example:
Carbon footprints according to the GHG protocol, or ISO 14067
LCA studies according to ISO 14040
LCA studies in line with the Environmental Footprint approach of the European Commission
Environmental Product Declarations (EPDs) in line with EN15804
Screening LCIA studies
Organisational LCA studies
Life Cycle Costing studies
Social LCA studies
And so on.
Linked to this core use of openLCA, you can also import and export data, create and modify life cycle impact assessment (LCIA) methods, collaborate within a team, and many more things.
The idea for this manual is to exactly describe, and guide through, these different use cases and applications.
GreenDelta has been the developer of openLCA from the beginning. Apart from developing openLCA, GreenDelta is are involved in sustainability research, consultancy services, case studies, database development and the development of various other tools.
In our latest release, openLCA 2, we gave openLCA a fresh visual and technical update. Explore a variety of new features, including:
Improved model graph: The improved model graph allows direct modelling within the graph interface, offering greater flexibility and user-friendliness. Moreover, users can customise the graph’s appearance using various present and editable themes.
Updated Design & Dark Mode: The application’s design has been refreshed and now also include a dark mode, providing a visually appealing interface that reduces eye strain in low-light environments. Our dark mode seamlessly follows the mode set for your entire system.
Improved Calculation Speed: We optimized openLCA calculations, leading to faster processing and better overall performance. You’ll experience shorter waiting time to obtain results.
Accelerated Calculations with Data Libraries: The system uses data libraries to boost calculation speed, allowing even quicker and more efficient analyses.
Direct Work with Environmental Product Declarations (EPDs): Users can now import and create EPDs directly within the system, streamlining the workflow and eliminating the need for extra tools or manual processes.
LCIA Methods: The structure of the LCIA methods has been improved, especially by turning impact categories into independent entities.
Enhanced Results Visualization: We improved the visualization options, including a Sankey diagram and the possibility to view, edit and compose a product system on a schematic platform. Users can also export a contribution tree with a chosen number of levels for detailed analysis.
Improved and Faster Regionalized Calculations: Regionalized calculations have been significantly improved, making the process of calculating environmental impacts for specific regions much faster.
LCA Collaboration Server 2.0: The collaboration server has been upgraded to version 2.0, offering enhanced features for smooth collaboration, data sharing, and project management among multiple users.
Parameters: Now it is possible to create parameter sets in product systems to perform scenario modelling. Is it also possible to update uncertainty values in the global parameter table, and redefine parameter across the database by modifying the global parameter values, among other available options.
Enhanced Script Writing: The system’s API has new utility functions accessible via an internal Python editor, making it easier to write scripts and customize the application more efficiently.
Script storage: It is now possible to store scripts as global scripts or exclusively within the database.
Waste flow impact direction: A new functionality allows the user to specify the impact direction as either "Input" or "Output" for every impact category available.
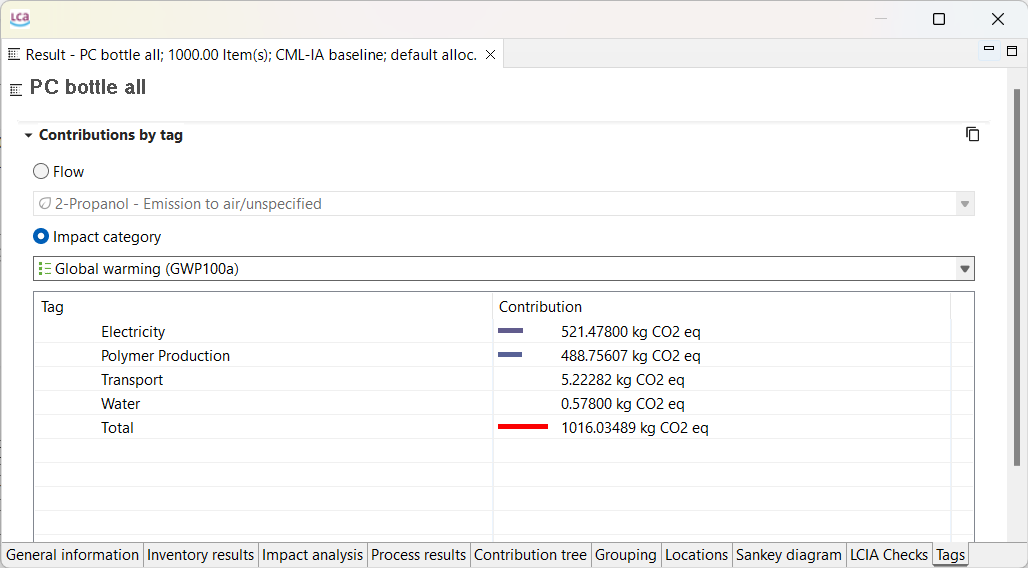
Additional Information through "Tags": Users can now add extra information to different system components using tags, making it easier to organize and retrieve specific data or analysis.
Extra features to enhance your experience:
Experimental theming support for product systems
Project result page now mirrors that of product systems
Improved calculation setup and options for projects
Experimental feature to prefer links within the same location
Uncertainty distribution parameters in the global parameter table
Monte Carlo simulations for the direct calculations
ecoinvent geographies added directly to reference data
The fastest way to get openLCA is to download the (zip/dmg/tar.gz) archive or the installer (Windows). The installation process for openLCA differs slightly depending on whether you are using Windows, Mac, or Linux.
In this section you'll discover system requirements, installation instructions, and initial setup steps for running openLCA on your system.mdbook.
Hardware requirements for openLCA vary based on LCA model complexity. For optimal performance, a faster processor and more RAM are recommended. Here are the minimum system requirements:
5-15 GB RAM, depending on the background database and model size (6 GB for ecoinvent 2, 20 GB for PSILCA)500 MB free hard disk space + space for databases (e.g. ecoinvent 3 requires ~250MB)
5-15 GB RAM, depending on the background database and model size (5 GB for ecoinvent 2, 15 GB for PSILCA)500 MB free hard disk space + space for databases (e.g. ecoinvent 3 requires ~250MB)
openLCA natively runs in Linux, Mac, and Windows. For all operation systems, you can download the respective archive (zip/dmg/tar.gz). For Windows, there is also an installer. Using the zip archive in Windows is typically more convenient than the classic installation in Windows. It is quick and easy and the least "intrusive" method, helping you maintaining a clean system.
To get openLCA running, first step is to download openLCA from the download page (via openLCA.org). The installation process then slightly differs depending on your operating system -Windows, Mac, or Linux. Below, there are instructions for setting up openLCA on your specific platform.
openLCA download/installation options: Zip-extraction and direct execution or full installation
Regardless of the installation approach you choose, there will be no difference in the program's performance.
Once you have downloaded the zip archive, simply extract the content, launch the openLCA.exe, and the program will start running.
A decompressed ZIP file
If you have enabled smart screen on newer Windows system, a warning will pop up that Microsoft does not know the organisation issuing the software. You can safely press "install anyway" and proceed.
If you are not an admin on your computer, extract the zip file to a folder where you have write access, for example your user directory.
With the zip installation, you can have multiple openLCA installations and versions that coexist without conflicts on your computer. This allows you also to run multiple versions of openLCA simultaneously. However, be mindful of the storage space requirements. Uninstalling, btw., simply means to delete the respective folder and its subfolders that you created from the zip archive.
To install openLCA 2 on your MacOS system, begin by double-clicking the downloaded DMGImage. This action will open a window where you can conveniently drag-and-drop the openLCA2 application (the .app file located on the left side) into the applications folder of your MacOS system (located on the right side). Once the app is successfully installed, you can launch it either by using the Launchpad or by navigating to the "Applications" folder using the Finder.
Windows: Download the installer file from the download page of the openLCA website and run it. You can choose whether openLCA will be available only for the user who installs it, or for anybody working on the computer. For the installation, you will need admin rights. The folder where openLCA stores its databases will be created for the user who is running the installation.
It is therefore not a good idea to ask an admin to install openLCA via the installer when you are not the admin yourself, since you will not have access to the database folder afterwards, and also not to the folder where openLCA stores the configuration file, which means you will not be able to change the settings after the installation.
Note: You must first uninstall previous versions of openLCA.
Setup screen for installation in Windows
Follow the installation steps to the end and you can begin working with openLCA.
After the installation, openLCA can use a moderate amount of memory (RAM) from your computer, to allow use and installation on many, also weaker, computers. It is typically useful, however, to expand the memory, especially if you plan to use modern, larger background databases such as ecoinvent 3. The approach for expanding the memory is slightly different in Windows and Apple systems.
Check please the minimum requirements for allocated memory here (#link); as a general rule, 16GB RAM is sufficient.
Note: You cannot allocate more memory than what is installed on your computer. You need to leave some memory for the operation system and other software as well. In order to see the available memory, check e.g the task manager in Windows.
To increase memory allocation on Windows, open "File" then "Preferences" and the tab "Configuration". Here you can select the maximum memory usage. It is recommended to increase this value for calculating very complex product systems. In the picture below, we show how to assign 30 GB to openLCA on a system that has 64 GB of accessible memory. >Any changes made to the configuration settings will require restarting openLCA to apply.
Preferences Configuration
Note: Increasing the memory allocation does not necessarily improve performance. When openLCA is assigned a large amount of memory, the Java garbage collector may run less frequently. Hence, the collection cycle can take longer and may temporarily affect the application. As a result, openLCA may appear slower for short periods even when more memory has been allocated. You can check memory usage in the Task Manager. Finally, memory should be increased only as needed.
Note: This procedure is new with openLCA 2 (old version below)!
To increase the memory allocation on a Mac, start by launching openLCA. Then after clicking on "File" open "Preferences".
How to access the "Preferences" in openLCA under macOS
Note: It is NOT under "openLCA" and "Settings"! And then the tab "Configuration":
Preferences Configuration
Adjust your memory accordingly!
macOS (old procedure)
Start by launching the "Finder" and navigate to the "Applications" folder. Locate openLCA in the Applications folder. Next, right-click on openLCA and choose the option "Show package contents". Once you have accessed the "Show package contents" option, navigate further by opening the "Contents" file. Within the "Contents" file, locate and open the "MacOS" file. You can do this by double-clicking on the file named "openLCA.ini". If the text editor does not open automatically, you can manually select the "Text Edit" program to open it.
Within the text editor, you can manually modify the memory allocation by changing the value. For instance, you can set it to 4096M. After making the desired changes, save the file, close all windows, and proceed to restart openLCA.
openLCA uses fast numerical libraries (UMFPACK, openBLAS, etc., for the nerds). These, however, are publicly available with an aggressive open source license that prevents us from distributing them together with openLCA. To bring these into openLCA, you will need to install them yourself. To do so, simply click on the "make the calculation in openLCA faster" banner on the welcome page in openLCA.
How to access fast libraries
This will download and install the libraries, in the openLCA database folder. You need to restart openLCA afterwards, and the banner will disappear.
In the openLCA log file, accessible via help / Open log file in openLCA, you will find an entry such as:
Confirming a successful installation. These libraries make openLCA 5-10 times faster than the default java libraries.
Having completed these steps, you are good to work with openLCA.
Since openLCA 2.0.3, we’re thrilled to announce a significant improvement in the user experience. Through the incorporation of the Intel Math Kernel Library (MKL), we have removed the necessity to download the supplementary UMFPACK library for accelerated calculations. MKL stands as an optimized and efficient library for mathematical and scientific computations.
Please, note that openLCA 2.0.3 with the previous math libraries can still be downloaded from openLCA.org.
To update openLCA, simply download the latest version from the openLCA website. openLCA software operates independently from its databases, which means that multiple software versions can coexist on the same system. This makes upgrading straightforward and allows you to keep older versions available if needed.
Zip archive: Extract the archive to a folder of your choice and start openLCA directly from that folder. No installation is required and no need to remove the older versions!
Installer version: You must first uninstall previous versions of openLCA. Then ,run the installer and follow the installation steps. The installer will create a standard application installation on your system.
After starting the new version, your existing databases will still be visible and can be opened from the database list.
When opening a database created with an older openLCA version, the software checks whether the database structure matches the version requirements. If the structure differs, openLCA will prompt you to update the database.
Before performing the update, openLCA may ask whether you want to create a backup of the database.
Creating a backup is recommended for important projects but can be skipped if a backup already exists.
During the update, openLCA modifies only the database structure, not the actual data. All processes, flows, product systems, and results remain unchanged.
However, after the update is completed, the database cannot be opened with older versions of openLCA anymore.
The database update process is generally reliable for incremental updates, such as moving from one minor version to the next.
For larger version jumps (for example from openLCA 1.4 directly to 2.6), the automated update script may fail because the database structure has changed too much between versions. In such cases, the update should be performed in intermediate steps, such as:
openLCA 1.4 → openLCA 2.0
openLCA 2.0 → openLCA 2.4
openLCA 2.4 → openLCA 2.6
Older versions required for these intermediate steps can also be downloaded from the openLCA website.
Unlike some other LCA software, openLCA does not rely on a hardcoded reference flow system that changes between software versions. As a result, upgrading the software generally does not require any modifications to reference flows or existing model structures.
This design makes upgrading openLCA comparatively straightforward while maintaining compatibility with previously created models.
Our website offers a range of services for both new and existing openLCA users. you can find download links for the software, source code, openLCA LCIA Method Pack, case studies, user manuals, and links to instructional videos. Go and check out our Learning & Support section.
openLCA is a free and open source software. However, many LCA databases are not for free. GreenDelta has created openLCA Nexus, an online repository for making LCA data available to users. It contains free and "for purchase" data. Some are shown in the image below.
Moreover, the Nexus website allows you to search for data sets in Nexus. It is also possible to filter data sets by the data provider, location, category, price and year of validity.
openLCA offers the largest collection of data sets and databases worldwide for LCA software, some for purchase, some for free. Altogether, around 300,000 different data sets are available on Nexus.
Extract of available databases at openLCA's platform Nexus
Most databases support the same reference flows and impact assessment methods. Some databases are separate, and do not mix with the others. An example are Input/Output databases such as PSILCA, the SHDB, or exiobase.
On Nexus, you can use the search engine and the "Map" feature to explore the content of the available databases.
openLCA Nexus website
To order and download a database from the openLCA Nexus site, please follow these steps:
Register an account at Nexus and log in: We are committed to stringent data protection principles to ensures the security of your privacy.
Select the desired license and add it to the cart: Navigate the "Databases" section, explore the available licenses, and select the one that aligns with your requirements or preferences. Note that some databases may be available for free, while others require payment.
Place an order: Once you have added the license to your cart, proceed to place an order. You can check openLCA Nexus website's FAQs for more information about database licenses.
Approval and database download: After your order is approved, go to the "Downloads" section on the Nexus website. This section is located in the upper right-hand corner of the page when you are logged in. Here, you will find a list of data files available for download.
Select files and format: Select the files you wish to download from the available options and choose the format you prefer (if applicable).
Review and accept licenses: Before downloading the file, carefully read and agree to the licenses and the End User License Agreement (EULA) by checking the two box at the bottom
Download: Click on the "Download" button to start the download process.
Downloading a database from Nexus
Note for macOS users: If you are using Safari, the browser will automatically unzip your downloaded zip files. However, you need the zipped file for import in openLCA (e.g. when you want to import JSON-LD, methods packages, ILCD...). You can solve this issue in two ways:
Use another browser for downloads, where the zip-files are not automatically unpacked after successful download.
Zip the archives again by using a third-party tool, because the build-in archive tool from Apple will add additional resources to the zip-file that can create issues when importing the file in openLCA.
ask.openLCA is public support platform, operating as hub where users and ask questions and receive answers, facilitating access to assistance and information.
In this section, we provide an overview of openLCA's key features by demonstrating a typical LCA modeling approach. These key elements include selecting a background database, creating processes and products, connecting them to a life cycle, choosing an impact assessment method, performing life cycle calculations, and reviewing the results. Detailed instructions for using the software will be provided in subsequent sections of this manual.
The essential first step in LCA modeling using openLCA is the selection of a background database. In the software context, a "database" serves as a repository for the components required for conducting LCAs, therefore, you need to create or import one to work with openLCA. Moreover, it's uncommon to model the entire life cycle from scratch. Instead, you will get common processes from an existing database (these "common" processes typically include electricity production, transport, construction, waste treatment, and so on). You will typically model yourself core, foreground processes specific to the product or service you want to analyze.
In this case study, we'll model the life cycle of a pack of oat milk compared to the life cycle of a pack of cow milk, using core processes from the Agribalyse database, freely available on Nexus for users that have an ecoinvent license. Check the "Accessing databases from openLCA Nexus" to learn how to download a database.
Downloading a database from Nexus
Once you have your database, you can check the "Databases" section to learn more their properties.
Now, we can design the life cycle phases, or processes, of our product (in this case, packed oat milk). As you will see, a process is a set of activities that transform inputs into outputs. They are characterized by a quantitative reference, which is the product that the process produces, or, for waste treatment processes, the waste it treats. In the context of this case study, we will skip the raw material extraction phase and directly model the processes of the manufacturing phase.
Below, you can see the process that model the production phase of an oat milk pack, with its input and output flows.
Process representing the production of an oat milk pack, with its input and output
To model the entire life cycle of this product, we'll also create the distribution phase, use phase, and end-of-life processes (you can find details about end-of-life modeling in this section).
We will integrate all the processes we just created into a life cycle model by creating a product system from the process with the respective reference flow (oat milk, consumed). openLCA will connect the supply chain for you.
Life cycle model of an oat milk pack, with all its interconnected processes
Following the same steps, we'll also create the product system of a cow milk pack. This way, we can compare them and draw some considerations about their different environmental impact.
Life cycle model of a cow milk pack, with all its interconnected processes
With your life cycle model ready, it's time to calculate the inventory of your product. This provides insights into the materials and resources utilized and emitted throughout the life cycle of your product. This is the Life Cycle Inventory (LCI) and in openLCA, it can be obtained by clicking on "Calculate" in your product system window.
The "Inventory Results" tab will open and contain a table with input and output flows of the product system, showing amounts and units for each of them.
To generate the Life Cycle Impact Assessment (LCIA), you need to add an LCIA method to the calculation. After clicking on "Calculate" in the product system window, you need to choose an "Impact assessment method" from the drop-down menu, which will calculate the environmental impact from the life cycle inventory.
If you are interested to display impacts per life cycle stage click here
For a detailed analysis of the impacts of the individual life cycle stages in openLCA, you have to slightly modify the modelling approach which will lead to the following model graph:
This will allow you to assess the impacts per life cycle stage as displayed in the Sankey diagram here:
And in a similar fashion in the Contribution tree:
Comparing life cycle model results, i.e. product systems, can provide valuable insights into their relative environmental performance. In openLCA, this is done via projects.
When you create a project, you can add the product systems you want to compare and generate insights and graphs for both of them.
Relative impact results of one pack of oat milk vs one pack of cow milk, obtaind using EF Method
Congratulations! You have successfully gone through the key steps in openLCA. With this knowledge, you can now start making informed decisions to improve the environmental performance of your products and processes. Happy analyzing!
Next, we will go systematically through the features of openLCA.
When you launch openLCA for the first time, it does not contain any data. On the left side, you see an empty Navigation field. On the right, you see the Welcome page.
openLCA Welcome page
The Welcome page provides quick links to openLCA Nexus, instructional videos, case studies, this user manual, the openLCA download page where you can download the latest version of the software as well as LCIA methods, and, eventually, a link to more information on the openLCA network and its users.
Save / Save As... / Save All: This option saves the work that is currently opened in the editor tabs. Unsaved tabs will be not included in the calculations that will be performed.
Close / Close All: This option closes the current/all windows opened in the editor.
Preferences: Under preferences, you can customize openLCA upon your needs. Here, you can find settings as memory allocation for openLCA, and language selection.
Collaboration: Here, you can select your preferred configurations for working with the collaboration server. Each bullet point comes already with a description and is not further described here:
Check referenced changes
Smart checking
Enable comments
Preferences Collaboration
More information about the Collaboration Server can be found in the respective chapter.
Configuration: Here you can choose among eleven available languages (Arabic, Bulgarian, Catalan, Chinese, English, French, German, Italian, Portuguese, Spanish or Turkish). You can also select the maximum memory usage (see chapter).
Preferences Configuration
Graphical editor theme: You can change now the theme for the model graph and Sankey diagram namely: Dark, Light, Nord Dark, Nord Light, Poimandres. However, to access the dark mode for the whole application, you need to select it on your operating system.
Reset window layout: Furthermore, you can reset your window settings if you encounter a bug or if you find yourself lost with the number of open windows.
Download calculation libraries: This option allows you to integrate fast calculation libraries for openLCA. This function is still developed currently.
Note: You need to restart openLCA to activate configuration changes.
Experimental features: These features are still in development, but you can already access them by checking this box. We welcome any feedback to further refine them. Here you can activate the novel social impact assessment feature.
Preferences Experimental Features
Import/Export: Here you can change the ILCD Network settings (currently under development).
Logging: Here you can set what information should be written in openLCA's log file. You can also keep the log file opened permanently if you want.
Number format: If you are not a fan of the six-decimal display format, you can modify it here. This setting will not affect calculation results and it is just for your convenience, adjusting the format in the user interface.
In case you made a mistake here, "Restore Defaults" will always bring you back to the default settings.
Note: Almost all the functions described here can also be accessed via right click with mouse on the active databases in the navigation panel.
The following options are available under "Database" when a database is opened:
New Database: For creating a new database, either from scratch or loading it from file. Access the respective sections for details: Creating a new database from scratch section "Creating a new database loading it from file" for details. It is also possible to activate both functions by right-clicking on the navigation window.
Backup Database: Copy the database into an archive file to save it.
Validate: Checks the database about inconsistencies and creates a validation report.
Copy: Creates a copy of the active database.
Rename: Renames the active database.
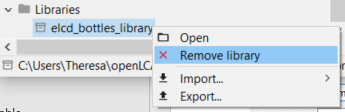
Delete Database: Deletes the active database from openLCA. Please note, this action is irreversible!
Close Database: Closes the active database. Alternatively, opening another database will automatically close the active one.
Check linking properties: Performs a comprehensive provider check on the active database and displays the results in a table. It will show if processes lack a default provider, whether product or waste flows exist with multiple providers, if and which product flows have multiple providers and identifies provider linking options that are uncritical with the active database.
Properties: Shows the database's location on the computer and the type of the database.
Compress database: This function will remove deleted datasets from the active database freeing up space in the database.
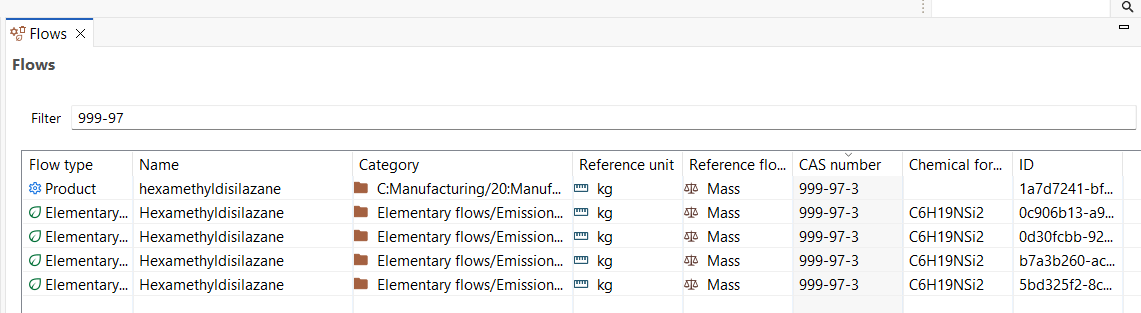
Content: Here, lists of "Processes", "Parameters", "Flows", "Flow properties", "Units" and "Currencies" are available. Clicking on them shows a list of all the flows or all the processes within the database. This option allows you to filter all flows using the CAS number or chemical formula.
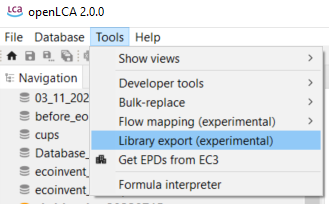
The following options are available under "Tools":
Options under Tools
Show views
The following options are available after clicking on "Show views" and "Other...":
Options under Show views, Other...
General
Console: Displays the log file
Minimap: Not available, a relict from creating openLCA with eclipse
Outline: Displays a list of all the processes of a product system, including all its background processes. It is only applicable after you’ve created a product system. Open the product system’s Model Graph (tab) and choose the "Outline" option from "Views". The outline allows you to choose the processes you wish to show or hide from the Model Graph.
Palette: Not available, a relict from creating openLCA with eclipse (don't worry)
Properties: Not available, a relict from creating openLCA with eclipse (don't worry)
Other
Commit History: Shows the commit history of the synchronization with the
collaboration server, see section "Link with Collaboration Server".
Compare with repository: Shows the comparison with the
collaboration server, see section "Link with Collaboration Server".
Navigation: The Navigation window displays the databases you have imported
into openLCA and all the data sets they include.
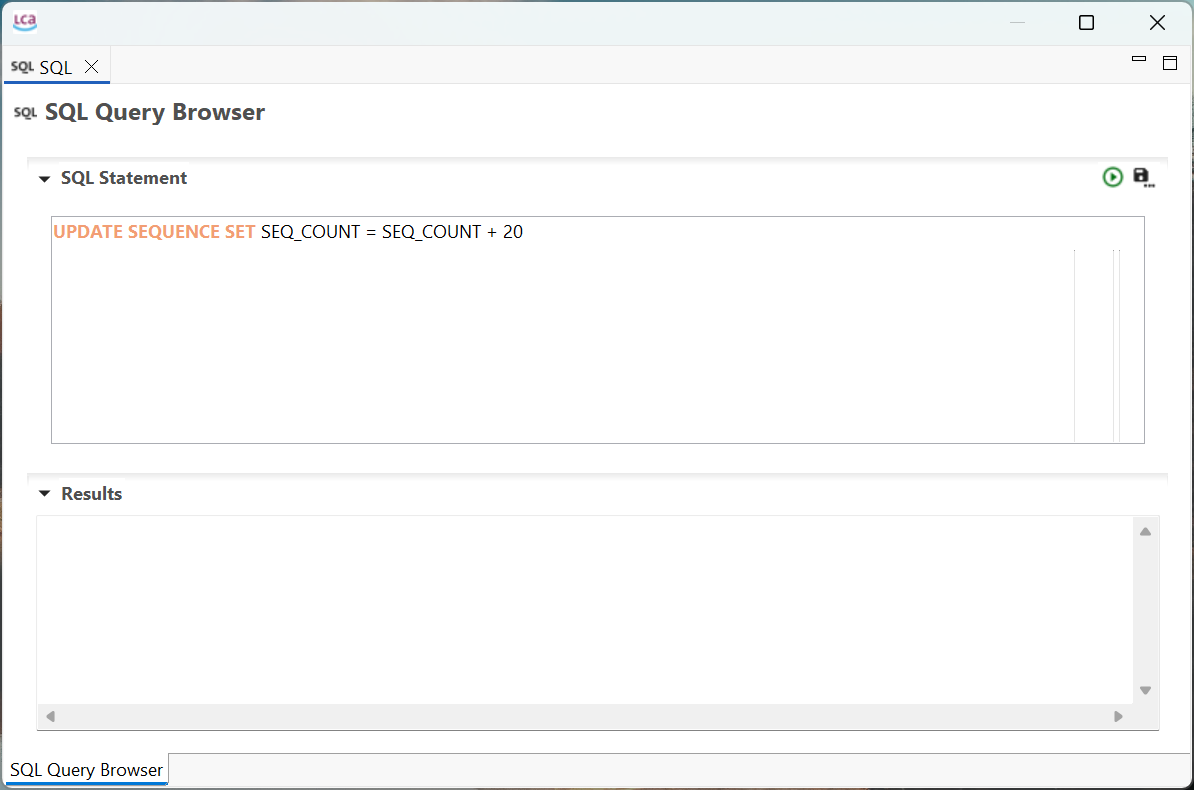
SQL: A tool that can be used to carry out SQL queries in openLCA.
Console: The console tool is the live feed of our program with the same content as our log-file.
Python: openLCA supports the possibility to run Python programs directly in openLCA. With this feature, you can automate calculations in openLCA, write your own data imports or exports, perform sensitivity analysis calculations by varying parameter values, and much more.
IPC Server: Inter-Process Communication is a platform-independent data exchange interface via HTTP. IPC Server allows running openLCA services via Python’s standard library
However, to run the scripts use the respective button (green arrow) in the tool bar.
Bulk-replace: It is a tool that allows the replacement of a flow or product
provider with another flow or provider. To find out more details on bulk-replace see "Using mapping files in openLCA" chapter.
Flow mapping (experimental): Still under development but already available for you! Contact us if you want to learn more about this feature.
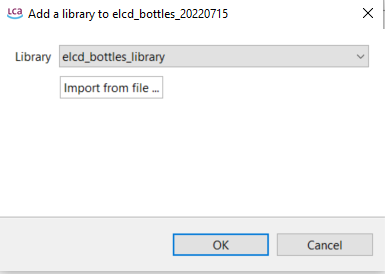
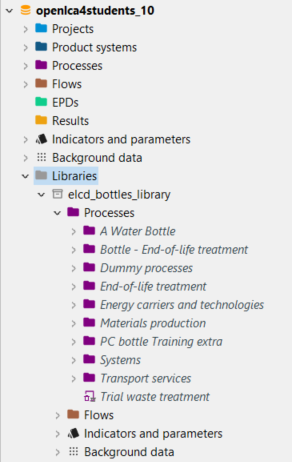
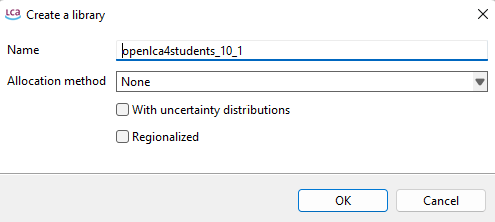
Libraries: See the respective chapter on libraries.
Get EPDs from EC3: With openLCA 2 it is now possible to download or download EPDs from EC3 (Embodied Carbon in Construction Calculator) by Building Transparency. This requires access to the Building Transparancy server. Also an upload is possible.
SmartEPD: API connection for SmartEPD. Still under development but already available for you! Contact us if you want to learn more about this feature.
Hestia: API connection for hestia. Still under development but already available for you! Contact us if you want to learn more about this feature.
Formula interpreter: Use this interpreter to check if your formulas are correct. More information on the interpreter is accessible by opening the formula interpreter and typing "help" in the command line.
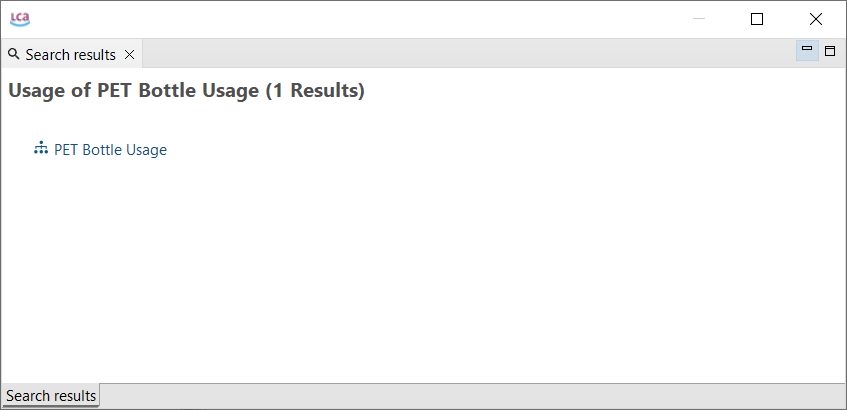
On the top-right corner of the page, the "Search" function allows you to search for keywords in openLCA (e.g. name of flows, processes, social indicators, currencies, etc.). You can search across all sections or specify specific areas. In openLCA 2, you can also search for datasets within accessible repositories on the collaboration server and import them into the local working database.
Search function in openLCA
When you search for a term, you can even filter the results:
Filtering after using the search function in openLCA
Note: 'AND' combines words in the search bar, e.g. ethylene and market.
As displayed, there is a small icon with two yellow arrows on the on the top-right corner of the navigation. This is the "Link with the editor" function and can be active (light blue highlight) or deactived (no highlight). If the option is activated, the flows/processes/product systems being opened in the main window of openLCA (editor) will be opened in the navigation panel. If it is deactivated, the currently opened flow/process/product system will not be opened in the navigation.
Activated "Link with Editor" option
This option is helpful if you are looking for a flows/processes/product systems in a database with the option activated it will automatically open the respective folder structure in the navigation panel. Once found, you can deactivate the option again.
Moreover, if you click on the three dots next to the editor you will also find the "Refresh" function. It refreshes the "Navigator". For example, when creating data sets in a Python script or via the IPC server, they won't show up in the "Navigator" if you do not refresh it.
In openLCA 2, every new window is organized as a tab next to the welcome one within the main window. Right-clicking on a tab provides different management options, improving the user-friendliness of openLCA.
Right-clicking a tab
Tabs can be detached and moved around on the screen. By dragging and dropping a detached tab next to an existing tab in openLCA, you can reverse the detachment. This feature allows you to run openLCA in a single-window and multi-window mode, particularly beneficial when working with multiple screens.
To show two tabs either underneath or next to each other, drag one tab till a double line appears on your screen.
Placing tabs underneath or next to each other
Note: An asterisk "*" in front of the tab's name indicates that the data of your tab is
not saved and therefore an older state of this tab will be included in any calculation.
Note: If you are unhappy with your choice of tabs and windows, you can always reset them under File → Preferences → Configuration → Reset Window.
In openLCA, a "database" functions as a container that organizes and stores interconnected elements needed by openLCA. It serves as a repository for projects, product systems, processes, flows, results, and other important components required for conducting LCAs. Key elements of an openLCA database are shown below, with their relations.
Database elements. The direction of the arrow represents the direction in which the information flows.
After launching openLCA for the first time, you will notice that the navigation section is empty. To start working with openLCA, you can either create a database from scratch
or load one from an existing file (e.g. one you might have downloaded from openLCA Nexus, in this case follow the instructions for "Accessing databases from openLCA Nexus" on openLCA Nexus section). You can also load a database from a GitHub repository("New database" > "From repository...").
Empty Navigation window following openLCA installation
openLCA offers the flexibility to have multiple databases imported in the software. Each database functions independently and only one database can be "active" at a time, while the others remain "inactive". This allows you to separate different LCA studies or case studies for better organization and management.
However, with openLCA it is also possible to combine multiple databases, by merging their content. This feature enables comprehensive analysis that incorporates various datasets and LCA models. Check "importing and combining databases" section for details.
Note: It is considered good practice to work with one database for each case study/LCA project performed in openLCA.
New! Now in openLCA 2 you are able to sort your databases in folders. Right-click on a database and then click on "Set folder", and create your new folder:
After your folder is created you can add also other databases in it just dragging and dropping them.
Note: The databases of openLCA are stored by default on C:\Users\NAME\openLCA-data-1.4 (Windows). If you are considering to change this defaul folder, follow this instruction .
Once you opened or created a database, you'll see these elements in the navigation panel:
Projects: Projects serve as a platform to compare different product systems, allowing users to assess and evaluate various scenarios.
Product Systems: Product Systems in openLCA are sets of interconnected processes, linked by flows, that model the life cycle of a product. They are essential for calculating inventory results and conducting impact assessments, outlining the processes involved in producing or modifying products and materials.
Processes: Processes are a set of interrelated or interacting activities that transform inputs into outputs within a product's life cycle. They outline the sequence of activities involved in producing or modifying products and materials, forming the core of a product system's structure.
Flows: Flows represent products and materials in a life cycle, connected within the process network. They can be inputs, outputs, energy, and emissions.
New!EPDs (Environmental Product Declarations): openLCA allows import and creation of Environmental Product Declarations, EPDs. EPDs provide verified, aggregated environmental performance information for specific products.
New!Results: Results in openLCA are stored impact assessment results obtained from calculating product systems.
Indicators and Parameters: Indicators and parameters serve as flexible components that can replace plain input/output values, on the process, Impact assessment method, product system, project and database levels. They are key for a flexible model, and ideal for scenario analyses where some aspects of a model need to be changed to check for potential impacts on the calculation result.
Impact Assessment Methods: in openLCA you can import different impact assessment methods. These methods provide the framework and algorithms to quantify and assess the environmental impacts associated with the product systems.
Impact Categories: Impact categories are classer representing environmental issues of concern to which life cycle inventory analysis result may be assigned (e.g. "global warming", "human toxicity").
Social Indicators: In openLCA users can assess social impacts, incorporating social considerations into the life cycle assessment.
Global Parameters: Global parameters can be found and are valid on all levels in the database (processes, product systems, etc.). They can be used to modify formulas and amounts across processes, for example, or also settings in that should be valid throughout an entire database, which makes them really powerful.
Data Quality Systems: Data Quality Systems are matrices designed to evaluate and record the reliability of data across three key levels: overall data quality within a process, data quality for each individual data exchange within a process, and data quality of social aspects. Data quality can be calculated for at the data exchange within processes level, and the score is shown in inventory results, the LCIA results / impact analysis, and sankey diagrams. Furthermore, uncertainty values can also be calculated from the matrices and can be used in the Monte Carlo simulation.
Background Data: Background data summarize the elements that users typically don't engage with often, like units, locations and so on.
Flow Properties: Flow properties are characteristics or properties associated with flows, such as length, mass, volume, or other relevant attributes that help in quantifying and analyzing the flows.
Unit Groups: Unit groups are collections of units for a given flow property. For instance, units of area like square meters (m²), square feet (ft²), and square yards (sq. yd) are part of the same unit group. One unit group always has one reference unit, other units in the same group can be converted from one into the other.
Currencies: In openLCA, you can assign costs to flows, which enables the calculation of the Life Cycle Costing of a product or service.
Actors: Actors represent individuals or entities. Actors can be researchers, experts, or stakeholders, e.g. data providers, reviewers, authors, and so forth.
Sources: Sources are references, citations, etc.. openLCA allows storing of the original pdf report and other supporting information for sources.
Locations: Locations are simply locations, and they can be a region, a country, or any other point on a map. They are important for localizing the supply chain and for calculating regional impacts.
Note: openLCA utilizes Universally Unique Identifiers (UUIDs) to identify and manage all entities, including processes, flows, product systems, projects, parameters, impact categories, and impact assessment methods. UUIDs are standardized identifiers ensuring uniqueness across systems or databases, even from one user to another.
Loading a database allows you to import an entire openLCA database, with all elements, process datasets, models, etc., into the openLCA system you are currently working with. This is useful e.g. for restoring backups, or for migrating all LCA work from a project or colleague.
For loading a complete database, you need a zolca file from openLCA. For example, most files provided by openLCA Nexus are zolca files (see "openLCA Nexus" section in "Resource" for mode details about downloading databases from our platform). The zolca file format was specifically developed by GreenDelta to compress and package openLCA databases, for backup and sharing purposes.
To restore a complete database, follow these steps:
Right-click on the navigation window and choose "New database" and then "From file...".
Select the zolca-format database file you want to load.
Note: Keep in mind that you have to update openLCA from time to time as the databases will be created with the most recent openLCA version. This is often the reason for the error message: 'Could not get the version from the database. Is this an openLCA database?'.
Note: The program decompresses the files into a different directory (C:\Users\NAME\openLCA-data-1.4). As a result, the original zolca file remains compressed and won't be directly affected by changes made to the database within the software.
To create a new database in openLCA, follow these steps:
Right-click in the navigation window and select "New database" and then "From scratch...".
Step 1: Creating a new database
A wizard for creating a database will appear, asking you to name the new database.
Step 2: Data creation wizard
In the wizard, you can choose from the following "Database content" options:
Empty database: Select this option if you want to create a blank database without any data. As you can see in the figure below, all folders are empty.
Units and flow properties: This option includes flow properties, unit groups, and currencies in the "Background data" folder of the new database.
Complete reference data: This option provides a more comprehensive setup, including elementary flows, flow properties, unit groups, currencies, locations, and mapping files in the "Background data" folder of the new database.
Difference between the three available new database types
Note: Typically, you will create the database with the "complete reference data" setting, unless you are importing data sets from external sources with other flows than the openLCA reference flows. E.g., you can import an entire SimaPro database and just use all flows and LCIA methods from there. Units are causing less issues in different database and LCA software systems (every LCA software has a unit "kg"), and you will need units, of course, thus in an empty database, you will need to create everything yourself. Starting with a database that contains most basic content such as units thus saves time.
New! The ecoinvent geographies, along with their respective geometries, are now directly added to the reference data. Hence, if you create a database using the "Complete reference data" template, it will include these geographies.
Once you've made your selections, simply click on "Finish" to finalize and create the new database!
openLCA has an internal database that stores all the different elements visible in the navigation tree (or, most of them at least). With a new openLCA version, the structure of the internal database, the database schema in IT terms, may change, e.g. because new elements have been added in a new version.
When you try to open a database in openLCA with an older database schema, the software will detect the differences and prompt you to update the database. After the update, your database will be compatible with the new version of openLCA.
Backing up a database before updating to a newer openLCA version
Note: Once the database has been updated, it will only be compatible with the newer version of openLCA. It cannot be reverted to be compatible with older versions of openLCA! It is recommended to create a backup of the database before updating it.
After completing these steps, the database will open and automatically become your active database (indicated by the yellow icon and bold text). You will see the navigation panel with various folders:
Previously we have described the function "Creating a new database loading it from file", which is specifically intended for zolca files. As working with data, in particular during the life cycle inventory data collection phase, is rather complex, openLCA supports various data formats to work with.
Note for macOS users: If you are using Safari, the browser will automatically unzip your downloaded zip files. However, you need the zipped file for import in openLCA (e.g. when you want to import JSON-LD, methods packages, ILCD...). You can solve this issue in two ways:
Use another browser for downloads, where the zip-files are not automatically unpacked after successful download.
Zip the archives again by using a third-party tool, because the build-in archive tool from Apple will add additional resources to the zip-file that can create issues when importing the file in openLCA.
To import data into openLCA, click on "File" and then "Import", or right-click on an active database in the Navigation Window and choose "Import".
Under the "Import" section, you can find the following options:
File: This option allows you to import data in various formats, including zolca, EcoSpold 1, Excel, HSC Sim Flow (experimental), ILCD, and SimaPro CSV. The import format is detected automatically.
Other: This option allows you to manually specify the format of the import, in the picture below you can see the wizard.
Import Wizard
The details for each option are displayed below:
Importing a database from an exported zolca file
The fastest way to open a zolca-format database in openLCA, is outlined in the "Creating a new database loading it from file" section. Alternatively, you can use the "Import" function with the following steps:
Click on "File" and then "Import".
Select "Import entire database" and then click on "Next".
Choose the option "From exported zolca-File" in the import wizard.
Locate the desired zolca file in your file browser and select "Open". Then, click "Finish".
Import from exported zolca-File
After importing it, the database will be "inactive". To activate it and gain access to its flows, processes, and other components, simply double-click on it.
Note: The program decompresses the files into a different directory (C:\Users\NAME\openLCA-data-1.4). As a result, the original zolca file remains compressed and won't be directly affected by changes made to the database within the software
Importing an existing database
In openLCA, an existing database refers to a database that has already been imported or created within the software. To import data from an existing database into the currently active database, you can follow these steps:
Start by following steps 1 to 2 as described above.
Select the option "Existing database".
Use the drop-down menu to choose the desired database from the available options.
Finally, click on "Finish" to complete the import process.
Importing databases and data sets as Ecospold, Excel, ILCD, SimaPro CSV, and JSON-LD
By following these steps, you can import databases in various formats into existing openLCA databases, allowing you to expand and enhance your data resources:
If needed, create a new empty database in openLCA to also import the respective reference system (elementary flows, units etc.) from the database/data set.
Double-click on the target database to activate it before importing the data.
Navigate to the "File" menu and select "Import". Choose "Other" from the options.
Select the specific format of the database you want to import (e.g., Ecospold, Excel, ILCD, SimaPro CSV, or JSON-LD).
Here are some notes on specific formats, be aware that this is not an exhaustive guidance but provides just some key aspects:
For SimaPro CSV files, add a flow in the window and optionally select a flow mapping file. If you are importing multiple CSV files without a mapping file, import all the CSV files together to ensure correct mapping.
For ILCD files, select the import file from the directory and optionally a flow mapping file. ILCD databases have to be in .zip format to be imported.
For Ecospold1 files, ensure to check and assign units using a flow mapping file.
JSON-LD is the in-house format for openLCA. You can import entire databases, LCIA methods or any other database element to import. JSON-LD data has to be in .zip format.
When importing JSON files, you have three options for the case of already existing datasets:
Never update a data set that already exists: The system will check for matching UUIDs. If a match is found, the existing dataset will remain as it is.
Update data sets with newer versions: If matching UUIDs are found, the system will update the existing datasets only if the imported version is newer (the version can be checked in the "General information" tab of every dataset).
Overwrite all existing data sets: If matching UUIDs are found, the system will replace the existing datasets automatically with the imported ones irrespective of versioning.
Datasets with UUIDs that are not present in the current database will be imported anyway, regardless of the option you choose.
Click "Finish" to initiate the data import process.
The duration of the import may vary depending on the size and complexity of the data.
Importing GeoJSON files
In openLCA 2, we introduced a new feature that allows you to import GeoJSON files, so you can incorporate geographic information for existing locations in the database. The feature compares attributes like name, UUID, or code of the locations in the database with the features specified in the corresponding GeoJSON file. This helps to find and assign the appropriate location. For example, you can use this method to import the GeoJSON file of ecoinvent locations available at Geography ecoinvent using this method.
Within the database, GeoJSON data is stored in a compressed binary format. This approach reduces storage requirements and ensures fast loading of the data.
To import GeoJSON files, follow these steps:
Select "Geometries from GeoJSON" in the import wizard under "Other".
Choose the folder where the GeoJSON file is located.
Select the specific GeoJSON file you wish to import.
Note: If the GeoJSON file is in a zipped format within the selected folder, extract or unzip it before proceeding, as the import wizard can only add uncompressed GeoJSON files. The GeoJSON file may not be visible in the folder view, but it will be visible in the import wizard once the folder is selected.
In openLCA, it is possible to merge multiple databases into a single one. The databases available in openLCA Nexus are carefully mapped to ensure that all elements within each database are accurately recognized and applied. This mapping prevents the creation of duplicate flows during import and guarantees the correct functioning of impact assessment methods.
To combine databases, follow these steps:
Begin by creating/importing the first database. It is recommended to import the largest database first to minimize compilation time.
Activate the imported database by double-clicking on it.
Now, you can proceed to import the remaining databases by right-clicking on the active database, choose "Import" then "Other...".
Select "Import entire database", click on "Next" and eventually choose the database to import from databases that are already present in openLCA or from an exported zolca file (see picture below). Click on "Finish" to combine the databases.
The software will automatically combine the databases. The duration of this process may vary depending on the size of the databases involved. You can refer to this instructional video on combining ecoinvent 3.1 databases for visual guidance.
You can decide to combine the active database with another database already present in openLCA or an exported database
When integrating databases from different LCA software that use different names for elementary flows, mapping files become essential for importing these databases into openLCA. These files describe the correspondence between flows in the source system and those in openLCA, facilitating the matching of elementary flow references. By using mapping files, you can align the elementary flow reference system of another data format with that of openLCA during the database import process. Mapping files are in .csv format, containing the necessary data for accurate mapping.
For your convenience, openLCA holds mapping files for the most common formats (ILCD, SimaPro, EcoSpold1) are included when creating a database with complete reference data, see section "Creating a new empty database".
The database just created has a section "mapping files" under Background data, where you can find the mapping files for SimaPro, EcoSpold1 or ILCD:
Location of mapping files in the navigation panel
Example of a mapping file
The mapping file is required while "importing a database" with different data formats, e.g. SimaPro, EcosPold1 or ILCD, see the figure below.
Importing a database using a mapping file
Always check how the mapping file fits to you data, and remember that you can also create your own mapping file following the column schema described on this link.
If you have a new mapping file, you can add it with a right click on "Mapping files" and then "Import".
Importing a new mapping file
You can also access the mapping files through the main menu bar at the top under "Tools".
Importing a new mapping file
For the manual correction of elementary flows or providers, you can also use the "Bulk-replace" function under "Tools":
Using the bulk-replace function for flows
Note: Please always make sure that your mapping was done correctly using the "Validation" (see below) or after a calculation, having a look into the "LCIA checks" tab. Check out the "Results Analysis" chapter for details.
The validation option serves to confirm the integrity of inter-linkages within a database following the import and mapping processes. It ensures that all connections within the database are functioning correctly and accurately. Validate a database is particularly helpful to confirm the accuracy of imported data from external sources and its integration into the existing database. To validate a database, right click on the it and click on "Validate".
In case the validation process encounters errors, it is crucial to address any missing links before proceeding with further modifications. If validation proves to be impossible, it is recommended to discard the recent changes, retrieve the repository again, and start over by committing the modifications.
Examples of validation messages:
the presence of duplicates or synonyms for a unit
the quantitative reference is a product input or waste output
Example of errors when validating an active database
In general, errors may arise when corrupt records are retrieved from the repository, or the flows of the database appear to be incompatible (it might be required using a mapping file during the import).
Exporting databases in openLCA allows users to extract and save data in various formats for further analysis or sharing.
Note: The methodologies described in this chapter can be applied to the whole database in use as well as single elements (flows, product systems, results...). You can right click on the element you want to export and select "Export".
openLCA supports data export in many formats, offering adaptability to different needs:
Ecospold: Allows exporting impact assessment methods and processes.
Excel: Enables exporting processes, analysis results, Monte Carlo simulation results, and more.
Select either "Impact method" or "Processes" after clicking on "EcoSpold". Select the destination directory and the datasets to export, then click "Next" which leads to the ecospold1 configuration setup.
Selecting data/processes to be exported
When processes are to be exported, the next step is to select which processes you would like to export. Once selected, click on "Next" to "EcoSpold Configuration" and customize the export.
Under "EcoSpold Configuration" you can check general export settings to align with the required schema, as well as amendments to the exported product names.
Autofill missing schema with missing values – this ensures that all fields, required by the ecospold1 format, are filled with default values
Export all datasets into one file – by selecting this, all ecospold1 files will be exported as one large file, else each process dataset is exported as an individual ecocpold1 file
Create categories file – where relevant this file bridges the 2-level category structure available in the ecospold1 file with the rest of its associated category hierarchy in the database in categories.xml file, as shown in the snippet below.
Add export information with dataset ID to general comment_
when selected, the ID information is integrated into the general comment of the process information. (For example: The inventory refers to the production of a greenhouse with glass walls with a lifespan of 20 years
openLCA export
This data set was exported from openLCA. The UUID of the data set in openLCA was:
66d8967f-879f-3094-889c-f69a3e520fc0)
when deselected, the UUID of each process is included in the file name. For example: file name process_66d8967f-879f-3094-889c-f69a3e520fc0.xml
To export processes as Excel files, select "Processes" after clicking on "Excel". Specify the export directory and the processes to export, then click "Finish". Each process will be saved as an individual Excel file.
You can choose between exporting LCIA methods or processes in SimaPro CSV. Then click on "Next" to select the elements you whant to export, select a recipient folder for the CSV and and eventually click on "Finish".
openLCA allows to export your database as JSON-LD. This allows you to efficiently export selected datasets (processes, product systems etc even on a folder level). Also, you can export the default provider for product inputs and waste outputs. For this, select "JSON-LD" in the export wizard. Choose an export directory and the database elements to export, then click "Finish".
Selecting the dataset/s and destination for the JSON-LD export
Note: The option "Export default providers of product inputs and waste outputs" will not only export the provider link but also the linked processes. This is important if you only export the processes but not the whole database.
openLCA allows users to easily copy information from any table and paste it into other applications like Excel or Notepad. Please check "Importing and exporting data" section for details.
Flows represent products and materials that move throughout a life cycle, interconnected within the process network, and take form of inputs, outputs, energy, or emissions. Flows can be substances, products, materials, energy carriers, emissions, or other types of inputs or outputs. A flow is characterized by its name, flow type, and reference flow property (unit category in which the flow is expressed). Examples of flows include electricity, water, CO2 emissions, aluminium, and so on.
In general, openLCA distinguishes three flow types:
Icon
Description
Elementary flow
Product flow
Waste flow
Elementary flows: These flows represent material or energy entering the system that has been drawn from the environment without previous human transformation, or material or energy leaving the system and released into the environment without further human transformation. For example, crude oil extracted from the ground, or emissions released into the air.
Product flows: These are all the flows that are not elementary or waste flows, and represent the materials or energy exchanged between processes within the product system.
Waste flows: Waste flows are any substances or objects that the holder needs to dispose of, like by-products with no market value or those requiring more resources to recycle than their economic return.
Each flow created in openLCA must be associated with a reference flow property, such as mass, volume, area, and so on. Though, it is also possible to have multiple flow properties for the same flow (e.g. uranium can be measured using both mass and radioactivity units, gasses can be measured using both mass and volume units, etc.)
Note: Certain waste flows can also be modelled as product flows. In databases this is usually stated in the name. Waste paper is a great example. As it can be used in the production of paper, waste paper isn’t necessarily modelled as a waste flows but instead as a product flow.
To create a new flow in openLCA, follow these steps:
Right-click on the "Flows" folder in your active database.
Select "New flow" from the context menu.
Creating a new flow
The flow creation window will open automatically. Here you can provide a name for the flow, adapt the flow type as a product, elementary or waste flow:
Flow creation window
And also choose the reference flow property:
Flow creation window
It is mandatory to define a reference flow property to proceed. However, you can change it afterwards.
Click "Finish" to complete the flow creation process.
After clicking "Finish," a new flow window will open in the editor interface. Here, you can further specify and define the properties and attributes of the newly created flow according to your requirements.
Note: If you want to organize flows into different categories, first choose to add a category (sub-category). This allows you to create a new category/folder under which you can then add flows to maintain organization.
After opening a flow in openLCA, you will find tabs at the bottom of the window that provide access to different information and settings relevant to the flow. These tabs differ based on whether the flow is a product, waste, or elementary flow. Let's explore the contents of these tabs:
General information
General information: Here you can view and modify the flow's name, add a description, additional details or tags, and create a process using the flow as reference.
Note on "Version": openLCA performs versioning for you. Every time you save the flow, the version will be updated automatically. Additionally, you can also manually higher the version by clicking on either on "Update major version" or "Update minor version". The version can't be reset or modified downwards within openLCA to keep track of changes.
Note on "Infrastructure flow": This checkbox serves to store whether a flow is infrastructure flow or not (so, the flow is a product with long lifetime and costly – a building, a machinery, …). This is a mandatory field in the EcoSpold1 format and also used by SimaPro e.g.. In openLCA, it has no practical effect.
Used in Processes (for product and waste flows only): This section shows the processes that consume or produce the flow. Double-clicking on a process will open it in the editor for further exploration.
Additional Information: You can use this section to include extra details like CAS number, chemical formula, location, and synonyms to facilitate search and identification of the flow.
Using the PubChem API: With openLCA versions >2.6.1, we implemented an automatic match function using the PubChem API. openLCA will search for details of the chemical name if you click the button:
Once found, openLCA will write the CAS number, the chemical formula and synonyms into the respective fields:
Furthermore, openLCA will fill under the 'additional properties' ("see Preferences") tab, SMILES and InChi codes:
Those can be very helpful while working with Cheminformatics.
Flow Properties
Under the "Flow Properties" section, you can to modify the reference property of the flow. Clicking on the green plus icon, you can also add any other properties relevant to the flow (e.g. economic properties, technical properties etc.). Alternatively, you can add new properties right-clicking on the property table and select "Create new". When you enter an additional flow property, you need also to enter a conversion factor to allows conversion between different properties.
Add/edit flow properties
Conversion factors are given in the "Formula" column
For elementary flows only, you have a third tab called "Characterization Factors". Within this tab, you can view the impact category or categories in which the flow is involved (if any), the impact method associated with the category, the location associated with the flow (if any), the characterization factor for each impact category, and the corresponding unit.
A process is a set of interrelated activities that takes place within the life cycle of a product or system, and transforms inputs into outputs. A process can be a manufacturing process, a transportation activity, an energy generation process, or any other operation within the life cycle. Processes are defined by their quantitative reference, which represents the amount of product or service that the process provides. For example, a process could be the set of all inputs and outputs occurring in the production of 1 kg of PET granulate.
openLCA distinguishes two types of processes:
Unit process: A unit process is the smallest (least aggregated) unit in a production system, for which input and output data are quantified. It can contain any flow type.
System process: A system process is an aggregated life cycle result saved as a process.
The following picture shows the difference between a unit process (left) and a system process (right). In the left picture, each process from A to G is a unit process. In the right picture, instead, is shown an aggregated process (system process).
Difference between unit process and system process
The following picture shows the difference between a unit process (left) and a system process (right) in openLCA.
Difference between unit process (left) and system process (right) in openLCA
Unit processes and system processes are displayed with different icons in the navigation window as shown below.
Unit processes (purple font colour, empty background) and system processes (purple font
colour, filled background)
Moreover, in openLCA we differentiate the icons between processes with product flows (gear) and waste flows (bin) as reference accordingly:
Top three process are process with product flows as reference in contrast to the other three processes representing waste treatment
Right-click on the "Processes" folder and select the option "New process" from the context menu.
Step 1: Creating a new process
Provide a name for the process and choose a quantitative reference for it by selecting an existing flow, or create a new flow by checking the corresponding box. If the flow is not named, it will automatically adopt the same name as the process.
Step 2: Selecting a quantitative reference while creating a new process
Click "Finish" to create the process, which will then open in the editor.
After creating a new process, the process window will open, allowing you to define and manage the properties of the process.
It is also possible to create waste treatment processes. Check "Waste modelling" section for details.
After opening a process in openLCA, you will find tabs at the bottom of the window, that provide access to different information and settings relevant to the process.
Tabs of the process window
In the sub-chapters that follow we'll explore every tab in details.
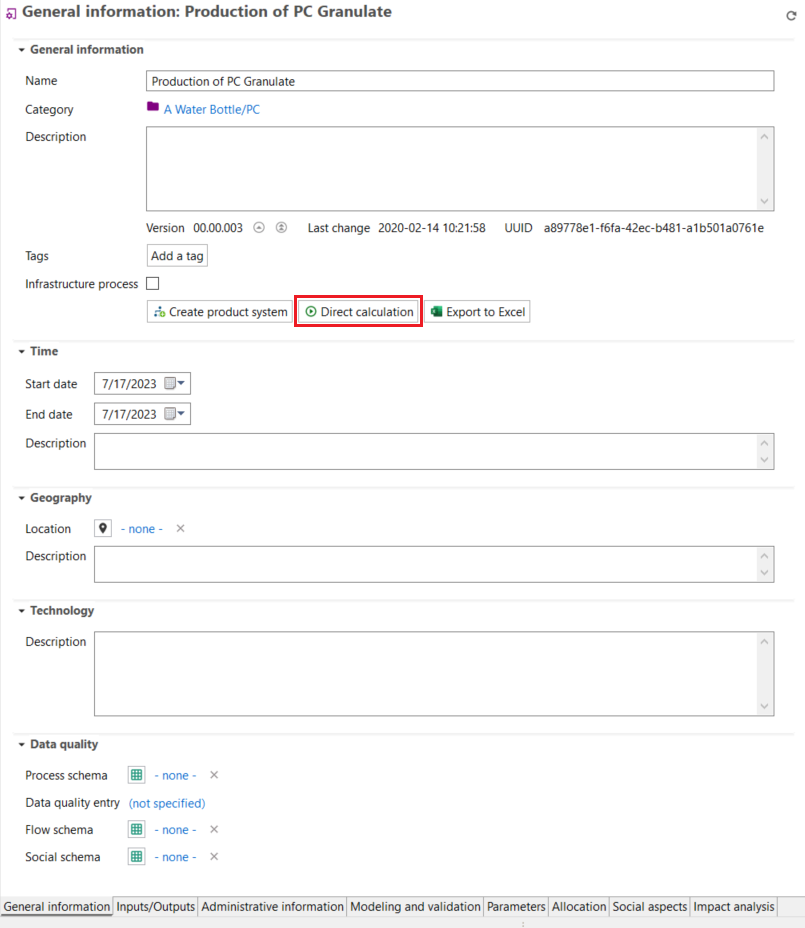
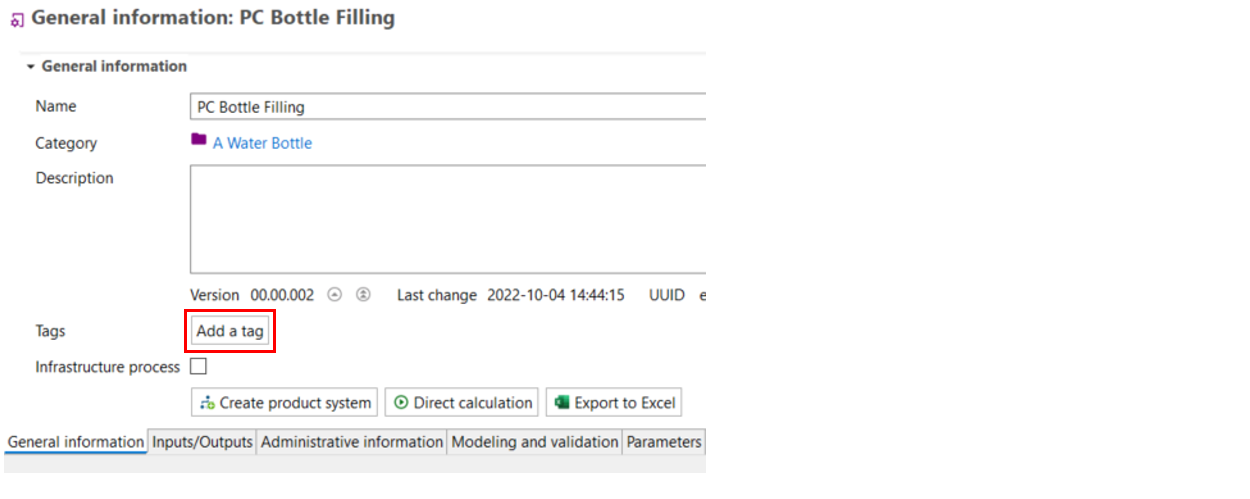
Here you can view and modify the name of the flow, add a description, additional details or tags, create a product system from the process and export the process tabs to an Excel file. Additionally:
Note on "infrastructure process": This checkbox serves to store whether a process is infrastructure process or not (so, the process is a product with long lifetime and costly – a building, a machinery, …). This is a mandatory field in the EcoSpold1 format and also used by SimaPro e.g.. In openLCA, it has no practical effect.
Direct calculation: The "Direct calculation" feature generates and then calculates an in-memory product system, connecting processes using default providers or the first found connection. Reproducible and correct results are only obtained if there are unambiguous connections between these processes, i.e. if either there is always only one producing process for a product, or there is always a default provider set, to make the connection to the providing process clear and unique.
If you are unsure about the connections, check the linking properties of a database, either via "Database → Check linking properties" or via the "Check linking" option in the pop-up window after selecting "Direct calculation":
Check linking prior calcuation
The main advantage of "Direct calculation" is its lower memory usage. It bypasses the need to create a separate product system in advance. This is particularly practical when working with databases that create very large product systems such as PSILCA and exiobase.
Here you can define the data quality flow schema for your process on process and flow level.
Options for data quality in a process
The process data quality will be filled in the "Data quality entry" whereas flow data quality will be filled in at the Inputs/Outputs tab next to the respective flows. Check Data Quality section for details. Further a "Social schema" can be filled.
As we’ve seen, a process encompasses all the inputs and outputs associated with an operation. Let's look at the setup of an Input/Output table of a process in openLCA.
CHANGE IMAGE
Inputs/outputs tab window with highlighting on the tools to the right top corner
In the top right corner, you will see several icons: "Refresh" (circled arrow), "Add Flows" (green plus), "Delete Flow" (red x), and a "123"/ "fx" icon you can use to switch between displaying the "Amount" as either a value or formula (when mathematical operations have been applied).
Note: A waste can also be designed as an input covering recycling approaches in openLCA. Then it is possible to select "avoid product" to define a supplier. Check "Waste" section for details.
Flow
Product, elementary, and waste flows can be added as inputs or outputs to the process in several ways. You can drag and drop them from the navigation panel, double-click on an empty flow cell, or click on the green plus icon. A pop-up wizard will appear in which you can manually select the flows from the drop-down list or utilize the filter option to narrow down the choices. The option "instant search" allows you to select/deselect that openLCA runs the search function directly while you type. You can deselect this option if the live search slows down your operating system massively.
Moreover, you can also drag and drop processes into the input/output section. This will automatically add the respective reference flow to the table with the selected process as a provider.
Category
The "Category" column displays the child category of the flow, indicating its placement within the folder structure.
Amount
You can enter the amount of the flow as values, formulas, and/or parameters.
To view the calculated value, click on the "123" icon located in the top right corner.
To see the original formula/parameters, click on the icon again, which will change to the "fx" icon.
Note:
When a formula and/or parameter is typed in the "Amount" field, the software will calculate the value for the amount automatically.
You can use the formula interpreter, accessible under "Tools" → "Formula Interpreter", to identify errors within your formulas.
Unit
openLCA supports a wide range of measurement unit types to represent different physical quantities. Some common types of units available in openLCA include:
Mass: Kilograms (kg), grams (g), tons (t), etc.
Volume: Cubic meters (m³), liters (L), gallons (gal), etc.
Energy: Joules (J), kilowatt-hours (kWh), megajoules (MJ), etc.
Length: Meters (m), kilometers (km), miles (mi), etc.
Time: Seconds (s), minutes (min), hours (h), days (d), etc.
Money: Currency units such as USD, EUR, GBP, etc.
Area: Square meters (m²), square kilometers (km²), hectares (ha), etc.
Pressure: Pascals (Pa), bar, psi, etc.
Temperature: Celsius (°C), Fahrenheit (°F), Kelvin (K), etc.
Electric Current: Amperes (A), milliamperes (mA), etc.
Units are assigned to the flows based on the flow property defined in the "Flow properties tab" You have the flexibility to change units by clicking on the unit cell and choosing a different unit from the provided list. If a conversion factor is available, the amount will be automatically converted to the newly selected unit.
Note: openLCA allows users to create custom/new units. This can also be done in the "Flow properties tab".
Changing flow units within a process editor
Cost/Revenue
openLCA has the capability to assign costs and revenues to processes, which enables conducting Life Cycle Costing studies.
To add or modify a cost/revenue value, follow these steps:
Select a cell in the "Costs/Revenues" column, click on it and select "Edit".
Specify your desired currency and enter the overall costs or revenues for the corresponding flow in the pop-up window.
The software automatically calculates the price per unit based on the value in the "Amount" column.
Revenues are displayed in green, while costs/expenses are shown in violet.
Adding costs to flows
Adding revenues to flows
Note:: openLCA allows you to create custom/new currencies. It can be done in the "Currencies" folder in the "Background data" section of the Navigation panel.
Creating a new currency
Uncertainty
Users have the option to associate uncertainties to data in their LCA studies. Otherwise, this cell is set to 'none' in a user-created process..
To add uncertainty data to flows, follow these steps:
Click on the uncertainty cell corresponding to the flow and select "Edit".
Choose the desired uncertainty distribution, such as logarithmic normal, normal, triangle, or uniform and fill in the required data.
Adding uncertainty information, step 1
Adding uncertainty information, step 2
Note: Uncertainty data can also be defined for parameters and LCIA characterization factors in a similar manner.
Avoided waste
Avoided waste occurs in a situation where the waste from a process becomes a resource for another process. System expansion is a technique used to account for avoided waste. Learn more about the concept of avoided waste in the "Waste modelling" section, and explore the concept of system expansion in the "Allocation" section.
Provider
In openLCA, a "provider" refers to the process that supplies a specific flow (the source or origin of a particular input or output flow). Output "providers" are waste treatment processes, taking the waste generated in a process. You see that the name does not perfectly fit here but we did not set up a new name. The provider information helps to establish the relationships and dependencies between different processes and flows within the LCA model, and makes the input / output unique. It can be overwritten in a product system, meaning that you can select a new, different connecting process in a product system.
To choose a provider for a flow, follow these steps:
Click on the provider cell corresponding to the flow and choose "Edit".
From the drop-down list, select the specific provider for the flow (in cases where multiple providers exist for the same product flow).
Note that many processes from databases like ecoinvent have predefined default providers. To access detailed information about the provider, simply right-click on a flow and select "Open provider".
Note: When creating a product system in openLCA, the software can automatically handle flows with multiple providers. It offers several options for auto-linking processes, which are explained in detail in the "Creating a new product system/Settings for a product system" section.
By default, the location of the inputs and outputs are automatically set to match the location of the process. However, you have the option to customize the location for the individual flows.
To modify the location:
Click on the location cell associated with the flow you want to change and select "Edit."
A pop-up window will appear, allowing you to choose a location from the available options. You can also apply filters to find the desired location.
Gain more insight into the use of locations in the "Regionalized LCA" section.
Description
Add a description or additional details about the process.
In the "documentation tab", former "modeling and validation" and "administrative information", you will find all details related to your process. It is divided into seven subsections:
Mentioning applicable standards or regulatory frameworks the dataset complies with, such as ISO14040, ILCD, or sector-specific requirements. Further if it is self-declared or verified by an external body.
You can detail in overall compliance, nomenclature, methodological, review, documentation and quality compliance.
Here dataset detail their literature source or methodological references.
To add a data source, click on the green "+" icon in the "Sources" section. If the required source is not listed, you can add a new one by right-clicking on the "Sources" folder in the Navigation and selecting "New source."
The "Administrative Information" subsection is where you can input or find dataset-related details such as ownership, publication, access and use restrictions, and more. It's important to note that the entries in the administrative information section do not have any impact on the actual calculations.
The definitions of data set owner, data generator, and data documentation are not fixed. However, data owner can be the contacts of the person or entity who owns this dataset. A data generator can be an expert who compiled and modelled the data set as well as internal administrative information linked to the data generation activity. And the data documentor can be the contact of the responsible person or entity that has documented this data set, i.e., entered the data and the descriptive information. Some guidance is also provided in the ILCD handbook.
You can also include reviewers by clicking the blue "Add actors" icon within this section. If the actor you want to add isn't listed under "Actors," you can create a new one by right-clicking on the "Actor" folder in the Navigation panel and selecting "New actor."
Note: It's important to note that the entries in the modeling and validation section do not have any impact on the actual calculations.
In the "Direct impacts" tab of a process, the process's direct impact is calculated. Hence, only elementary flows present in this process (no upstream impacts) will be considered. You can choose the impact assessment method directly within the tab and the results will dynamically update accordingly. This option is advantageous in "System Process" databases, e.g. GaBi, Environmental Footprint.
Impact analysis of a process
Note: The "Direct impacts" tab only provides you with the impacts of this particular process. Hence, the overall impacts are displayed only in the case of using system processes. In the case of using a unit process-based database, only the direct impacts (elementary flows used in this process) will be calculated. To quickly calculate the overall impacts including the whole supply chain, check out the "Direct calculation" section.
Note: The "Direct impacts" used intrinsically the "regionalized calculation". This is only relevant if a regionalized method, currently only EF 3.1, TRACI, AWARE, in combination with regionalized flows, is used.
After creating flows and processes, it is time to create product systems. They are life cycle models and are used to to calculate inventory results and impact assessment.
A "product system" is described by ISO 14040 as a "collection of unit processes with elementary and product flows, performing one or more defined functions, and which models the life cycle of a product." In openLCA a product system is a set of processes connected by flows, performing one or more defined functions and modelling the life cycle of a product. A product system has a reference process with a defined amount of the product (referred to the functional unit), which serves as basis for calculating impacts for all connected processes within the system.
In this section you can learn how to create a product system and specify its settings:
There are two ways to create a new product system in openLCA. You can use the navigation panel and then manually add the reference process, or you can create it directly from an open process, that will automatically be selected as reference process for the new product system. Both can also be used in combination, i.e. manually creating a part of the system and have the software then autocomplete the remaining supply chains.
Autoconnecting processes allows you to create large systems, literally consisting of several thousand connected processes, fast; it is good if the connections are clear already from the database, either since there is only one possible connection (provider process) for each product, or since default providers are set, for the processes. Manual connection gives you full control over the connection, and is needed for databases like GaBi or EF, where connections are ambiguous.
The "New product system" pop-up window will appear and you can use it to define the name of the product system and selects the reference process, the provider linking, the preferred process type, and the Cut-off option you prefer.
Product system creation window
Reference process: The reference process is the process that models the last step of your supply chain, or the last step of a specific chain. For example, the production of a battery pack may represent either the entire supply chain of interest, or an intermediate stage within the production model of an electric car. If you want to assess the potential impacts of the battery pack, the corresponding process "battery pack" is chosen as the reference flow. To add the reference process to a new product system that you are creating from the Navigation panel, you can type the name of the process into the "Reference process" field, or navigate through the process folders. If you are creating the product system directly from a process, that process will automatically be selected as the reference process.
Auto-linking: To automatically have all upstream processes linked to the reference process, select "auto-link processes". Hereby, the auto-linking function connects input and output flows between processes. Using the auto-linking feature, you can save time and effort in manually linking processes within an LCA model. It helps ensure that the material and energy flows within your model are properly accounted for. If you don't select this option, no upstream processes will be taken into account!
The following options are available upon selecting "auto-linking" option:
Check multi-provider links (experimental): This option has just been added for your convenience and allows also to check for linkages to various providers (please check the "Model graph" tab later on).
Provider linking: When creating a product system, openLCA can automatically check for flows with multiple providers. However, many processes from databases such as ecoinvent have preselected providers which are called "default providers". If openLCA detects a flow with multiple providers in a product system, you can choose how openLCA should handle this situation, choosing from three default provider options.
Details on default providers
Only link default providers: openLCA will exclusively create links between processes that share input and output flows from the default providers.
Prefer default providers: openLCA will give priority to creating connections using data from the default providers. However, if there are no default providers set, openLCA will consider other providers to establish connections.
Ignore default providers: openLCA completely disregards the default providers during the auto-linking process. The first suitable process connection found will be used then in each case.
After creating a product system, it is possible to add and delete connections in the "Model graph" tab.
Unit process or System process: The next step is to choose whether to connect to a unit process or a system process if no provider is selected in the process. This setting only has an effect if default providers are not used or not specified, since the default provider is always one specific process, which is then already a unit or system process. The difference between a system and a unit process is described in the section "Processes".
Cut-off threshold: It is possible to set a cut-off threshold for the auto-connection to reduce the complexity of your product system. Providers that contribute less than the threshold to the inventory are not connected (numerically cut off). This is applied throughout the whole (connected) supply chain! Elementary flows of the reference process are not affected! The function can be handy for databases with extensive process networks with minimal individual process contributions and consistent unit, for example multi-regional input-output databases, e.g. PSILCA. Be aware that the cut-off is applied irrespective of the used unit and focuses solely on the numbers! For this reason, it works best for databases where all products have the same unit, such as, again, multi-regional I/O databases (PSILCA).
To finally create the product system, click "Finish"!
In the following we will describe each tab of a product system in openLCA:
General information
The general information tab is split into "General information" and "Reference".
Product system - General information tab
General Information: Here you can change the name of the product system and optionally add a description. Below the "Add a tag", button, the "Calculate" button starts the impact calculations (you can achieve the same clicking on the green "Calculate results" icon above of the navigation panel). The "Update" button (circular arrow) to the top right corner allows you to reset the connections between processes. This is helpful if you performed any changes to the processes being involved in the product system. You can also do this in the model graph.
Reference: Here you can see the reference process of the product system and editing the reference product, the flow property, the unit, and the target amount. The target amount should be chosen in accordance with your functional unit.
Parameters
At the product system level, you can add "Parameters"
by selecting the green "+" button at the end of the "Parameters" bar. It is not possible to create new parameters on the product system level, but you can add parameters that are already defined in processes. You can customize the parameters you add by selecting one and then change the amount, the uncertainty or the description. To select multiple parameters at once use your keyboard's "Shift" button. The amounts saved in a product system will override those saved in a process, for the given product system. However, the values saved in the process will not change.
Model graph
The model graph is a tool to visualize and modify the product system, with all its processes and the connections between them. Check the "Model graph" section for details.
Statistics
The Statistics section gives you some basic numbers and facts about the product system, like the number of processes that compose it, links, whether the graph is connected, and the name of the reference process. If the graph is not connected, there is at least one section that is not linked to the reference process; such a non-connected section cannot be scaled in relation to the reference process, evidently, and thus cannot be calculated. The statistics sheet also provides information about provider linking and processes with the highest in-degree and out-degree. The in-degree counts how many connected input flows a process has. The out-degree shows how many times a process is linked to other processes in the product system.
The model graph in openLCA is a powerful tool for the visual representation of the product system including its supply chain (linkages to processes). It shows the interconnections of the product system's processes and flows, showcasing the supply chain (upstream and downstream) of a product. Here we will describe its functionality in detail.
Quick start
If you open the model graph tab, you will see the reference process of the product system. Double-clicking on processes within the graph will show the flows on their input and output side. You can expand the visible supply chain by clicking on the "+" symbol next to the name of the processes. To hiding/collapsing it, click on the "-" symbol. You can also freely reposition processes without disconnecting them by dragging them around the window.
The model graph with expanded (first tier) and still collapsed processes (second tier). As visualized, we activated the options "Show elementary flows" and "Enable process editing" under right click "Settings".
To show elementary flows and adding or removing flows directly within the graph, right-click on the graph, click on "Settings" and then check "Show elementary flows" and "Enable process editing".
Activated settings in the model graph.
Connections between processes are visualized as lines. Those connections or the processes themselves can be deleted. Note, that alterations to the model have an influence on the entire product system and that only connected processes will contribute to the product system's calculation.
With this new feature, you can use the brown "+ add flow" button to modify processes by adding new input or output flows. A pop-up window will appear so you can add or create the new flow.
Model graph -> Process editing -> Add/Create new flow
This allows you to model the product system directly within the model graph. After adding a new flow to a process, you need to add its provider. This can be done by right-clicking on the flow, then "Search providers".
Model graph - Search providers
A pop-up window will appear with a list of all possible providers for that flow. You can select the right one and check the box "Connect" to add the provider and connect the flow to the process at the same time. Likewise, it is possible to search for recipients for specific outputs.
Model graph - Search providers - Connect
Note: If you add processes with this function, the full supply chain will NOT be added. You have to manually add it afterwards, using the "Build supply chain" function (see below).
Moreover, if you want to create/edit the product system graphically, you can drag and drop processes from the navigation panel into the model graph void area. Then you can drag a flow to the corresponding one in the provider/receiver process to create the connections between the flows. To connect the newly added process to its supply chain, right-click on it and then select "Build supply chain".
Model graph - After a drag and drop of a process, the flows are connected manually
You can also remove a connection by clicking it and selecting "Delete". The result is shown below:
Model graph - Example of removing a connection (before)
Model graph - Example of removing a connection (after)
Removing a connection can be useful when you want to assess the impact of your product system without a particular process, e.g. "printing wiring board" in the example, or more broadly, without considering a specific phase like the "use phase" of a product.
To add a provider again to a flow that is missing one, right-click on the respective flow and select "Search providers".
Model graph - Search providers
A pop-up window will appear with a list of all possible providers for that flow. You can select in the table which provider you would like to add to the model graph and check off "Connect" to automatically connect the process to the flow. Likewise, it is possible to search for recipients for specific outputs.
Model graph - Search providers - Connect
Otherwise, you can also draw connections by dragging from one flow to another flow! To do that, you need to have the respective processes expanded, then click on the provider flow and drag it to the receiver flow:
Manually connection flows
This was a glimpse of how you can use the model graph. See below for more details:
Zoom bar (new)
A new feature in openLCA 2 is the zoom bar on the bottom right, which allows adjusting the reading size and display section by zooming in and out. You can either use the zoom bar directly or scroll with the mouse to zoom in and out. Holding the keyboard space bar while scrolling allows vertical movements, and pressing alt + SHIFT while scrolling allows horizontal movements. In addition, you can reposition the graph by clicking and dragging it on the screen. Holding the space bar while clicking and dragging a process will result in the movement of the whole graph.
Selecting processes
Several processes can be selected at the same time by pressing the Ctrl keyboard (Control), clicking on the void area and dragging the selection outline over the processes you want to select.
Model graph - Multiple process selection
Right-click in the model graph
By right-clicking on the background in the model graph, the following options will appear:
Model graph - Options (background)
Add process: Adds a process to the model graph without connecting it.
Add a sticky note: You can add sticky notes to your graph. They will be stored locally in the openLCA-data-1.4 folder and not in the database itself.
Model graph - Sticky note
Update process links: With this option, you can reset the connections between processes. In the pop-up window, you have the option to choose between the same "provider selection" and "preferred process type" options that are available when calculating a product system. Additionally, you can select "Keep all existing links" and "Prefer links within the same location."
Model graph - Update links
Focus: Positions the reference process in the middle of the view window.
Model graph - Focus
Mini-map: Displays a miniature view with a zoom bar. This helps you navigate in complex model graphs. The blue area represents the current view.
Layout as tree: Arranges the processes in the model graph so that those at the end of a supply/value chain are positioned to the right side of the graph.
Model graph - Tree layout (left before, right after)
Maximize or Minimize: Maximize allows to see the input and output flows, the corresponding amount and unit. The quantitative reference is in bold. Minimize will collapse the information beside the process name. A double-click on the process name either maximize or minimize it.
Model graph - Maximize
Settings: In the settings pop-up window, you can adjust the shape of connection lines, enable the display of elementary flows, and activate in-graph process editing.
Note: Themes can be modified under "Graphical editor theme" on File > Preferences > Configuration (check out Toolbar: File), and also by editing the .css files under /openLCAdata-1.4/graph-themes. To reset the themes to the original one, simply delete (or rename) this folder before launching openLCA. In addition, the colours of the model graph elements marked with #model (note that #sankey, refers to the Sankey diagram) can be modified by changing the hexadecimal colour codes (using Google colour selector for example). It is very important to keep the same syntax of the document (no changes can be made outside of the bracket {}).
Save as image: Saves an image of the model graph as .png file
Right-click on a process in the model graph
By right-clicking on a process in the model graph, you find the following additional options:
Model graph - Options
Open in editor: Process: This option will lead you to the general information tab of the selected process.
Add Process: This option allows you to add a process to the model graph. It will not be conntected directly.
New!Set analysis group: This new function of openLCA 2.4 allows you to conveniently categorize your LCA product system results into various categories, such as the EN15804+A2 modules. Instead of setting up specific processes, you can easily group results. Check the dedicated section for details.
Add Sticky Note: For documentation reasons, you can add a sticky note to the process.
Delete: Removes only the selected process but keeps all the processes that were linked to it. Those Tier-1 processes will then be displayed in the model graph. This facilitates modelling in the foreground of your product system and exchanging processes:
Model graph - Example of deleting a process (before)
Model graph - Example of deleting a process (after)
Build supply chain: Allows you to connect processes in the model graph. You can then select whether to build the complete supply chain for the process or just the next tier. Next tier means adding one provider without its supply chain.
Model graph - Build next tier
Remove supply chain: This action removes the selected process and its entire process chain from the product system. It includes all upstream product providers and downstream waste treatment processes that are not used by any other processes in the system.
Model graph - Example of removing the supply chain (before)
Model graph - Example of removing the supply chain (after)
Right-click on a connection in the model graph
By right-clicking on a connection in the model graph, the following additional options will appear:
Delete: Removes only the link to the selected processes
Removing the link to the supply chain
This results in a flow that is not connected to a supply chain.
Model graph - Example of removing a connection (before)
Model graph - Example of removing a connection (after)
To add a provider again to a flow that is missing one, right-click on the respective flow and select "Search providers".
Model graph - Search providers
A pop-up window will appear with a list of all possible providers for that flow. You can select in the table which provider you would like to add to the model graph and check off "Connect" to automatically connect the process to the flow. Likewise, it is possible to search for recipients for specific outputs.
Model graph - Search providers - Connect
Otherwise, you can also draw connections by dragging from one flow to another flow! To do that, you need to have the respective processes expanded, then click on the provider flow and drag it to the receiver flow:
Manually connection flows
View tab in the tool bar
The "View" tab allows to access some of the options described above, as well as some additional ones:
Model graph - View
Expand all: Expands the model graph to show all connected processes.
Collapse all: Minimizes connected processes to show only first and second tier.
Match with: To match the length of a process with another one first click on the process you want to change; press Crtl and click on the process which has the desired length. Then use the "Match with" option.
Model graph - Match with (left before, right after)
Drag and drop results into the model graph
In openLCA 2 it is now possible to drag and drop results into the model graph. Check in this section for details.
A product system can serve as the provider to another product system - the result is then a "nested" product system. For this, drag and drop a product system into the model graph of a different product system and connect it to one of the input flows via "search recipients for".
Nested product sysyems
You will see the contributions of the sub-product system to the overall results, e.g. in the impact analysis and contribution tree results.
A product system can also be used as an input flow for a process. The quantitative reference flow of the product system will be added to the process.
Drag-and-drop of a product system into the input flows of a process
As you will see (check "Save and exports results chapter" section for details) you can now save your results and use them in different ways. Among them, once saved, you can drag results in a product system:
Result dragged in a product system
You can use this feature to complete the supply chain when the inventory is not known, if the method used is the same.
Is also particularly helpful when working with EPDs (check "Using results of EPDs in the supply chain" section for more details).
There are three ways to access the calculations of the impact assessment of a product. You can right-click on a product system in the navigation panel and select "Calculate", click on the "Calculate" button in the "General information" tab of the product system, or click the on green "Calculate results" icon above the navigation panel.
Calculating a product system
Either way, a pop-up window will open and you can choose the calculation properties.
Another option, very convenient for data exchange, is it to export the product system as a JSON-LD file. This feature is available for every elements of the database.
You can right-click on the product system you want to export and select "export":
On the window that will pop up, select "JSON-LD".
Afterwords, you can decide the name of your .zip file and where in your computer it's going to be saved. In the same window, you can check the elements that are going to be saved, adding or excluding some of them. When you're satisfied, click on "Finish".
You can now import the elements you exported in another database in openLCA, right-clicking on it and selecting "Import".
Eventually, you can export the product system as a matrix, by left clicking on 'Export as matrix' on the toolbar.
This will show the following window:
From here you can choose: the folder where the product system is exported, the format you want it exported (CSV, Excel, Python), the used allocation method, the respective impact assessment method (present in that database), regionalization, cost calculation and uncertainty distribution. If you have created parameter sets for your product system, these can be selected using the drop down menu as in the picture below.
Esporting as matrix a product system with parameter sets
Impact assessment methods are essential components of life cycle assessment. They quantify the potential environmental impacts associated with products, processes, or services. These methods analyse the data from the inventory phase and translate it into meaningful indicators. LCIA methods encompass a wide range of impact categories, like global warming potential, acidification, eutrophication, and human toxicity, provided typically with the idea of fostering businesses and individuals to make informed, sustainability-driven decisions that promote a greener and more responsible future.
Note: If you use the databases provided from openLCA Nexus, they often do not contain LCIA methods (called "impact assessment methods" in the software). This allows us to update databases and LCIA methods faster. Hence, the LCIA methods need to be imported/created by you in each database in openLCA to carry out life cycle impact assessment. See below for details.
Nexus databases do not always include LCIA methods, allowing users to select their preferred method. There is one overall LCIA method pack (the openLCA LCIA methods pack) that we provide to be suited for many different databases (that also includes normalisation and weighting when the method provides them).
However, some databases require their own specific method pack. In Nexus, you'll find detailed information for every specific case. The table below provides information about the most commonly used databases available on Nexus. You can see if the database is compatible with the openLCA method pack and if a proprietary method is available to download. To learn how to download a database or method pack from openLCA Nexus, follow the instructions on this section of the manual.
Database
Compatible with openLCA method pack
Proprietary method available
Ecoinvent
✓
✓
Agribalyse v3.1
✓
✗
Agri-footprint 6.3
✓
✗
ESU World Food (unit and system)
✓
✗
EuGeos’ 15804_A2-IA (unit and system)
✓
✗
GaBi
✗
✓
ELCD
✗
✓
IO
✗
✓
ProBas
✗
✓
EN15804
✗
✓
Ökobaudat
✗
✓
After downloading one or more of these method packs, you can import the file into an active openLCA database. Do not extract JSON-LD's .zip files before importing!
Note for macOS users: If you are using Safari, the browser will automatically unzip your downloaded zip files. However, you need the zipped file for import in openLCA (e.g., when you want to import JSON-LD, methods packages, ILCD...). You can solve this issue in three ways:
Go to the settings of Safari and unselect the default option "Open "safe" files after downloading".
Use another browser for downloads, where the zip-files are not automatically unpacked after successful download.
Zip the archive again by using a third-party tool, because the build-in archive tool from Apple will add additional resources to the zip-file that can create issues when importing the file in openLCA.
To import a method pack, click on "Import" → "Others", then click on "Linked Data (JSON-LD)" and "Next". In the next window, browse for the file. The program will ask you how do you want to handle the import. You can:
Never update a dataset that already exists: The system will check for matching UUIDs. If a match is found, the existing dataset will remain as it is.
Updated datasets with newer versions: If matching UUIDs are found, the system will update the existing datasets only if the imported version is newer (the version can be checked in the "General information" tab of every dataset)
Overwrite all existing datasets: If matching UUIDs are found, the system will replace the existing datasets automatically with the imported ones irrespective of versioning. This is the option we recommend when importing an updated version of the openLCA LCIA methods pack.
Datasets with UUIDs that are not present in the current database will be imported anyway, regardless of the option you choose.
Eventually, click on "Finish".
The import will then start automatically and may take a few minutes. When it is finished, the LCIA methods will be available in the database, under "Indicators and parameters", as shown below.
LCIA methods in openLCA
Note: you can later assess the compatibility of LCIA methods with your database in LCIA checks.
In openLCA 2, the impact categories are independent from the LCIA methods, and the LCIA methods are rather an "umbrella" which can contain several impact categories – this allows you to easily create own methods, e.g. for projects, by simply adding existing impact categories to e.g. a self-created LCIA method.
Moreover, you can also create impact assessment categories. This might be helpful if you wish to tailor your impact assessment method to include specific categories like fossil fuel depletion that may not be present in your current method.
To do so:
Right-click on the "Impact assessment categories" category.
Select "New impact category".
Name the new method, add a reference unit and optionally a description.
Click "Finish", to open the new impact assessment category in the editor.
To see how to add impact categories in the impact assessment method window, characterization factors, etc, see the section below.
In some methods maybe the characterization factors of a substance are missing. Hence you can add (or modify existing) characterization factors (CFs) in a LCIA method.
To add a CF to a LCIA method:
Open the method and the respective category you want to add your CF to. Change from "General Information" to "Characterization factors"
Click on the green plus in the upper right cornern and select the flow you want to add the CF to and confirm with "OK":
The flow now has the CF of 1. By selecting the field "Factor", you can modify this number.
Make sure that you saved the impact category. This is also the way to modify the characterization factor of an elementary flow. However, you can make sure that you added/modified the CF by opening the elementary flow itself and change to "Characterization factors" tab.
In openLCA versions from 1.x to the latest release, you could edit and create impact categories and factors within the impact assessment method tab. However, in version 2.0, this functionality has been separated, and now you can work with a distinct set of individual impact categories. You can edit their characterization factors, categories, flow properties, units, and uncertainty data in the "Impact category tab".
General information
Here you can view and modify the name of the method, add a description, additional details or tags, as well as:
Adding a source from the sources in the database. If unavailable, create a new source as described in "Database elements".
Adding a code (i.e., a short name for the category, useful in result views).
The image below shows an example of the General Information tab for the CML-IA baseline methodology from ecoinvent.
LCIA methods - General information tab
Normalization/Weighting
To add normalization and weighting factors to the impact categories of an LCIA
method:
Open in the "Normalization and weighting" tab.
Click on the green "+" on the top right/double tap or right click on the empty cell under "Normalization and weighting set" to add a new set.
The impact categories saved in the method will automatically appear in the window on the right, where you can then manually type in normalization and weighting factors.
Adding normalizing and weighting factors to impact categories
In openLCA 2, LCIA categories are now stand-alone entities that are stored outside of an LCIA
method. A single LCIA category can be used in several LCIA methods and an update
of such an LCIA category will update it in all LCIA methods where it is used.
The database update moves the LCIA categories to the new category "Environmental
indicators" in the navigation.
Note: As LCIA categories in different LCIA methods
often have the same name, there are also LCIA categories with the same name in
this folder. This can be easily changed by giving these LCIA
categories more descriptive names.
LCIA category - General information tab
The contents of the impact categories window will be explained in the following sections.
New: In openLCA 2, a new feature allows you to specify the impact direction for each impact category as either "Input" or "Output" (as shown in the figure below). Basically, resource use categories are input, emission-related categories are output. The default setting, when no specific impact direction is chosen, is "Unspecified". With the option "Unspecified", all characterization factors and their signs (plus or minus) will be taken for the calculation as they are written into the factors table of the methods.
General information window of an impact category with the setting for "Impact direction" set to "Input".
When you choose "Input" or "Output" as the impact direction, openLCA handles the sign of factors automatically, depending if the flow is an input (resource) into a process or an output from a process (emission). This way, the sign of the characterization factors is set during the calculation and displayed in the results. Taking water as an example. In the figure below, an impact method is shown to calculate the net use of fresh water, meaning all water used as an input is summed up and all water lost as an output is subtracted. If the resulting total impact value is positive, more water is used as an input resource than water is emitted in the output of processes and vice versa. When no impact direction is set "Unspecified", the factors for water have to be negative for all flows inside the emission compartments and (correct) modelled as an output of processes. When the impact direction is set from "Unspecified" to "Input", the factors for water can remain positive for all flows (see the figure below). During the impact calculation in this example, openLCA will automatically invert the sign of the water flows in the output of processes. On the other hand, if the impact direction "Output" is chosen, the water flows in the input of processes will be inverted. The inverted value will also appear on the impact analysis window on the results page, so that users can directly see which flows are contributing with a positive sign and which ones with a negative sign.
Water elementary flows and characterization factors (all positive) inside an impact method to calculate the net use of fresh water with the impact direction set to "Input"
The advantage is that all flows, which are modelled in a "correct" way for resources in the input and emissions in the output of processes can keep their positive factor for the characterization. For example, carbon dioxide emission to air has the characterization factor 1.0 for the global warming potential. The flow for carbon dioxide removal from air (using it as a resource) can also keep the positive number of 1.0, since it is essentially (but not technically) the same elementary flow. Another advantage of setting the impact direction is that negative values for the factors inside the methods (which are of course still possible), will directly show the user which flows are modelled on the "wrong" opposite side of a process. With the example from above, the water output (emissions compartment) can be also modelled as an input with the opposite sign for the factors inside the method. It will be on the "wrong" side, but the impact direction is set to "Input" and the calculation result will be the same. The input gets not inverted and the water factors would remain negative and contribute as an output.
Note: To correctly respect impact directions users should use the new method packages to obtain correct results: Version 2.0.3 onwards. For more details check our blog post about the topic.
In openLCA, you can now assign locations to characterization factors and process inputs/outputs. These locations are then used in the new calculation, and shown in the reults. By default, for inputs and outputs, the process location is used, but you can specify a different location at the flow or even exchange level if needed.
More on regionalized calculation can be found in the "regionalized LCA" section.
Adding locations for flows in impact categories and using filters
In openLCA 2, a similarity check for LCIA categories is available as a separate tab within the impact category editor. This feature can be useful for finding duplicate impact categories.
To perform the impact assessment, various scientific LCIA methods exist. Depending on goal and scope of your study and other aspects, specific methods are used. Here we provide a small overview of most common methods and the impacts they cover:
Water Use
Energy Use
Land Use
Acidification
Climate Change
Resource Depletion
Ecotoxicity
Eutrophication
Human Toxicity
Ionising Radiation
Ozone Layer Depletion
Particulate Matter
Photochemical Oxidation
Latest or Original Source
AWARE
✓
-
-
-
-
-
-
-
-
-
-
-
-
Boulay et al. (2018)
CED
-
✓
-
-
-
-
-
-
-
-
-
-
-
Frischknecht et al. (2007)
IPCC
-
-
-
-
✓
-
-
-
-
-
-
-
-
IPCC (2021)
USEtox 2
-
-
-
-
-
-
✓
-
✓
-
-
-
-
USEtox (2016+)
ReCiPe
✓
✓
✓
✓
✓
✓
✓
✓
✓
✓
✓
✓
✓
Huijbregts et al. (2017)
Environmental Footprint
✓
✓
✓
✓
✓
✓
✓
✓
✓
✓
✓
✓
✓
JRC (2022)
CML
-
-
✓
✓
✓
✓
✓
✓
✓
✓
✓
-
✓
Guinée et al. (2002)
TRACI
-
-
-
✓
✓
✓
✓
✓
✓
-
✓
-
✓
Bare (2021)
As displayed above, some impact methods only cover one specific impact category but represent also the fundation of other methods, e.g. IPCC is used in the Environmental Footprint method.
After you've completed the modeling of your processes, created your life cycle model (product system), or finished constructing your project report, it’s time to move on to the calculation.
Calculation properties
To start the calculation for a product system, have the product system open, and then press on the "Calculate" green botton. In the upcoming screen, you can customize the calculations according to your requirements. You can choose the allocation method, the impact assessment method, normalization and weighting set, the calculation type (lazy, eager or Monte Carlo simulation) or whether to include regionalized calculations, cost calculations or data quality. In detail:
Allocation method: Here you can choose the allocation method applied in the calculation throughout the product system. Options are none, casual, physical, economic, or "as defined in process". "None" is the default setting. "As defined in process" means here that the allocation is performed as defined prior in each process (you could have different allocation methods in different processes). However, the chosen option will overwrite predefined allocation methods in the individual processes. See Allocation section for more details.
Impact assessment method: Here you can choose the Impact assessment method from the list of methods available in your activated database. If no methods are listed, you need to first import a method pack into the database, or create a new method.
Normalization and weighting: In this section, you can select a normalization or weighting set for your values. This set needs to be present in the impact assessment method. If the chosen method doesn't have any set, you need to add them to the impact assessment method first.
Eager/all & Lazy/On-demand: You can choose to perform the calculations in "Eager/All" or "Lazy/On-demand" mode. Eager calculation provides complete results upfront, while lazy calculation offers faster navigation and on-demand calculation of impacts. For more details see section Lazy vs Eager calculation.
Monte Carlo Simulation: You can perform uncertainty calculations using Monte Carlo simulation. This method considers all uncertainty distributions defined in flows, parameters, and characterization factors, with the exception of the one associated with the reference product of the system. Check Monte Carlo simulation section for details.
Regionalized: Check this box if you want to calculate the results in dependence of regions using geoJSON files. Check Regionalized Calculation section below for details.
Include cost calculation: This option additionally performs cost calculation. Check Life Cycle Cost Calculation section for details.
Access data quality: If you've included data quality information in your processes, this option will calculate the data quality for your results. Be sure to define the details of the data quality assessment by clicking "next" before proceeding with the calculation. Especially, the data quality system specified here must be referenced by the processes. Check Data Quality section for details.
When calculating impact results, you can choose between eager and lazy calculation mode:
Eager/all: This mode will calculate the entire LCA model including all contributions of flows and processes to the result upfront, regardless of whether the results are immediately needed in the visible editor. While the advantage of this mode is that it provides comprehensive results immediately, it does require more computational resources and time, especially for large and complex models.
Lazy/On-demand: This mode will postpone the calculation of contribution results until they are specifically requested. Lazy calculation has the advantage of reducing computational load and speeding up initial model loading and navigation. It calculates and displays results as needed, more complicated calculations, e.g. in the contribution tree and Sankey diagram, are only done once the Sankey diagram or contribution tree are requested. After an initial calculation, the results are cached until the result is closed.
Whether you choose "Eager" or "Lazy", the calculation results will be the same!
The General Information tab provides details about the product system for which the impact was calculated. It includes information on the allocation method, target amount, the LCIA method used, and data quality information.
In the "Top 5 contributions to impact category results - overview" section, you can see the five processes with the highest direct contributions to the selected impact assessment category. Likewise, in the "Top 5 contributions to flow results - overview" section, you’ll find a bar chart illustrating the five processes with the highest direct contributions to the selected flow. You can change the flow for which the information is displayed by selecting a flow from the list. You can save the diagram as image by clicking on the picture icon far right on the bar above the histogram.
General information tab
On the "General Information" tab you will also find the option to export and save your results. For more information see section "Save and Export Results".
In the first two tables in "Inventory results" you find the list of all the input and output flows of the product system, showing the amounts and units for each on them. You can sort the flows alphabetically, by category, unit or amount, clicking on the corresponding header cell. Additionally, If you click on the arrow symbol before the flow’s name in the Inputs or Outputs section, you will see all processes in the product system that use that specific flow, and thus contribute to its amount in the result.
Inventory results tab
You can copy the content of all tables in openLCA editor and paste it into other applications like Excel or Notepad. Simply select the desired information with " Crtl + Click" (multiple selection) or " Crtl + A" (overall selection) and copy it with " Crtl + C" or by right-clicking and then clicking "Copy".
Inventory results, inputs section
The last table on this tab is called "Total requirements". The first columns contain all the processes that are included in the product system. The second column shows the output product of the corresponding process, followed by its he amount and unit.
If you check the box "Include Cost Calculation" when setting the calculation properties, the total requirements table will also show the added value for each process. Check "Life Cycle Costing" section for details. Likewise, if you check the box "Assess data quality" when setting the calculation properties, this table will also show information about data quality in the Inputs and Outputs sections according to the data quality schema previously defined for "Processes". For more information about "Data Quality" check the dedicated section.
Inventory analysis - added value calculation & data quality information
This tab is visible in the results window only when you've chosen an impact assessment method in the calculation wizard. In the table, you can view the results with its reference units ("Impact assessment result" column) for each impact category. You can also select whether to display associated processes or flows (choose which one you want to see in the "Sub-group by:" section above the table) contributing to these impact categories by clicking the arrow next to the impact category name to expand them.
If you checked the box "Assess data Quality" when setting the calculation properties, information about data quality is displayed in the Impact analysis according to the data quality schema previously defined for the processes, see section "Processes".
The "Process results" tab shows both the direct and the total upstream contributions to the impact, per process. Direct contributions/impacts are those resulting solely from a specific process.
In the section "Flow contribution to process results", select a process from the drop-down list and the input and output flows that contribute to that flow will be listed. In impact assessment results, results are shown for all impact categories of the selected LCIA method.
Process results tab
If you want to export your results including the upstream contribution please copy them from this tab (directly to an Excel sheet e.g.).
The contribution tree breaks down process contributions to flows and impact categories, displaying upstream totals. This feature allows you to check for every flow in which process is involved, and similarly, for every impact category which are the processes responsible of the impact, and in what percentage. You can access further details expanding the processes by clicking on the little arrow before the percentage. This way, you can see which processes are the largest contributors to a given impact category and which processes are the largest contributors to a given flow emission. Meaning that the contribution tree can be used to easily look for impact hot-spots within the life cycle (processes with the highest contribution).
Note that it can be possible that the percentage of the single processes do not add up to 100%, because the contribution in percentages always display the contribution of the total upstream (supply chain) without the direct contribution of the corresponding process. But you can easily check the absolute amounts of direct contributions inside a process with the last column "Direction contribution" in the contribution tree.
Analysis - Contribution tree tab
If you check the box "Include Cost Calculation" when setting the calculation properties, the contribution tree breaks down process contributions to cost categories (added value or net cost), displaying upstream totals. The economic perspective can be changed by selecting added value or net cost.
In openLCA, it is possible to group products to see the cumulative values of these grouped products. This is very helpful if you want to group your impacts according to categories like "Transport", "Electricity", "Production" or even by life cycle stage. The values shown in the "Grouping" tab are the direct impacts (i.e. upstream values are not included).
To create a new group, select the green "+" icon in the right-hand corner of the editor. Then name the new group.
Step 1: Creating a new group
To display the list of all product and waste flows within your product system not yet assigned to a group click on "Other". If you want to move a product flow to a group, right-click on the flow, select "move," and choose your desired group. To select multiple processes together, click one process, then hold "Shift" and click another product. If you want to avoid selecting all products in between, use "Ctrl" instead of "Shift".
Step 2: Creating a new group
Once you have created groups and added product / waste flows to them, their contributions for specific flows and impact categories will be displayed in the table and as a histogram chart. Please note, the contributions displayed are direct (i.e. without upstream contributions). To consider upstream contributions, you must include all upstream processes in the group.
Grouping, results
Once the grouping is done, openLCA allowes to save the grouping for also other result analysis. This option is extremly helpful if you want to harmonize the way various calculation results are analyzed! You can save groups in the Grouping tab by clicking on the "Save" icon located in the top right-hand corner of the Grouping editor. Give the group a name and press "OK". These groups will be available in the results editor each time you carry out a direct or classical calculation for any product system.
To open saved groups, click on the folder icon in the top right-hand corner of the Grouping tab.
The location tab illustrates specific information on localized flows and impact and cost categories (if you checked box "Include Cost Calculation" when setting the calculation properties). The locations are set in the flow level in openLCA.
The location contributions are only displayed if the database contains the geometries of the locations (e.g. by importing the ecoinvent geometries).
You can adjust the map's position by clicking on it and moving the mouse. To zoom in or out, use the scroll wheel on your mouse.
The Sankey diagram visually represents the impacts of processes within the product system on specific flows/impact categories. The diagram shows both the direct contribution and the upstream total contribution of the process. To open a process in a new editor tab, simply double-click on it.
Right-click anywhere in the Sankey diagram editor and select:
"Focus" to focus on the process the calculation is based
"Minimap" to displays/hides the minimap
"Layout as tree" to update the order of the processes
"Settings of the Sankey diagram" to select the flow or impact and cut-off level to be displayed.
"Save as Image" to save the Sankey diagram as png file.
Sankey diagram
You can access the "Setting of the Sankey diagram" wizard by clicking on the "Filter" icon located in the top left corner. Here you can specify:
If you want to display a flow or an impact category
Cost category (only accessible if you included cost calculations in calculation setup)
Min. contribution share (inferior contribution limit for a process to be shown in the diagram)
Max. number of processes that can be shown in the diagram
Design settings: theme, orientation, shape of the connections
Sankey Setting wizard
Next to the "Filter" icon you can open the product system and the impact assessment method. See the current set "Min. contribution share" and "Max. number of processes".
Since openLCA v2.4, you can conveniently categorize your product system's processes into various categories allowing later to group results. This is particularly helpful if you assign groups according to the EN15804+A2 modules as used for EPDs. Moreover, it allows us to analyze life cycle stages without changing the connectivity within the model graph.
After creating the product system, you can hover over a process in the model graph, right-click, and choose the desired option as seen below:
A pop-up window will appear, allowing you to set up a new analysis group by clicking "add analysis group" or selecting "Add EN 15804" from the drop-down menu for predefined group analysis according to the EN15804+A2 lifecycle modules.
If you select "add EN 15804 modules", a pop-up window will appear allowing you to assign the selected process under any category. You can delete any group by clicking the "x" sign next to it.
You can also create a new one, by clicking on “Add analysis group” at the end of the list:
It is also possible to set colors, by clicking on the color box in front of any group, to categorize the processes in the model graph, as shown below:
The chosen colors are then visible in the model graph respective to the group.
After saving the work, you can perform the calculation and view the group analysis results in the “analysis groups” tab below the results window. You can also investigate results contribution per flow and impact categories as seen in the lower side of the window. Further, you can click on any impact category and copy-paste the entire table of impact assessment results into Excel.
If you selected the EN15804 module group initially or followed such a structure, it's also possible to directly create an EPD by clicking on the EPD icon at the top right of the window. A pop-up window will appear, where you can click "OK".
The EPD and the results per group shall appear in their respective locations, as in the picture below, and they can also be exported as JSON-LD.
In openLCA, when you're analyzing the environmental impact of a product or process, you can view the results in two different ways: contribution trees and analysis groups. These help you understand which parts of the supply chain are responsible for which portions of the total impact.
Now, the results from these two views only match exactly when there are no overlapping groups along a supply chain path. If one group contains another (like a group within a group), it can count the same impact more than once, which causes differences in the totals.
Simple example:
Imagine a product system with 5 steps, from E (raw material) to A (final product). Each step contributes an equal impact of 1. So the total impact is 5.
We also assign some of these steps to analysis groups:
B is in group g1
D is in group g2
In the contribution tree, the numbers just add up along the path:
But for analysis groups, we have to be careful not to double-count:
g2 (D and everything below) = 2
g1 (B and its upstream) = 4, but since D is already counted in g2, we subtract that: 4 – 2 = 2
The top level (A) = total – g1 = 5 – 2 = 1
Still totals to 5, but we avoided double-counting by subtracting the already-included impacts.
Identifying and reviewing these uncharacterized flows is an essential step toward ensuring the consistency of the LCA, as emphasized in the ISO 14040 and 14044 standards. openLCA supports this by providing the 'LCIA Checks' tab to identify potential inconsistencies between the Life Cycle Inventory (LCI) and the Life Cycle Impact Assessment (LCIA) results applied. In detail, it lists all elementary flows from the LCI that are not characterized by the selected LCIA method.
LCIA Checks tab
These unmatched flows may lead to an underestimation of environmental impacts, indicating gaps in the impact assessment coverage and potentially pointing to issues such as mismatched flow mapping or the need to consider a different LCIA method. This is in particular relevant to elementary flows that hold a large share of the inventory.
However, openLCA allows to display unmatched flows in two formats:
Grouped by LCIA category: Organizes missing flows by impact category, helping to trace gaps more effectively within specific environmental issues (e.g., climate change, toxicity, etc.).
Ungrouped: A flat list showing all excluded flows irrespective of LCIA categories.
By clicking the "Save results as..." button in the General information tab of a product system results window. Alternatively, you can select "File" → "Save" above the navigation panel, you can save your results as either a "result" or as a system process.
In openLCA 2 you can save results or even create a system process based on the results
This option creates the folder "Results" in the navigation panel. The tab "Results" displays general information, Impact assessment results and Inventory results (Inputs & Outputs).
Saving your results as a "result" allows you to easily access your results without the need to re-calculate them. In addition, it can serve as an easy way to compare calculations e.g. change of LCIA method. They can also be direclty used in product systems (see next paragraph).
This option creates a system process which is helpful if you want to use your results in another product system. This option also supports to hide detailed information on your product system.
The "Export to Excel" option in the "General information" tab or the "Excel" icon above the navigation panel enables you to export your results as an .xlsx file.
Saving and exporting results
You can then choose the export configuration that best suits your needs:
Note: At the current state the results can not be exported as ILCD data but openLCA allows to export the results as JSON-LD data.
In openLCA, projects are used to compare multiple product systems You can also use parameters to benchmark various options within the same product system. The resulting report is a powerful tool to communicate the results of your comparative study.
For instance, you can compare the production of polycarbonate (PC) and polyethylene terephthalate (PET) bottles using a project in openLCA (you can access this bottle case study for free). This comparison involves evaluating two or more product systems with a comparable functional unit:
Within a project, you can also vary parameters used in your product system. This allows you to compare different versions of the same product system, which is an essential part of conducting a "Sensitivity Analysis" in a comprehensive LCA study.
After you finished to model one or multiple product systems, you can create a "Project" to compare them. It should be noted that for a valid comparison, both processes should use the same functional unit. To create a new project, right-click on the "Projects" folder and select "New project".
Step 1: Creating a new project
Name the new project and provide a description (optional):
Step 2: Creating a new project
The new project will open in the Editor (check below for details):
Project window
General information
In the "General information" section you can edit the name of the project and optionally add a description. Moreover, you can add a tag and run the calculation.
Note: We recommend to create a report before running the calculation. Click on "Create report" in calculation setup section and then configure it in the new "Report" tab. Check Report Template section for details.
Calculation setup
In the "Calculation setup" section, you can select the impact assessment method for the calculation, as well as normalization and weighting set, if applicable (you can select a set from the methods you've imported in the database, but only if the method you chose includes one or you've created it yourself). You also have the option to select "Regionalized LCIA" and "Include cost calculation".
Project setup, Calculation setup
Compare product systems
In the "Compare product systems" section, click on the green "+" icon on the right to add the product systems you want to compare. In addition, drag-and-drop function is supported too.
Adding product systems to a project
Each selected product system acts as a "variant" for the calculation. You can select the same product system multiple times and/or different product systems. For each variant, you can then provide a new name, a different allocation method and amount. For example, to compare three different allocation methods applied to the same product system, select that product system three times and then select a different allocation method for each. You can also decide which product systems to display in the results.
Project setup, Variants
Parameters
In the "Parameters" section, it is possible to change parameter values for variants. For example, we can compare the impacts of a PET bottle production based on the transportation distance of the PET Granulates: 200, 350 and 500 km. In the "Compare product systems" section, you can select three times a product system for PET Bottle that contains a parameter for the transport distance (‘distance_A’).
Then, rename each variant and add the parameter ‘distance_A’ in the "Parameters" section by clicking on the green "+" button on the right and selecting it from those available. Eventually, enter a new parameter value for each variant.
Project setup, Parameters
Once you have configured your project in the "Project setup" click on "Calculate" to obtain the results for different parameter variations.
After clicking on "Create report" in the calculation setup section, you can configure it in the new "Report" tab. This report is generated along with calculations when you click the "Calculate" icon in the "Project setup" tab. By default, a report contains the sections "Introduction", "Project Variants", "Selected LCIA Categories", "LCIA Results", "Single Indicator Results", "Process contributions", and "Relative Results. In the "Report" tab, you can name the report, add or remove sections, rename sections, edit their descriptions, delete sections with the red "X" icon on the right, and change their order using the up/down icons. Additionally, you can select a "Component" for each section. For example, which type of chart or table should be displayed. After configuring all the sections, remember to save the project before generating the report.
Project, Report tab
We want to emphasize our high variety of graphs for the communication of your results, e.g.:
Indicator bar chart
Relative LCIA results - bar chart
Normalization bar chart
Relative LCIA results - radar chart
Normalization radar chart
Single score bar chart
Process contribution chart
Relative LCIA results - Radar chart example (In the software the mouse over allows to access more details)
Note: For normalized charts, the normalization method needs to be selected in the "Calculation setup" section of "Creating a new projet".
After you click on "Calculate", a results tab will open showing the compared product systems and the impact assessment results.
Project results, Results tab
Moreover, the processes' direct contributions (flow vs impact category) are displayed. You can search for a specific process using the search bar ("Search a process") below. In case you selected to include cost calculation, the Net Cost or the Added Value are shown.
In the report tab you will find the calculated results in the template you chose beforehand. It is generated as an html file with interactive elements based on Java. The following is directly extracted from a report (Java elements can not be displayed in this manual):
Note: If you report is not displayed correctly, make sure you have WebView2 (for Windows) or WebKit (for Linux) installed on your device. Also make sure that the "Use Edge Browser" box in Preferences > Configuration is checked (see details under Preferences > Configuration in "Toolbar: File").
This table shows the name and description of the variants as defined in the project setup. The variant names of the project setup are used for all charts and tables of the other report components.
The table below shows the LCIA categories of the selected LCIA method of the project. Only the LCIA categories that are selected to be displayed are shown in the report. Additionally, a user friendly name and a description for the report can be provided.
This table shows the LCIA results of the project variants. Each selected LCIA category is displayed in the rows and the project variants in the columns. The unit is the unit of the LCIA category as defined in the LCIA method.
The following chart shows the single results of each project variant for the selected indicator. You can change the selection and the chart is dynamically updated (not in the manual but in the software itself).
This chart shows the contributions of the selected processes in the project setup to the variant results of the selected LCIA category. As for the single indicator results, you can change the selection and the chart is dynamically updated.
The following chart shows the relative indicator results of the respective project variants. For each indicator, the maximum result is set to 100% and the results of the other variants are displayed in relation to this result.
All impact chosen impact categories for PC vs. PET
You can export a report in HTML format by clicking on the "Export report" icon located above the navigation panel. This option is available when the results window is open in the editor.
Exporting a report in HTML format
The program will prompt you to locate the folder where you want to export the HTML file. Once it is saved, you can open the HTML file with a browser (Internet Explorer, Mircosoft Edge, Safari Google Chrome, Mozilla Firefox etc.) to view the report.
Waste represents any substance or object that that needs to be dispose of, like by-products with no market value, and it can be generated at any stage of a product's life cycle. In openLCA are represented by a specific "Flow" type.
This approach aligns with the "actual" direction (i.e. material flow direction) of what is being modelled and was introduced with openLCA 1.7. Waste flows are generated as outputs of waste generating processes. In waste treatment processes they serve as the quantitative reference, and can be found on the input side.
Right-click "Processes" → "New process" → "Create a waste treatment process".
Choose a (previously created) waste flow as your quantitative reference → click "Finish". The chosen waste flow is now an input to your waste treatment process.
Creation of a waste treatment process, material flow logic
Waste producing process following the material flow logic
Waste treatment process following the material flow logic
Note: If waste are consumed by a process, system expansion can be applied by checking the box "Avoided waste", as the waste consumed does not need waste treatment elsewhere. A process providing the benefit of using waste as an input can be credited with the avoided impact of having to treat that waste elsewhere.
The opposite direction approach works the other way around, and makes it possible to model waste treatment without the use of waste flows, but using normal process flows instead. This was the only option up until openLCA 1.7. It is still worth to mention, especially if you're working with older databases that may not include waste flows. As waste is the quantitative reference of a waste treatment process, but a quantitative reference cannot be an input to a process (since it is, essentially, the main product/output of a process), waste treatment is seen as a service necessary to provide to waste generating processes. The waste then appears as a negative output (an input) of the waste treatment process, and analogously as a negative input (an output) of the waste generating process.
Model graph displaying the opposite direction approach
Add the waste (type: product) flow as a negative output of a waste treatment process.
Add the waste (type: product) flow as a negative input to the waste producing process considered.
Creation of a waste treatment process, opposite direction approach
Waste treatment process following the opposite direction approach
The reason there are two different approaches is because different databases manages waste in different ways, i.e. waste flows are not present in all databases.
When a process involves several products, you have to assign how much of the impact each product is responsible for. Typical examples of such processes are co-generation of heat and power (multi-output) or a landfill (multi-input). These allocation problems can be dealt with using two different strategies; partitioning or system expansion.
There are three allocation by partitioning methods in openLCA:
Physical allocation: partitioning based on the physical relationships between the products in terms of, for example, mass.
Causal allocation: partitioning based on assumptions or former research on the relative impact of different products.
Economic allocation: partitioning based on the economic (cost or revenue) relationships between products. Consequently, an economic property in terms of cost/revenue has to be added for this to be applicable.
Moreover, we also provide the following technical solutions:
As defined in processes: this option will perform allocation according to the method used in each individual process along the supply chain.
None: if none is selected, no allocation will be applied, even for multifunctional processes. Hence, each product of a process gets the entire impacts of this process and its supply chain.
Below is an example illustrating how the three different methods are applied in openLCA. In this example, 1.0 kg of wood and 0.3 kg of bark are produced from 1.0 kg of saw log (measured as solid wood under bark).
Inputs and Outputs for our example, note that economic properties have been added
The allocation factors for physical, causal and economic allocation can be viewed/altered in the "Allocation" tab of a process. Select the "Calculate factors" button and the software will automatically calculate the values for the three allocation methods.
The "Allocation" tab with the "Calculate factors" button
Calculate factors
The physical allocation factors are calculated based on the ratio between the products (wood and bark) physical unit. Since the output of wood and bark is 1.0 kg and 0.3 kg respectively, the allocation factors become 0.77 and 0.23.
For causal allocation an assumed ratio can be inserted. In this example, we assume that the wood is responsible for 60% of the impacts, whereas bark is responsible for 40%.
In the case of economic allocation, we assume a revenue of 1.0$/kg for wood and 0.4$/kg for bark.
Important: openLCA does not automatically update the allocation factors prior calculation of a product system. Hence, it always uses the last saved allocation factors. So, if you work with allocation in your study, make sure that the allocation factors are in the most recent state prior to creating a product system. However, it is possible to use Parameters and Formulas in allocation factors, which are updated during the calculation of the respective product system.
Calculated allocation factors. Causal allocation has to be inserted manually, else it will by default get the physical allocation factors.
Note: For the automated calculation of the allocation factors, the main product and the by-products need to have the same flow property. But openLCA will tell you if this is not the case. However, if you manually fill in the allocation factors (physical, economic or causal) or formulas, openLCA will refer to those.
Note: When a currency is unavailable, a new currency can be created under "Currencies" under the "Background data" in the Navigation panel. A conversion factor can be added according to whatever reference currency is set.
Be reminded that also recycling processes are multi-output processes as they treat waste and produce recycled material hence they require allocation. It is necessary to use allocation to distribute the impacts according to the linked process. A short example on how to model recycling in openLCA is displayed below:
The model graph for a recycling scenario
As the recycling process is a multi-output process allocation is needed! Here, physical allocation was applied.
Note: Here we allocated 50% of the impacts to the recyclate and the waste. This is only one option. However, if you are not modeling a closed-loop scenario this can be a relevant detail you should consider.
Another way to address multi-output product systems is through System Expansion. In system expansion, the inventory associated with the production of a by-product is subtracted from the total inventory of the multi-output product system. This “avoided impact” is calculated based on an additional, single-output product system that “expands” the system boundaries.
According to ISO 14044, system expansion should be the preferred approach for handling multi-output processes, as it avoids allocation by accounting for the impacts that would be generated if an alternative process supplied the by-product.
Expanding the system boundaries to subtract the impact of a by-product from the product system
For example, if a process produces electricity and heat (such as in a co-generation setup), and you want to isolate the impacts of producing the electricity, the heat can be treated as an avoided product. This means that the environmental impact of producing the same amount of heat via another process (e.g., “Heat, gas heating”) is subtracted from the total impacts of the co-generation system. Effectively, the modeled system is "credited" for offsetting that external heat production.
In openLCA, system expansion can be implemented by checking the “Avoided product” box for the by-product as seen below:
Avoided product check box highlighted in the Inputs/Outputs tab
It is important that a process providing the avoided product flow exists in the database. When creating the Product system, this provider will appear in the Model graph as a supplier on the output side of the original process.
The model graph showing heat as an avoided product, with a respective provider for the output
Note: In the model graph, avoided flows are displayed in italics, making it easier to distinguish them from regular flows, especially in more complex systems.
Parameters can be used on the process, Impact assessment method, product system, project and database levels. Parameters display variables instead of concrete values used in the inputs or outputs. They can be defined as simple values, formulas or complex functions. Parameters can overwrite each other (e.g. the value set for a parameter in a process can be overwritten on the product system/project levels).
In practice, parameters facilitate sensitivity analyses to estimate how much the modification of any certain aspect of the model will impact the outcome of a study. Parameters are also useful when working with preliminary data that is subject to change or for the creation of different versions of the same system while changing certain input/output values.
In openLCA you can find three types of parameters:
"Global" parameters can be found and are valid on all levels.
"Input" parameters are parameters that are only valid for the process/LCIA method/Product system in which they are saved.
"Dependent" parameters are parameters that include input or global parameters in their formula. The figure below illustrates the view on openLCA for an example.
New! Global, input and dependent parameters can be created within a process or impact assessment method. These are then also available in product systems and projects in which the process or impact assessment method is used. It is not possible to create a new parameter on the product system or project level.
Global, Input and Dependent parameters (reload button for global parameters and add parameter button highlighted)
Right-click on "Global parameters" in the "Indicators and Parameters" section in the Navigation panel.
select "New parameter".
Enter the name (see rules below), description (optional), type (input or dependent parameter) and amount, then click on "Finish".
Creation of a global parameter
After creating a global parameter, a general information window will open up in the Editor, and you can add tags and uncertainty (new!).
To load in a process the global parameter you’ve created, select the "reload" button in the "Global parameters" section in the "Parameters" tab in a process or impact assessment method.
Global parameter - general information
To create an Input and Dependent parameter:
Open the "Parameters" tab of an open process.
Select the "+" at the top right-hand corner of the input/dependent parameters section.
Assign a name, value, uncertainty (for an input parameter) and description.
In case of a dependent parameter, a formula can be used to link it to the parameters it is dependent on. To write a correct formula, you can check the accepted constants, operators and functions in this chapter.
Note: An input/dependent parameter can be converted into a global parameter by right clicking on it and selecting "convert to global parameter" (new!).
Conversion of an input/dependent parameter into a global parameter
The use of parameters within a database can be checked via the "usage view" feature (right-click on a parameter and select "usage").
Note: Use the formula interpreter ("Tools" section in "Running openLCA for the first time") to check the functions you want to include in dependent parameters.
The list of all parameters inside the database can be viewed and edited by clicking on "Parameters" under "Database" → "Content". This opens up the window below which as a (new!) feature allows editing of uncertainty by double-clicking in the "Uncertainty cell". The value and formula of parameters can also be edited here.
When you edit a parameter name or value, it will now be automatically updated throughout the database, e.g. if the parameter is used in a formula of a dependent parameter, it will automatically change.
Parameter sets: create some parameters, assign values meant for different scenarios and then save those scenarios and choose them within the same product system. An example is provided in the parameter section of the section Product systems.
If the same parameter has different values at different levels, the system's hierarchy determines which parameter value takes precedence in calculations. The parameter values at the highest hierarchy (+) overwrite the value at the lower level (-).
An illustration of the parameter hierarchy can be seen below.
For example, if a process has the same name as a global parameter 'x', then within that process, the parameter will have the process parameter value. While in another process if 'x' is used, it will have the value of the global parameter.
Compared to the previous version of openLCA, in openLCA 2 it is now possible to add so called "parameter sets", that allow the user to easily switch between parameter scenarios. When you create parameter sets, a new input field is added to the calculation properties popup window of the product system. This field then allows you to select which specific parameter set should be used for the calculations.
Product system - Calculation properties - New parameter set
In this example, we show the use of parameters and parameter sets to simulate various scenarios. The process Battery pack does include two types of electricity sources and two types of transportation. The parameters "transport_type" and "electricity_source" are both set to 1, which means the transport by truck and the electricity from renewable sources will be used to calculate the Battery pack impacts (see "Amount" column 1-parameter).
Product system - Parameter use
However, in the "Parameters" tab in the Battery Pack product system, you can switch between the different transport and electricity types by creating parameter sets. See the example given in the following figure.
Under Tools → Parameter analysis is a feature that allows you to change given parameter variable(s) across different iterations.
To do so, first, you must define a global parameter that is also used in your process(es). Next, you must create a product system based on that process. Then, when you go to Parameter analysis, as shown above, a pop-up window will appear.
Then you should select the product system, impact method, and so on. Next, set the number of iterations (runs) you wish to perform. In the space below, you should right-click and select Create new to add the parameter they want to change in each iteration.
The parameter will appear in the table below. You must then set the start and end values, which will be divided equally across the specified number of iterations. Finally, you can click OK to run the iterations.
The results will then appear in a table format for each impact category of the selected impact method. You can export the results by clicking Export to Excel at the top.
Dependent parameters in openLCA are useful for dynamically adjusting LCI data based on specific scenarios. They allow users to create complex models where results update automatically as input parameters change.
Users can use the constants, operators and functions listed below to create formulas for dependent parameters. This is particularly useful when users wish to connect openLCA to external tools where input parameters may be initialised by or dependent upon user inputs.
Function/Operator/Constant
Description
Examples with values
Usage in a Dependent Formula
pi
Ratio of circumference to diameter
pi = 3.141592653589793
circle_area = pi - radius^2
e
Base of natural logarithm
e = 2.718281828459045
exponential_growth = e^growth_rate
+
Addition
1 + 2 = 3
total_cost = material_cost + labor_cost
-
Subtraction
5 - 3 = 2
net_income = revenue - expenses
-
Multiplication
2 - 3 = 6
total_energy = energy_per_unit - units_produced
/
Division
6 / 2 = 3
average_cost = total_cost / quantity
^
Exponentiation
2^3 = 8
compound_interest = principal - (1 + rate)^time
div
Integer division
7 div 2 = 3
batches = total_units div batch_size
mod
Modulus (remainder)
7 mod 2 = 1
remaining_units = total_units mod batch_size
=
Equal to
1 = 1 = true
is_equal = value1 = value2
<> or !=
Not equal to
1 <> 2 = true or 1 != 2 = true
is_not_equal = value1 <> value2
<
Less than
2 < 3 = true
is_less = temperature < setpoint
<=
Less than or equal to
2 <= 2 = true
is_in_range = value <= limit
>
Greater than
3 > 2 = true
is_greater = pressure > threshold
>=
Greater than or equal to
3 >= 3 = true
is_above_min = score >= passing_score
and or &&
Logical AND
true() && false() = false
in_range = temperature >= low && temperature <= high
Note: Often the length of the formula field allowed by the software (150 characters) is insufficient for the formulas users wish to enter. The length of the formulas can be extended using the SQL command below in the SQL query browser of openLCA, found under Tools>developer tools>SQL (select the green icon to run). Users may save this formula under the ‘scripts’ database elements folder as this script has to be applied to each new database in openLCA as it is only used in the active database.
ALTER TABLE tbl_exchanges
ALTER COLUMN resulting_amount_formula
SET DATA TYPE VARCHAR(15000);
ALTER TABLE tbl_parameters
ALTER COLUMN formula
SET DATA TYPE VARCHAR(15000);
Below are some examples using global parameters that users can try out. In each of these examples, the input parameters are created first as described in the parameter section, so that they can be used in the dependent parameters where the formulas are added. Dependent parameter formulas can also use other dependent parameters.
Note: openLCA requires precise syntax. If there is any mistake in the syntax—such as incorrect usage of operators, missing parentheses, or improper logical conditions—the software will return an error and the calculation will not proceed. In the example below the bracket was removed before the first ‘if(and’ from the concrete amount formula.*
in "Background data" you can find all the elements that users typically don't engage with often, like units, sources, locations and so on. You can freely explore this section on your active database.
Locations can be regions, countries, or any other point on a map. They are important for localizing the supply chain and for calculating regional impacts.
Here an example of how locations are shown in openLCA when you click on them.
In a life cycle assessment (LCA), it is not enough to simply construct a model and calculate results. According to the ISO 14040/14044 standards, the study must also be validated to ensure that it reflects the intended goal and scope. Validation is about confirming that the model is complete, consistent, and reliable. openLCA provides several features to help practitioners perform this step systematically.
openLCA supports LCA practitioners in conforming to the ISO14040/14044 by:
ISO 14040/14044 Requirement
openLCA functions/features supporting it
Validation of data
- "Model Graph" (to visualize product system) - Disconnection of processes from the product system to review LCI for mass and energy balance
Identification of significant issues
- "Contribution Tree" to identify dominant processes/flows - "Sankey Diagram to visualize impacts - "Contribution Tree" for hotspot detection
Consistency check
- Consistent use of physical units (flow properties) - Same allocation rules and numerical cut-off throughout the product system - "Parameter Sets" for scenario consistency - Data Quality Assessment of results
Completeness check
- Database Validation (detects errors and missing links) - “Check linking properties” function (unlinked flows) - Detection of unmapped flows ("LCIA Checks")
Sensitivity check and Uncertainty analysis
- Parameter variation via "Parameter Sets" - Scenario comparison in "Projects" - Hierarchical parameter logic - "Monte Carlo Simulation" for uncertainty propagation - Visualization of data quality in results
Already during the data collection, data validation and mass/energy balance must be ensured in LCA studies. However, LCA models can be complex and after building the product system, practitioners should analyze if those balances are still given. To conduct this but also to get an overview, openLCA lets you probe the structure of the product system directly. For example, you can disconnect selected processes, see Model Graph, to test for inconsistencies in mass or energy balances, or to explore the role of specific flows such as energy use or transport demand to cross-check with your data entries:
The respective inventory will display the amount of needed energy or transport over the whole supply chain, as the processes have been removed from the supply chain. This helps you understand how much each process contributes to the overall resource demand and highlights potential data gaps or imbalances that may require correction or further justification.
This logic allows you to further investigate the disaggregated life cycle inventory in detail, but also to review mass and energy balances if you consider the whole life cycle of a product. However, by partly disconnecting relevant product flows, it allows you to prove that the sum of product flows equals the sum of the waste flow:
Hence, you could consider that the masses in your investigated part are balanced. Combining the approach with assessing the Data Quality of your product system allows you to investigate the foreground and background data quality of the product flows.
The goal here is to identify key issues by organizing the LCI and LCIA results in a way that emphasizes the most relevant aspects of the study. Significant issues may include disproportionate contributions of certain flows (e.g., energy, emissions, waste), impact categories (such as climate change, resource use, etc.) or particular life-cycle stages and processes (e.g., transport, energy supply, production steps). To conduct this step, openLCA supports the user through the Contribution Tree and Sankey Diagram, which visualize dominant processes and flows. Users can interactively navigate through subprocesses to identify environmental hotspots of their product system, which is not only helpful for the interpretation of the results but also to comply with the identification of significant issues.
The consistency check ensures that the assumptions, methods and data are applied coherently throughout the study. This involves verifying that differences in data quality are justified by the goal and scope, that regional and temporal aspects are handled in a uniform way and that system boundaries and allocation rules are applied consistently across all modeled systems. The same principle applies to the use of impact assessment methods, which should be applied consistently across the study.
openLCA inherently supports this criterion, so users do not need to worry about enforcing it themselves. openLCA supports the usage of the same physical units, conversion factors, allocation principles and impact assessment methods throughout the product system. This includes ensuring that allocation settings (e.g. economic throughout all processes in calculation setup) or numeric cut-off rules (see product system setup) are defined uniformly within the product system:
Furthermore, openLCA supports the user by handling units and flow properties consistently throughout the database, see Background data. Databases that are obtained from openLCA Nexus and new databases ('from scratch') already hold harmonized units and flow properties. This avoids errors caused by mismatched units or flow definitions and ensures that all data can be compared and aggregated reliably, for example, by automatically converting grams to kilograms or kWh to MJ when needed.
Further, functions such as the Parameter Sets allow users to systematically review and confirm that assumptions are applied consistently across all model variants. This means that when exploring alternative scenarios (e.g., different energy mixes, technologies, or allocation rules), openLCA helps ensure that changes are applied in a controlled and transparent way, making comparisons between scenarios more robust.
However, to ensure that the required regional and temporal aspects are represented in the Data Quality in a uniform way, the data quality of your inventory and impact results can be assessed during the calculation phase. The results indicate whether the flows and processes that contribute most to the results are supported by high-quality data in the regional and temporal context, helping practitioners identify hotspots where data may need to be improved or replaced.
Large differences of data quality in processes or flows, in particular in the foreground model, should be justified in the LCA study.
Some databases, here Carbon Minds, also provide an overview of the reviewer's quality assessment of datasets in the Documentation tab. This can further indicate potential issues.
The sensitivity check examines how robust the results are when faced with uncertainties in data, modeling choices, or calculation procedures. This means testing whether the conclusions change significantly if input data varies, if allocation methods are adjusted, or if certain assumptions are altered. openLCA supports this by allowing you to perform sensitivity and uncertainty analyses and observe how the results respond.
openLCA ensures sensitivity checks by offering integrated options for parameter and scenario variation. You can use parameters in your foreground model and adjust these at several stages of the openLCA database Hierarchy. In the product system, you can then adjust them systematically via parameter sets and rerun the calculations to observe changes in results. Projects in openLCA make it easy to compare different scenarios side by side, allowing the re-definition of parameters between scenarios of the same product system.
A relevant example could be to prove your assumption that the catalyst within the PET granulate product could be omitted in your LCA study, as they fall under your cut-off criteria (<1% of mass inputs). To later demonstrate this assumption, you perform a sensitivity analysis using openLCA’s project function.
As visualized, in most impact categories, the change of impacts was rather marginal. Hence, this backs the previously made assumption. However, if this would be more drastic, the outcomes of the sensitivity analysis would imply to redesign the LCA studies’ assumptions.
Uncertainty analysis in openLCA is done by allowing uncertainty information to be stored with input and output data that can be applied during calculations. Then, Monte Carlo Simulation simulations can be performed directly in the software to generate a distribution of results rather than a single point value. The outcomes can then be visualized, making it possible to evaluate how stable the study’s conclusions are when accounting for uncertainties.
A completeness check verifies that all the necessary data and information are available for the calculation of results. If important processes or flows are missing, you need to evaluate whether they are critical to fulfilling the goal and scope of the study. This can be performed in certain ways in openLCA.
First, after you have finished modelling, you should check that the validation of your database does not return any errors and that all providers are set across your entire database. openLCA supports this process through database validation and the 'Check linking properties' function, see Toolbar. The latter scans the database for unlinked product flows and waste flows. Running this check helps ensure that all exchanges are properly connected. Databases provided on openLCA Nexus are offered with a clean validation check and, in cases of high-quality databases, also the “Linking Properties” of the database look like this:
If you run into linking errors, analyze the reasons. If it is due to data you changed in the background data, you can export your foreground model and re-import it into a new database. Some background databases hold flows with several providers, which is not a problem, just should be taken care of that in the processes, are respective 'default provider' is set to prevent ambiguity.
Another layer of completeness is required to be tested on the LCI and LCIA levels. Initially, you have to make sure that your life cycle inventory does not hold any product flows anymore, as they will not be characterized by the LCIA method.
Once done, you have to make sure that during the impact assessment, undefined or unmapped elementary flows are minimized as they can compromise the completeness and reliability of the results. Here, openLCA supports you with the LCIA Checks tab of the Result window in post-calculation by displaying all the flows that are not assessed in the respective impact category.
If you find here elementary flows that should be assessed, you have to provide them a characterization factor in the method or exchange them in the respective process. This can occur due to mis-mapping of flows, e.g. carbon dioxide (fossil) vs. carbon dioxide, fossil. Only one of them is commonly assessed.
One of the main challenges in the creation of LCI datasets and databases is balancing transparency and the protection of suppliers’ intellectual property.
For suppliers, there is very little incentive to share process or product data at the level of granularity required to make a high-quality, transparent LCI dataset. As a result, several strategies for preserving supplier IP in the creation of LCI datasets have been developed, all centred around the concept of aggregation.
The goal of these aggregation strategies is to ensure that datasets are representative of reality without exposing the process data of any one supplier. This anonymisation is a critical step in creating high-quality, FAIR, open-access datasets. openLCA supports you with this in several ways.
In vertical aggregation, multiple unit process inventories (UPIs) are combined to create a single dataset representing the entire production chain. A fully vertically aggregated dataset is known as a system process (effectively a life cycle result saved as a process, see process chapter, with only elementary flows). Datasets can also be partially vertically aggregated (also known as partially terminated datasets). More details on fully vs partially terminated datasets are provided below.
Vertical aggregation provides the datasets with the most realistic representation of production chains while still maintaining supplier confidentiality [1].
Three production chains comprised of three individual UPIs
Vertical aggregation across three production sites
The latter approach has been conducted in our research project PRIMUS to generate EcoProfiles of plastic recyclates. Have a look at the respective methodology (download directly).
To create a horizontally averaged dataset, multiple UPIs or aggregated processes from different production chains that supply the same reference flows are combined. For unit processes, all exchanges are averaged. For system processes, the inventory results of each process are averaged to create a new dataset. Horizontal averaging allows data representing a broader range of production sites/types to used, but is methodologically less robust than vertical averaging due to potential differences in the averaged operations [1].
Horizontal averaging across three production sites
Both types of aggregation can be either company-specific or an average of different suppliers within an industry [2]. A hybrid of vertical and horizontal averaging approaches is often used in the creation of datasets.
A fully terminated dataset (also known as a system process) is a dataset that contains the entire product system within its boundaries. Since all intermediate exchanges are generated and consumed within the system boundaries, the inputs/outputs appear as a list of only elementary flows [3]. By removing any intermediate exchanges from the dataset, fully terminated processes protect confidential IP while still allowing LCA practitioners to calculate life cycle impacts [2].
However, the lack of transparency provided by fully terminated processes means that users lose oversight over the background system and are unable to adapt processes, limiting the flexibility of the model. Furthermore, comparability between fully terminated process datasets can be limited due to differing assumptions made regarding allocation, cut-off etc.
Historically, fully terminated processes have had the added benefit of requiring less computational power in LCA calculations. However, recent technological developments, such as precalculated database libraries developed by GreenDelta mean that there is often no longer a meaningful difference in calculation speed between unit and system process datasets.
Screenshot from openLCA showing fully terminated process (system process)
In addition to fully disaggregated and fully terminated processes, datasets can be created in a “partially terminated” format. Partially terminated datasets consist of an almost completely aggregated dataset except one or more intermediate exchanges listed that the user can connect to background datasets [4]. This allows to still protect details of activities without neglecting transparency or updatablity.
Screenshot from openLCA showing partially terminated process
In all cases, GreenDelta is happy to provide support for extracting and sharing LCA data using openLCA.
There are several ways to perform data aggregation in openLCA. The fastest is to calculate the results of your product system and save them as a novel system process by clicking the "Save results as..." button in the "General information" tab of the results window see process chapter:
Save as result:
You can then generate a system process, which can be further exported as an ILCD or JSON file and shared with other practitioners.
If you want to produce a partially terminated process from your results, you need to hold intermediary flows in your calculated flow (the supply chain should not be fully resolved):
You can follow the logic presented in the Validation Chapter by disconnecting respective product flows from your reference process in the model graph or by not setting the provider on process level prior to the product system creation and removing the tick from 'auto-link processes. This will give you an inventory solely consisting of intermediary flows and direct emissions from this process you can export again as described above.
This can also be done using various scripts; feel free to reach out to us for consultancy on this matter.
[1] PlasticsEurope, ‘Eco-profiles program and methodology’. Accessed: Oct. 07, 2025. [Online]. Available: https://plasticseurope.org/wp-content/uploads/2024/03/PlasticsEurope-Ecoprofiles-program-and-methodology_V3.1.pdf
[2] United Nations Environment Programme and SETAC, Global Guidance Principles for Life Cycle Assessment Databases. 2011. Accessed: Dec. 11, 2025. [Online]. Available: https://www.lifecycleinitiative.org/wp-content/uploads/2012/12/2011%20-%20Global%20Guidance%20Principles.pdf
[4] European Commission. Joint Research Centre., Guide for EF compliant data sets. LU: Publications Office, 2020. Accessed: Sep. 25, 2025. [Online]. Available: https://data.europa.eu/doi/10.2760/537292
This section addresses advanced aspects of openLCA and requires a solid understanding of life cycle assessment principles, impact assessment methodologies, and the functionality of the software itself.
With openLCA you can perform regionalized impact assessment, accounting for specific conditions and characteristics of the location where the processes occur. With parameters, you can define regional characteristics affecting the impacts. Regional characteristics and information about geographic locations are contained in GeoJSON files that can be imported into openLCA.
The new regionalized calculation employs a location-based approach. Here, locations are independent entities within the database, interacting with impact factors, processes, and exchanges to generate region-specific impact assessments. This approach differs with the traditional flow-based regionalization, which relies on region-specific flows to incorporate regional Characterization Factors (CFs).
This location-based approach is more flexible, as it enables the addition of new regionalized CFs at any scale (e.g., basin-level, sub-country level...) without needing to introduce new flows. The pictures below illustrates the key differences between location-based and flow-based regionalization approaches.
Note: regionalized calculation is an advanced form of impact calculation. It is more resource consuming that a normal impact calculation and it is needed to be handled carefully. We advise to allocate enough memory for the calculations (check how to do it under Preferences > Configuration in "Toolbar: File"), to perform it using a location-based regionalized method, and to check that the locations of processes are the intended ones along the whole supply chain (check section "Assign locations to processes and exchanges" below for more details).
At the moment, these are the methods we offer that are location-based regionalized:
EF 3.1 (adapted): available in openLCA method package from v2.4.0 upward. Regionalized in "hybrid" format (meaning that can be used with the new regionalization tool, but it's still compatible with traditional flow-based regionalized databases).
TRACI 2.2 (freshwater and marine eutrophication impact categories): available in openLCA method package from v2.5.0 upward. Regionalized in "hybrid" format.
AWARE 1.2: available in openLCA method package from v2.6.0 upward. Regionalized in "hybrid" format.
LC-Impact: available in Nexus as standalone (compatible with the same databases as our method pack). Location-based regionalized only. For LC-Impact we provide also regionalization setups in json format, where the flow-binding has already been set.
Nonetheless, in this chapter you will learn how to bind flows yourself and to calculate characterization factors for specific locations, which works both for methods already regionalized and method that are not yet updated, but which provide geographic information for their impact factors.
A regionalized LCA needs to understand locations. In openLCA 2, available locations in a database are shown in the navigation tab under Database → Background data → Locations.
Available locations in a database
Opening one, you will see geographic data, including latitude, longitude and country code (e.g. ES for Spain), and the covered area defined by GeoJSON. It is also possible to modify the coordinates by using the text editor that can be opened by clicking on the pencil icon in the "Geographic data" section.
General geographic data - Example: Spain
Locations can be also imported in the active database, for instance from a GIS software, as GeoJSON files File → Import → other → geometries from GeoJSON.
Import of locations into active database
Alternatively, locations can be also drawn by users in geojson.io as polygons, lines or points.
geojson.io example
The coordinates text can then be just pasted in the text editor in openLCA, after the creation of a new location (right click on location folder → new location → add name and country code → open the text editor in the geographic data
("pencil" icon) → paste coordinate text from geojson.io).
Use of coordinates text from geojson.io example in the openLCA text editor
Data for regional characteristics are contained in GeoJSON files, which can be imported in openLCA. To regionalize an impact category, first go to "impact categories" folder and open an existing category (or create a new one). Then go to the tab "regionalized calculation" for the opened category. Here you need to import regional characteristics (e.g. population density, watershed area, characterization factors…) by clicking on "open" and selecting GeoJSON files available in your laptop (e.g. previously exported from a GIS software). Parameters are extracted during the GeoJSON file import and are available under the section "GeoJSON Parameters".
Regionalized calculation
Each imported parameter can be visualized in a map by selecting the parameter and clicking on the "world" icon in the GeoJSON Parameters section.
Flows for which you want to calculate geo-spatial based CFs need to bound to the regional characteristics contained in GeoJSON files, so that the CFs can vary based on the selected location for exchanges and processes. In the "flow bindings" section under "regionalized calculation" in the open impact category, add the flows that you want to regionalize (use the "+" icon") and parametrize the "formula" field using the parameters extracted during the regional characteristics import and available under "GeoJSON parameters". In regionalized assessment, the parameter value derived from the GeoJSON file is used for the formula evaluation. Instead, if you apply non-regionalized LCIA or no location is available for exchanges and processes, the default CF value will be used in the calculations.
In "Formula" field, you can chose the parameter of your geoJSON that you want to use for the calculation of the CF of the flow you chose. You can treat that field as any other formula in openLCA. For instance, if you have a water flow expressed in Kg and the parameter of your geoJSON is in m3, you can se
In the "Range" field, you can view the minimum and maximum values for each parameter. The "Aggregation Type" field allows you to choose the aggregation type for the calculation of your CFs: "Weighted Average" (N.B.: area-weighted average), "Average," "Minimum," or "Maximum." The "Default Value" displays the value derived from the selected aggregation type performed for each parameter on your entire map.
Example of flow binding and parameterization
Currently, openLCA cannot store the GeoJSON parameters and flow bindings, but you can save and export your setup by clicking on "save". You can import this configuration again at any time by clicking on "open" and selecting the exported setup.
The calculated CFs instead (see below) can be saved and therefore permanently stored in the impact category of choice-
The last step to set-up the regionalized LCIA method, is to link process locations and LCIA methods spatial units. Therefore, the intersection between GeoJSON file features and process geometries (stored in "Locations") is calculated by the software, thus resulting in dedicated CFs for locations selected by the user. By clicking on the "calculate" icon in the "flow bindings" section, the user defines the locations for which CFs are to be calculated for the flows added in the "flow bindings" section.
Defining the location for which the characterization factors are calculated
A window will open with the resulting characterization factors. The system will calculate, using the aggregation type you choose (see the above section) two values: 1) a value based on the geometry of the specific location you select; 2) a default value representing a global factor (what was called "default value" in the GeoJSON Parameters table) without a specific location, useful for instance when the location of a process is unknown.
Example results of newly calculated Characterization Factors
You can choose between two saving options:
Keep existing: This option preserves any existing CFs. For example, if the method you're using already includes a global default value, selecting this option ensures it remains unchanged.
Replace existing: This option overwrites all values. It will add or replace both the specific CF for the selected location and the default global value.
Eventually click on "Add new factors". The resulting CFs for the selected locations and flows are available in the tab "characterization factors" for the open impact category. A flow for each selected location and the same flow without a specific location are created and assigned with a CF depending on the location, or with the default CF value for the case of the flow without a specific location.
When running LCIA, you need to select an impact assessment method. Therefore, the regionalized impact category/ies need to be added to the method that will be used to calculate the product system impact. To create a new regionalized method, right-click on the folder "impact assessment methods" and select "new LCIA method". Then you can add the previously created impact category in the section "impact categories" in the first tab "general information".
Adding an impact category to the tab "General information"
To perform a regionalized LCIA, ensure that the correct locations are assigned to your processes and/or exchanges.
For process locations, go to the 'Geography' section in the 'General Information' tab of a process and select the desired location.
Process with Spain as assigned location
For exchange locations, add them to the 'Location' field in the 'Input/Output' tab of a process.
Exchange with Norway as assigned location
Mind that the locations of exchanges will have priority over the location of the process, if they differ. For instance, if a process has "Italy" assigned as its location, but some of its exchanges are designated with more specific regions (e.g., Sicily or a particular water basin), the impact will be calculated based on the exchange locations. If no specific location is given for an exchange, the impact will then be calculated using the process location (therefore, it's not mandatory to specify locations for every exchange).
Note: Instead, locations specified in flows (if any) are not considered in the regionalized impact calculation! These locations mainly apply to product or waste flows and are not relevant to regionalized impact calculations, which only account for process or exchange locations. See below:
If a location is specified at this level, it won't be taken into account during the regionalized impact calculation
To run regionalized LCIA for a product system, select a regionalized impact assessment method and check the box "regionalized calculation". Click on "Finish" to start the calculations.
Calcualtion of a regionalized LCIA
Regionalized results can be analysed using different tabs, such as "impact analysis" and "locations".
Costs are modelled in the software as associated with products, waste or
elementary flows, which are inputs and outputs of processes. They can be
positive or negative, while a negative cost is regarded as an added value. In general, there is no need
for the creation of a method for the LCC calculation. Have also a look at our LCC documentation.
The implementation in openLCA follows the proposal of the SETAC working group, for costs, with some modifications, as follows:
costs are modelled as properties of exchanges, i.e. of inputs and outputs of processes;
costs can be positive or negative; negative costs are added value
costs are displayed in the process editor, in a new column for the exchanges;
when a product system is calculated, both costs and added value are available, in parallel to inventory and impact assessment results
Value added builds on this concept, taking value added as "negative costs", i.e. reversing the sign.
The starting point for the cost model and LCC calculation in openLCA are the costs for process data sets. In the process editor, costs can be entered for each exchange, i.e. for each input and output, of a process. Both costs and revenues can be considered:
Costs and revenues for flows in a process
Costs on the input side are costs. On the output side, for products, amounts in this column are revenues (the product is sold), while the release of elementary or waste flows might cause a cost, e.g. release of CO2 or emission of waste water with heavy metals. Therefore, any positive amount entered for a product on the output side refers to revenue, while every positive amount entered for an elementary flow reflects costs. To help distinguish both, costs are shown in purple, while revenues are shown in green.
To edit the costs, or to enter new costs, click in the cost column, and click on edit.
Entering or editing costs in the process editor
A new window will appear for specifying the currency and the amount costs. The amount is meant to be entered as absolute value, i.e. as costs for the amount of the exchange as it is entered for the exchange; for the example in the second figure, it is the costs for 0.12 kg. The costs per specified unit, e.g. per kg, are calculated automatically; they are shown in the small window for entering costs which opens when clicking on edit in the cost/revenue column.
Entering or editing costs, detail window, with absolute costs (costs for the amount specified for the exchange) and costs per unit which are calculated
As shown in the figures above, costs are expressed in currencies. It is possible to switch for a cost entry between different currencies in the detailed cost window. All currencies available in a database can be found under background data, in the currencies folder. For an entire database, one currency is selected as reference, for the other currencies, an exchange rate is stored to allow recalculation of costs in another currency. The exchange rates are used for calculating the conversion factors which are applied when different currencies in the process are selected.
Changing the currency of a flow
Under background data you can find the available currency or add your own
The reference currency can be changed within one currency (click on "set as reference currency?").
General information on a currency
When changing the reference currency, all open currency editors will be closed for updating the conversion factors, and the editor of the new reference currency will be opened again.
In the case of multi-output processes, consideration of the costs of by-products
depends on the choice of allocation options when setting the calculation
properties (see "Allocation"). If no option is selected the price of the
by-products is considered as revenue, while if a type of allocation is chosen
the allocation factors are applied to the exchanges and the by-product cost is
not considered. The third possibility is to select the option "as defined in
processes": As before, if a type of allocation is chosen the allocation factors
are applied to the exchanges and the by-product cost is not considered; on the
contrary, if no allocation is selected all costs are calculated excluding those
from the by-products.
In case of multi-output processes in the database, it is important to know what happens to the costs of by-products during the calculation of a product system. You have different options for setting the allocation method in the calculation properties.
Choosing the allocation method in openLCA during the calculation setup. The box for "Include cost calculation" is checked!
Note: Furthermore, LCC can be performed stand-alone by selecting no method when the impact assessment is run.
Depending on this choice (and depending on what is defined in the processes itself) the following rules will be applied:
None: All costs are considered (the price of the by-product as revenue)
Physical, causal or economic: The allocation factors are applied to the exchanges and the price of the byproduct is not considered
As defined in processes: The physical, causal or economic allocation is chosen as defined in the processes itself. Again, the allocation factors are applied to the exchanges and the price of the by-product is not considered
and no allocation ("none") is selected in the processes, all costs except the one from the by-product are considered
If you want to apply system expansion, i.e. one of the output products is marked as "avoided product", the calculation is as follows:
When no allocation is selected in the calculation properties, the following formula is applied:
- Added value = Price Reference_Product – Price elementary flows/inputs – Price ByProduct – Added value of avoided supply chain
When allocation is selected (e.g. "As defined in processes"), the following formula is used:
- Added value = Price Reference_Product +Allocation_factor*(– Price elementary flows/inputs – Price ByProduct – Added value of avoided supply chain)
As you can define an economic flow property and hold a cost/revenue entry in the process, it is assumed that the process-specific information is more precise and the following rule is applied:
When economic allocation is selected and all output products have an economic value (revenue) defined in the process editor, those values will be taken. However, in the case that not all output products have a revenue defined, then the economic flow properties will be used for the calculation (if there are any).
Another important issue is the consideration of market variability through
uncertainty models. OpenLCA presents a column to assign an uncertainty to the input
and output flows of a process, but not to the price directly. This can be solved
by making the price a Parameter and assigning uncertainty
directly to it.
From ecoinvent database v3.3 onwards, the openLCA format provides prices for all products except for waste materials and their disposal. Otherwise, prices can be inserted manually in the input/output section for each process.
Note: In the ecoinvent database, price data are not intended to enforce economic balance at the level of individual unit processes. Prices are mainly used to support economic allocation. Hence, their role is to express the relative market value of the reference product and any co-products produced by the same activity to distribute environmental burdens across the different outputs of multi-functional processes. Because of this purpose, the prices assigned to outputs are not expected to equal the total cost of inputs calculated as price multiplied by quantity.
Several currencies are available in the database and for an entire database, one
currency can be selected as a reference for all the others.
The software allows to model different prices for the same material referred to
different processes or countries, as the price per reference unit associated with
the material is open and can be changed in the processes of the product system.
In this way, there is no need for the creation of the same material with a
different name and price associated.
As an example, a small case study will be presented in the following. The case study is taken from Moreau and Weidema (2015), who in turn refers to a publication by Heijungs and colleagues (Heijungs et al. 2013), and was rebuilt in openLCA.
The case study is a about the life cycle of a wooden chair, the functional unit defined as sitting on the chair for ten years. Overall, the chair is assumed to have a life time of 2 years, which is quite short. The simplified life cycle consists of few processes only:
Production of wood
Production of electricity
Production of the chair
Usage of the chair
Disposal of the broken chair
Costs and material exchanges between these processes are shown in Table 1. Since the functional unit is 10 years of sitting, 5 chairs are required.
Chair case study: Processes, physical exchanges, costs and value added (Moreau and Weidema 2015, modified)
Phase
Product
Amount
Costs per unit*
Costs**
Value added
Production of electricity
electricity
1 MJ
5 €/MJ
5 €
5 €
Production of wood
wood
1 kg
1 €/kg
1 €
1 €
Production of chair
electricity
2 MJ
5 €/MJ
-10 €
10 €
wood
-5 kg
1 €/kg
-5 €
chair
1 piece
25 €/piece
25 €
Use of chair
chair
5 pieces
25 €/piece
-125 €
-135 €*
broken chair
5 pieces
2 €/piece
-10 €
sitting
10 years
0 €/year*
0 €*
Disposal of broken chair
broken chair
1 piece
-2 €/piece
2 €
2 €
*in Moreau and Weidema 2015: "price"; **in Moreau and Weidema 2015: "monetary amount"
In openLCA, the processes have been created, and a product system has been built where these processes exchange their products. Note that the disposal (end of life) of the chair is modelled as provided service to the use of the chair, following the typical ecoinvent (and SimaPro e.g.) modelling of end of life treatment.
The created product system in the model graph in openLCA
One example for a process with costs is already shown in first figure of this page: The production of the chair.
When the product system is calculated, several summaries of results for costs and added value are available. For example, in the process contributions tab, a new section "costs/added values" is available, which shows the contribution of different processes to the final cost and added value result. It is possible to switch between costs and value added; costs are value added multiplied by -1, i.e. costs for input products "purchased" for one process, minus price of the generated products.
Value added and net-costs in the process contributions tab
For the production of the chair, for example, net costs are (5 + 10) € - 25 € = -10€; for 5 chairs required in the product system, the amount is -50 €.
In the contribution tree, value added and life cycle costs are available as new section, in addition to LCIA categories and elementary flows.
openLCA offers a detailed document on how to conduct LCC studies in openLCA free here. The database with the case study is available for download here.
openLCA can also be used to conduct social lifecycle assessments (SLCA) for any product or project. SLCA is a part of a sustainability assessment that focuses on the social impacts throughout a product's lifecycle. Guidelines for carrying out SLCA were developed (and were last updated in 2020) by the United Nations Environment Programme (UNEP) and can be freely accessed on their website.
Similar to conventional environmental LCA, there are background databases used for SLCA. In openLCA, PSILCA and SHDB are examples of social databases that can be used. You can also integrate SOCA, which is an add-on for ecoinvent LCI databases to carry out SLCA. Social LCA databases are available on openLCA Nexus, under the Database section.' This section will display content only if processes have social-related information.
In an active social database, you can find the "Social Indicators" in the "Indicators and parameters" directory.
Social indicators in "Indicators and parameters" directory
To learn more about any social indicator, you can double-click on it. In the General information tab, additional information about the unit of measurement, evaluation schema and activity variable are displayed.
General Information of a Social Indicator
Information regarding the social indicator according to each process can be viewed in the "Social Aspects" tab.Information on the raw values, risk level (evaluated according to the amount of the "raw value"), activity variable, data quality, comment and source can all be displayed. The risk-assessed indicators are characterised by the activity variable. For instance, for the time being, all indicators use working hours as an activity variable. To learn more about this and about each social indicator, it is recommended to visit the PSILICA manual which is available on the nexus website.
Data quality is a critical aspect of life cycle assessment (LCA) studies, and it is addressed in ISO 14040 and ISO 14044 standards. openLCA offers broad support for entering, managing, and calculating data quality in LCA models. Before we start, let’s remind us that in ISO 14040, data quality is defined as fitness for purpose.
Below, we describe how to work with data quality in openLCA.
Choosing a data quality system
First you need do define a data quality flow schema. If you generate a database with complete reference data, we provide you with two data quality systems. You can choose one of them in the "General information" tab, see "Process tab content":
Available data quality systems in a database with complete reference data in openLCA
You can also create your own data quality system or modify existing quality systems according to your own criteria. In openLCA, it is assumed that all data quality systems follow a pedigree matrix "style", i.e. there are data quality indicators that are evaluated in classes, from good to bad. These pedigree matrices can be defined from scratch, but openLCA contains some predefined data quality systems already.
Data quality system according to the ILCD data quality system requirements
To create a new data quality system, right-click on the "Data Quality Systems" directory and select "New data quality system". Then you can add indicators, scores and uncertainties.
Step 1: Creating a new data quality system
Step 2: Setup a new data quality system
Working with data quality
Now you can select a data quality system for the process, flows and social aspects.
Data quality information for processes must be defined in the "Data quality" section in the "General information" tab of a process window.
Process window tab - general information, data quality
On the other hand, data quality information for flows and social assessments need to be selected under data quality columns in "Input/Output" tab or in "Social aspects" tab, see "Process tab content".
Process window tab - Inputs/Outputs, Data quality for flows
Data quality system can be selected among the systems available in the "Data
quality systems" directory in the "Indicators and parameters" section of the
active database.
Data quality systems directory in an active database
You can access the existing data quality system in the folder "Data quality system" in the navigation panel. You can use for example, the ecoinvent data quality system improved by Dr. Andreas Ciroth (click here to read the complete report). When you open a data quality system in the Editor, you’ll see a "General information" tab. This tab displays scores for various indicators and provides options to assign uncertainty values to these indicators, as illustrated below.
Data quality systems, indicators and scores
As visualized above, adding uncertainty values allows for performing "Monte Carlo Simulations" in openLCA.
Setup of Data Quality Calculation
openLCA allows to quantify the data quality of a calculations. This can occur on flow level or on process level (see above). In case the data quality is provided on flow level, e.g. the unit process version of ecoinvent, or process level, e.g. the environmental footprint database, the data quality of the inventory and impact assessment (flow level) or the total requirements (process level) can be assessed. To access the data quality during a calculation, check the box "Assess data quality" when setting the calculation properties.
Checking the box for including a data quality assessment
Note: The system process version of ecoinvent does not allow the calculation of data quality as no data quality is provided on flow level.
Then, click "Next" and the "Data quality properties" window will open, allowing you to access the details on the data quality assessment.
Setup for the data quality assessment
You can choose the aggregation type, a rounding method, and how to handle exchanges that lack data quality values. Then, click on the "Finish" button to start the calculation, including the data quality assessment.
Results of Data Quality Calculation
When the calculations are done, the results window will open in the Editor. You will notice that the data quality of the inventory analysis is now shown in the inventory analysis tab with color-coded numbers.
Inventory analysis - data quality information
The abbreviations for the columns are Reliability, Completeness, Temporal correlation, Geographical correlation, Further technical correlation as defined in your data quality scheme, see "Processes".
In a similar fashion, the data quality for the impact analysis tab is displayed after the calculation is performed on flow level.
Impact Analysis - data quality
Note: If the data quality is captured on the flow level (e.g. unit process database of ecoinvent), the assessment and aggregation of data quality up to the impact categories in the results is based solely on the data quality entries for intervention flows (flows that cross the boundaries of the system, mostly elementary flows). However, you can get the aggregated data quality of product flows throughout the supply chain by deleting all links to this product flow in the Model Graph. This will give you results like this:
Inventory analysis with data quality of one unconnected flow
If the data quality is captured on the process level (e.g. environmental footprint database), the total requirements in respect to the reference flow of the product system are displayed. The abbreviations are Technological representativeness, Time representativeness, Geographical representativeness, Completeness, Precision, Methodological appropriateness and Overall quality:
Total requirements and data quality using the ILCD data quality scheme
As life cycle assessment models typically rely on many assumptions, methods to determine the associated uncertainty in life cycle inventory and life cycle impact assessment can be helpful to communicate the effect of those assumptions on the communicated results. Hence, openLCA supports to perform Monte Carlo Simulation (MCS) within a product system using per-exchange uncertainty information. The produced MCS result will display values from the number of calculations performed such as the mean, the standard deviation, the median, and the 2.5th percentile, as well as the 97.5th percentile to get the range for the 95% confindence intervall. Particularly the standard deviation can be useful for expressing the overall uncertainty in product system results. For further investigation and interpretation, exporting the results of the MCS to Excel may be useful.
The Monte Carlo simulation randomly varies your model’s input data using uncertainty distributions. This calculation method considers the uncertainty in the input data, resulting in multiple calculation results, each with a specific uncertainty distribution. Typically, several thousand iterations are carried out to obtain robust results.
The first step in openLCA is to add uncertainty data to all input and output flows in the processes. To add uncertainty data to flows, open a process, click in the uncertainty field and select "Edit". A pop-up wizard opens where you can choose between:
Logarithmic normal distribution (Geometric mean, Geometric standard deviation)
An asymmetrical probability distribution skewed towards the right, which is described through the geometric mean and geometric standard deviation. Unlike in normal distributions, the geometric mean is the maximum of the logarithmically transformed data set, just like the geometric standard deviation is the standard deviation of the logarithmically transformed data set.
Normal distribution (Mean, Standard deviation)
A type of distribution in which the values are concentrated symmetrically around the most common value, the peak and mean of a standard distribution. How much the values are spread around this mean is determined by the standard deviation.
Triangle distribution (Minimum, Mode, Maximum)
A distribution type in which all values are distributed between a minimum and a maximum. The mode defines the peak of the triangular distribution and this determines to which of the other parameters the concentration of values is skewed.
Uniform distribution (Minimum, Maximum)
A distribution type in which all values are evenly distributed between a minimum and a maximum value. Therefore, the minimum and maximum are the only required input parameters.
Adding uncertainty to flows
Likewise, it is also possible to define uncertainty data for parameters as well as for LCIA characterisation factors or to derive the uncertainty values from the respective data quality.
Luckily, some databases, e.g. ecoinvent, already provide uncertainty values for flows as visualized below (editing uncertainty as described above in the "Input/Output" tab of a "Process"):
Defined logarithmic normal distributed uncertainty of a flow as found in the input/output tab of a process
These are mostly based on a certain base uncertainty which is merged by with an additional uncertainty derived from the data quality and can be used directly for the Monte Carlo Simulation. However, if you use the ecoinvent database, we highly recommend the respective chapter about uncertainty Uncertainties - ecoinvent Support
When you click on the "test" button, openLCA will simulate the uncertainty for this exchange with 1000 runs:
An alternative approach to setting exchange uncertainties is to make us of the data quality pedigree matrices that come with the openLCA reference data. The predefined data quality pedigree matrices can be used to set the uncertainty of processes according to the confidence in collected data. To use this feature, the flow data quality has to be defined see "Data Quality". Following that the button "use as uncertainty value" makes it possible to use the documented data quality uncertainty as defined in the data quality system (ecoinvent or Weida/Müller/Ciroth/Lesage).
This uncertainty value will be set in logarithmic normal distribution and use the values defined in the pedigree matrix window.
Example exchange data quality, highlighting the function of using the data quality matrix for the determination of uncertainty values
Clicking on "Calculate" in a product system opens the pop-up wizard "Calculation properties". In this wizard you can select the calculation type Monte Carlo simulation and define the number of iterations.
Calculation properties: Monte Carlo simulation
Afterwards, the simulation editor will open. Select "Start" to begin the calculations. The calculation time required depends on the database and product system complexity, and the selected number of simulations. The results for each flow and impact category will be displayed while the simulation runs, though only one will be displayed at the same time.
The results will be displayed live and provide you with information about:
Results: Number of iterations
Mean: The arithmetic mean of the results obtained in the total number of iterations performed so far, signified by one of the central red lines in the graph.
Standard deviation: The standard deviation associated with the mean of the data set of results produced so far. This describes how dispersed the produced results are around the mean value.
5% percentile: The lower boundary value, which demarks the area of results produced by only 5% of iterations. It is marked with the leftmost line in the graph.
95% percentile: The upper boundary value, which demarks the area of results produced by only 5% of iterations. It is marked with the rightmost line in the graph.
Median: The center value of the distribution of iterations. For different types of distributions, this can differ considerably from the mean. This value is marked by the second one of the central lines in the graph.
The accuracy of the results is strongly depending on the number of iterations performed!
However, all results can be exported directly as an Excel document to further assessment. Simply click on the Excel icon on the right-hand side of the editor (see above).
Note: Depending on the type of uncertainty distribution most prevalent in the product system, the resulting mean may not match the value calculated in LCIA through regular product system result calculation. This results from a cumulative effect of skewed product system uncertainty distribution types propagating to the reference flow.
The results of all processes and sub-product systems that are part of a product system can be displayed separately in the Monte Carlo Simulation tab. For easy navigation, individual processes can be pinned.
It is also possible to compare two processes with a Monte Carlo simulation if you create a process and the corresponding product system, where one process is subtracted from the other to avoid double counting of uncertainties.
Creation of a process subtracting one process to the other for future comparison in Monte Carlo simulation
Under Tools → Parameter analysis is a feature that allows you to change given parameter variable(s) across different iterations.
A useful application is testing how impacts change over time. For example, in a building life cycle, impacts vary across the different stages of the building’s lifetime, as illustrated in the diagram below:
In the beginning, impacts arise from the construction phase. Later, impacts occur during the use phase, end-of-life, and beyond.
To model this, you must first define a global input parameter that is referenced in your process(es). In this example, the parameter is Year.
You must then insert this parameter into the relevant process(es). In the example below, if conditions are applied to indicate when the construction phase ends (assumed to be at year 0) and when the building enters the use phase (starting from year 1 onward).
Next, create a product system based on the process. When you open Parameter Analysis (as shown previously), a pop-up window will appear. Select the product system, impact assessment method, and any other required settings.
Set the number of iterations (runs) you want to perform. In the lower section of the window, right-click and select Create New to add the parameter you want to vary in each iteration.
The parameter will appear in the table below. Set the start and end values; these will be divided equally across the specified number of iterations. Finally, click OK to run the iterations.
In the example below, the range is set from year 0 to year 2. The number of iterations is set to 3, corresponding to Year = 0, Year = 1, and Year = 2.
The results will then appear in a graphical and tabular format for each impact category of the selected impact method. You can export the results by clicking Export to Excel at the top.
The full building life cycle can be found here: https://www.openlca.org/case-studies/
You can further apply time-dependent parameters when modeling life cycle costing. In the example below, capital costs and operational costs are defined separately. Operational costs are multiplied by an inflation rate adjusted using the year factor. Additionally, costs are assigned a negative factor, while revenue for the is assigned a positive factor. This ensures that net costs are calculated correctly.
The results then show how the net costs vary along the year, with the first two years indicating investment periods and this appears as negative factors.
You can learn more on this example here: https://www.greendelta.com/project/sh2e/
System dynamics allows to model non-linear behaviour of complex systems over time using stocks, flows, and feedback loops. It makes it possible to model product systems in broader system surroundings and further define dynamic relationships of system variables. In openLCA you can now link your LCA models to system dynamics models, making it possible to calculate dynamic impact results over time.
First, you need to enable "Support for system dynamics models" in the preferences (do not forget to press "Apply" or "Apply & Close" in that dialog):
Then, refresh the navigation via F5 or the refresh button:
You should see a folder "System dynamics models" in your database folders now:
Right click to create a new model or import a model:
When creating a new model, general information that can be defined includes the name, the start and stop time as well as the time steps, the time unit, and the impact assessment method. The defined time settings are specifications used for the simulation runs. The impact assessment method is for calculating the impacts at each time step. After the model has been created, these settings can be still changed in the “Calculation setup” tab of the system dynamics model editor window.
The imported models need to be in the standard XMILE system dynamics format. A pop-up window allows you to select a file in your file directory and import it directly.
When opening your system dynamics model, the model editor will show a graphical representation of your model in the tab “Model” and the defined calculation settings in the tab “Calculation setup”.
If you imported an existing model, it will show this model in the “Model” tab.
This model can then be edited by right clicking on a blank area of the model to add new elements or by right clicking on existing elements to edit or delete these elements.
When creating a new system dynamics model, the page will be blank. To add elements to your model, right click and choose the element you would like to add. Options are “Add stock”, “Add rate”, “Add auxiliary”, and “Add product system”.
The elements have the following shapes in the graphical editor:
The system dynamics elements are defined as follows:
Stocks: are accumulations or state variables in a system that represent quantities at a given point in time (e.g., population, inventory, or savings). They change only through flows.
Flows: are the rates at which stocks increase or decrease over time (e.g., births, sales, or withdrawals). They determine how stocks evolve.
Auxiliary: are intermediate variables used to calculate flows or provide additional logic and relationships in the model (e.g., birth rate, demand factor, or policy settings). They do not accumulate over time themselves.
When adding a stock, a pop-up window appears to define name, unit, whether the stock is a non-negative, input and output flows, the type, and finally values or an equation. Input and output flows can be added or remove by right clicking on the adjoining boxes. Only flows that exist in the model can be selected.
When selecting the type there are 3 options.
The equation type allows you to either enter a value or define an equation. An equation can consist of constants but also elements of your model as variables.
Common system dynamics functions can also be used. The implementation in openLCA is guided by the XMILE Standard. More information on the standard can be found here. A list of the supported functions for the system dynamics implementation in openLCA can be found here.
When selecting the Lookup function type, several ways of how y-values are estimated can be selected:
Linear interpolation: Draw a straight line between known points.
Linear extrapolation: Continue a straight line beyond the known points.
Discrete (next lower): Use the closest lower entry from the table.
The equation for x can be anything that evaluates to a number. Right click on the Lookup table to add or delete rows.
When adding flows or auxiliaries to your model these can be edited similar to stocks. Adding product systems on the other hand requires you first to select existing a product system in your database.
In a second step, system dynamics variables (stocks, flows, auxiliaries) can be linked to your selected product system. The variable can be selected to overwrite your reference amount of the linked product system.
Or parameters used in your product system.
During the simulation, the system dynamics model variable values calculated at each time step will overwrite the linked parameter values in your selected product system. This occurs in each iteration of the defined timeframe, thereby producing change parameter values over time and therefore, changing product system results over time.
A further variable type is an array. Currently these cannot be edited and only be shown in imported models that include arrays.
You can run the model with “Run simulation” in the calculation setup tab.
You should always test the model first before trying to link it to an LCA model, as not all features of your system dynamics software may be supported yet. You will get an error message if the model is not supported:
If you are only interested in the system dynamics results, you can run the model without having linked product systems or selected an impact assessment method. Otherwise you can select an impact assessment method and run the simulation.
You will then get LCIA results for each simulation step with the corresponding model variables.
In openLCA 2 we added EPDs as new elements. EPDs in openLCA contain the LCA information that is part of an EPD
(not the technical product information) and the text "around" the EPD result that make a complete EPD.
EPDs in openLCA contain the full impact assessment results, per life cycle stage, for a given reference product unit.
In brief, openLCA allows users to perform versatility of functions that makes it easier and transparent to develop EPDs.
Users are always recommended to download and use the recent version of the EN15804+A2 add-on, created by GreenDelta GmbH in accordance with the EN15804 norm, and read the release notes, especially to note changes on the impact method calculations.
To create an EPD, you must create the processes of a target product. In the figure below, various processes are shown, each of which has been generated following the lifecycle stages nomenclature, according to EN15804+A2, and saved in a respective folder. The creation of these processes works in the usual way in open LCA (see create new process section).
It is recommended that you ensure that reference flow property matches the declared unit and it would be the same for each lifecycle stage.
In the next step, product systems must be created from the respective processes.
To do so, go to the "General information" tab in the respective process and click on "Create product system".
Do this for all processes which should be included in the EPD to include all relevant modules.
After the product system is created, you can calculate the impact results choosing a LCIA method.
To include the results in the EPD, the product systems must be calculated. To do so, go to the "General information" tab of the product systems and right click on "Calculate". This must be performed individually for each product systems that you want to include in your EPD.
"General information" tab of product system
After clicking on "Calculate", you will see the interface depicted below. Here, you must now choose the set of indicators you would like to calculate and select the calculation type "Eager/All". After this, the results will appear automatically.
Selection of Impact Assessment Methods in the calculation of a product system
In order to view the results of the LCA study for the product of interest in an EPD format per lifecycle stages, you can create a product system for each process as seen below.
Then, create a process system with the flow of each lifecycle stage added. After that, create a product system but make sure that you uncheck the “Auto-link Process”. Then, in the model graph tab of the newly created product system, as seen below, you can drag-and-drop the product system for each stage.
Then, as demonstrated in the image below, you can move the pointer to the flow of the product system (1) and drag it to the flow of the existing in the “Lifecycle” product system (2).
Eventually, you will be able to set-up the model graph using product system of each lifecycle stage as seen below.
Note: The picture above represent a simplification. In a real-life scenario you would most likely model the life cycle with items and product flows, therefore the graph would look more like the picture below:
Results for the calculated product system of “Lifecycle” can then be viewed in the following format:
Alternatively, you can create a new project with a report and add all the lifecycle stage product systems as seen below.
With this approach, you can view the results all together for all impact categories for each stage, as you can see below. You can be copy the results that are displayed this way and insert them directly into the EPD report.
openLCA allows to storing the results in order to use them for an EPD or in further calculations.
In order to save the result of the calculation of a product system (per LC module) go to the "General information" tab of that specific result. Click on "Save result as". In the window that opens select "As a result".
"General information" tab of a result
The results are now saved and available under the folder "Results". The results of the calculations of all product systems (LC MODULES) that could be included in the EPD must be saved additionally.
An EPD structure can be created in order to store the information using the official nomenclature of the life cycle stages. In openLCA 2.4 there are two ways to create an EPD, the first way is explained below in this section, while the the second way is described in the Analysis group section.
To create a new EPD you can now right-click on the folder "EPDs" and select "New EPD". In the window that opens, please name the EPD.
Creating a new EPD
Next, you need to navigate to the section "Modules" under "General information" of the EPD. Here, you need to add all modules that should be included. You must select your declared product (flow) in the respective section under "General information".
"Modules" section in an EPD
It is now possible to export the completed EPD, by clicking on "File" and selecting "Export". Select "JSON-LD" and click on "Next". Your EPD should be selected. Click on "Finish". Your EPD is now saved in the folder you selected. That allows to exchange with EPDs and send them to responsible parties.
EPDs are usually stored in a PDF format but now also come with a digital copy that can be imported into openLCA seamlessly through few clicks. In this subsection, we cover “Adding EPDs manually” in case an EPD does not have a digital copy and importing EPDs from online sources. In openLCA, EPDs can be imported via three ways:
To do so, you need to create a custom set of results by right-clicking on the "Results folder" and then "New results". In the pop-up box, insert the name of the life cycle module.
Creation of the result example
Next, the results can be completed by adding an impact category from the respective method. It can be done by clicking on "Impact assessment" field and browsing through the list of available categories
Adding results to an impact category
After all necessary impact categories are added, a full list of associated impacts can be seen. However, it is important to link the burdens to a specific flow that will represent a functional unit. Thus, an existing or a custom flow can be selected by right clicking the "Inventory results – Outputs" field and selecting the right option from the list. Once finished, it is needed to right click on the target flow and set it as a reference. The amounts of the output flow must correspond to the original EPD or converted according to the new functional unit with all of the associated emissions.
With openLCA v2.2, you can now access a wide range of ILCD nodes through the soda4LCA tool. This also includes various EPD-focused nodes, e.g. International EPD, ÖKOBAUDAT... The soda4LCA tool can be accessed by going to Tools > soda4LCA as seen below:
Then, a pop-up window shall appear where you can select the desired database node (host) as shown below and then click on "ok".
You can search the library by "EPD", "impact category", and more.
With an active database, it's possible, then, to import the results by right-clicking on the desired entry and selecting "import selected". To ensure a smooth integration of the EPD in your database, make sure that you use an EN15804-compatible database like the EN15804 version of ecoinvent or the EN15804-compatible method package, which is available for free on the same page. If your active database does not hold the required impact methods, e.g. as in the EN15804 version, openLCA might download them from the respective soda4LCA node, which will take time. Further, this can lead to corrupted EPDs in openLCA, as not all soda4LCA instances contain the referenced indicators and flows.
If you have imported an EPD, it shall appear under the "EPD" folder in the working database. If you have imported an impact category, it shall appear under the "impact categories" folder and so on. To integrate results of EPD into the product system, please refer to "Using results of EPDs in the product systems" section. Make sure that you use the same impact method to calculate impacts as it had been used to generate the EPD. Otherwise the impacts of the EPD will not be taken into account.
Tip: When importing an EPD result to include it in your product system in openLCA, make sure there is a product flow set as the quantitative reference under Inventory result → Outputs (as shown below). If no product flow was available, you can simply create a new one, add it to the outputs, and set it as the quantitative reference. This ensures the EPD integrates correctly into your system model.
With openLCA 2 it is now possible to download or upload EPDs to EC3 (Embodied Carbon in Construction Calculator)
by Building Transparency; requires access (account) to the respective OpenEPD API.
To access the EC3 with openLCA, go to under Tools → API Clients → Get EPDs from EC3. The following window will appear:
After registering on their website: https://buildingtransparency.org/auth/login, insert your user name, click on 'Login' and insert your EC3 account password. Once you are connected you can download via URL/ID, or search and import EPDs through directly in openLCA.
openLCA will try to match openEPD LCIA methods with the openLCA indicators in the active database automatically but this can be configured by the user individually.
The imported EPDs will be displayed in the navigation panel under EPDs. An EPD can contain multiple result modules and hence the results are stand-alone models too and can be flexibly combined in EPDs they have a quantitative reference and can be used in product systems.
It is also possible to upload your EPD drafts to the EC3 server. For this open an EPD and select "Upload (Update) EPD on results on EC3". For this, please fill out all the information required in particular the declared product and the URN.
Then a new window will appear and you can click on "Upload (Update)".
Then you can check your uploaded version under https://buildingtransparany.org/ec3/epds/URN (replace "URN" with your specific URN).
It is also possible to import EPDs that have an ILCD format (zip file), e.g. Environdec by using the import function whilst a EPD-suitable database is active.
Imported EPD appearing in EPD and Result folder
After the import, openLCA will display if the import process succeeded with or without any issues. Now, the EPD and the respective results will be found directly in both folders (EPD and Results)!
To connect EPD results to your product system, this can be done in two ways (1) adding the result output flow into your respective process (2) adding the result output flow through the model graph.
In openLCA v2.5.0, within the process, you can add the product flow corresponding to the EPD result as an input.
Then, as usual, use the provider dropdown to select the appropriate module (i.e., the process or result) you want to link to your system. Make sure that you still generate a product system prior to the calculations, as the 'direct calculation' function does not work for now in combination with results.
Bonus: If your product flow is connected to normal processes and results, results are indicated by [R] as a prefix.
Important: Make sure that the results you connect are holding the same impact assessment categories as the method you plan to use later for your impact assessment. If you choose another method, those results will not be taken into account (e.g. only EF 3.1 LCIA results can be used together with the EF 3.1 method; using TRACI will not take those results into account as the UUIDs of the categories do not match). You can, however, add categories from multiple impact methods and manually fill in the LCIA results to prevent issues (e.g. full sets of impact categories for both EF 3.1 and TRACI). This step is optional if the result already contains the inventory results, and it will calculate the impacts from these inventory results in that case. If both LCIA results and inventory results are available, openLCA will always prioritize the inventory results, regardless of the present LCIA results. You don’t need to fill in the 'LCIA method' field to use an EPD’s LCIA results in product systems. However, if you do select an LCIA method, you will then only be able to choose impact categories from that method.
You can also add the EPD result’s output flow directly via the model graph edit mode by drawing the connection between your process and the EPD result. This method offers a visual way to integrate the flow into your product system.
The introduced or saved results can be directly used in a supply chain.
The flow must be added to the inputs of a target inventory that will be connected with a respective result.
Linking the impacts with an inventory
Unlike the provider selection, the results can be connected to a respective flow only via the "model graph".
Thus, a product system needs to be created first. After the supply chain is created, it is needed to open the "model graph"
under the product system element and drag and drop the result into the editor area. It is important to keep
track and select the correct reference flow to be able to link to the result.
EPD example
Once the results are in the editor area, they can be connected to the flow manually. That is done by dragging a connection from the
target flow to the results element.
EPD example
After all connections are established and the target amounts are set, it is important to save all changes prior to performing the impact assessment. Then, the results can be analyzed as usual.
Notes:
For users using the Ecoinvent v3.9 EN15804+A2 add-on database or previous versions: EPDs imported via ILCD formats cannot be integrated into the results of the EPD when utilized as part of a product system that is created on openLCA. Therefore, you must manually add the EPD results OR map the impact categories of the EPD results by creating a new process and adding suitable elementary flows representing each impact category.
For users using the Ecoinvent v3.10 EN15804+A2 add-on database with openLCA v2.2: EPDs imported via the ILCD format can now be directly integrated into the product system. You should use openLCA v2.2 with the ecoinvent v3.10 EN15804 add-on to import the EPDs and map them to the impact categories. However, we advise you to always verify that the impact categories are mapped correctly, as the online repository from which the EPD is imported does not always link the impact categories to their corresponding unique identifiers accurately.
In openLCA 2.5.0, you have now access to a new API called ‘SmartEPD’ which can be found under ‘Tools → API Clients → SmartEPD (experimental)’
You are first required to register via: https://www.smartepd.com/request-access where you can then get your own API key via your own profile as seen below.
Back in openLCA, after clicking on ‘SmartEPD (experimental)’, a window shall appear where you shall insert the following URL: https://smartepd.com/api/ and the API key they received.
Then, the following window appears where you can see the projects you created on SmartEPD website along with the EPDs created in the project.
You are allowed to upload your EPD results created in your database by simply right-clicking on the EPD icon in the SmartEPD window.
A pop-up window shall appear where your can click on the EPD along with the respective results you wish to upload. After which you can go back to your project on the SmartEPD website and review your results uploaded under “Results”.
At this stage, you can only upload your results and not import any EPDs from SmartEPDs.
Libraries are a new feature in openLCA 2.0. They are a tool that allows faster impact calculations and the use of processes, flows,
impact categories etc. across databases. The faster impact calculations results arise from precalculated matrices (see section "Library file system" for more information). Databases can be exported as libraries and inversely these libraries can be added to existing databases.
The data from these imported libraries can then be used normally in the database for LCA modelling.
Additionally, libraries allow for a better overview when using the graphical editor as some detail is hidden without compromising
the accuracy of the impact calculations.
Example of a library product system displayed in the graphical editor of openLCA 2.0
Using libraries allows also for a more accurate data exchange with the Collaboration Server as library data will not be exchanged but
instead only referenced.
You can add a library to an existing database.
To do so:
right-click on the database you wish to add a library to
select "Add a library".
Right-click menu data appear in openLCA 2.0 when you click on an existing database
A window will appear in which you can select what library you wish to import into the database.
The drop-down menu allows you to choose one of the openLCA libraries. If you wish to import an external library,
you can do so by clicking on the button "Import from file …".
This will open a conventional explorer window from which you can import a zip-formatted library file.
For more information about zip-formatted library files, read the section "Library file system".
The dialog box that will open when selecting to add a library to a database in openLCA 2.0.
A drop-down menu allows one to select from the set of libraries saved.
Before finalizing the library import into the database, you will be asked if you wish to really add the library to the database.
Simply press enter to proceed.
Once added to the database, the processes, flows etc. will be available in the database.
You can recognize everything that was added from the library by its cursive font.
If you open a library-derived process, be aware that you will be unable to alter the amounts of the inputs or outputs.
If you wish to do so, you will need to copy the process in question and make your alterations to the copy. In every other respect, however, you can use processes, flows etc. from libraries just as you would with those native to the database.
Example of a library that was added to a database in openLCA 2.0
To export a database as a library, open the database you wish to export. In the menu bar of openLCA go to "Tools" -> "Libraries" -> "Export (experimental)".
Menu bar in openLCA 2.6 to carry out a library export
Note: The sign ‘(experimental)’ means that the feature is a work in progress at the latest version and hence not fully functional.
A window will appear in which you can choose the name of your library as well as the allocation method. The window includes four additional options:
With costs – includes the costs and revenues present in the database in the library.
Precalculate matrices – performs a full matrix inversion. This requires extensive memory and computation time. In addition, results are slightly more accurate when the inversion is not performed, so this option is not recommended for unit process libraries such as ecoinvent. However, for databases with a matrix structure, such as PSILCA, it is more appropriate to enable this option.
With uncertainty distributions – includes uncertainty distributions, if available, as defined per flow.
Regionalized – includes regionalized calculations, applicable when the database already contains regionalized flows (i.e., flows associated with specific locations).
Note: enabling precalculated matrices, regionalization, and uncertainty distributions may significantly increase memory usage.
Once all settings have been selected as desired, click “OK” to create the library.
A dialog box which appears in openLCA 2.0 when exporting a database as a library
At the bottom of the Navigation bar, a Library folder icon will appear, which is where you will find all libraries
you have created saved.
Examples of libraries in openLCA 2.0 that were created from existing databases
If you wish to delete a library, you can do so by right-clicking on the library you wish to remove and select "Remove library".
Make sure the library is not being used in any of your databases, since openLCA with check if the library is being used and not
let you delete the library if it is in use.
Right-click menu data appears when clicking on a library in openLCA 2
Libraries allow for fast regionalized calculations of impacts and work with numpy matrices to store information. In general, libraries are saved as zip-files that can be shared and imported into openLCA 2.0 database using the "Import from file …"
button.
A library contains the following files:
A.npy: This file stores the square A matrix in a numpy format.
Each column and row label represents a process-flow pair.
Along the diagonal (i.e. where the process-flow pair is identical both in the column and the row axis)
the value will be either 1 (for product flows) or -1 (for waste flows). All other entries within the matrix represent
the exchanges relative to the base value of 1 or -1 along the diagonal.
If an exchange does not occur in a certain process, the value in the square matrix will be 0.
All columns and rows are labeled numerically. These labels act as IDs and link to their respective process-flow
pairs reference IDs in the file indexA.csv.
Schematic representation of the A matrix saved in a numpy file in an openLCA library zip file
B.npy: This file stores the B matrix. This matrix is not square. The columns mirror the rows of the A matrix.
This means the columns again represent the same process-flow pairs of the rows in the A matrix.
However, in the B matrix the rows represent a pair of elementary flows and locations.
If the elementary flows are not regionalized, only the elementary flow will be indicated here.
If an elementary flow-location pair is not associated with a process-flow pair, the indicated amount in the matrix will be 0.
All columns and rows are labeled numerically. These labels act as IDs and link to their respective process-flow pairs reference
IDs (i.e. column labels) in indexA.csv as well as elementary flow-location pairs reference IDs (i.e. row labels) in indexB.csv.
C.npy: This file stores the C matrix. This matrix is not square and is the matrix for the characterization factors.
The columns of the C matrix mirror the rows of the B matrix. Therefore, the columns represent elementary flow-location pairs.
The rows in the C matrix represent the impact assessment categories. All columns and rows are labeled numerically.
These labels act as IDs and link to their respective impact assessment category reference IDs (i.e. row labels) in indexC.csv as
well as elementary flow-location pairs reference IDs (i.e. column labels) in indexB.csv.
INV.npy: This file stores the inverse of the A matrix (i.e. the row and column axes are flipped).
M.npy: This file stores the M matrix which is the product of the B matrix times the inverted A matrix (INV x B = M).
A.npz: This zip-file stores the same A matrix as the one that can be found in A.npy.
However, this is a version of that file with all zero-value entries removed to save memory.
B.npz: This zip-file stores the same B matrix as the one that can be found in B.npy.
However, this is a version of that file with all zero-value entries removed to save memory.
C.npz: This zip-file stores the same C matrix as the one that can be found in C.npy.
However, this is a version of that file with all zero-value entries removed to save memory.
indexA.csv: This file acts as a mapping file for the numeric column and row labels in the A matrix as well as the column labels in the B matrix.
These mappings associate these matrix labels with the reference IDs of their respective flows and processes in the database.
indexB.csv: This file acts as a mapping file for the numeric row labels in the B matrix as well as the column labels in the C matrix.
These mappings associate these matrix labels with the reference IDs of their respective elementary flows and locations in the database.
indexC.csv: This file acts as a mapping file for the numeric row labels in the C matrix.
These mappings associate these matrix labels with the reference IDs of their respective impact assessment categories in the database.
library.json: This file contains meta data about the library itself. Parameters include the library name and if the library is regionalized or not.
meta.zip: This file contains a folder system of openLCA types (e.g. Processes, Flows, Impact Assessment Categories etc.).
Within these folders, you find the respective openLCA type’s JSON-LD files which mirror the entries in the adjoined openLCA
database from which the library was derived.
However, it should be noted that these JSON files do not contain any of the relative amounts associated with each object
(e.g. exchanges or impact fact values), as these are contained within the matrix files.
Only the process JSON-LD-files contains a reference to the respective 1 values within the A matrix
(the values that sit long the diagonal line) to allow for an association between matrix system and the JSON-LD files.
openLCA provides powerful scripting capabilities to automate tasks, analyze models, and integrate
life cycle data into external tools or workflows. There are the following approaches for scripting in openLCA:
Jython (Python) scripting within the openLCA application itself
Inter-process communication (IPC) using the openLCA IPC API
Using Structured Query Language (SQL) queries in openLCA
Both approaches enable automation and interaction with openLCA models, but they differ significantly
in how and where scripts are executed, their use cases, and their limitations.
Jython is a Python interpreter for the Java platform, and its interpreter
is embedded within the openLCA application. Python scripts are compiled to Java bytecode and
executed in the same Java runtime environment in which openLCA runs. This allows the scripts to
directly access and interact with openLCA’s internal resources—such as the user interface, the
current database connection, and other Java components.
It’s ideal for small tasks, data extraction, custom calculations, or batch modifications within the
openLCA GUI. Since Jython runs inside openLCA, you have access to internal variables like the
current database connection and the graphical interface.
📘 We provide a dedicated manual for Jython scripting in openLCA, including real-world examples:
Jython scripting manual.
You can also check out some examples on our
GitHub.
The openLCA IPC (Inter-process communication) protocol allows you to control openLCA from an
external script or application. This is especially useful for integrating LCA calculations into
automated workflows, external tools, or larger systems. The IPC protocol is language-agnostic and
can be used by any application written in any programming language (e.g. Python,
JavaScript/TypeScript, .Net, Go, etc.).
This protocol is provided by an openLCA IPC server, which can either be a running instance of the
desktop application or a web server with an openLCA back-end. An application can connect to such an
IPC server to call functions in openLCA, perform calculations, or interact with the database
remotely.
📘 To get started, check out the official API documentation:
openLCA IPC API.
You can also check out some examples on our
GitHub.
Both Jython scripting and IPC scripting offer powerful ways to interact with openLCA—but which one
is right for your use case? The decision depends on factors like whether you prefer scripting inside
openLCA or from an external environment, the level of integration needed, and how your workflow is
set up.
To help you decide, we've created a comparison table that highlights the key differences between the
different approaches.
Jython
IPC
SQL
Can I use this without writing any code?
❌ No
❌ No
❌ No
Can I use it directly inside the openLCA desktop application?
✅ Yes
⚠️ Only as server
✅ Yes
Can I automate repetitive tasks inside openLCA?
✅ Yes
✅ Yes
✅ Yes
Can I import data from Excel files (e.g. .xlsx) programmatically?
✅ Yes
✅ Yes
❌ No
Can I export data or results to Excel automatically?
✅ Yes
✅ Yes
⚠️ Difficult
Can I generate custom reports (e.g. Excel summaries, Word reports, etc.)?
✅ Yes
✅ Yes
❌ No
Can I create/modify processes, flows programmatically without persisting?
✅ Yes
✅ Yes
❌ No
Can I run SQL commands directly on the openLCA database?
✅ Yes
❌ No
✅ Yes
Can I use modern Python libraries like NumPy, SciPy, pandas?
❌ No
✅ Yes
❌ No
Can I run scripts from outside openLCA (e.g. from VS Code)?
⚠️ Difficult
✅ Yes
✅ Yes
Can I integrate openLCA with other tools or workflows (e.g. REST APIs)?
⚠️ Difficult
✅ Yes
⚠️ Difficult
Can I schedule calculations or run them in the cloud?
❌ No
✅ Yes
❌ No
Can I use it with other languages than Python (e.g. JavaScript, Go, .NET)?
❌ No
✅ Yes
❌ No
Does it integrate autocompletion and type annotations?
⚠️ Difficult
✅ Yes
❌ No
Nore: Some of the features above can also be done in openLCA without the need for any
additional scripting. For example, you can use the openLCA GUI to import and export data from/to
Excel files or run SQL commands directly on the database.
openLCA offers the option for users to access and edit the database directly via SQL queries, either from the integrated SQL Query Browser (Tools --> Developer Tools --> SQL) or by establishing a connection to external SQL clients. Through SQL, modellers can make mass changes to database elements, such as adding parameters, adding exchanges and editing processes, for instance.
However, an Apache Derby database engine is used. As such, SQL queries you write must be valid according to Derby’s SQL syntax. Some features or functions that exist in other databases may not be available or may require different syntax.
Note: Don't try to open an active database with external SQL clients. Importantly, when adding new database elements, the SEQ_COUNT of the database needs to be updated to reflect the number of elements added. This could be solved through simple queries like (for an example of adding 20 new elements): UPDATE SEQUENCE SET SEQ_COUNT = SEQ_COUNT + 20
With the general advancement of Life Cycle Assessment (LCA) and the spreading of Life Cycle Thinking (LCT), collaborative work on LCA studies becomes increasingly common e.g. within a company or team at the same location, within a company or team at different locations within multilateral projects (e.g. in research) on an international level and under participation of various entities such as companies, universities or consultancies as well as co-development of an LCA among executing contractors and clients. Moreover, it is becoming increasingly commonplace to use reference data for background processes, elementary flows, impact assessment methods, and other elements of existing LCA models. Often sharing of reference data for updating databases and distribution to users who are (also) distributed comes along with technical issues. In addition, quality assurance and review of LCA models through an external reviewer is of interest for anybody who wants to create a consistent LCA database.
The LCA Collaboration Server, now in version 2.0, is a server application that complements openLCA (the LCA desktop application). It is available for free, and support is available on demand.
This section is designed to be your quick reference guide, providing you with essential tips, shortcuts, and key insights to maximize your efficiency and productivity when working with openLCA. Whether you are a seasoned user seeking time-saving techniques or a newcomer looking for a comprehensive overview, this cheat sheet will empower you to navigate openLCA's features with ease and confidence.
Let's dive in and unlock the full potential of openLCA together. Happy exploring!
The "Usage" function allows you to find where the selected "Flow", "Process" etc. is utilized within the system. For this, right-click on a database element:
After clicking on "Usage", the following window will show where the selected process is used:
This function it’s helpful for example if you want to delete a connected process/flow.
Note: Moreover, the "Used in processes" section in every product or waste flow (General information tab) shows you a more detailed "Usage" information.
openLCA provides the flexibility to calculate the impacts of processes directly, without the need to create product systems. You can either use the "Impact analysis" tab (only direct impacts) or the "Direct calculation" function directly within a process.
If you don’t want to generate a product system to calculate the direct impacts of a process, you can directly use the "Impact Analysis" tab in processes! It enables you to select raw materials and services with low environmental impacts directly from a LCI database without the need to create a product system.
In the "Impact Analysis" tab of a process, the process's direct impact is calculated. Hence, only elementary flows present in this process will be considered (no upstream impacts). You can choose the impact assessment method directly within the tab and the results will dynamically update accordingly.
Impact analysis of a process representing the direct impacts
A fast way to perform overall calculations without generating a product system is by using the "Direct calculation" button in the "General information" tab of a process. This feature generates an in-memory product system comprising all processes in the database.
Direct calculation option in the "General information" tab of a process
However, accurate results are only obtained when there are unambiguous connections between these processes.
For example, each product should have a single process responsible for its production, and every product input should have a default provider assigned. To ensures the integrity of the connections (linking) between processes in the database, you can navigate to "Database → Check linking properties" or use the "Check linking" option in the pop-up window after selecting "Direct calculation".
Check linking prior calculation
The main advantage of "Direct calculation" is its efficiency in terms of memory usage. It eliminates the need to create a product system in advance, offering a practical solution. This is particularly advantageous for large databases such as PSILCA, exiobase, and GaBi.
It is possible to simply copy data from Excel into a process in openLCA, as long as the Excel table have the same column structure and column headings of the process inputs/outputs table in openLCA. See below.
Excel template
Paste Excel data into a process in openLCA
Copied data:
Copied Excel data in openLCA
To select specific columns and rows for copying, follow these steps:
Click on a cell within the table to begin the selection.
Hold the "Shift" button on your keyboard.
Click on another cell in the table to mark a range of rows and columns.
All the rows and columns between the initial and final selection will be highlighted.
In openLCA, tags are a feature used to organize and search data objects within the software.
They provide a way to assign labels or keywords to elements in your LCA model, such as processes, flows, or impact categories and can be later used to analysze your results or organize your data by tags.
Each element within openLCA can have multiple tags associated with it. To add tags, navigate to the "General information" tab of a flow, process, product system, impact category or the "Project setup" tab of a project,
and click on "Add a tag." A wizard will appear, allowing you to specify the tag's name and provide a description.
In contrast to using the "Grouping" function in openLCA, you can also analyze your results by using tags that have been added to flows/processes/product systems.
To display the "Tags" tab in the results you have to activate the options prior in the Preferences:
After restart of openLCA, you will be able to analyze your results by the provided tags:
For some databases, e.g. ecoinvent, tags are already provided. Hence, you can analyze your results accordingly. As you can also assign several tags to a flow/process/product system, multiple mentioning in the "Tags" tab can occur.
In addition, users can filter by tags on the Collaboration Server, which is a great way to locate and organise shared data
if a consistent tagging system is used within the team.
When you add a formula in openLCA (e.g. in the amount cell of Inputs/Outputs tab), the formula interpreter allows you to use these constants, operators and functions.
Being able to filter for flows using names, CAS numbers or chemical formula is especially useful when working with large databases or when you need to ensure that a specific chemical substance is correctly identified. Many chemicals may share similar names or abbreviations, but each has a unique CAS number. Using this feature helps you quickly locate the exact flow you need, avoid mismatches, and maintain consistency in your LCA modeling, particularly when mapping flows or integrating external datasets.
The database Content function allows you to filter "Flows" of the active database where the selected. As visualized the Flow type, name, category, reference unit, reference flow property, chemical formula, UUID as well as the CAS number are displayed.
By entering the CAS number in the empty cell, you can filter the flows by the CAS number:
The data is extracted from the flow's meta data with is found here.
Another option is to make use if the tag function in openLCA as we tagged in the most recent ecoinvent database version each flow and process with a chemical with the respective CAS number.
The chapters in the sidebar are now collapsed bu default at the first level when opening the manual. They can be expanded manually or browsed in the new TOC (see point below).
EPD chapter improved with the new section "Calculate impact assessment", where you can find the different possible ways to calculate the impact assessment in EPD format.
Improved user interface, including a resized search box for certain display resolutions and a refined dark mode theme
Major memory reduction for regionalized LCIA, resulting in smoother performance and making calculations more accessible for users with limited system resources
Faster calculations overall, including direct impact calculations
Bug fixes from v2.6.0 for a smoother user experience
Easier deletion of process chains in the graphical editor (Model Graph)
Better support for opening Python scripts on macOS and Linux
An updated documentation tab in the process editor, now featuring many more fields for ILCD compatibility, including multiple reviews, compliance declarations, and flow completeness.
An improved ILCD import (also for EPDs),
A soda4LCA tool for searching and downloading datasets from soda4LCA online databases (see Tools → soda4LCA andKnown hoststhen for pre-configured database connections),
Enhanced internationalization of messages, popups, and labels, increasing coverage by 70%. More translations and additional languages will be added soon.
Bug fixes: the system should no longer crash due to 0-values in product outputs and waste inputs (e.g., in LCA commons). The validation process will now also detect these flows.

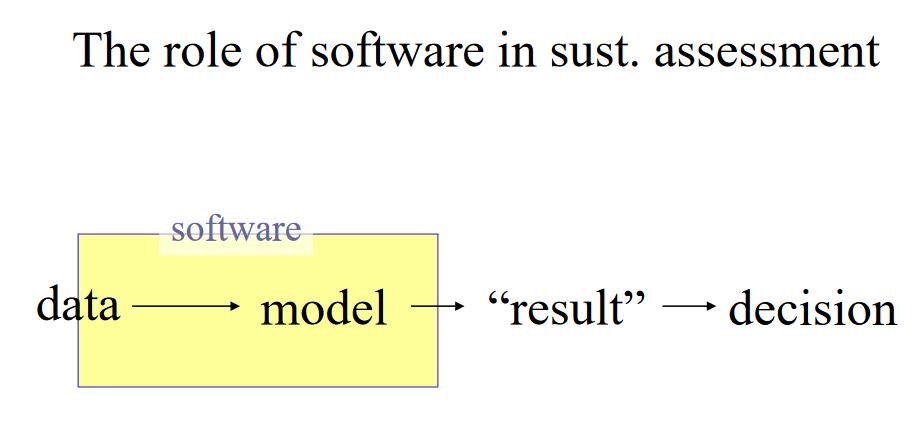

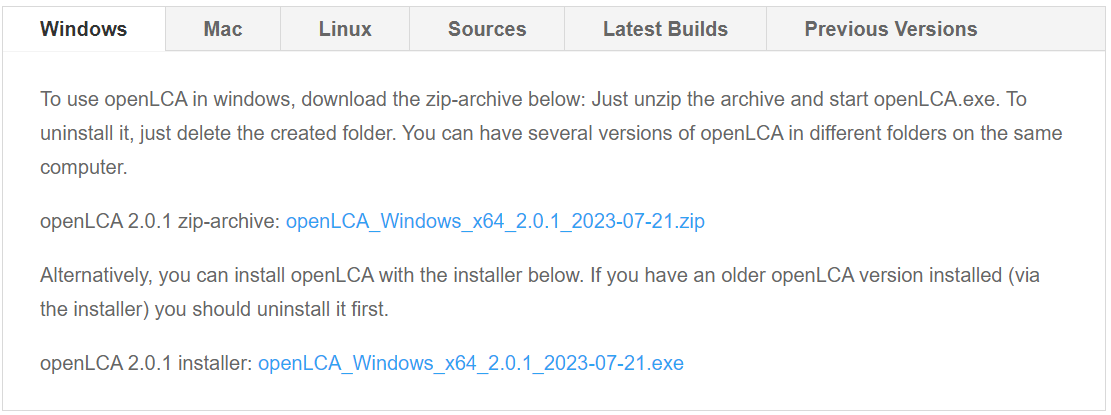
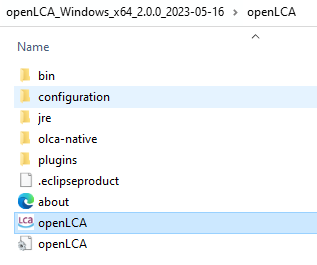

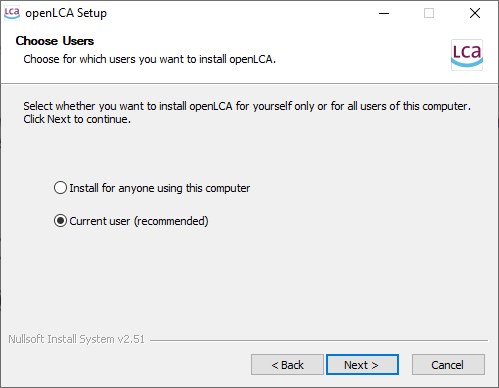
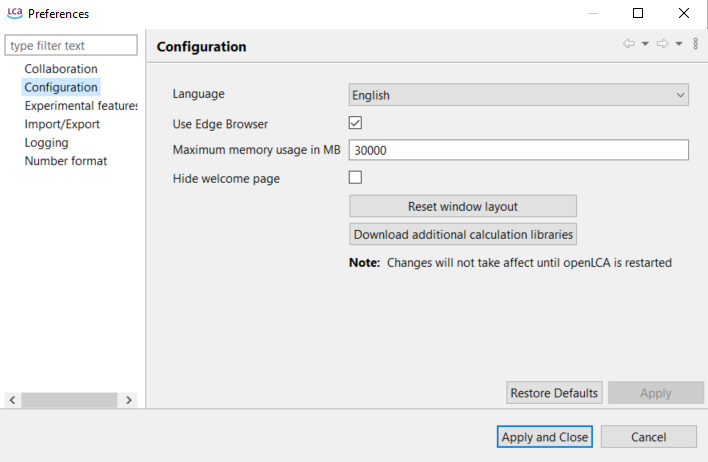
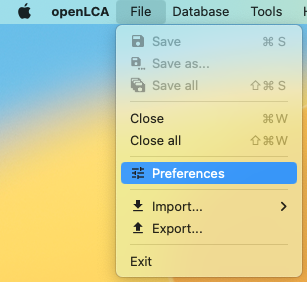
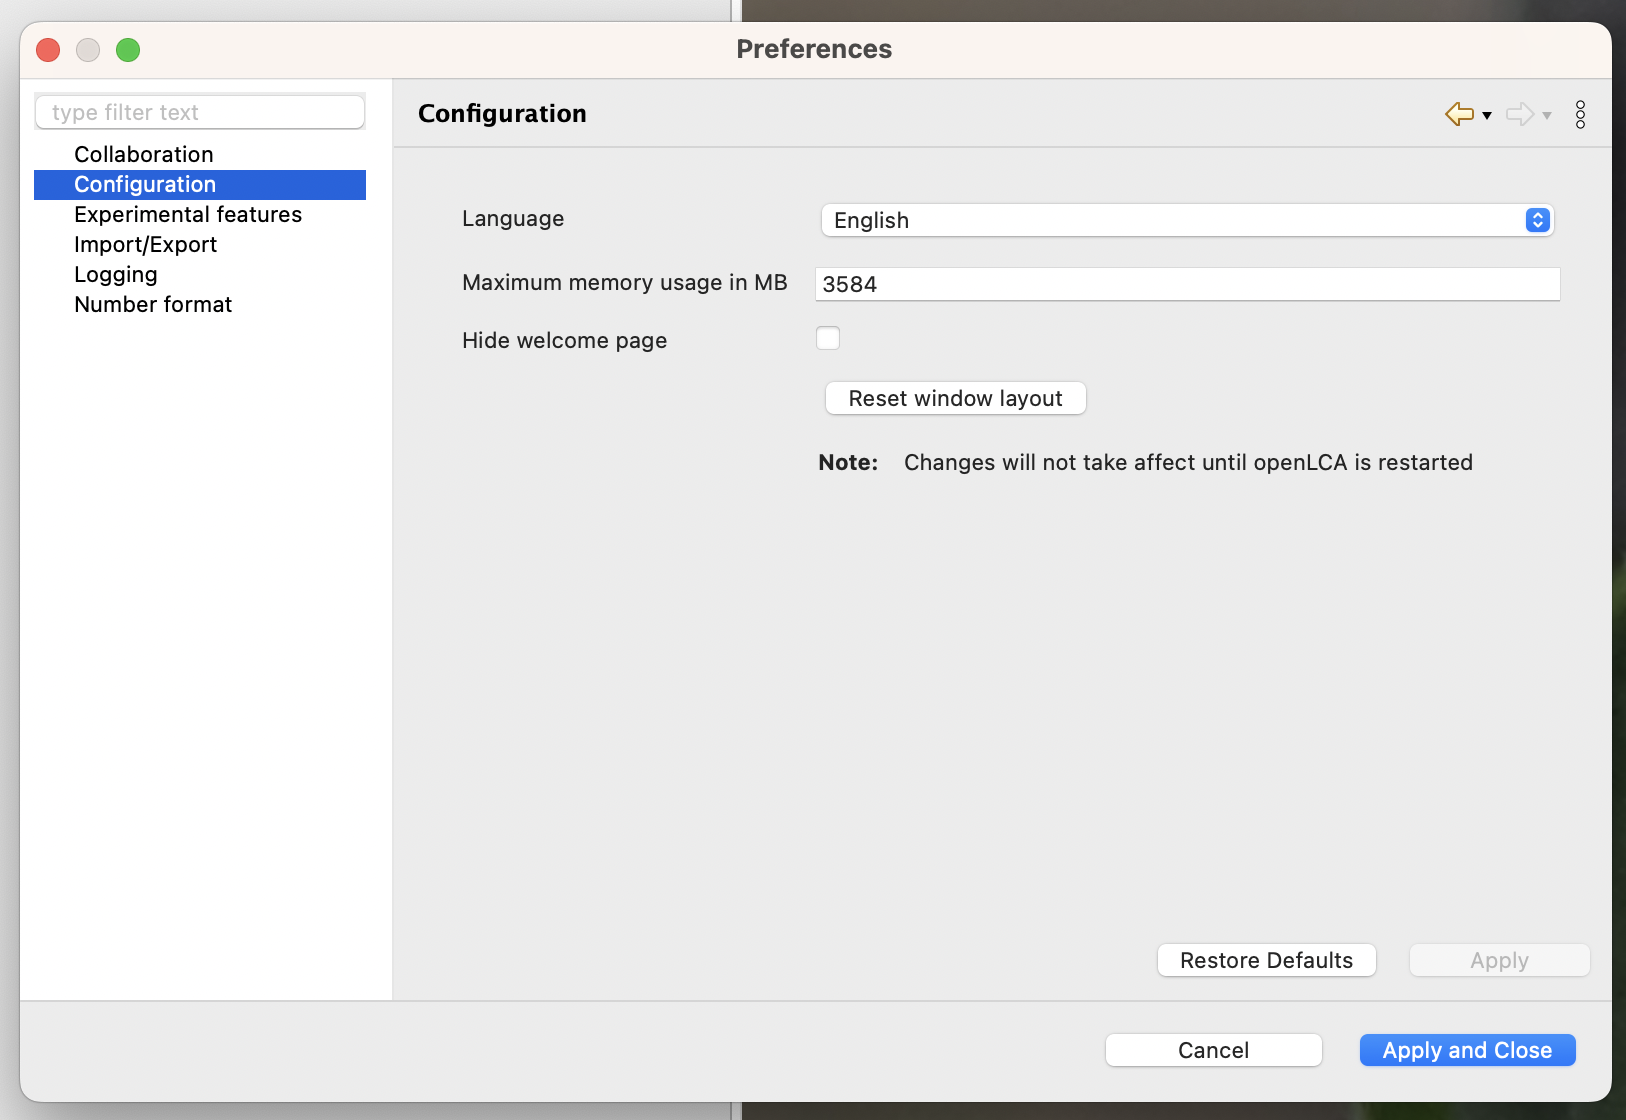
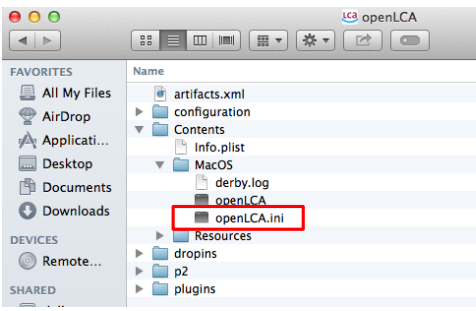
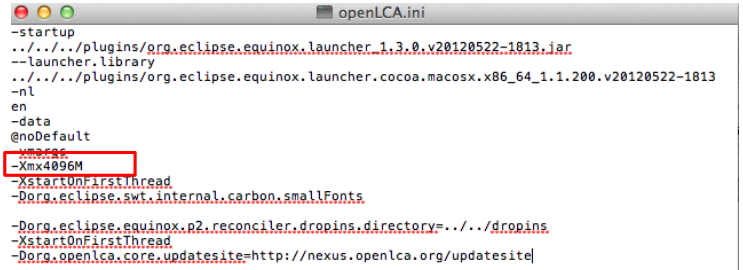


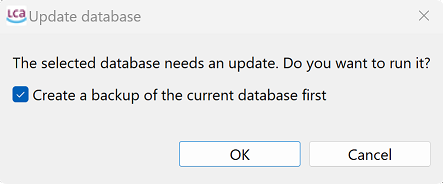

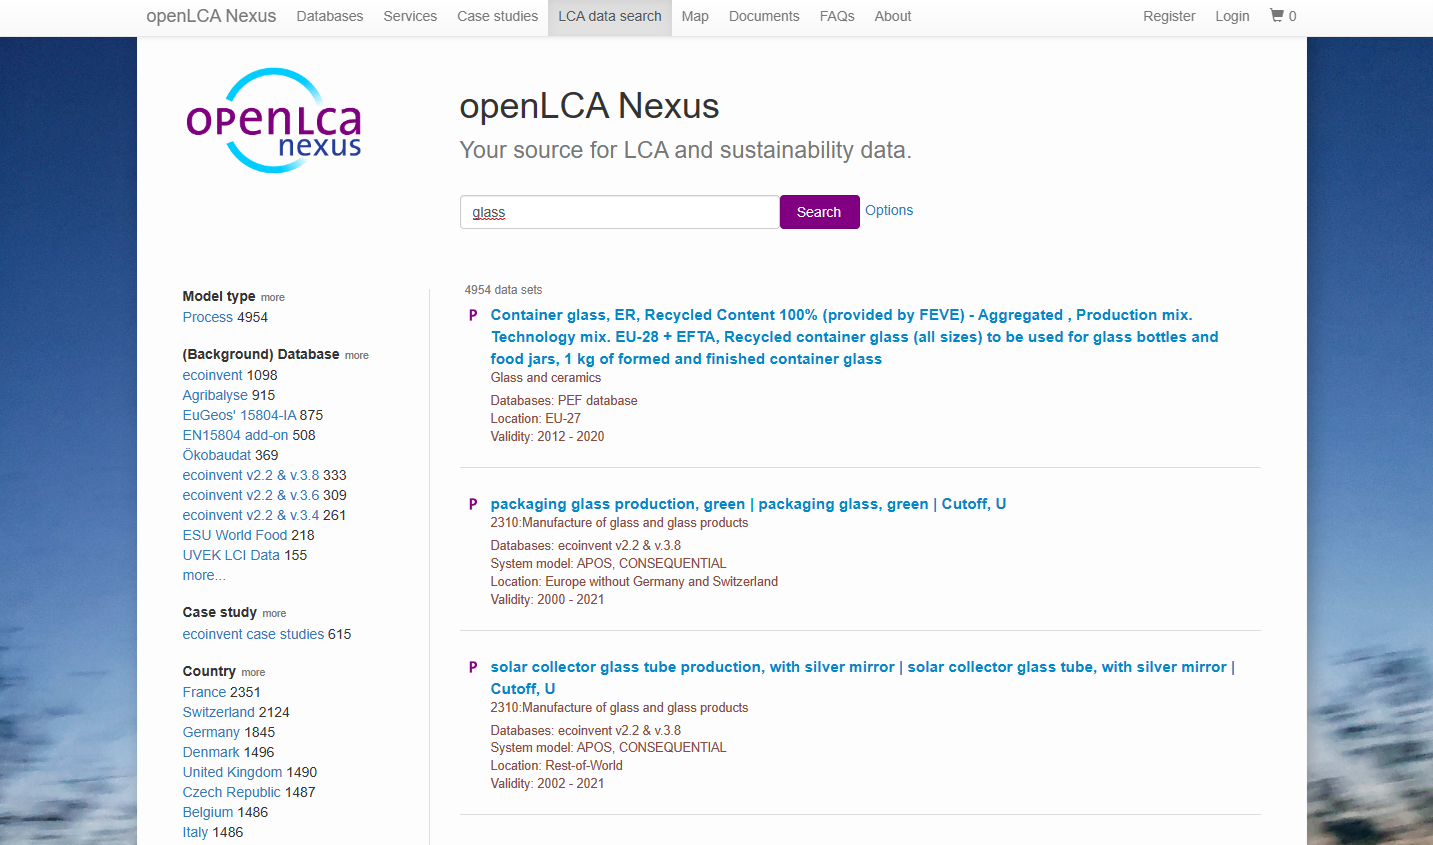 openLCA Nexus homepage search function
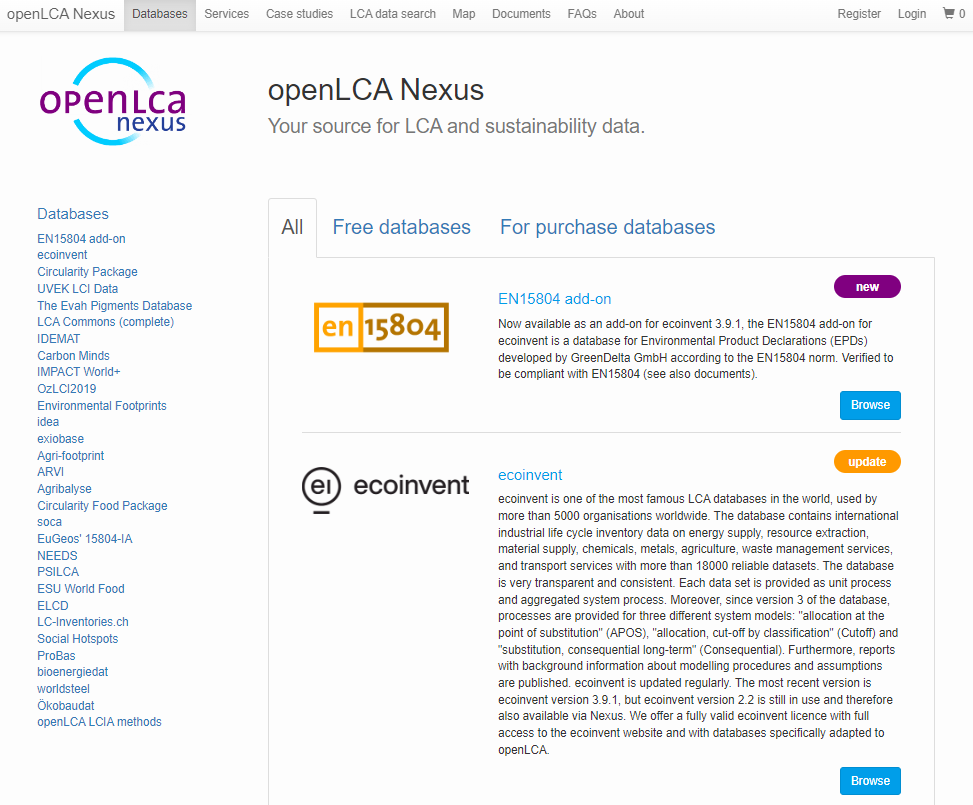
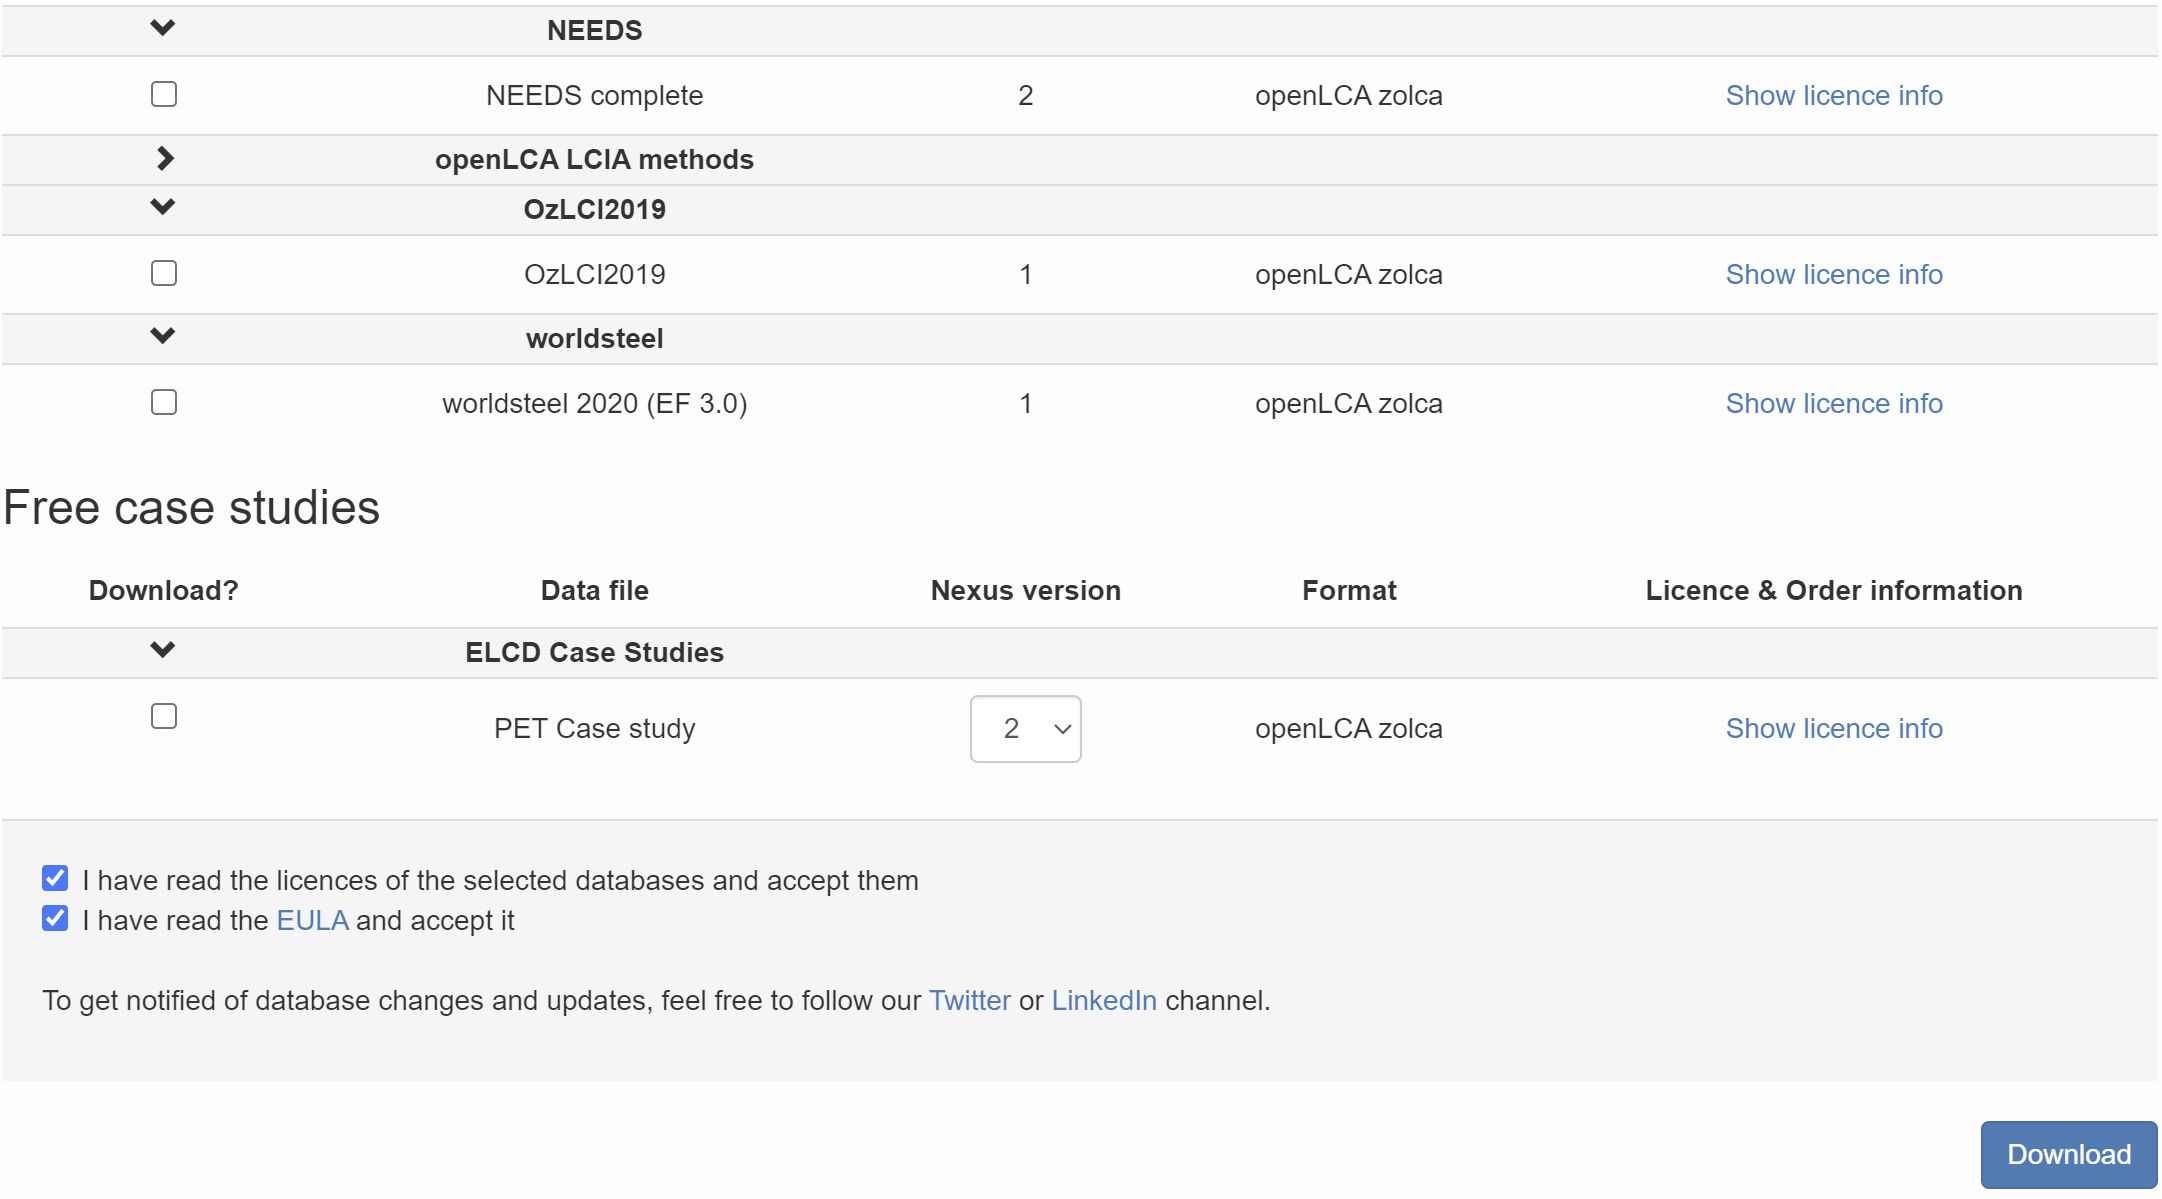 Downloading a database from Nexus
 Downloading a database from Nexus
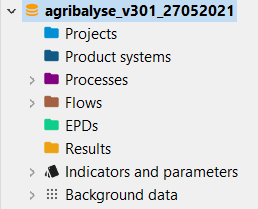
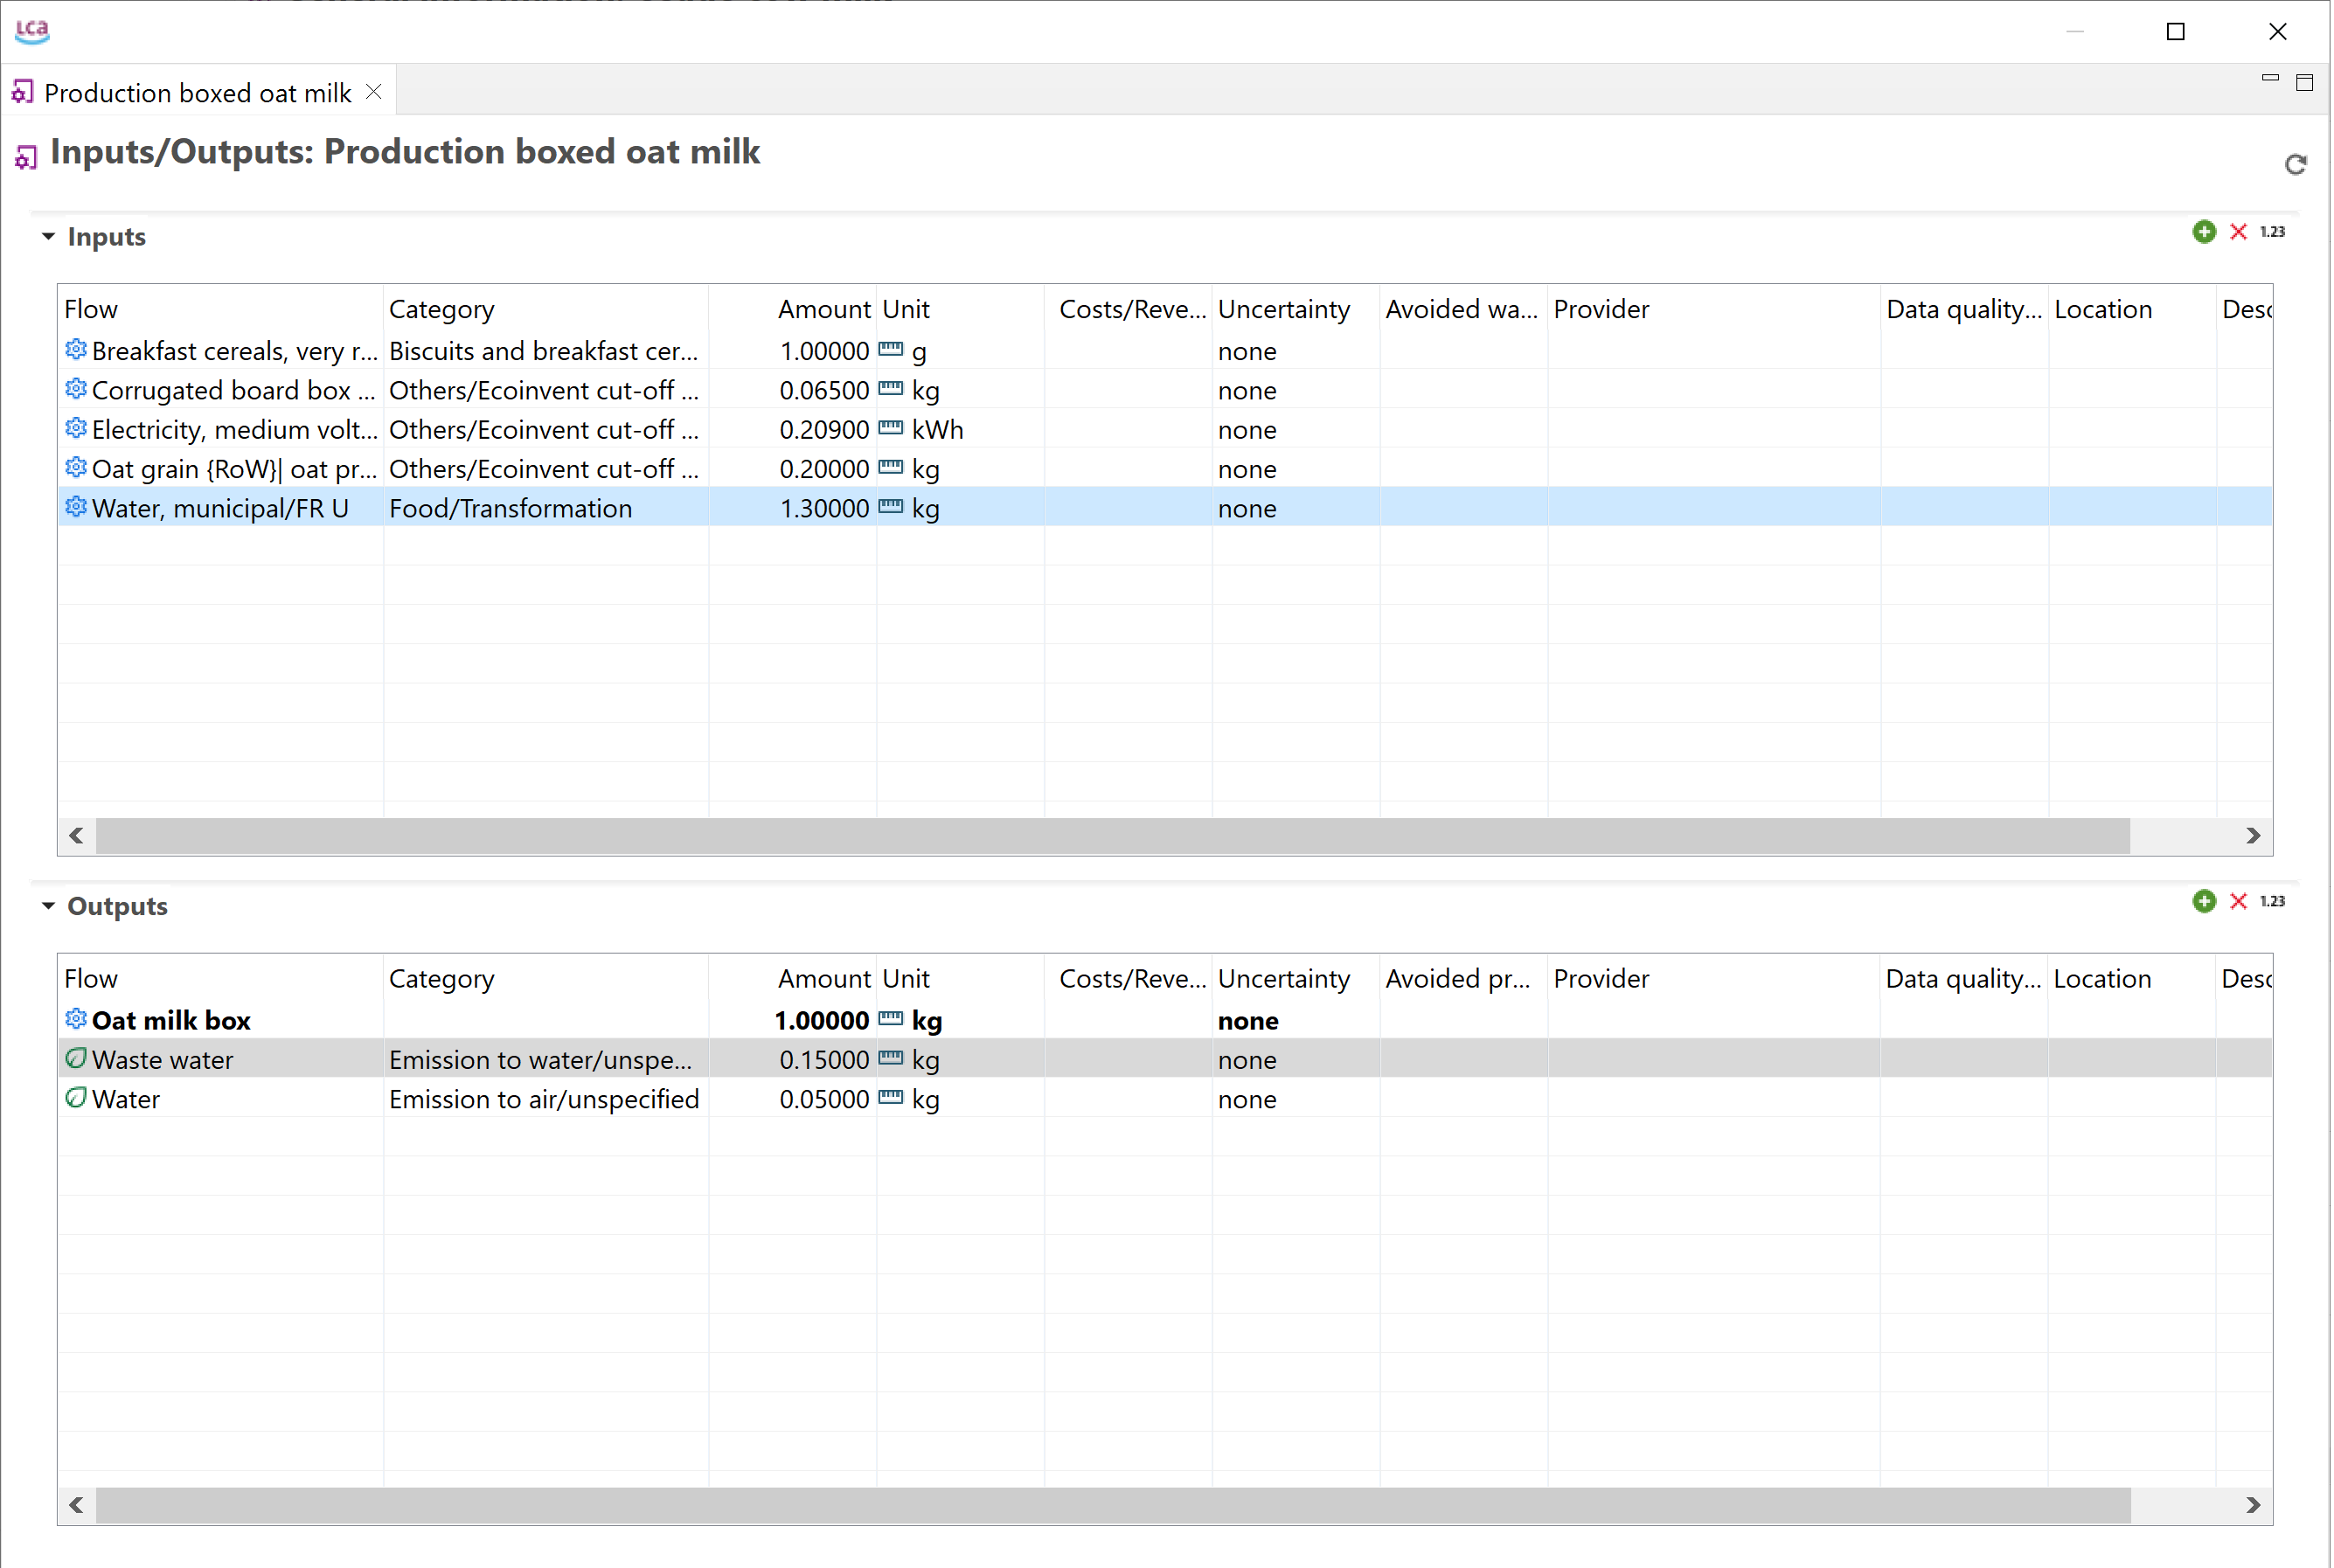 Process representing the production of an oat milk pack, with its input and output
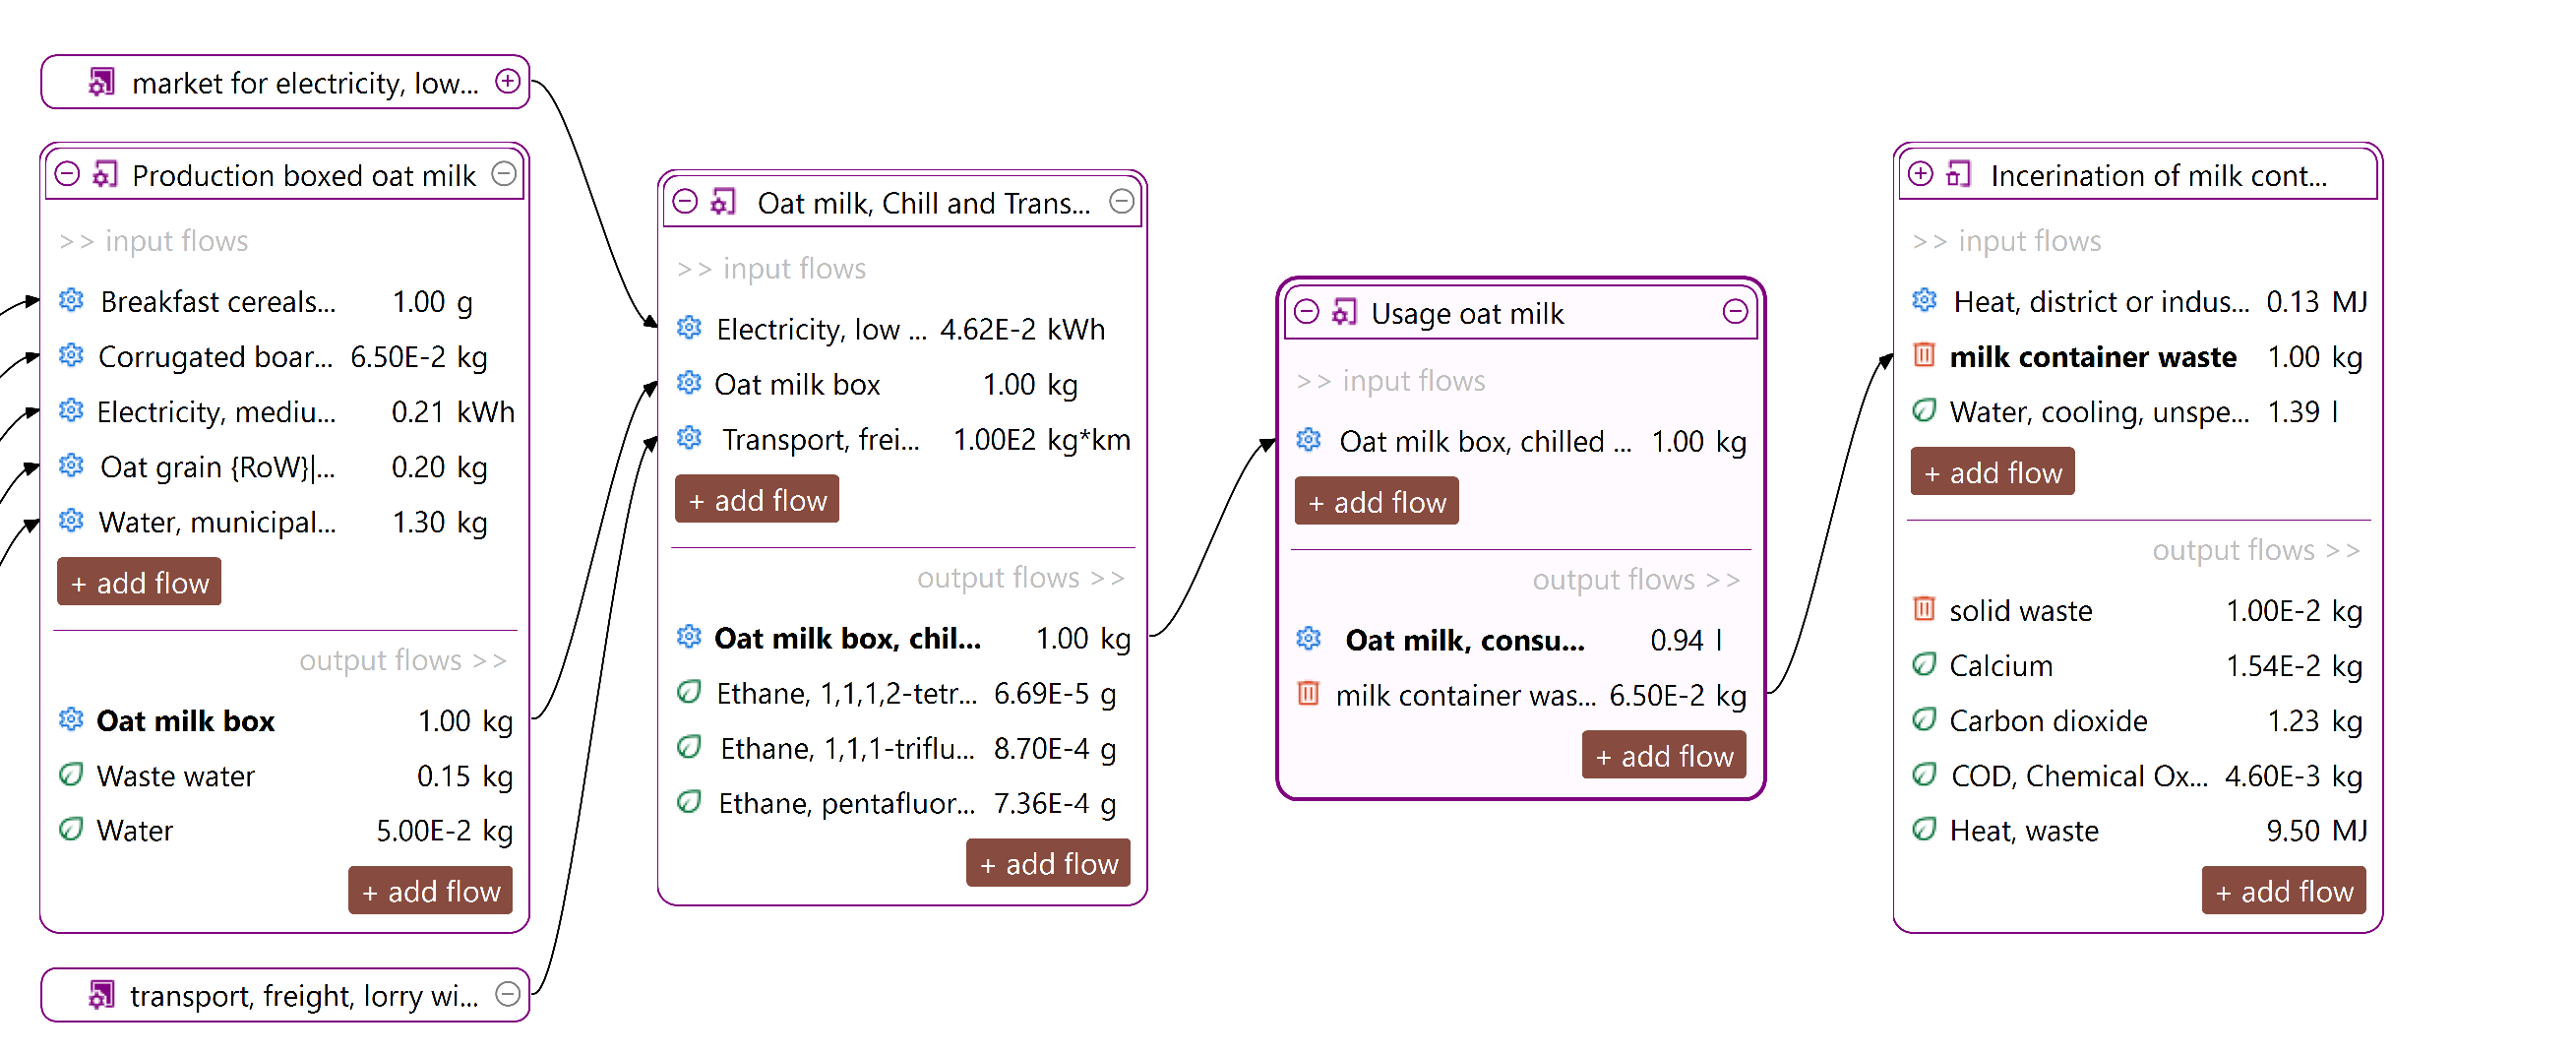 Life cycle model of an oat milk pack, with all its interconnected processes
 Life cycle model of a cow milk pack, with all its interconnected processes
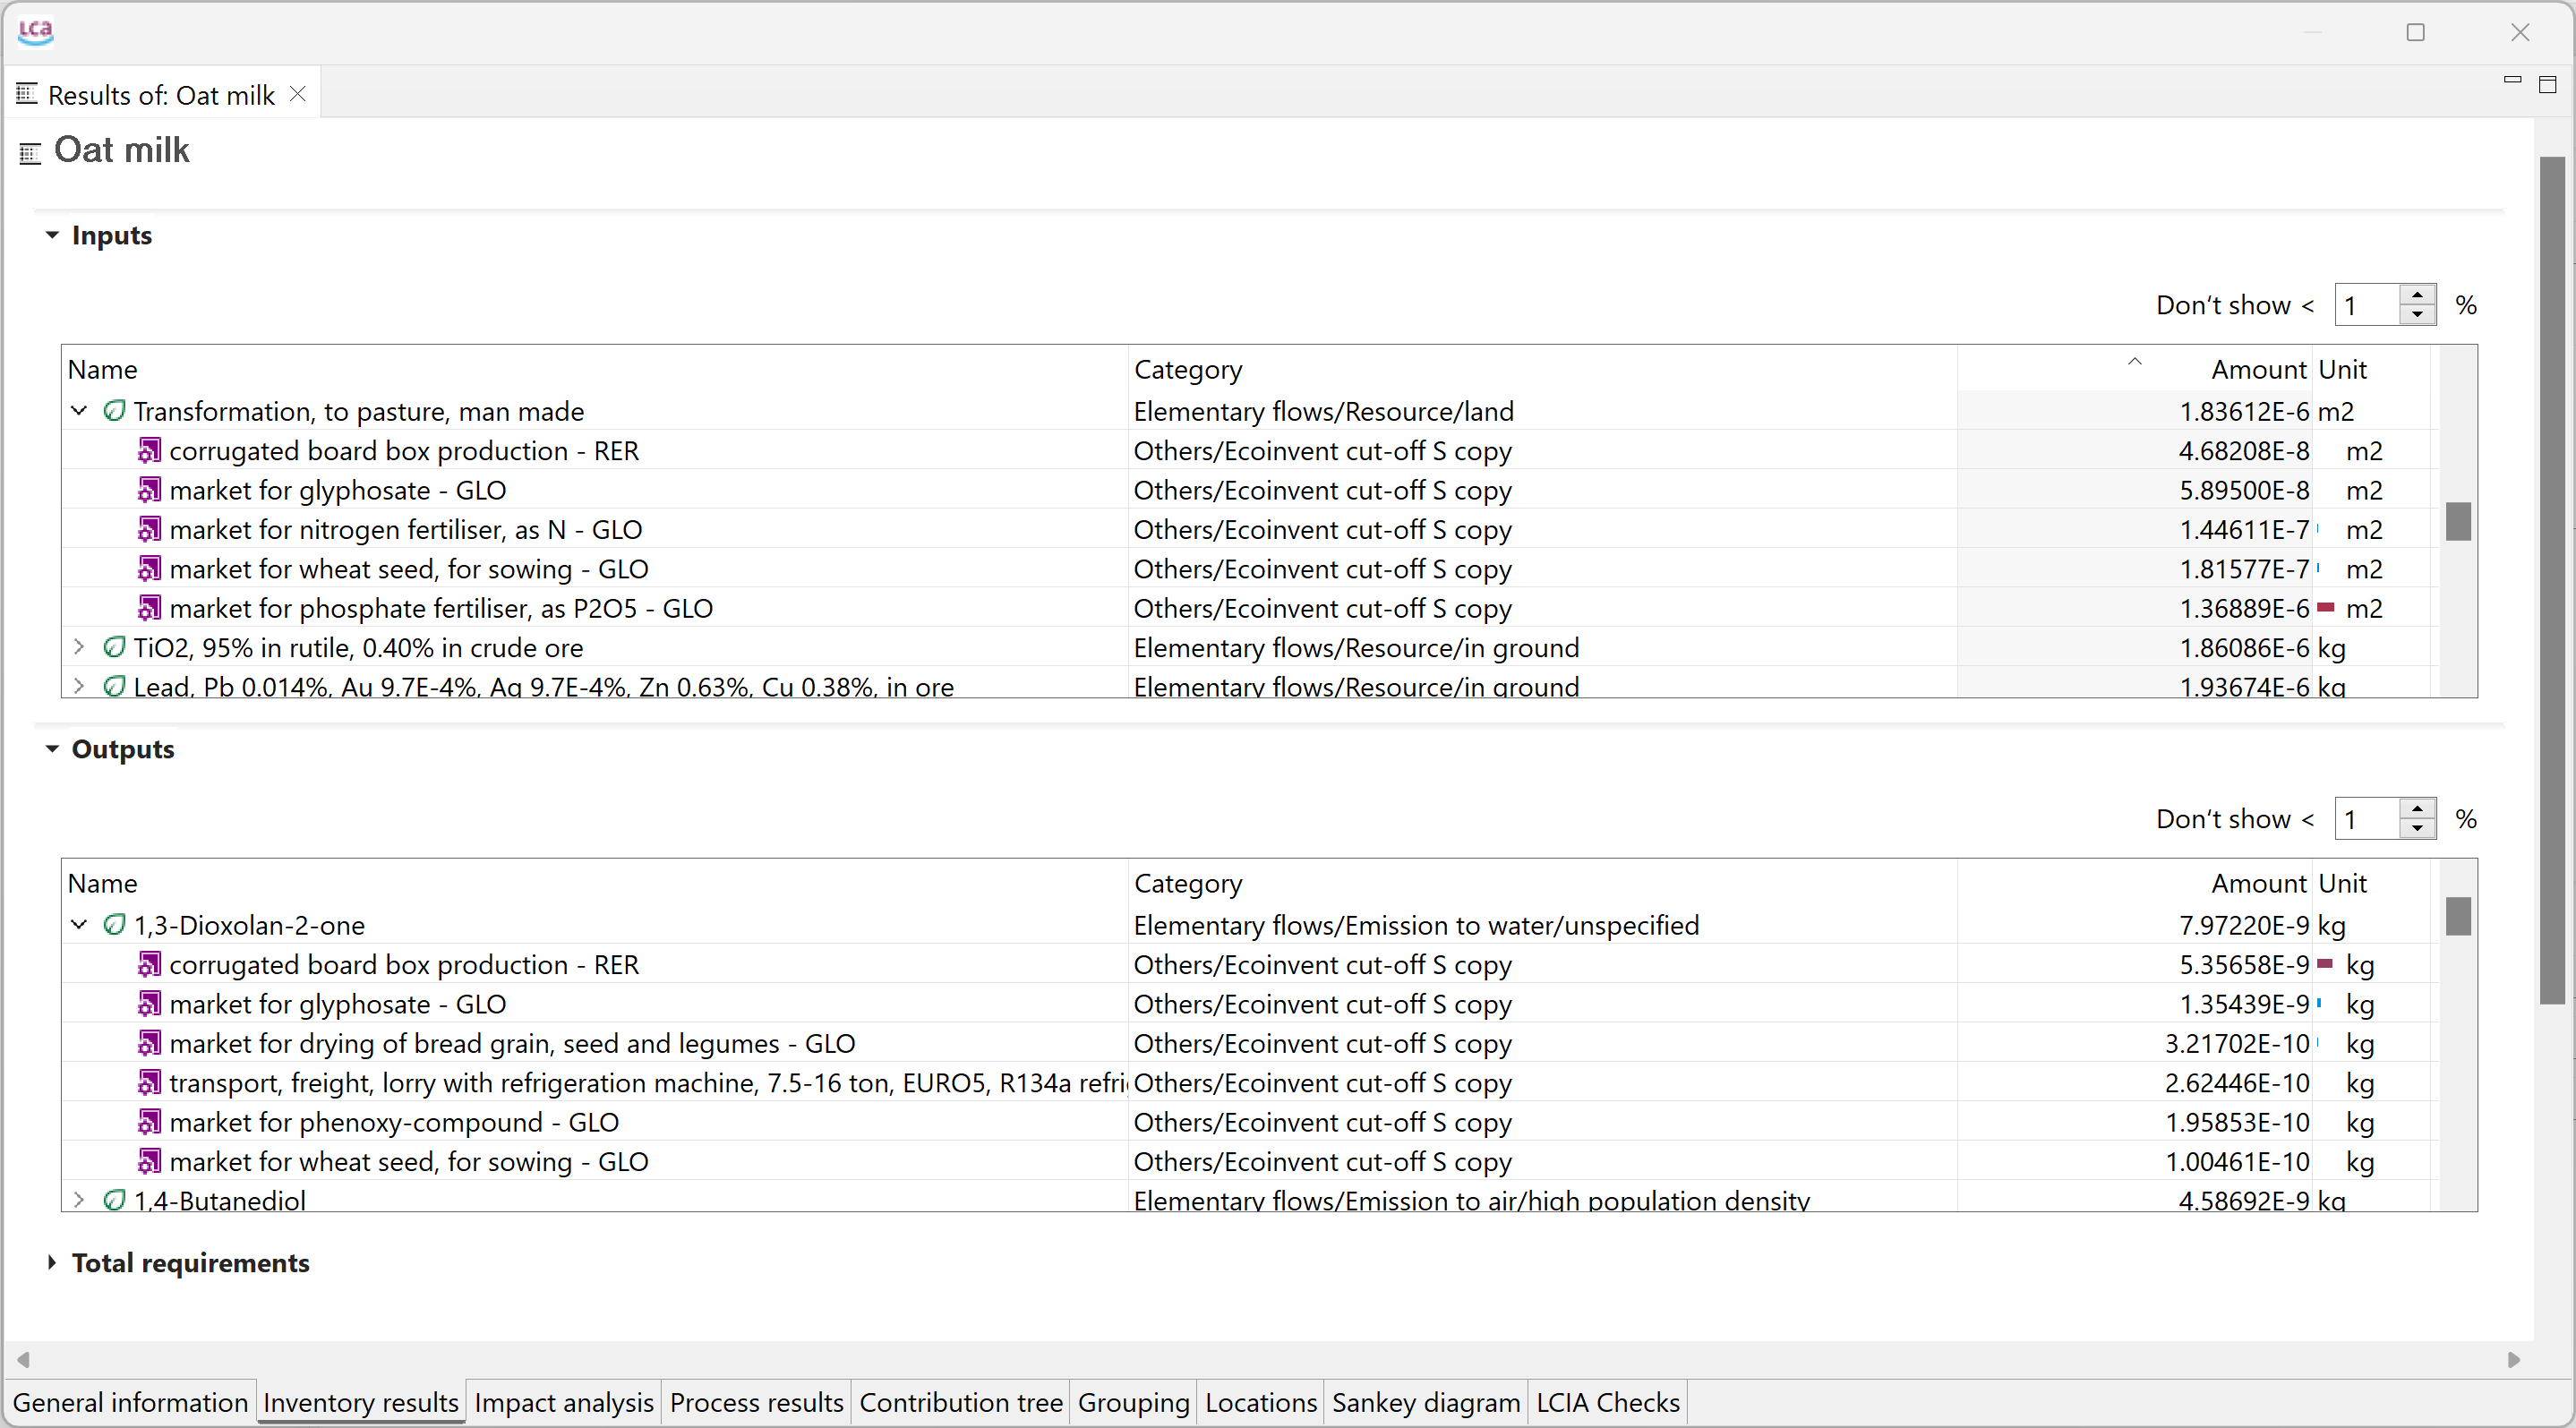
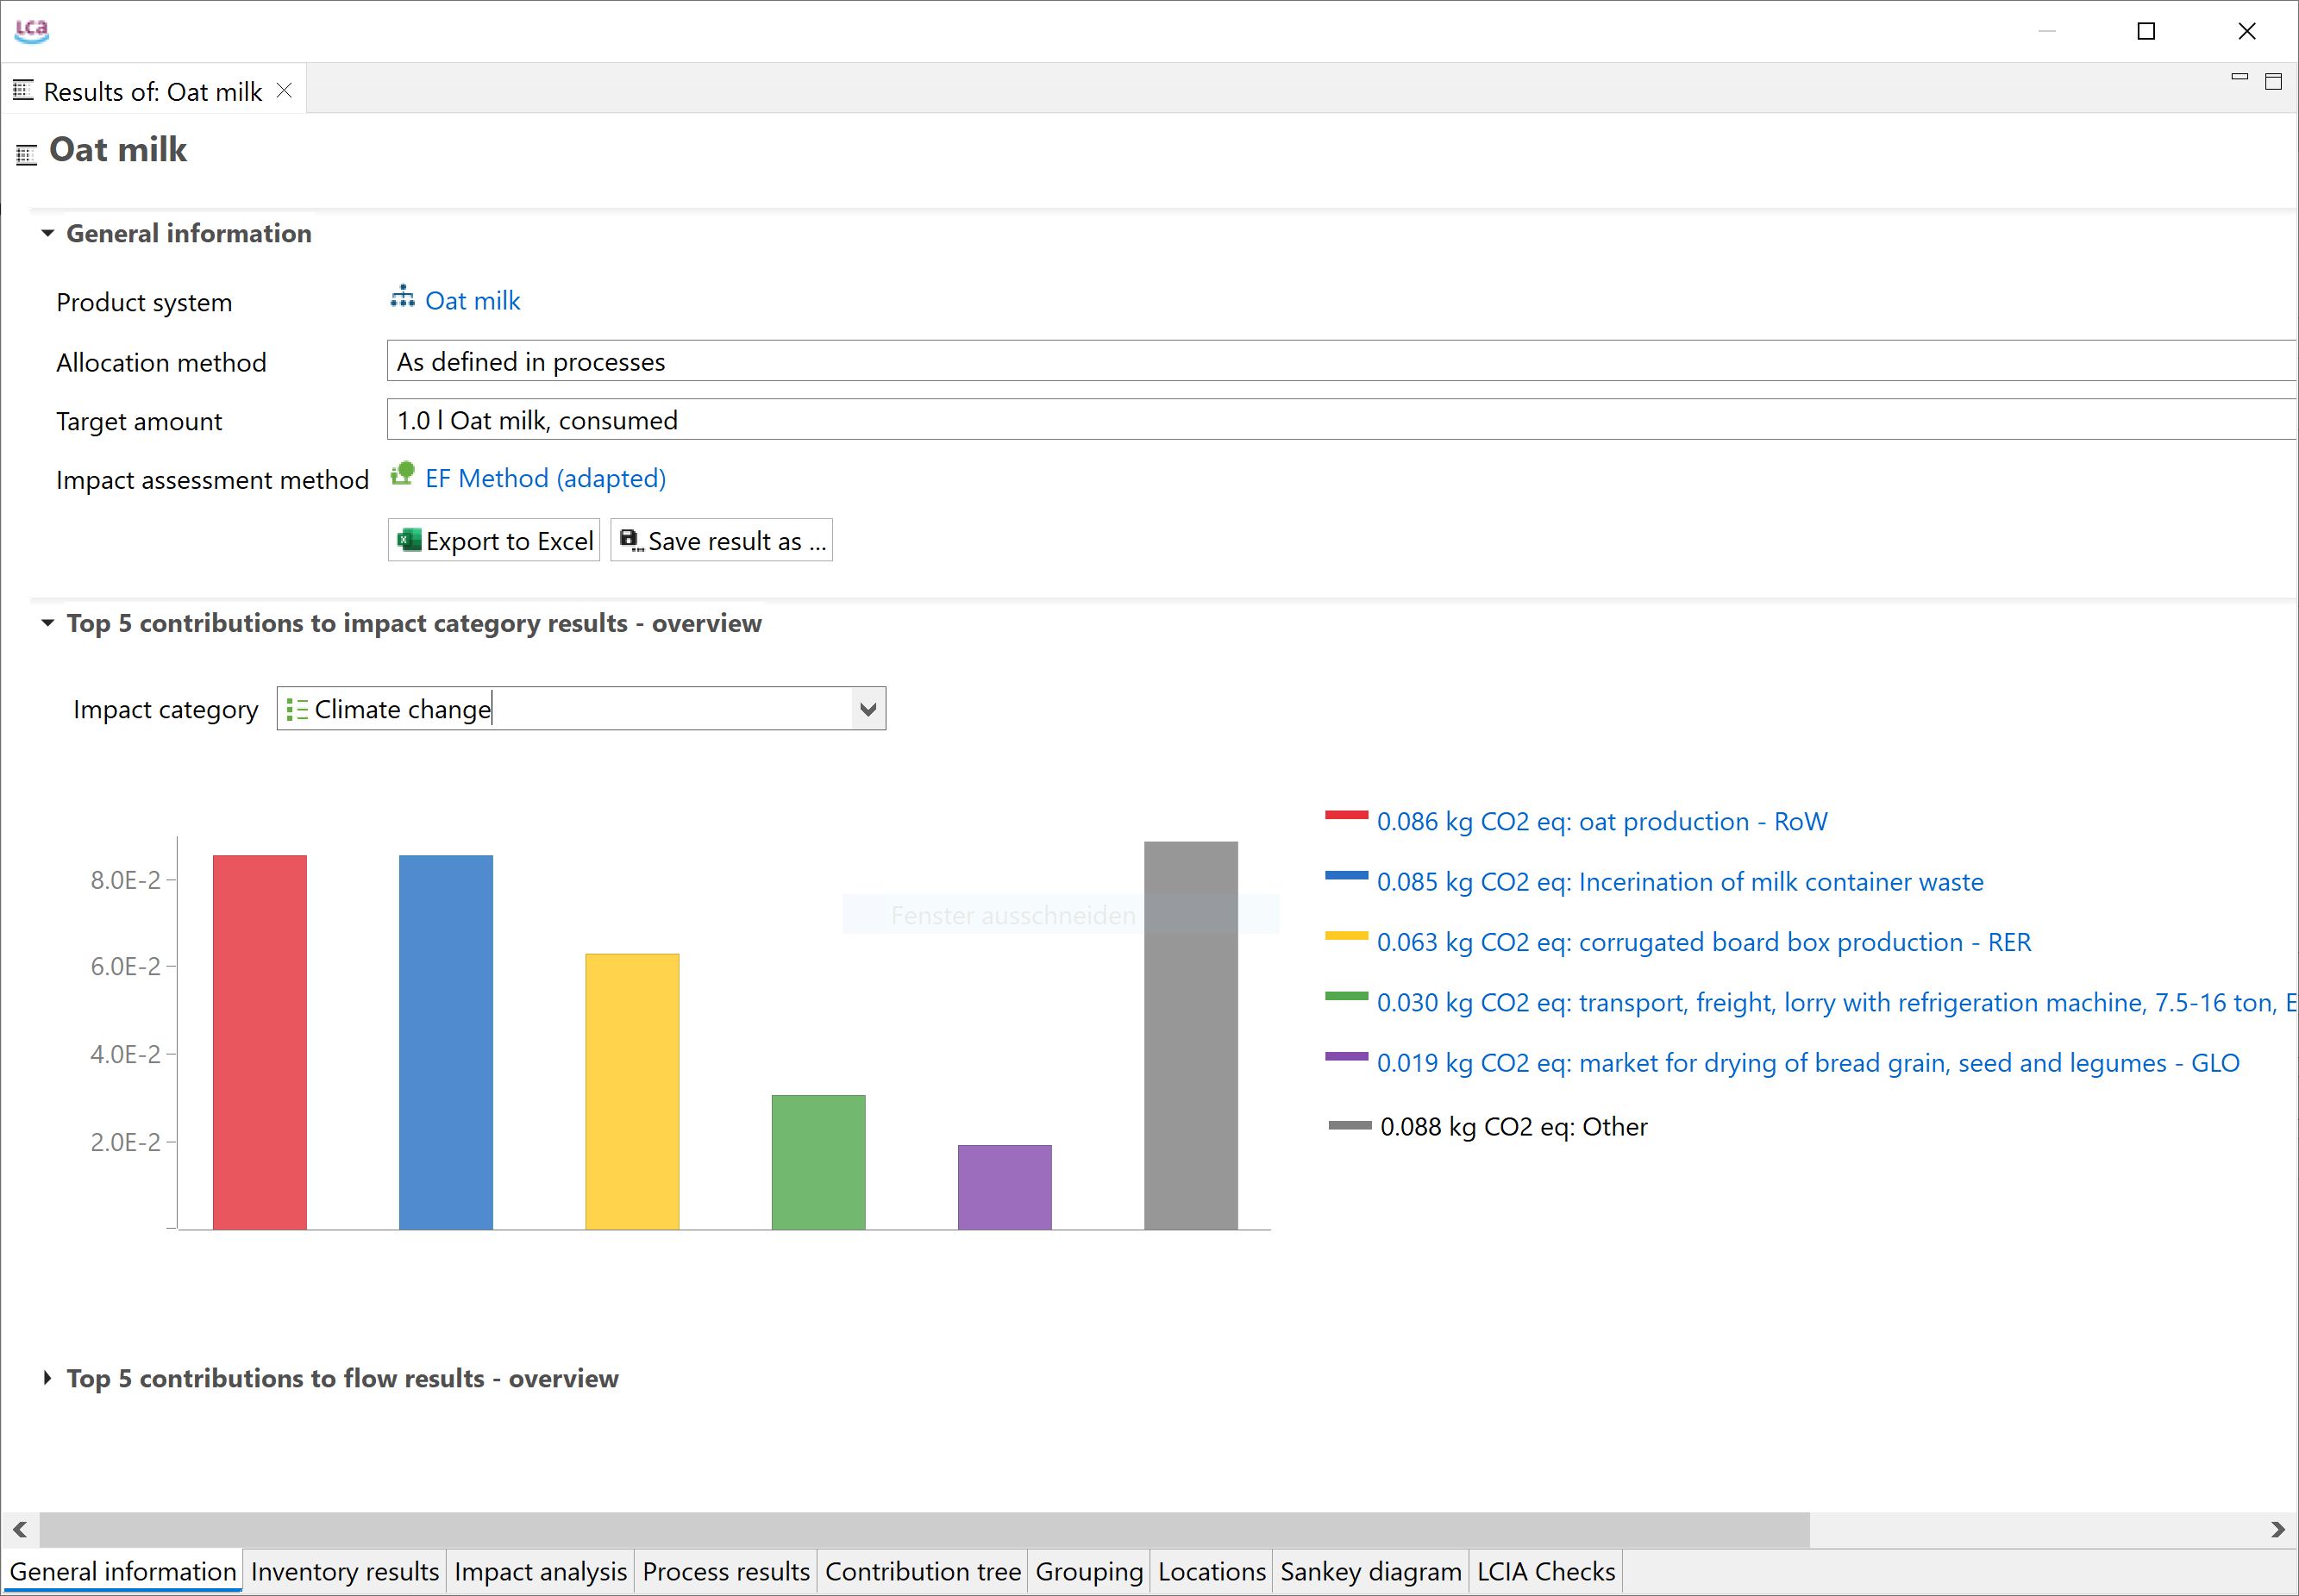 Calculation results window
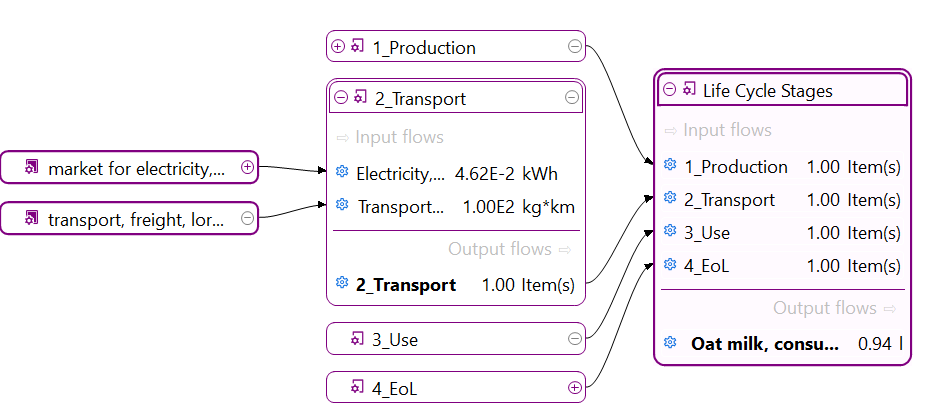
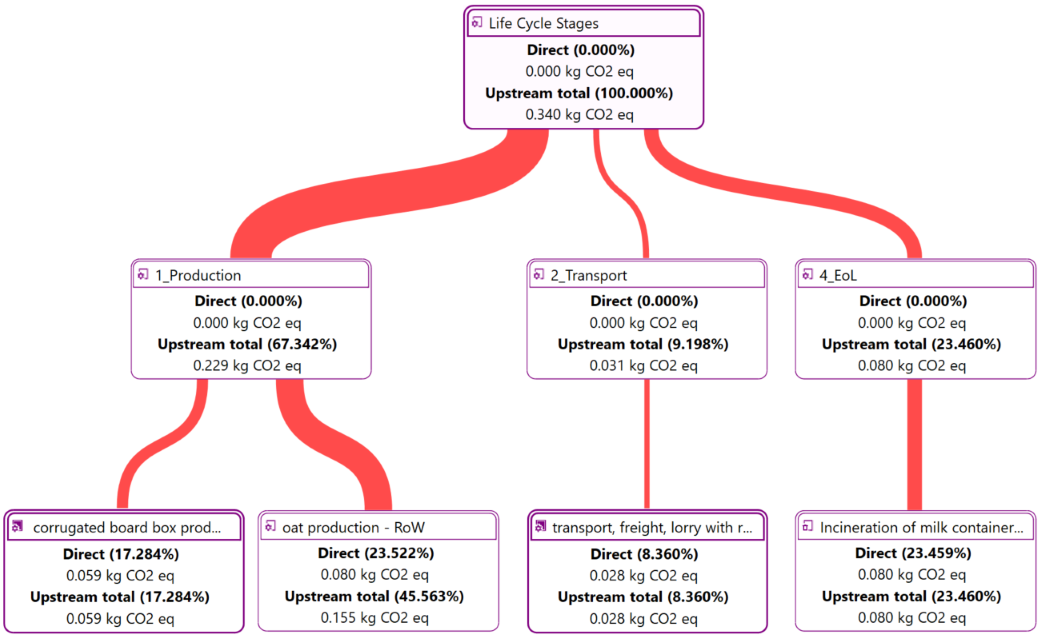
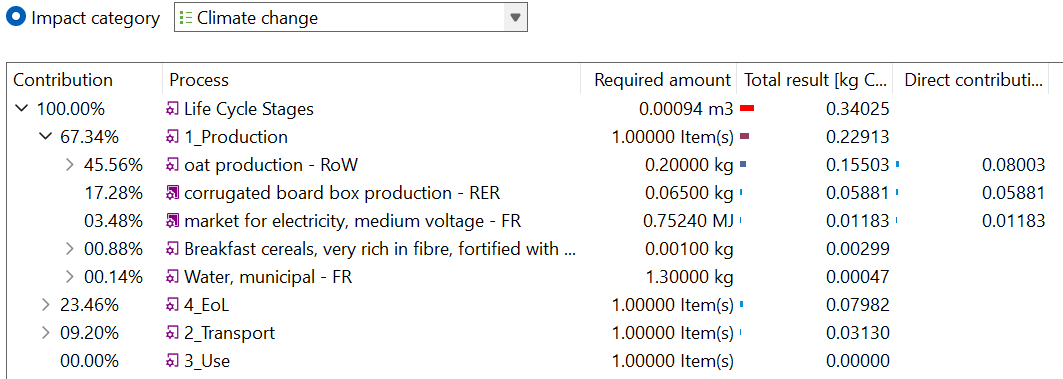
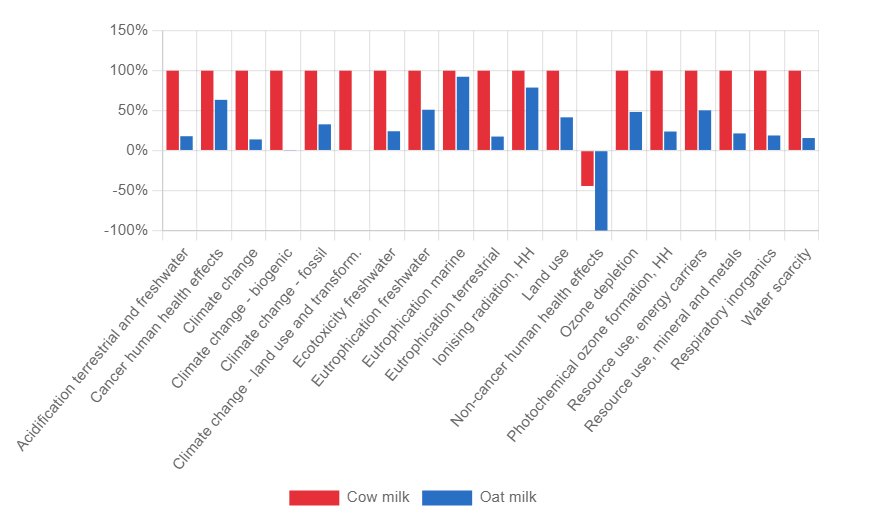 Relative impact results of one pack of oat milk vs one pack of cow milk, obtaind using EF Method
 openLCA Welcome page
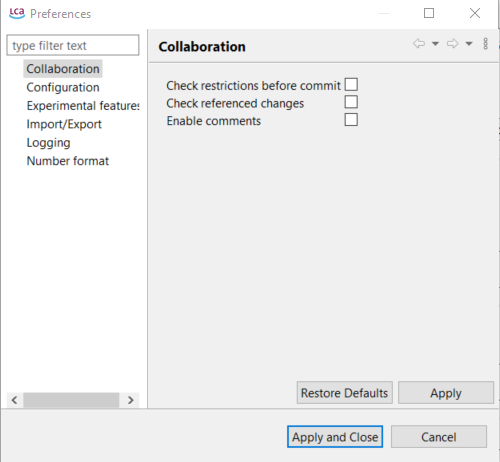

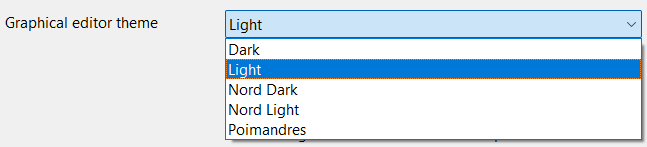
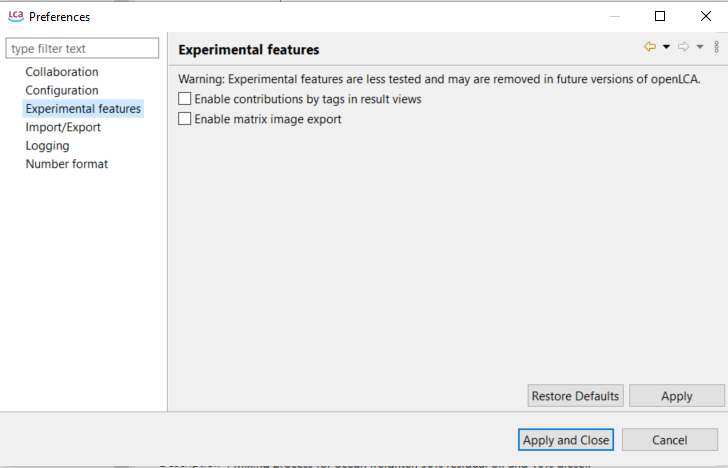
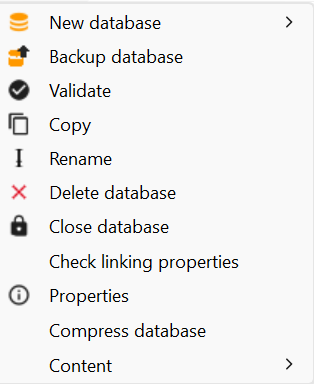
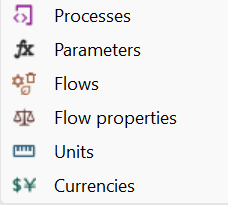
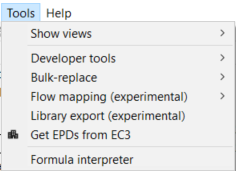
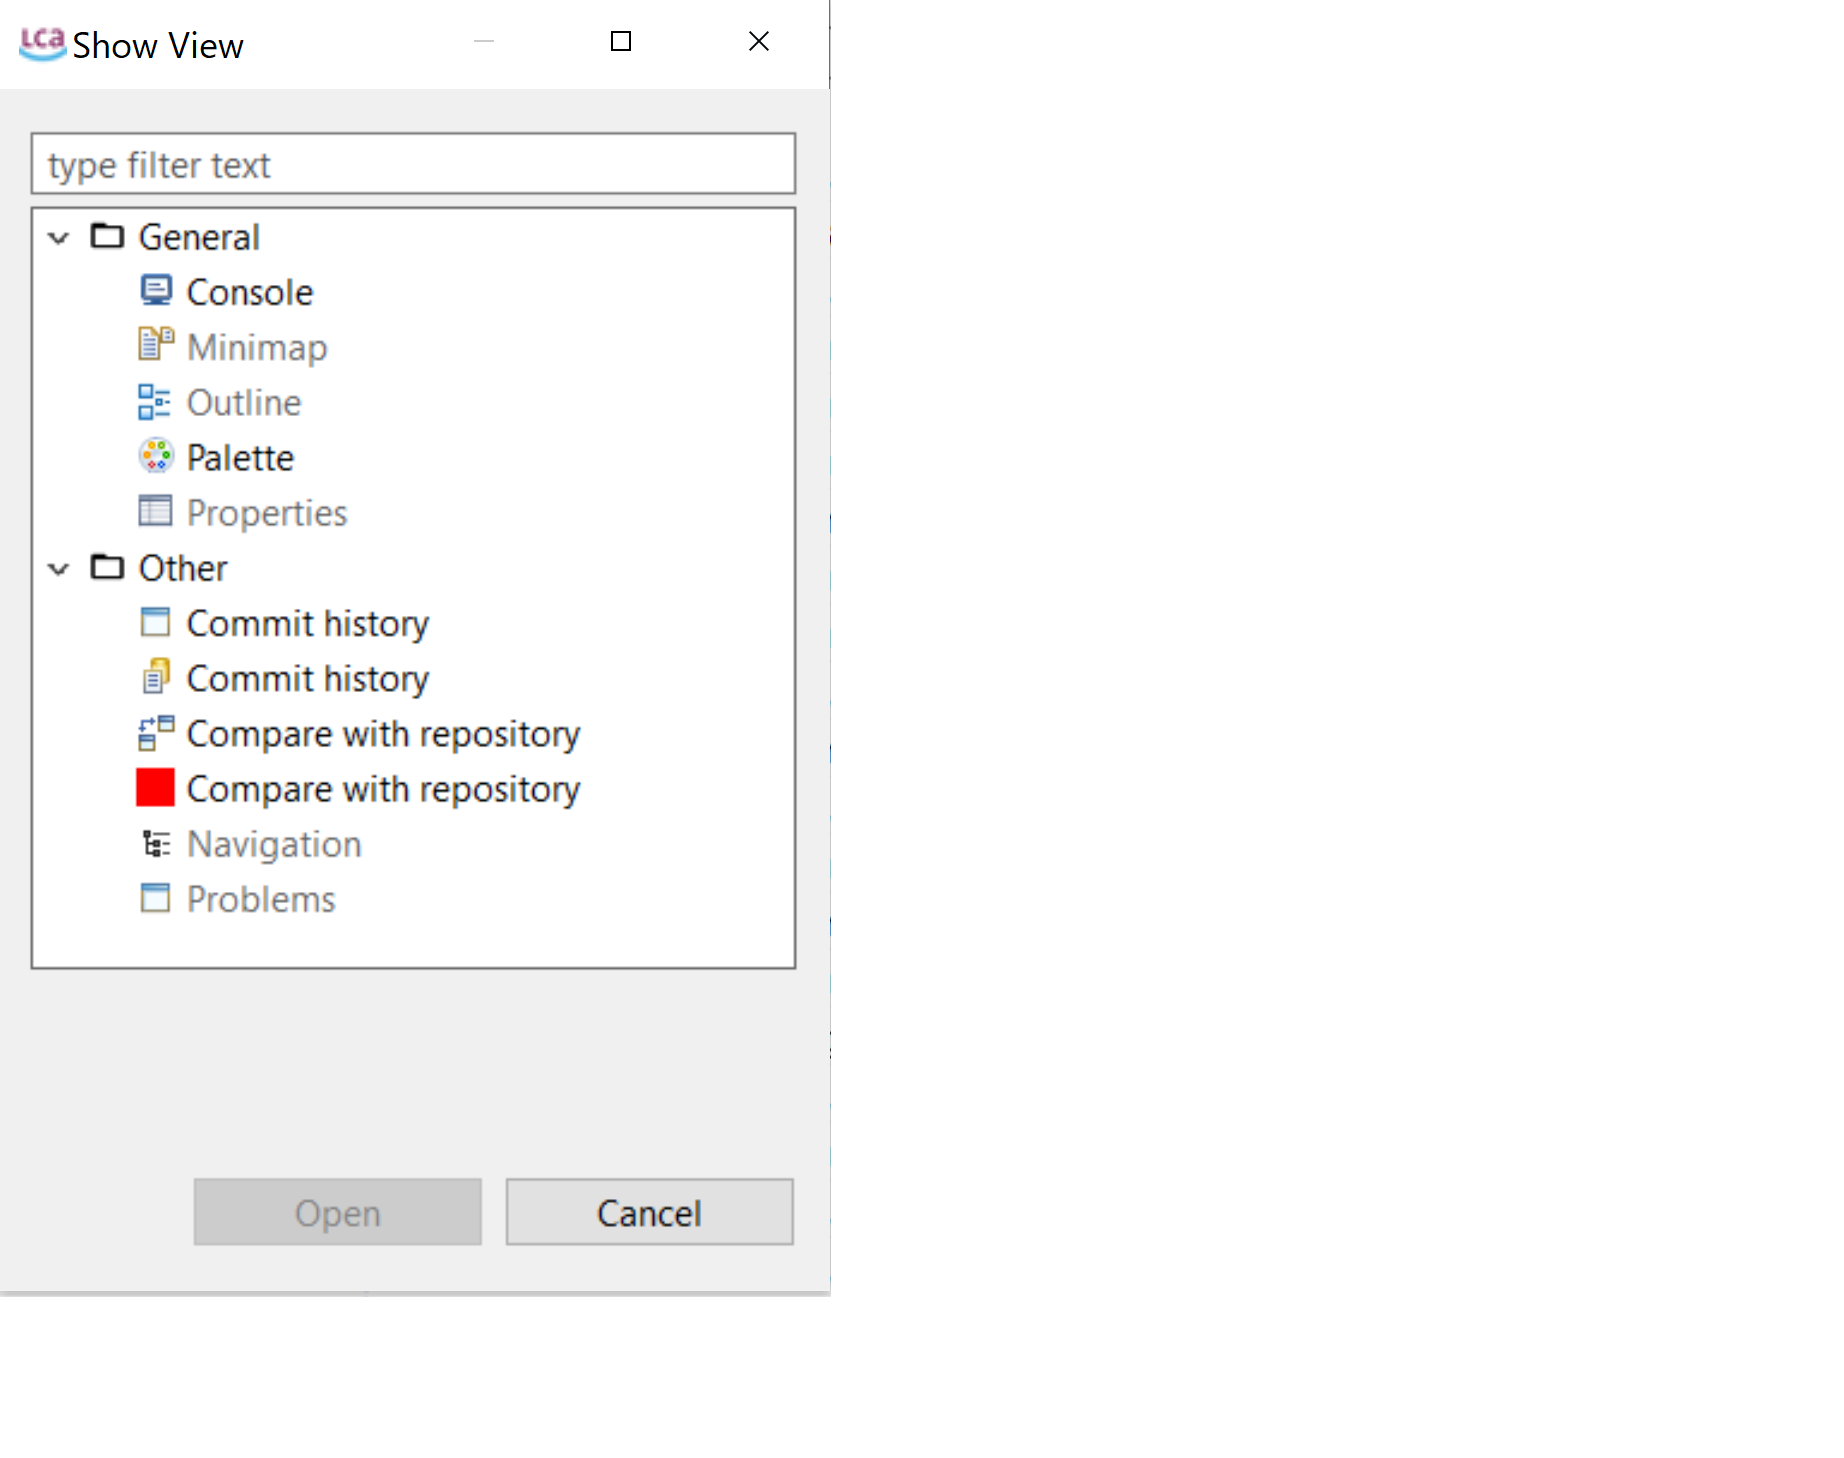
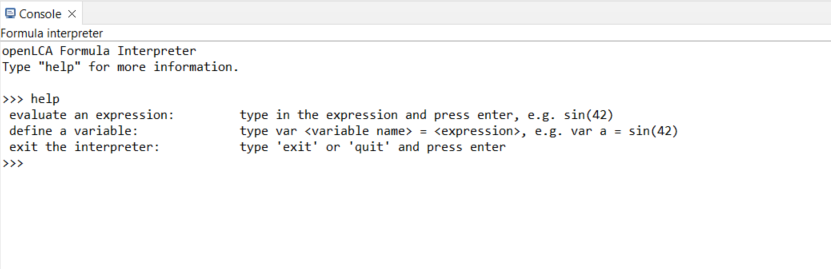
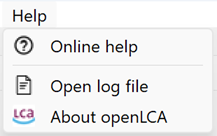
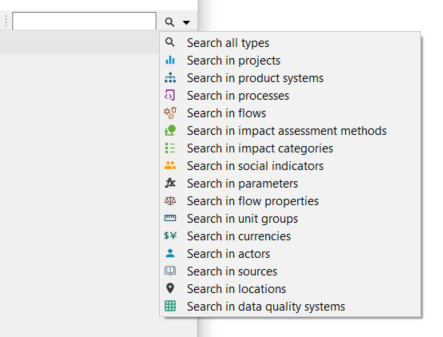
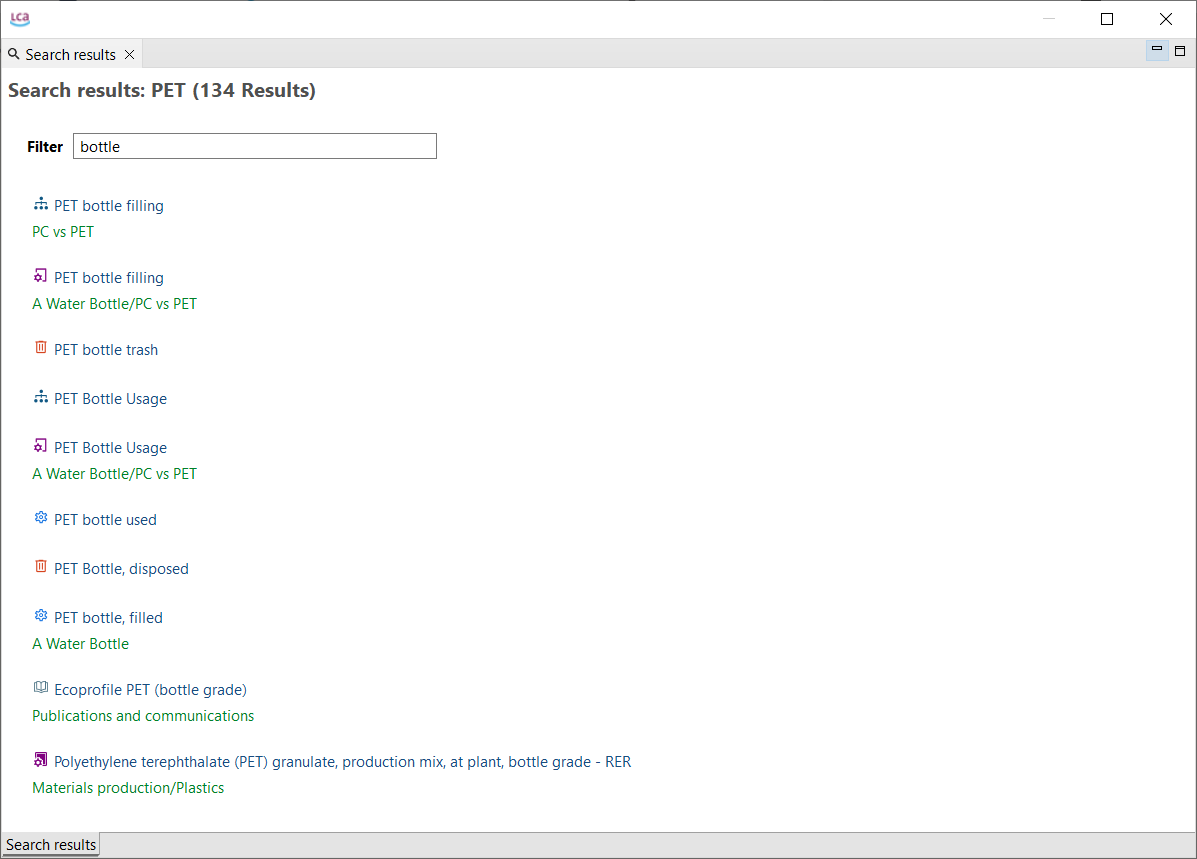

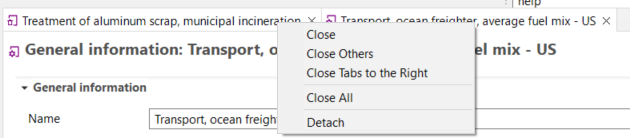
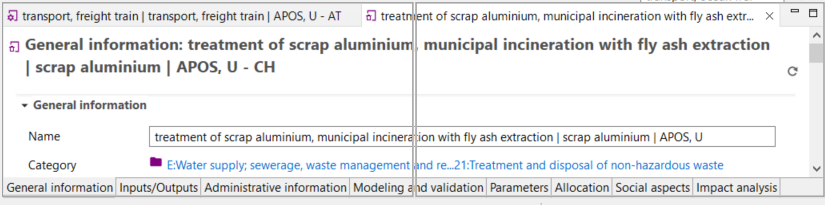 Placing tabs underneath or next to each other
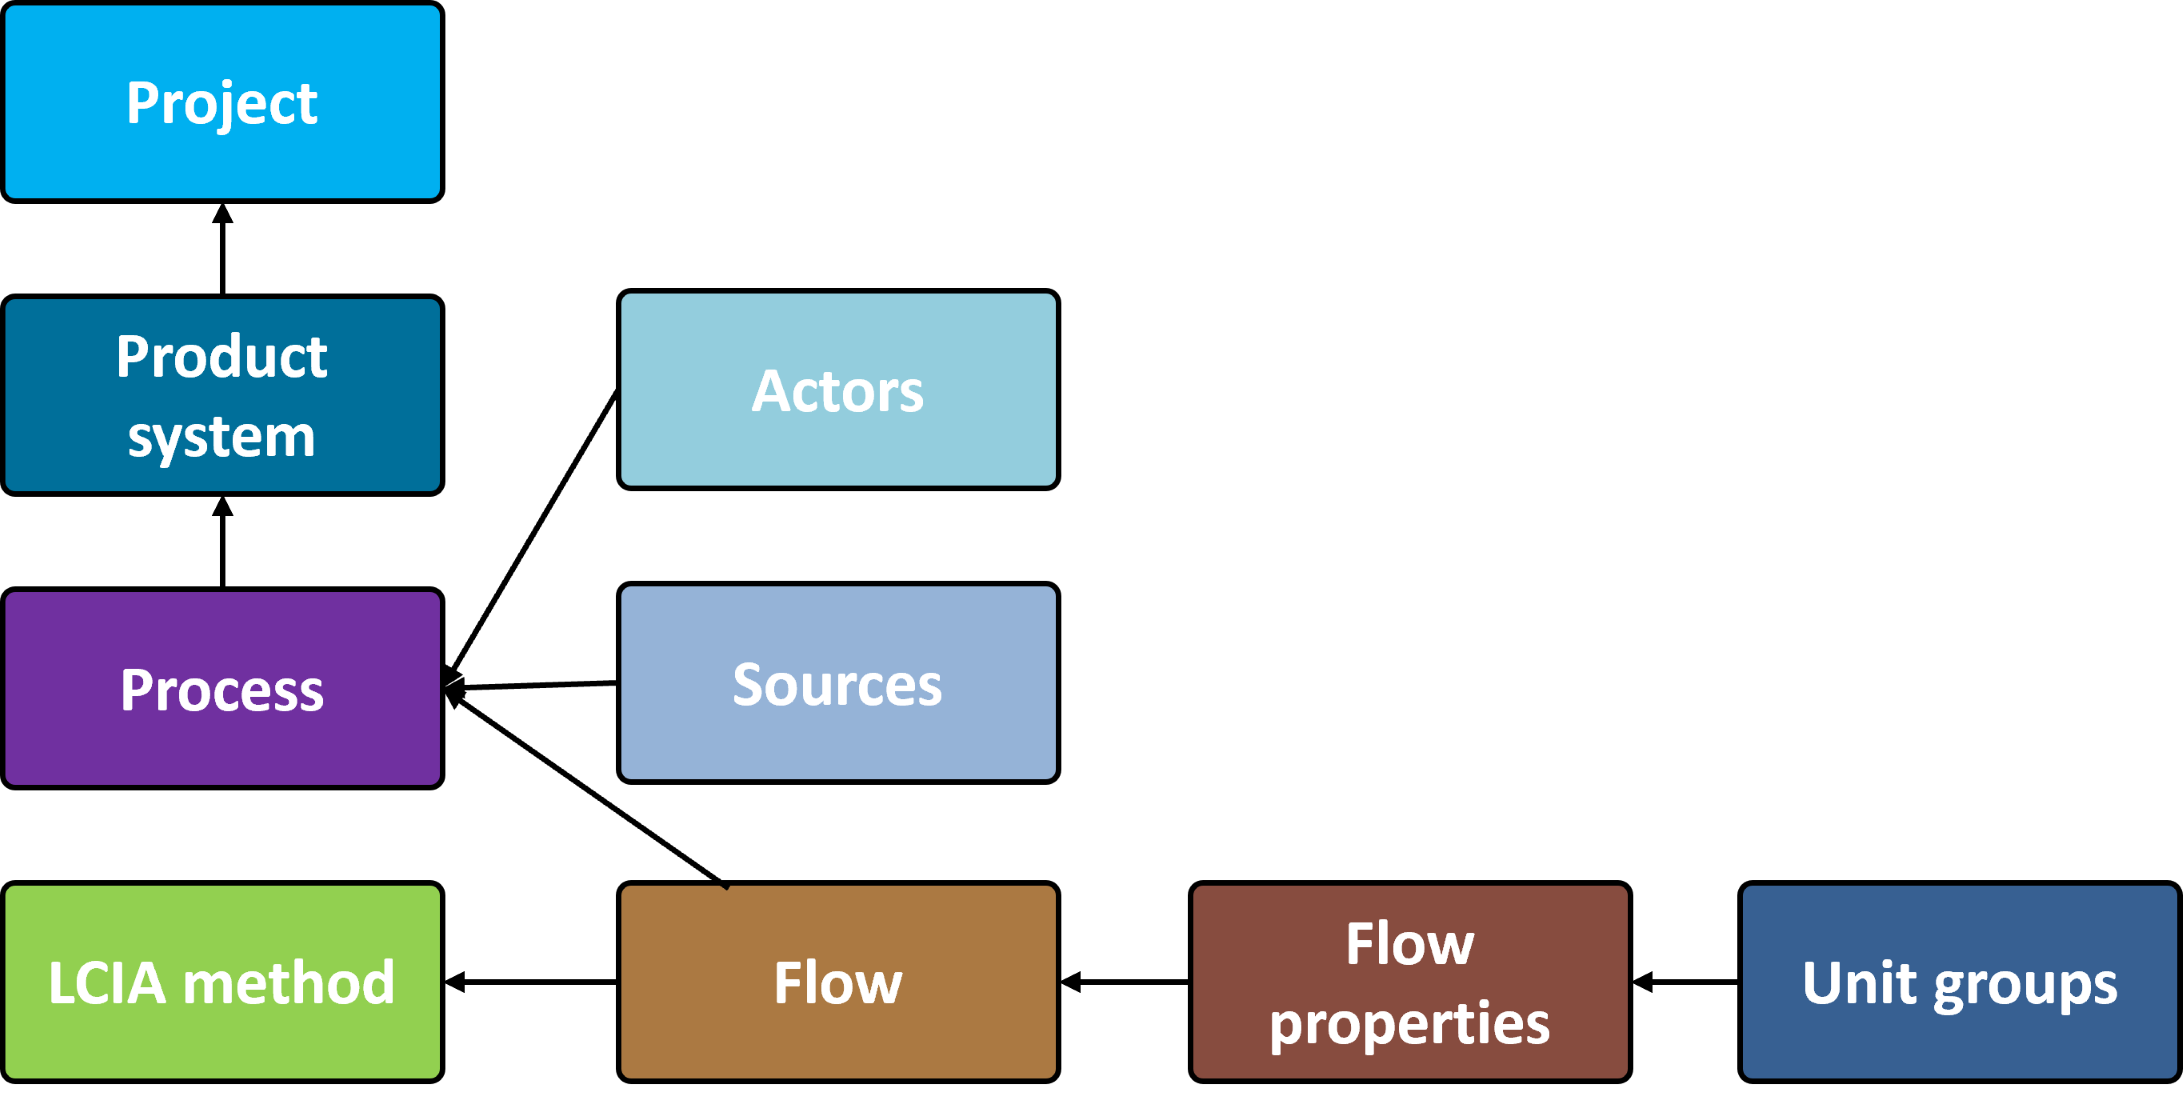
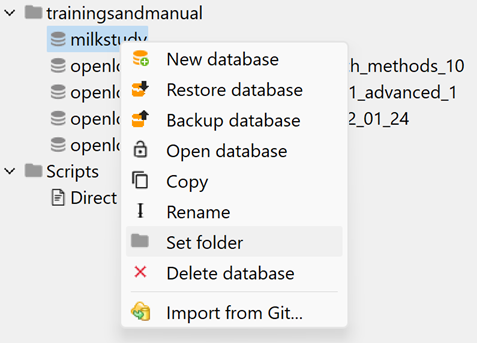
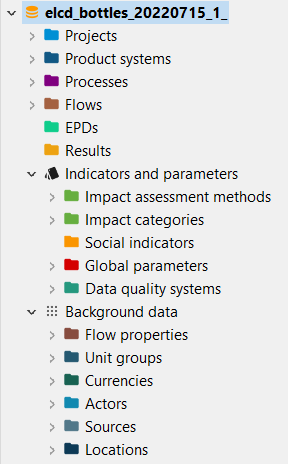
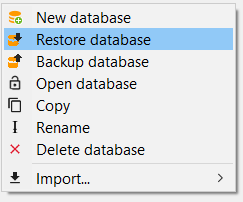
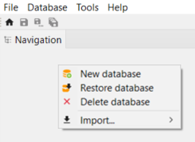
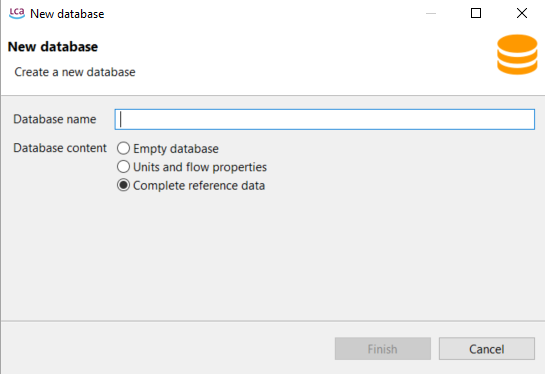
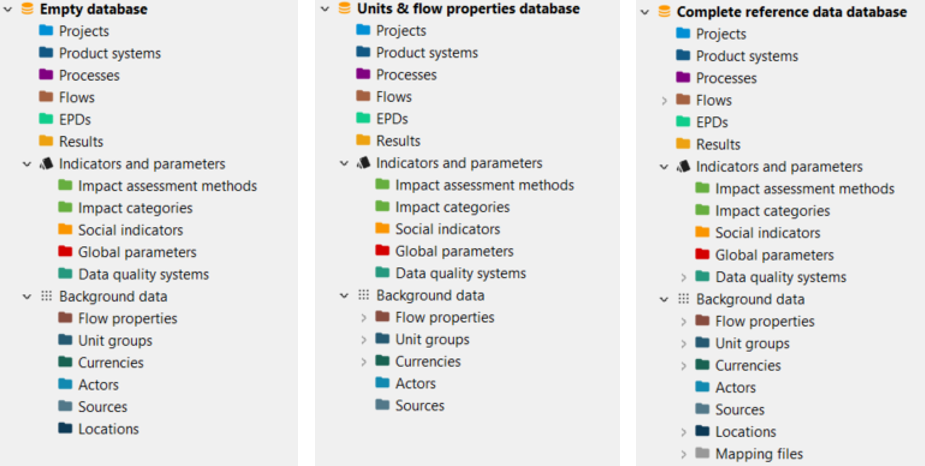


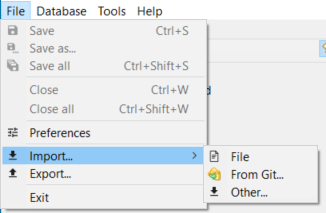
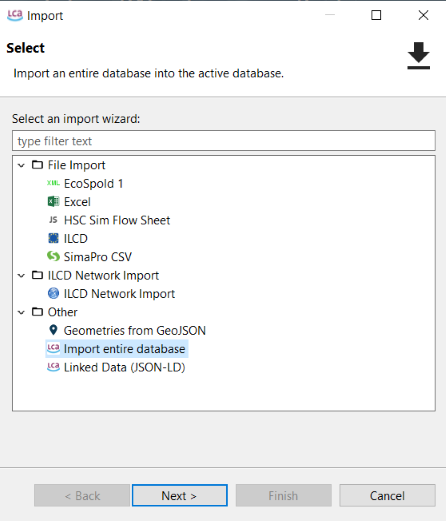
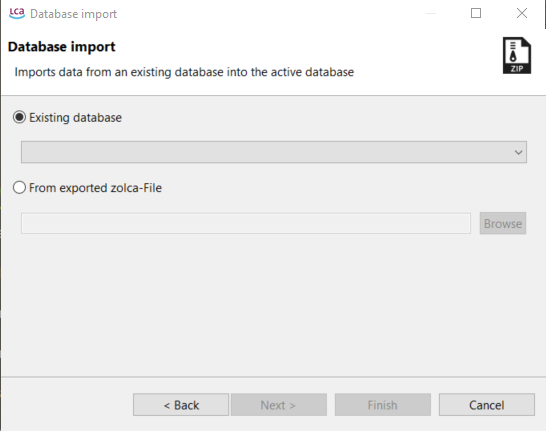
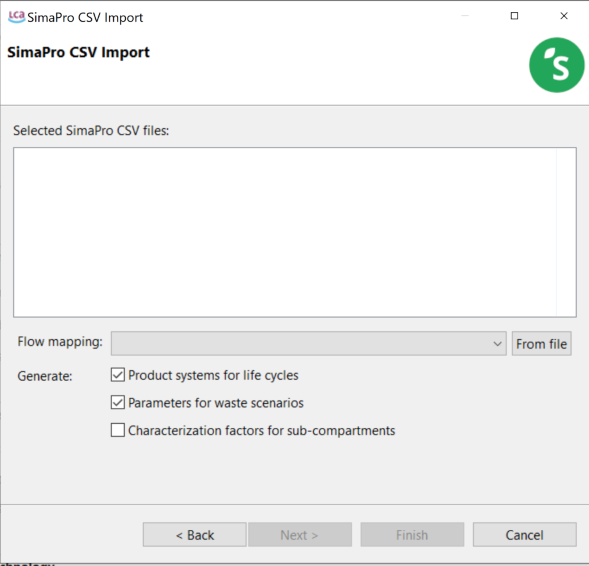
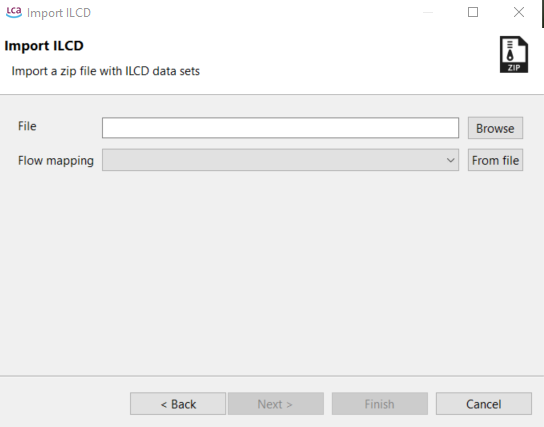
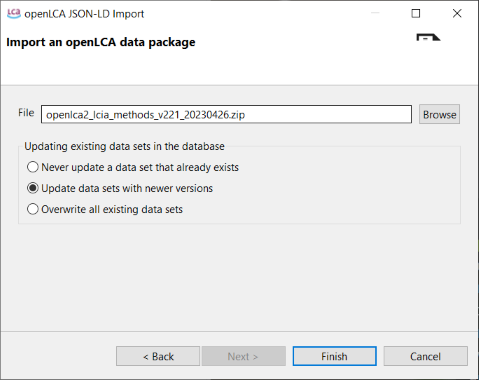
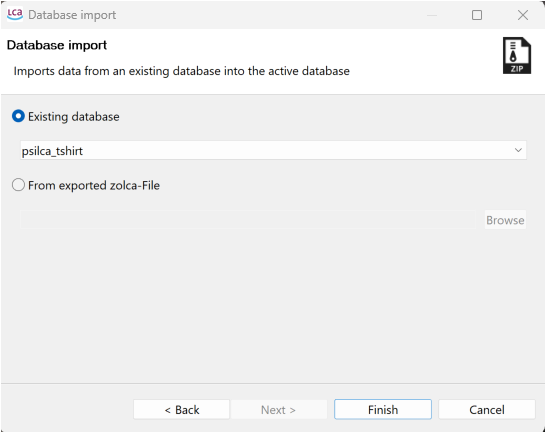
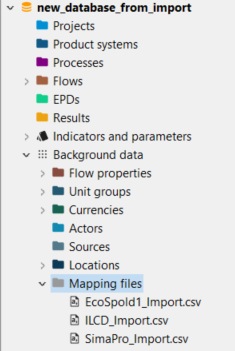
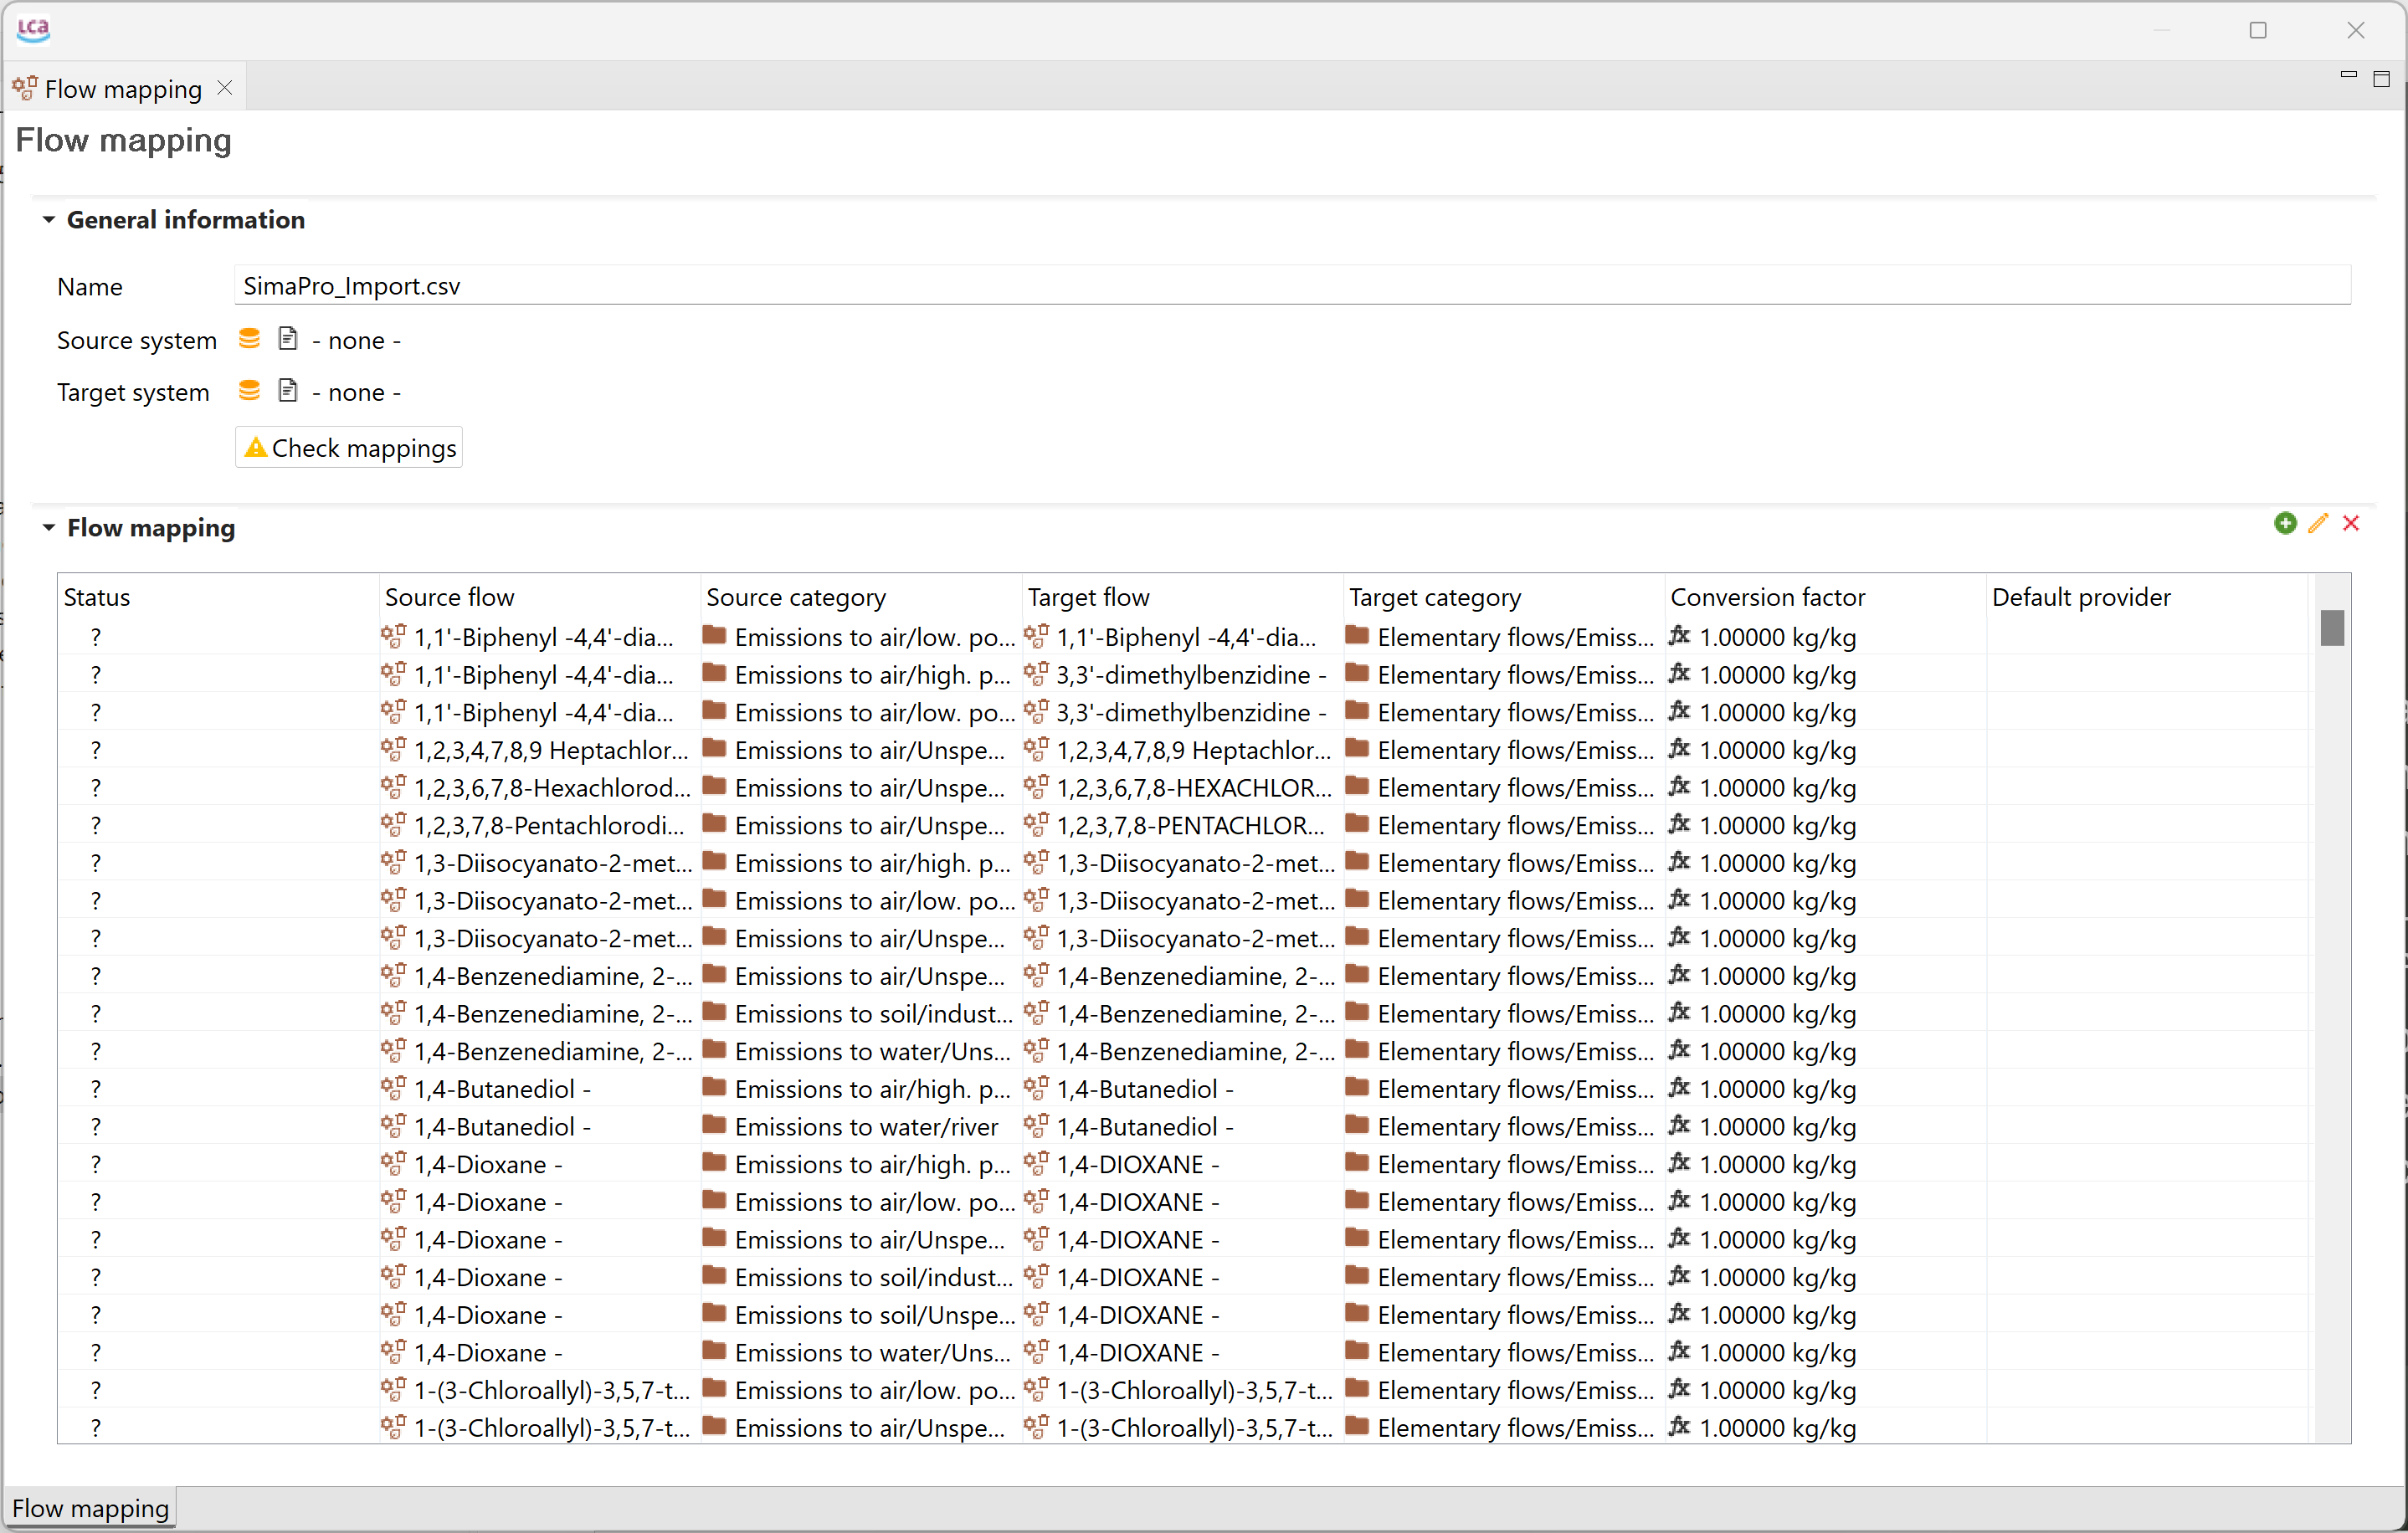
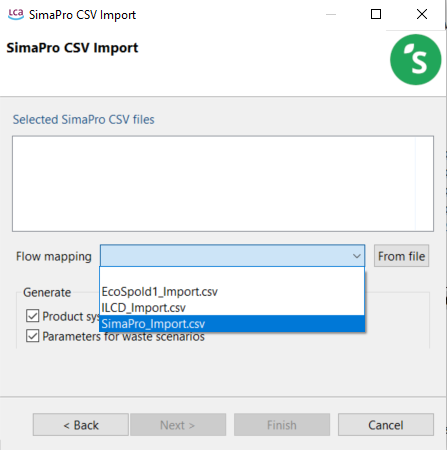
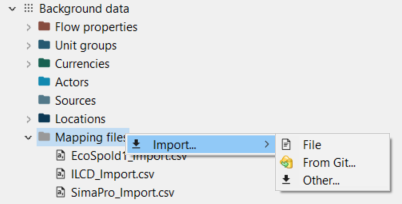
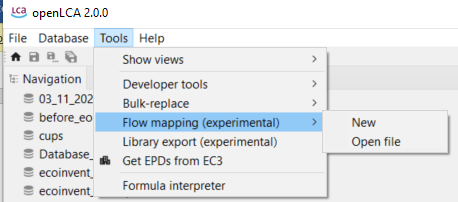
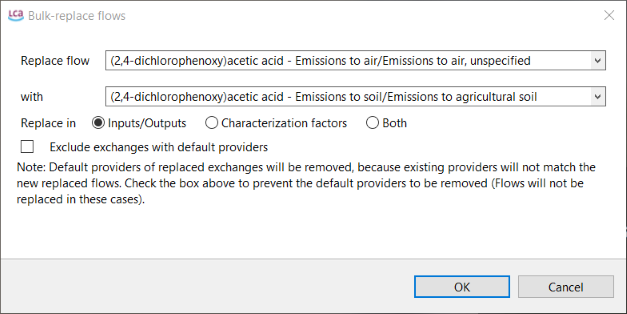
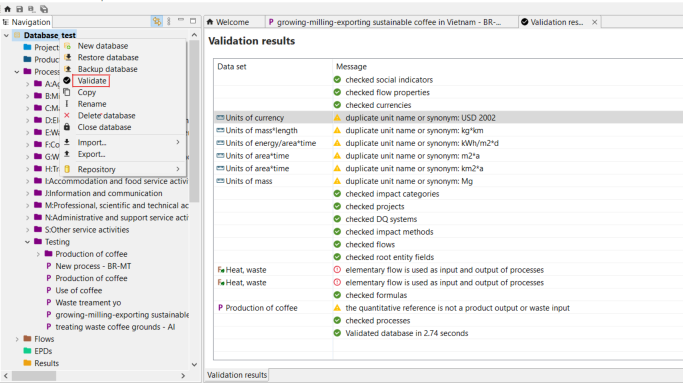
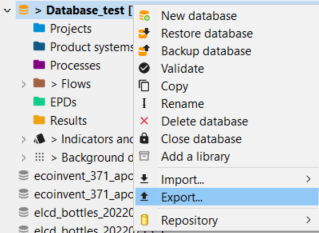
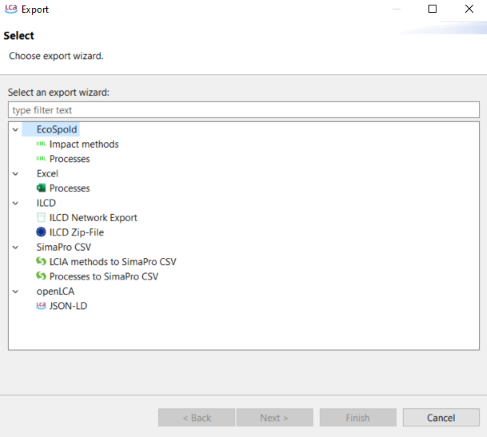
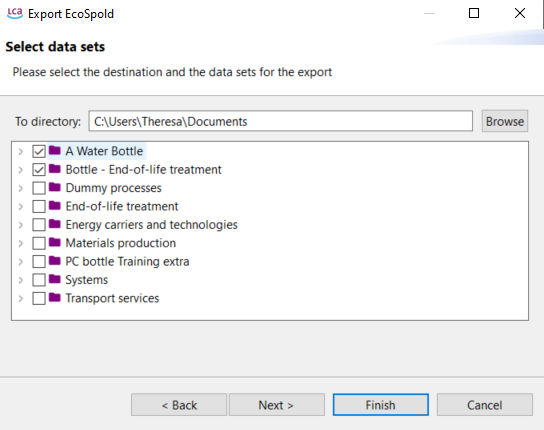
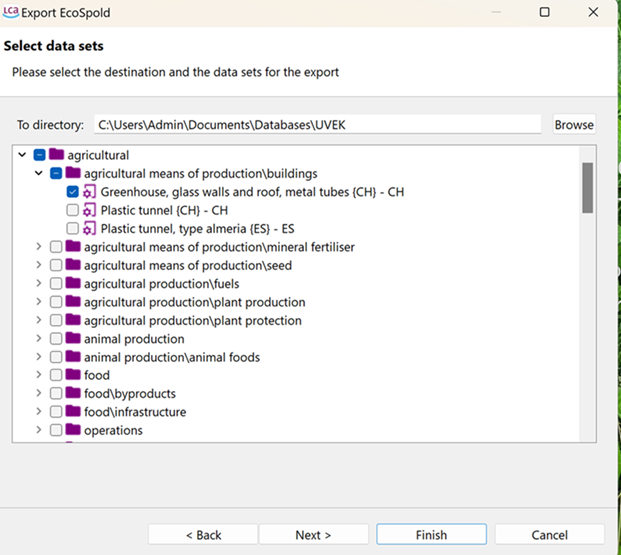
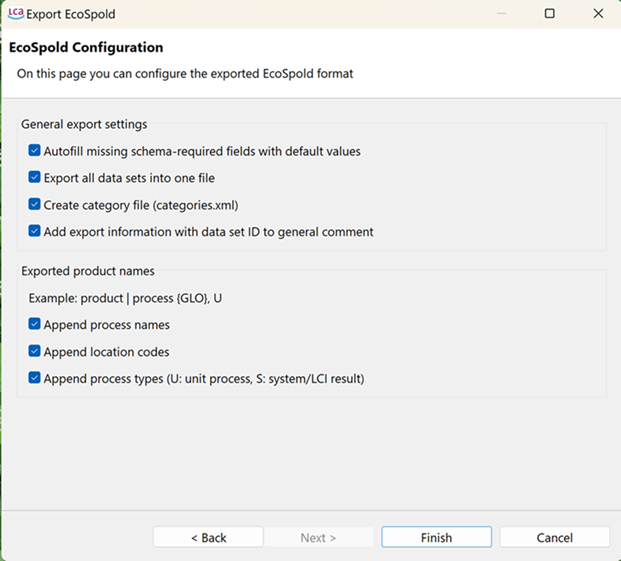
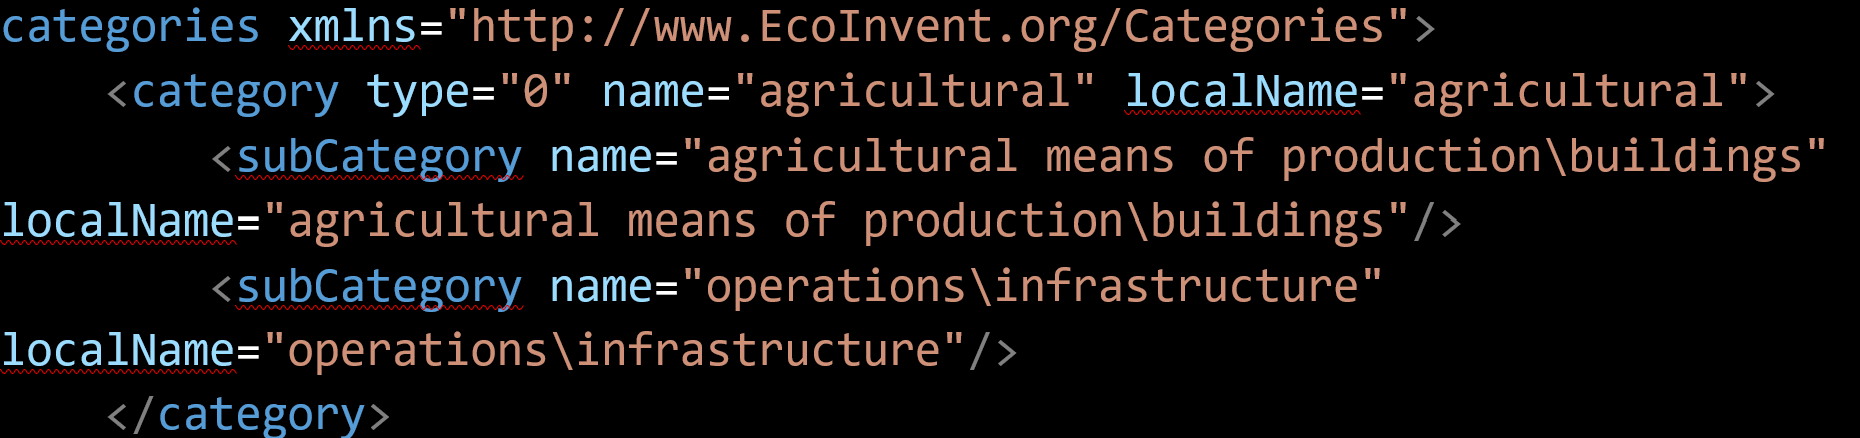
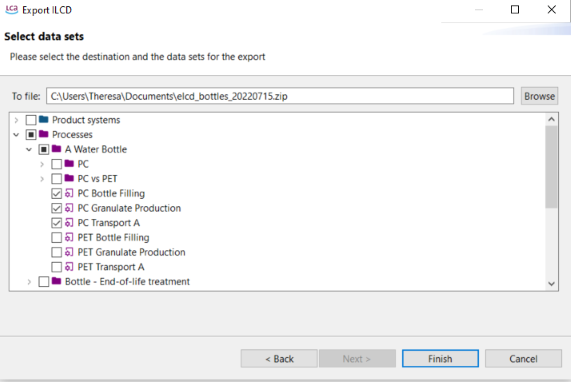
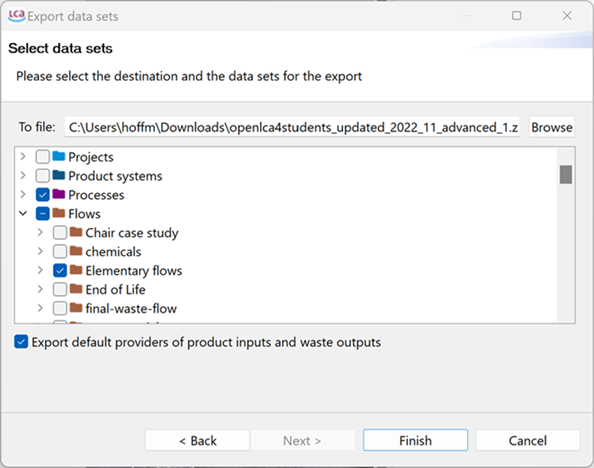
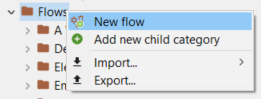
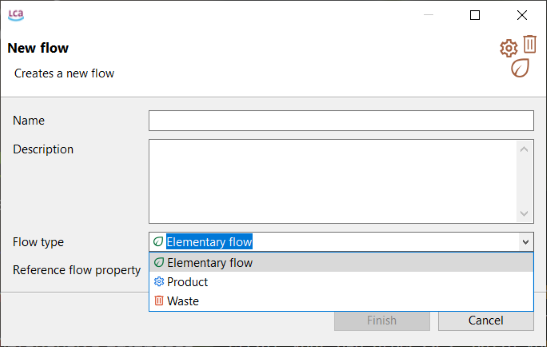
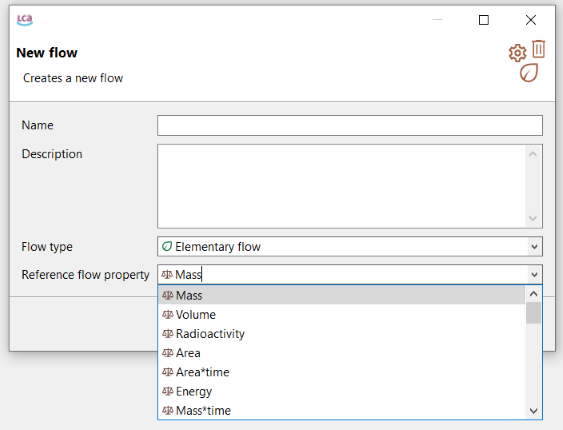
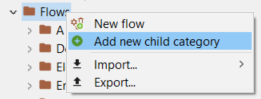
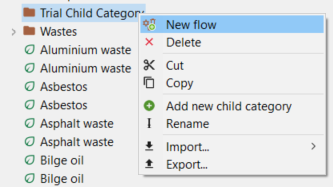

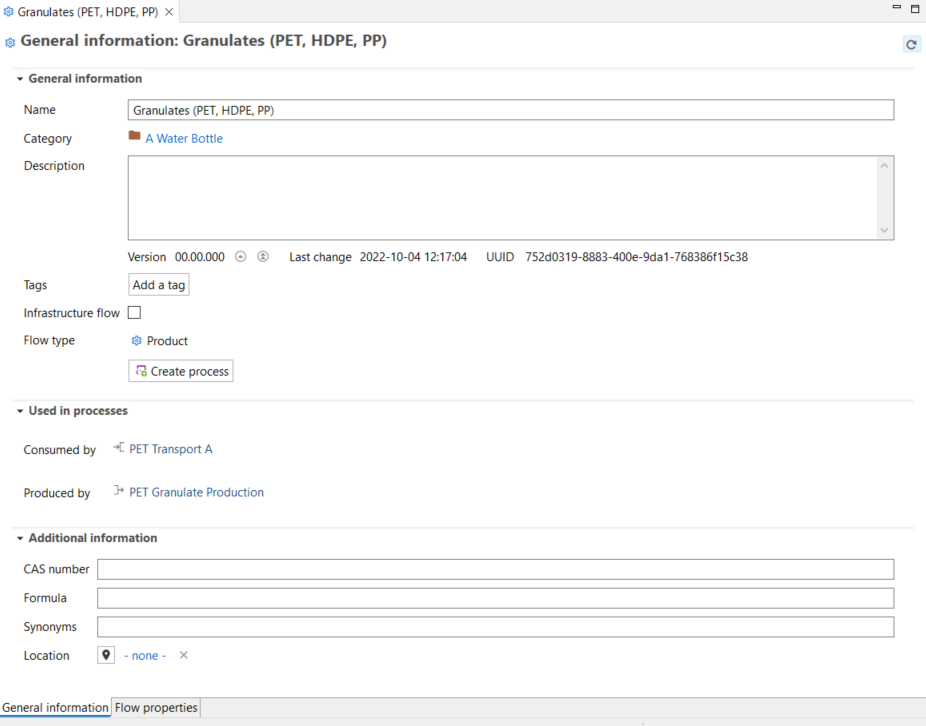
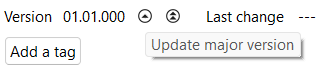
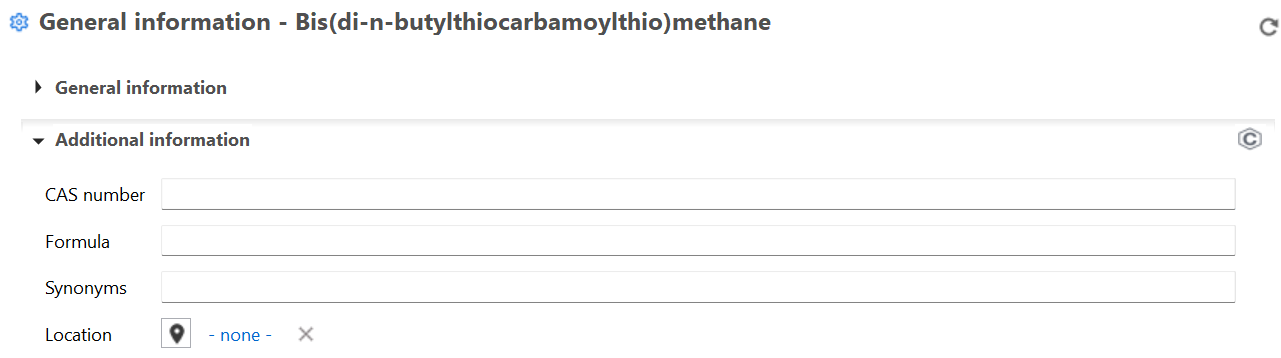
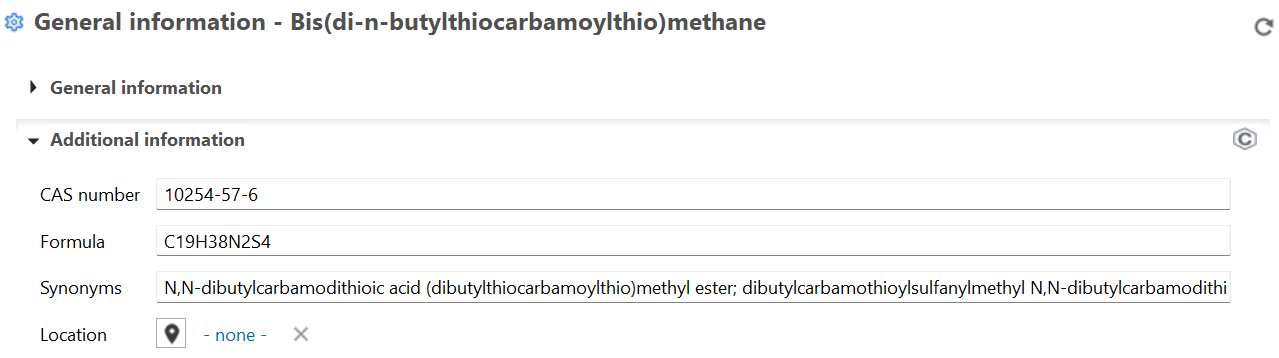
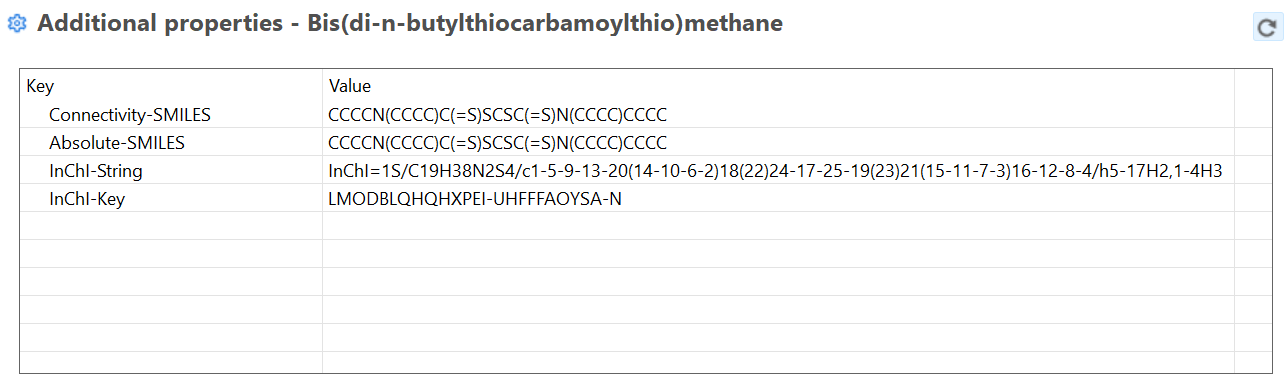
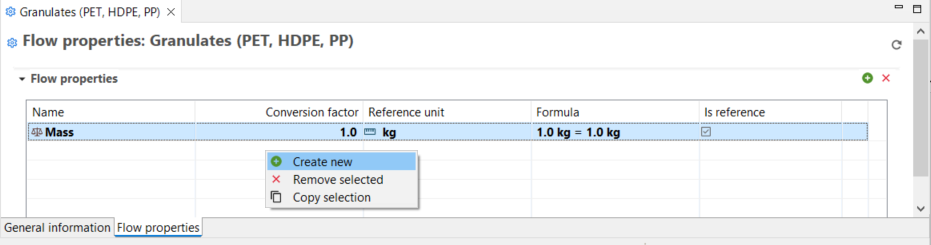
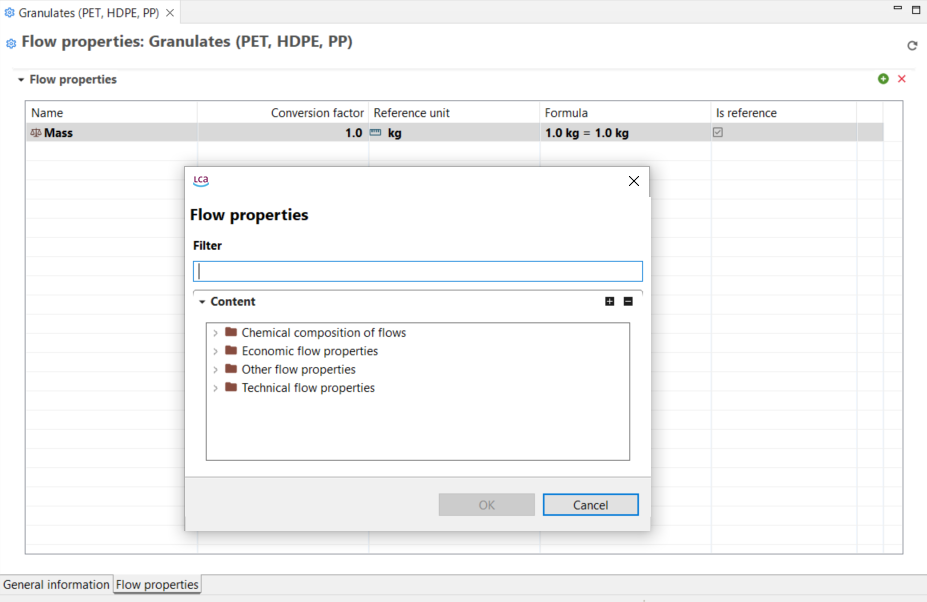
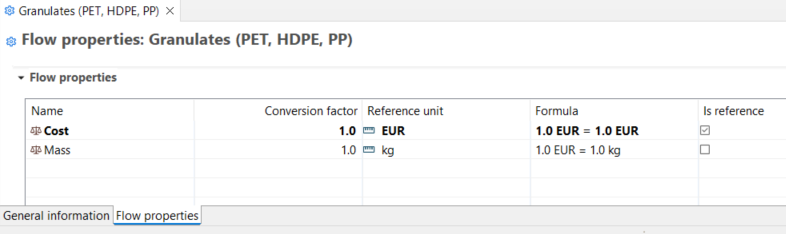 Conversion factors are given in the "Formula" column
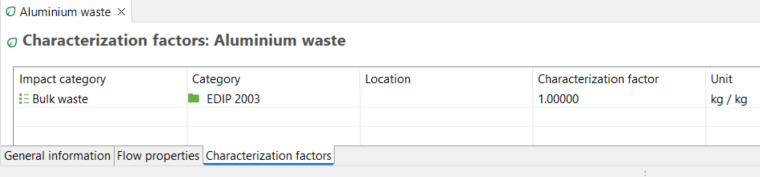
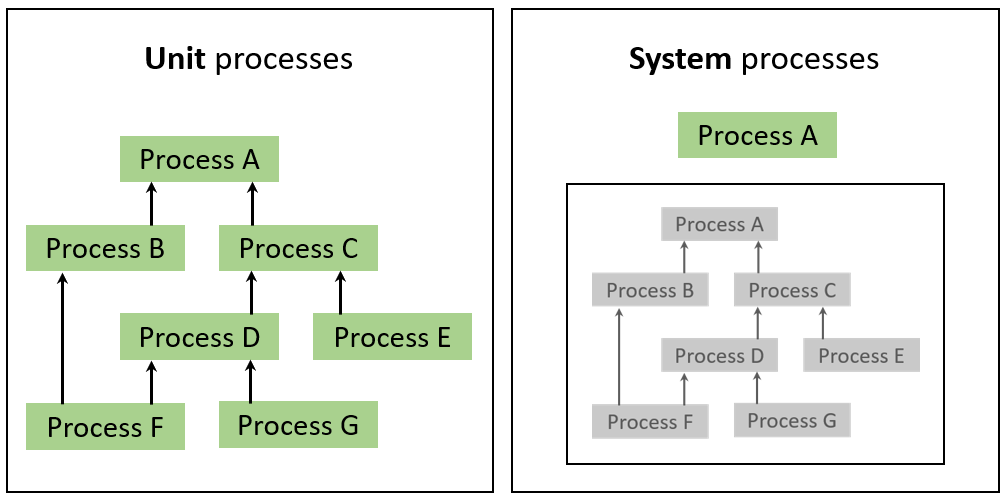
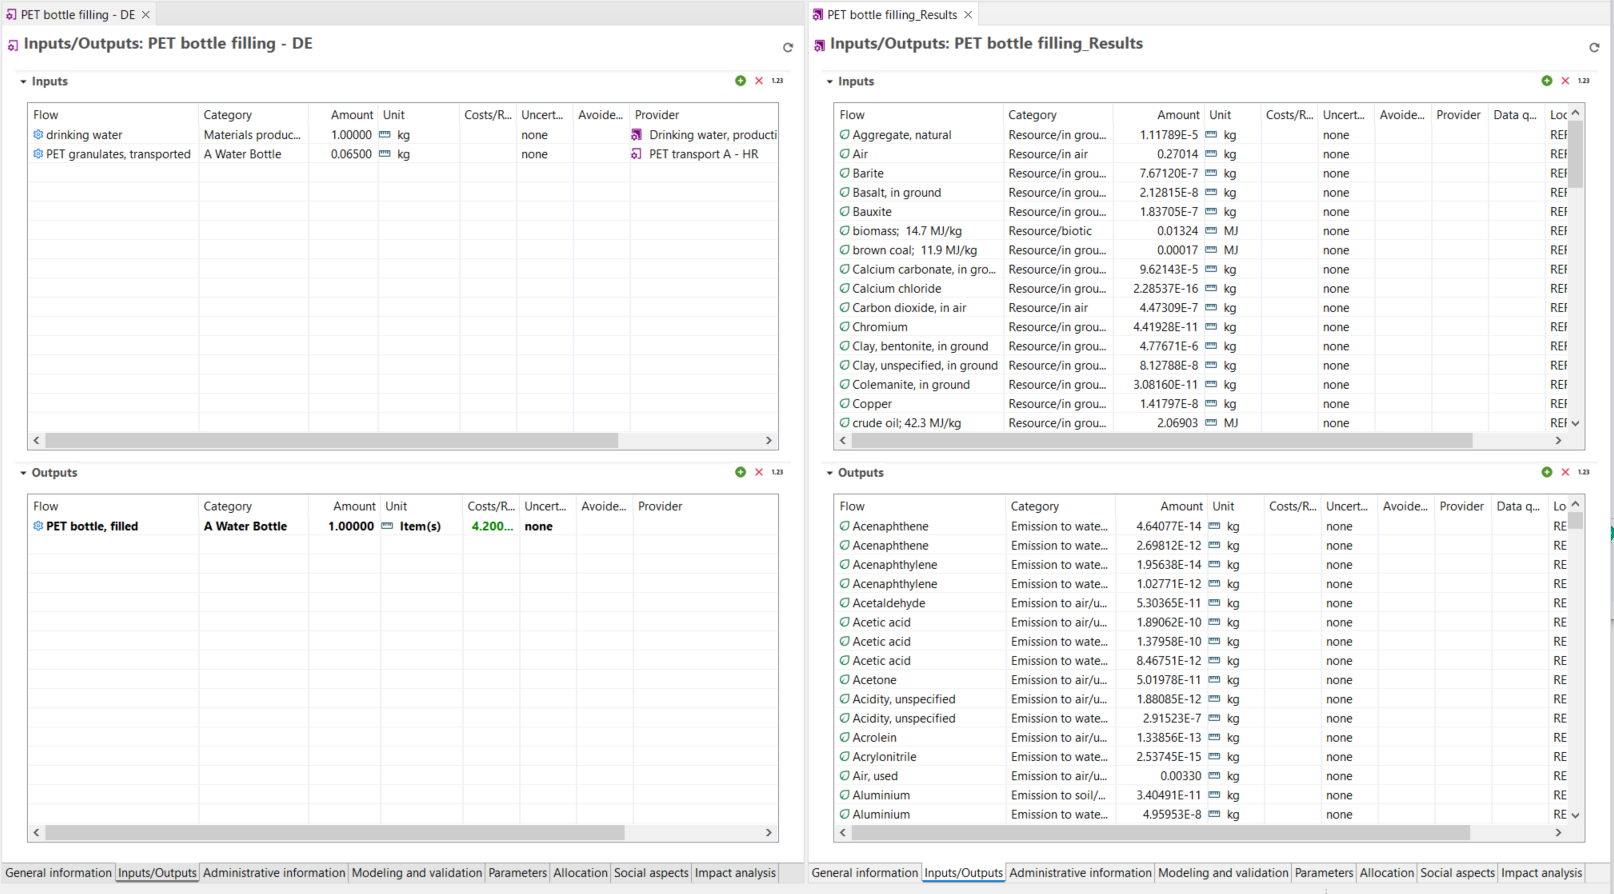
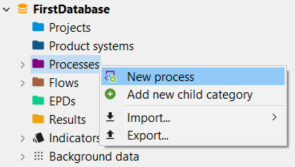
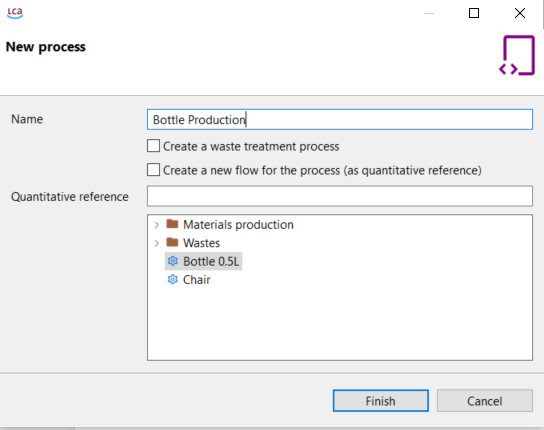
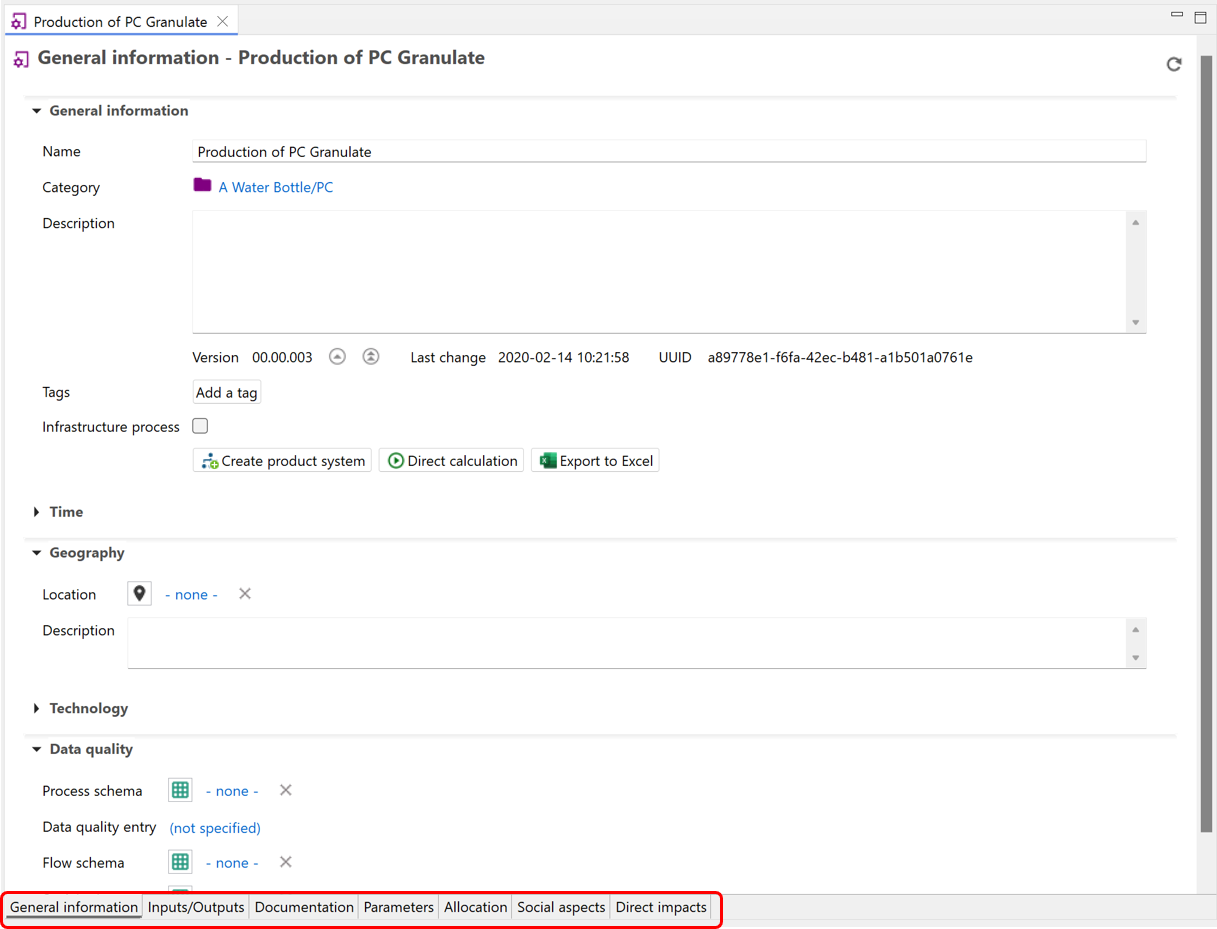
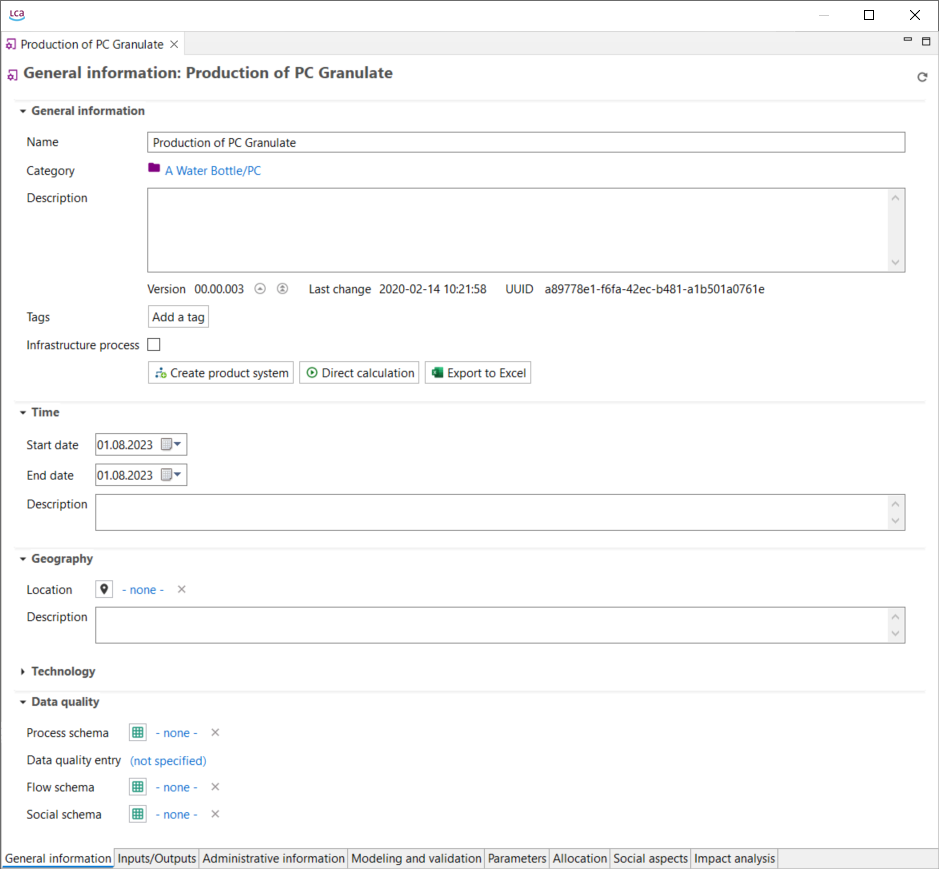
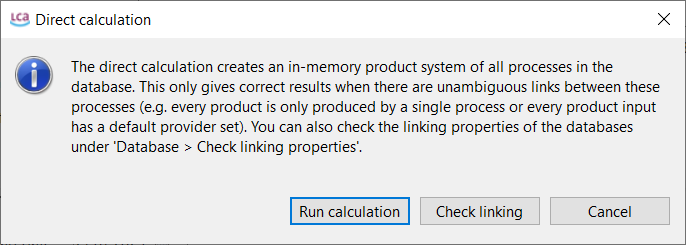
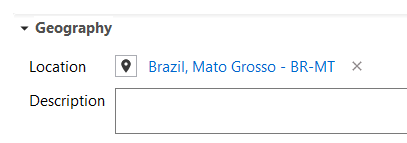
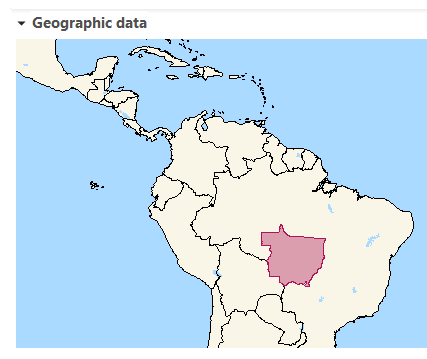
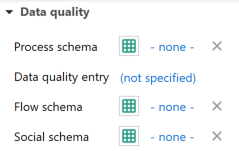
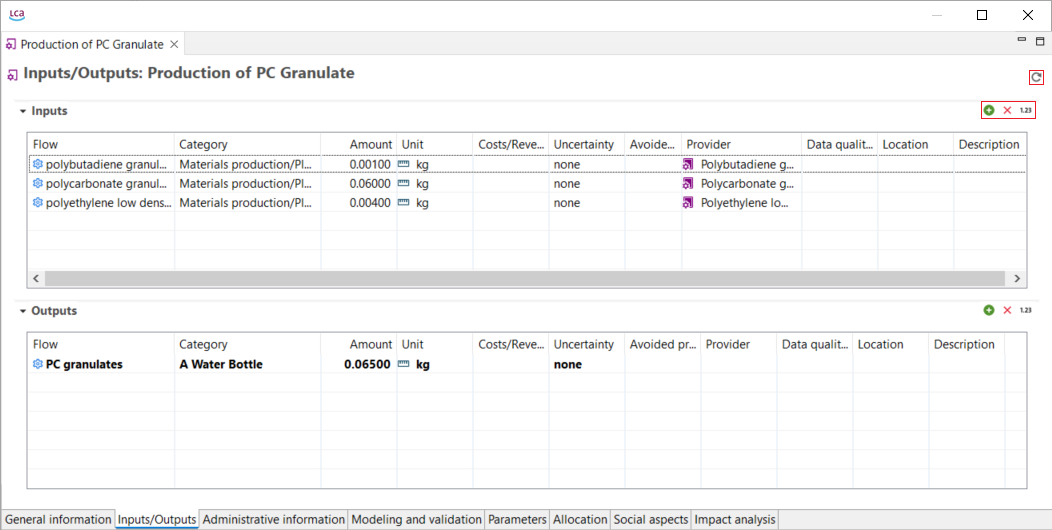
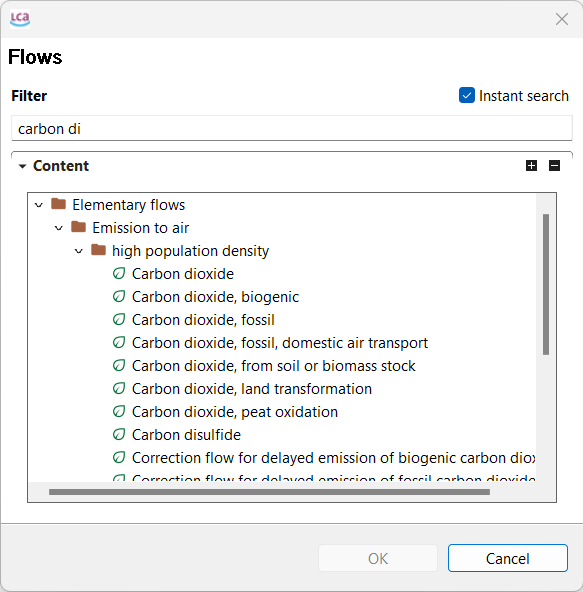
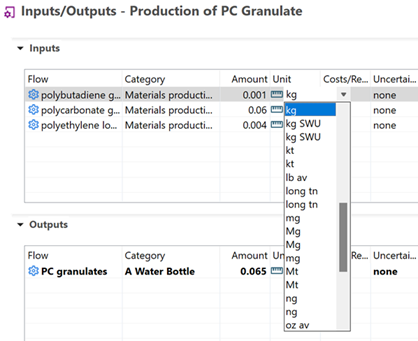


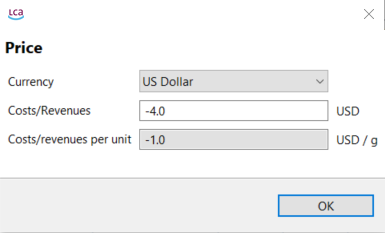
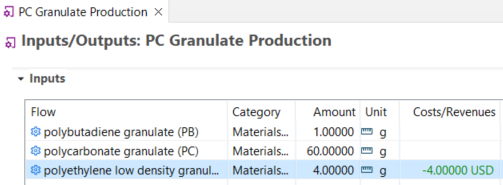
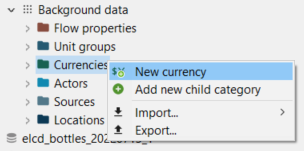

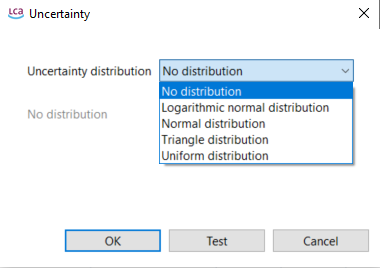

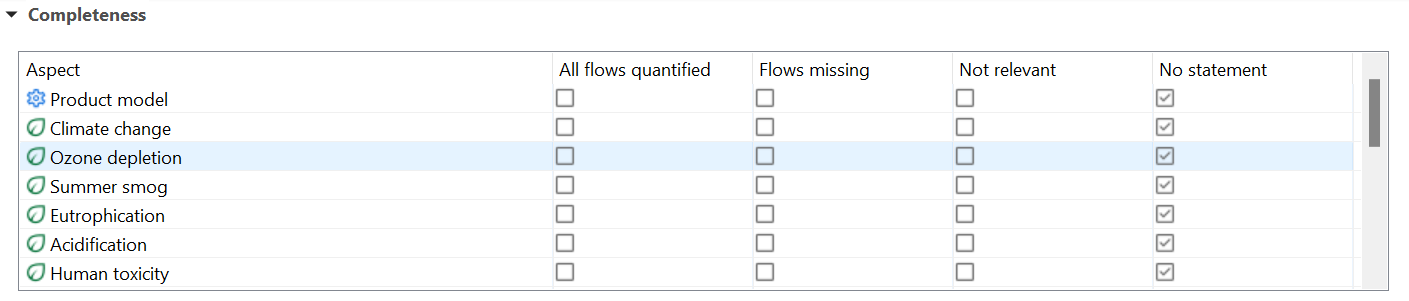
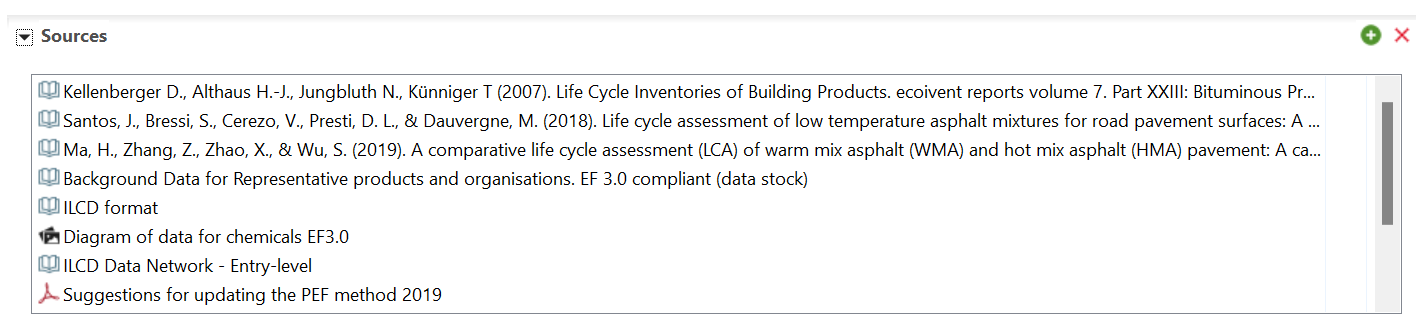

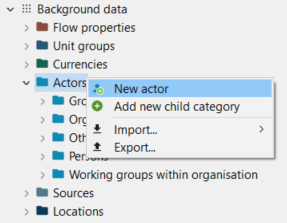
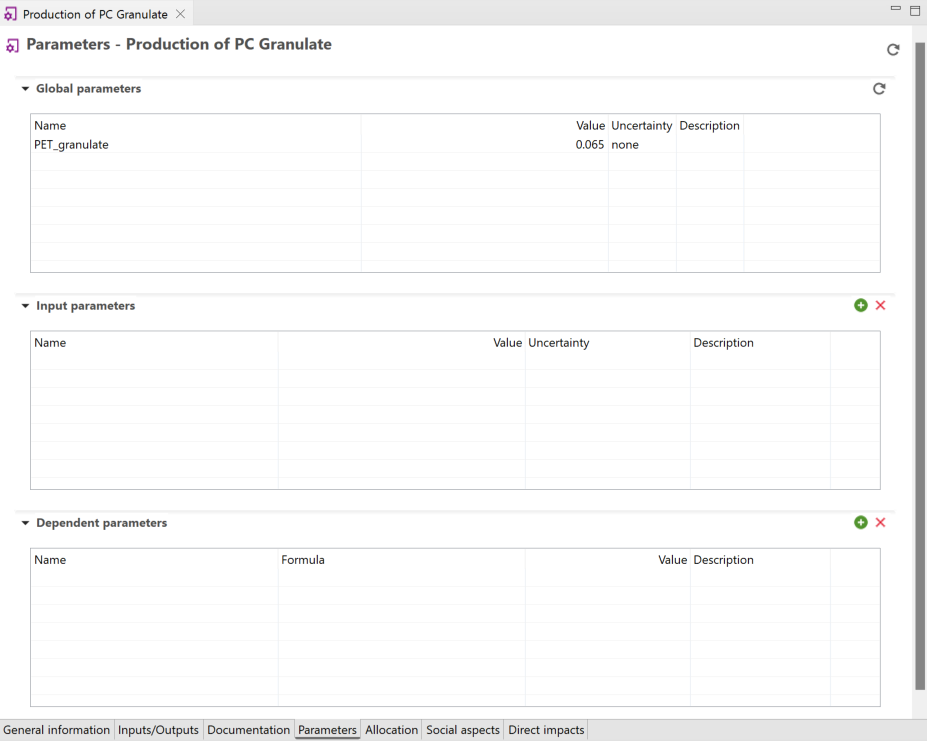 Parameters tab
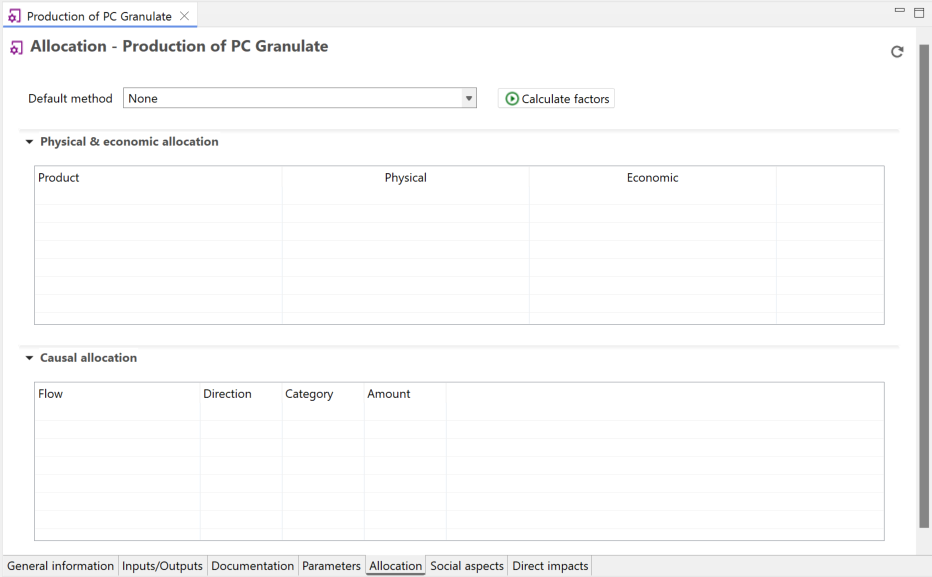 Allocation tab
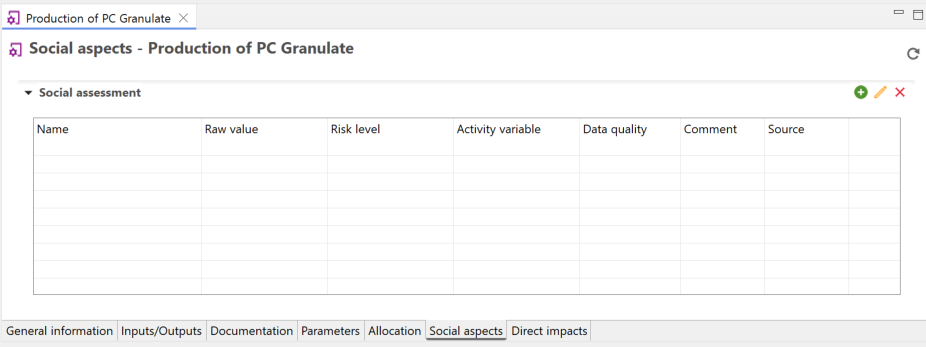 Social aspects tab
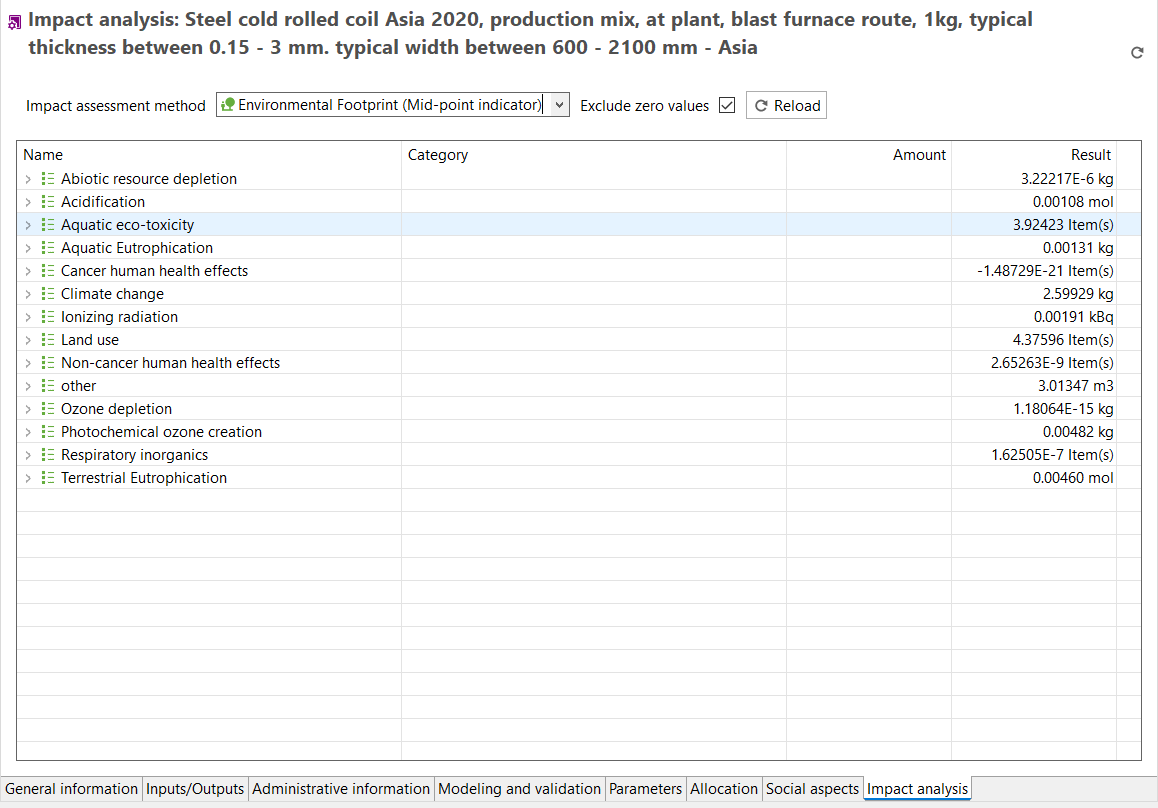
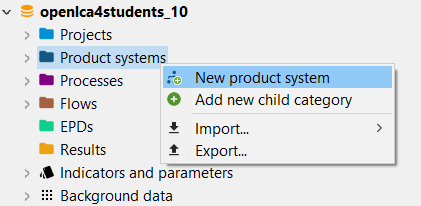
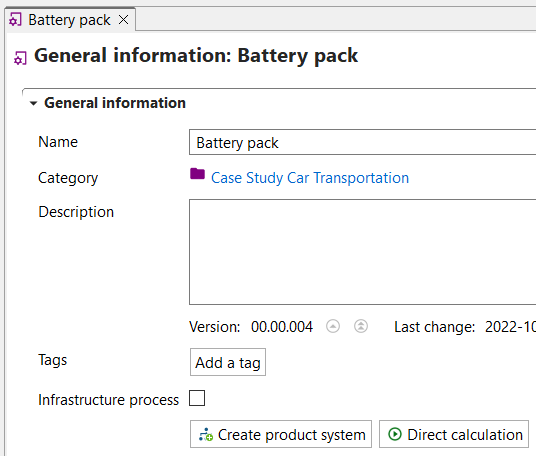
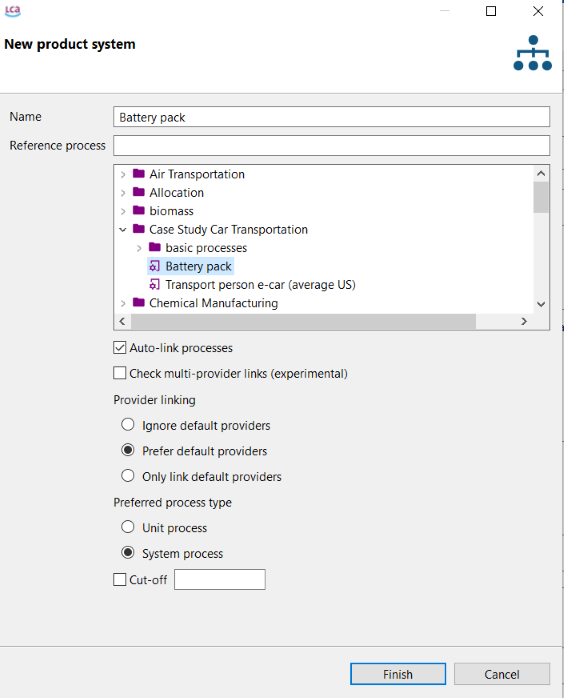


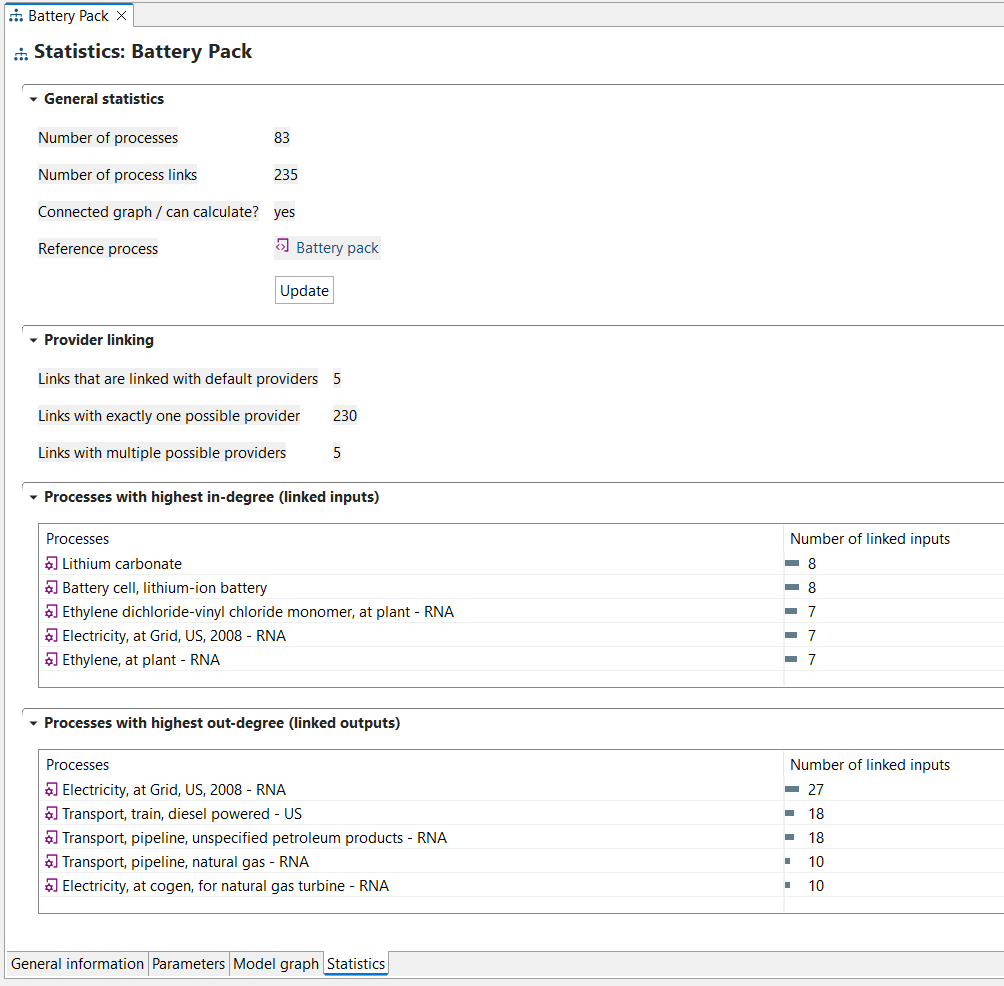
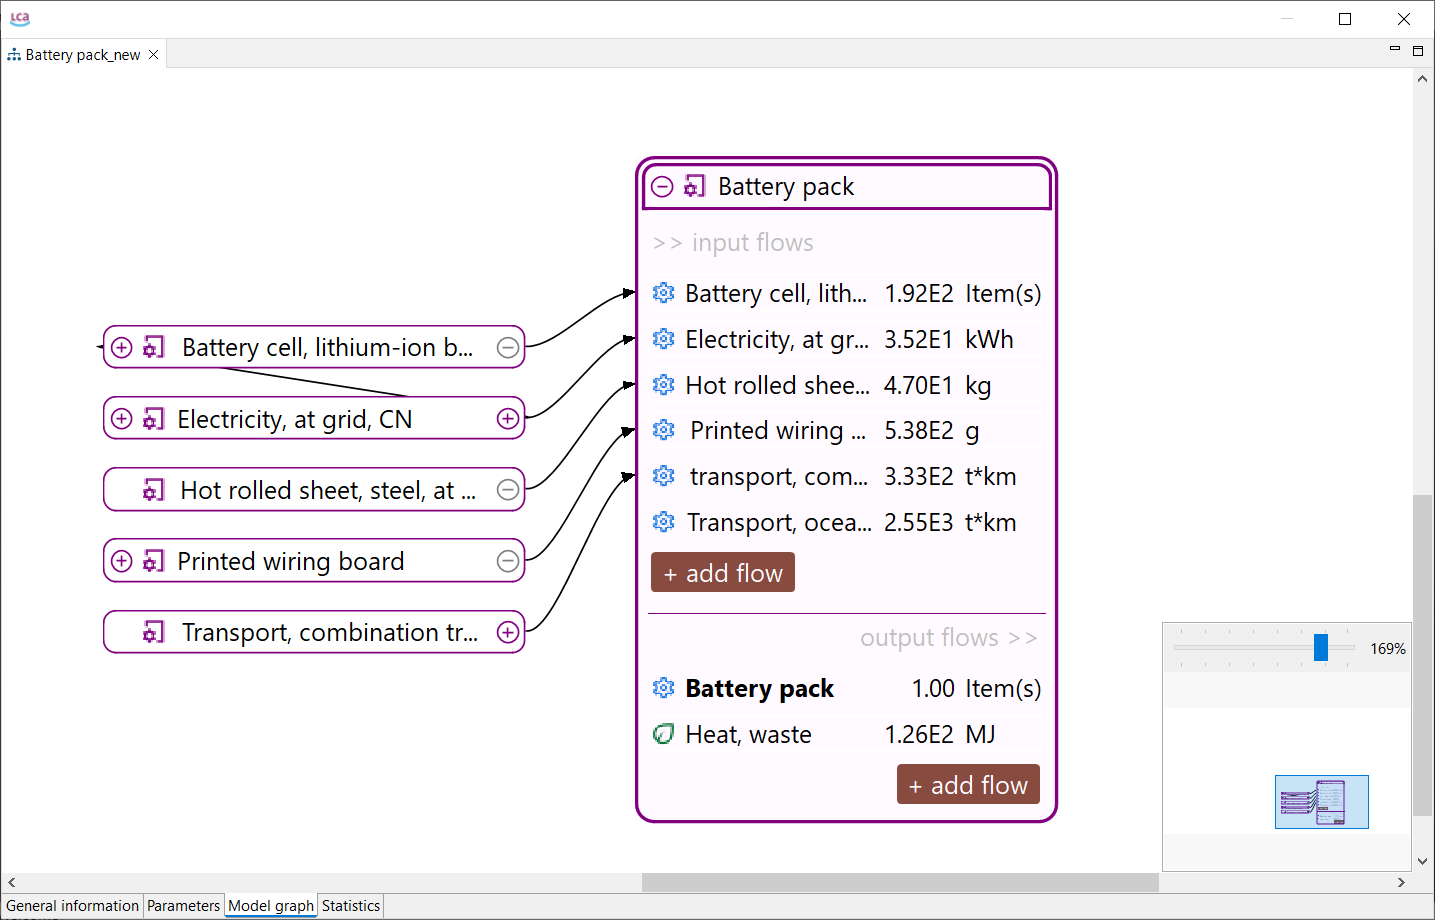
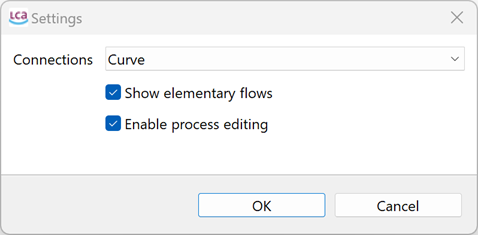
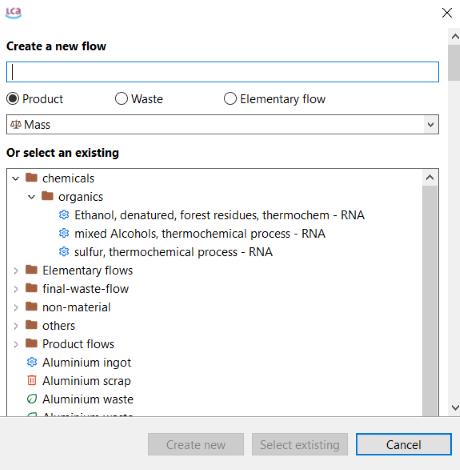
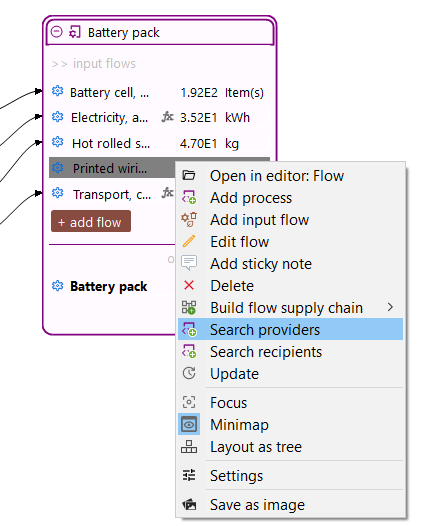

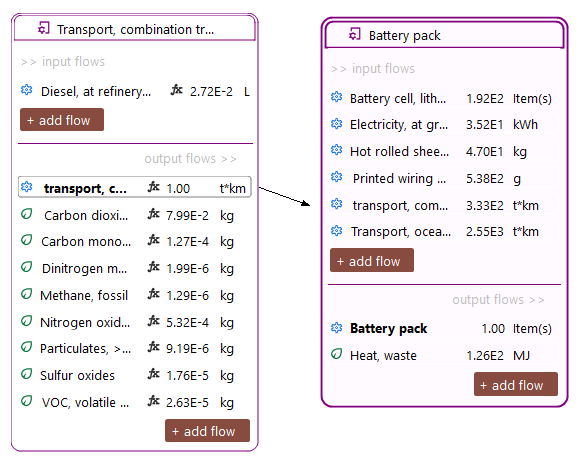
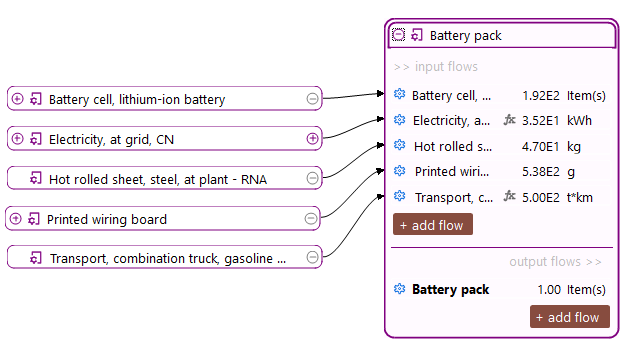
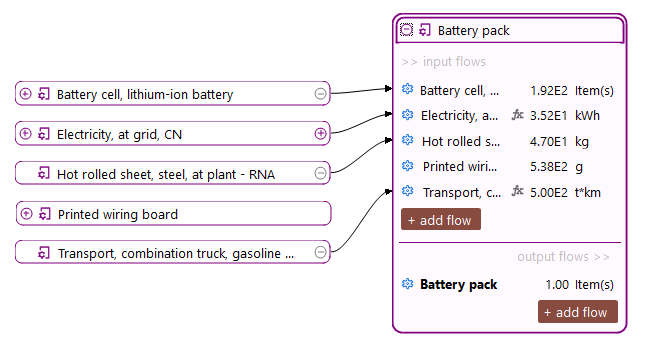
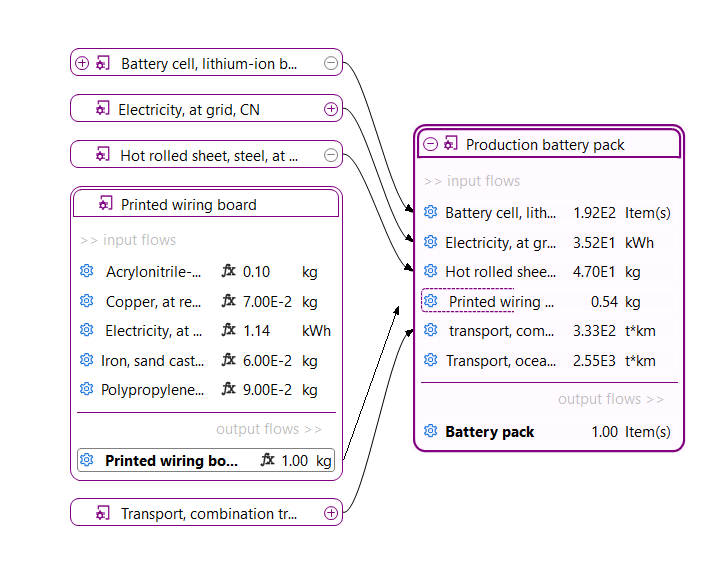
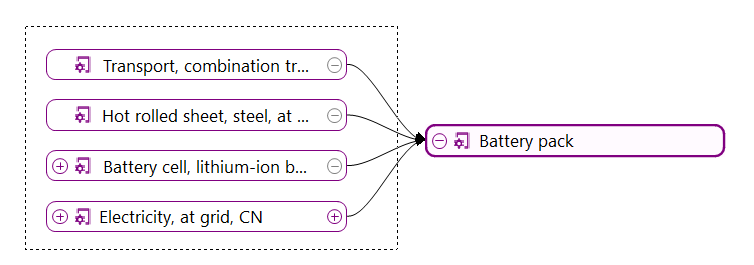
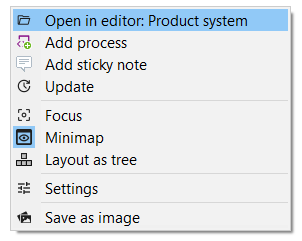
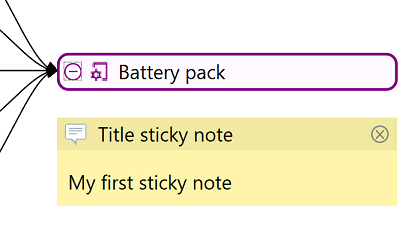
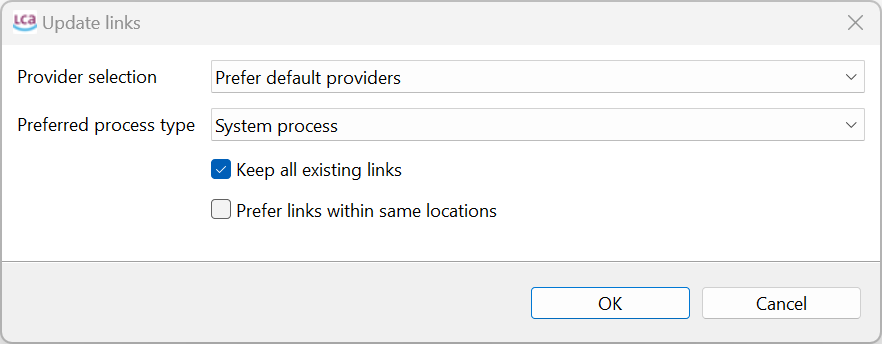


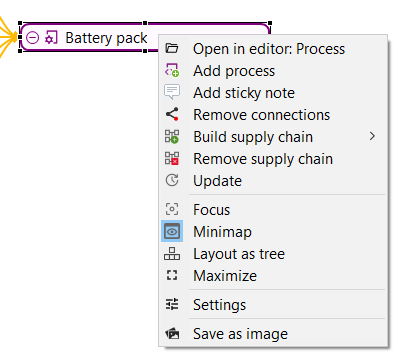
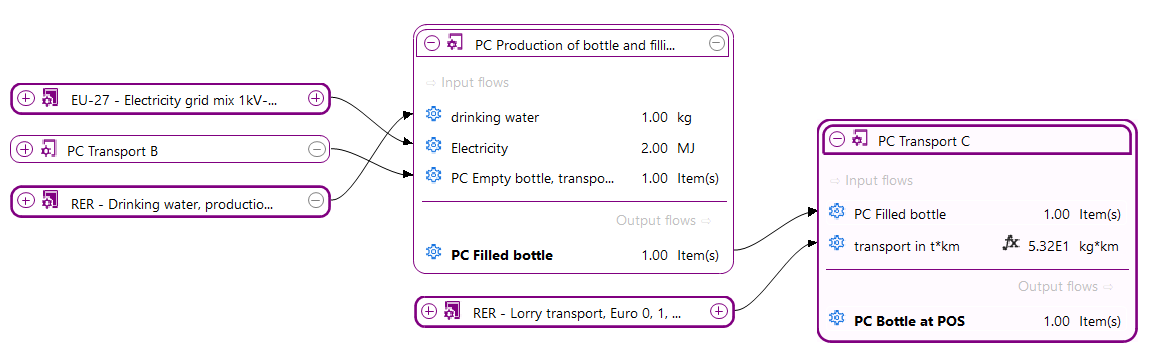
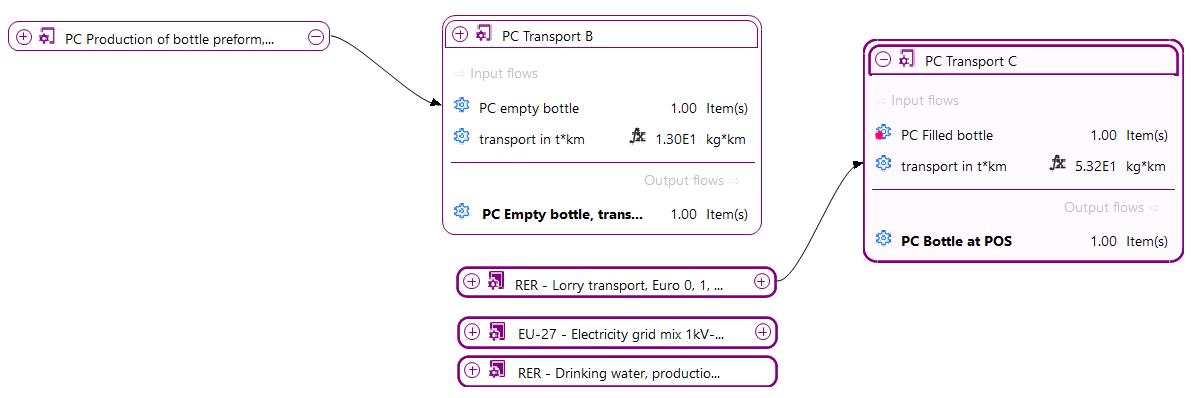
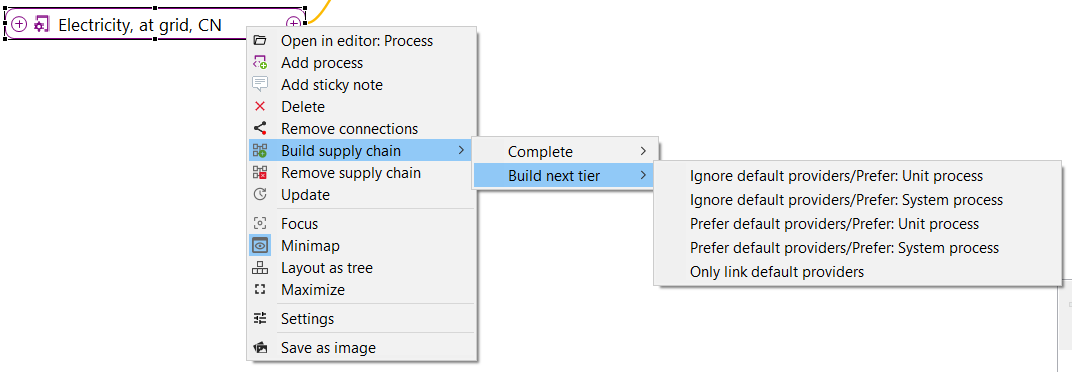
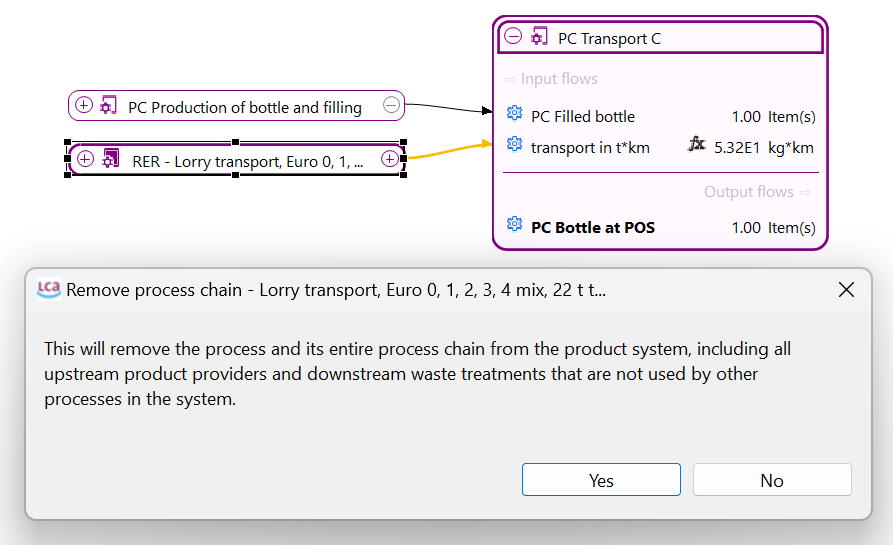
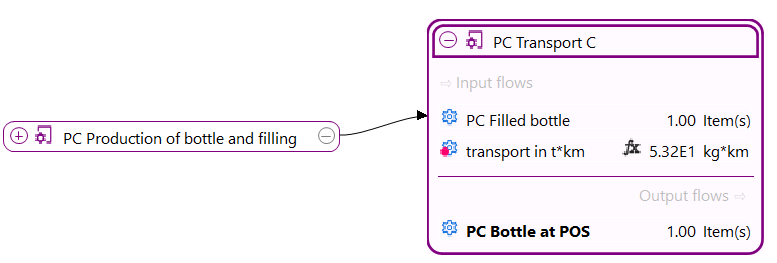
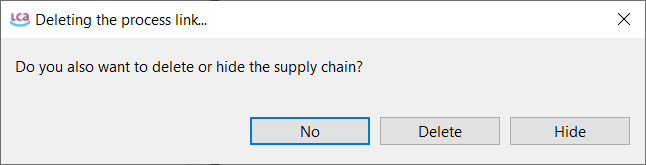


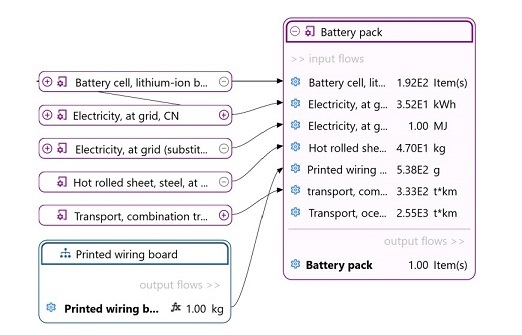
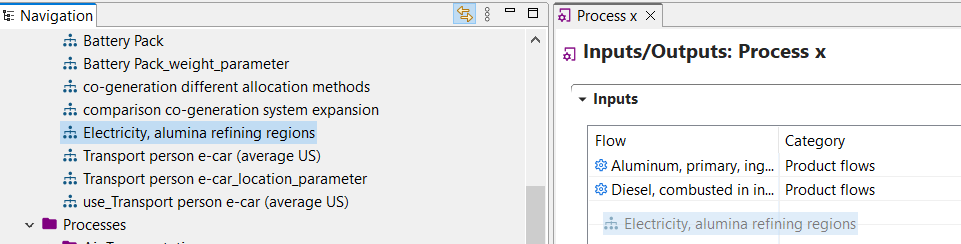
 Result dragged in a product system
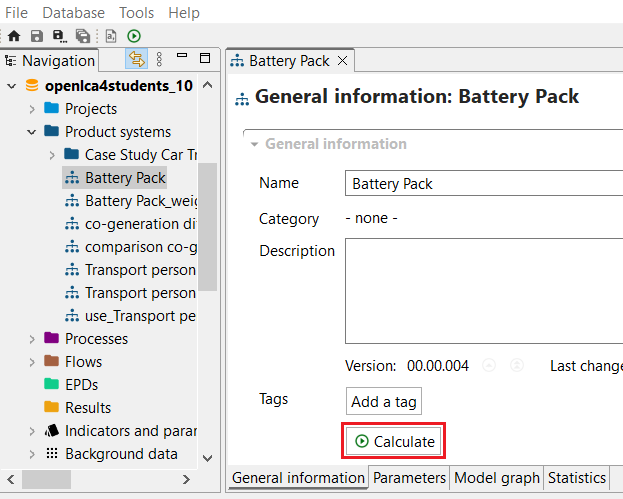 Calculating a product system
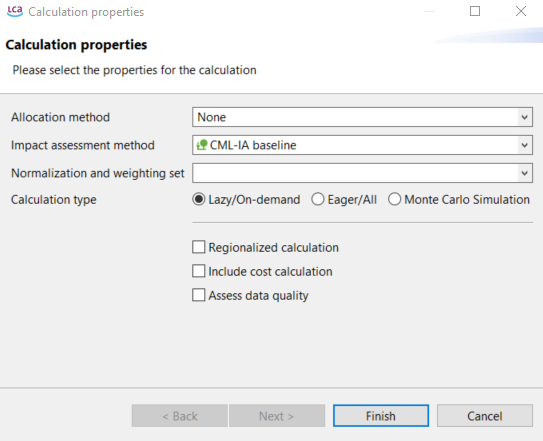
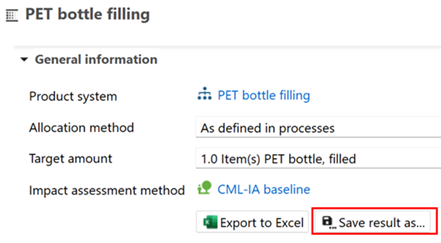
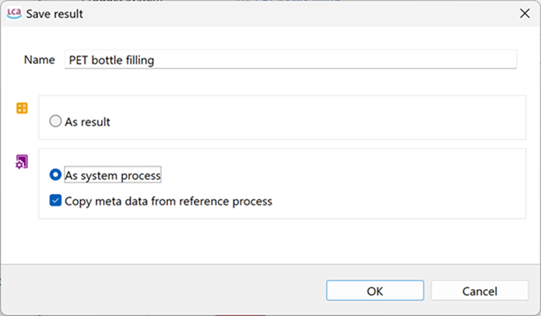
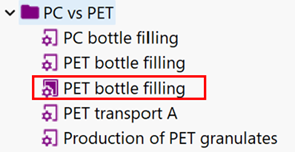
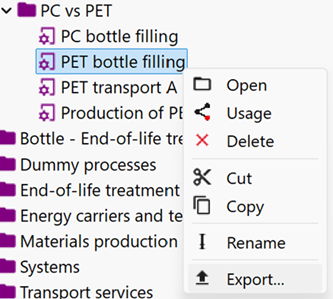
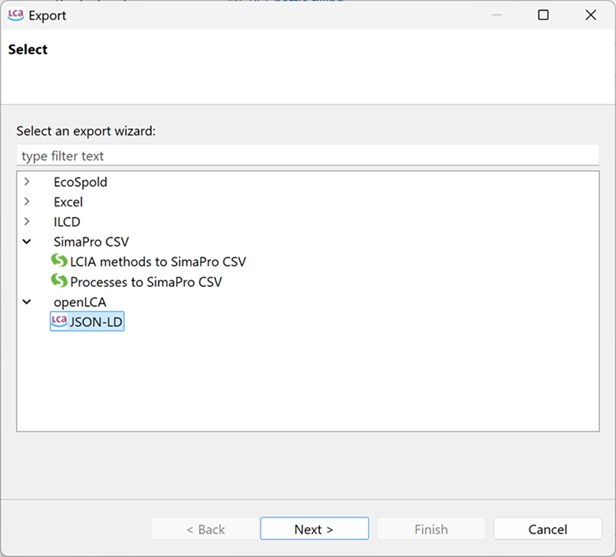
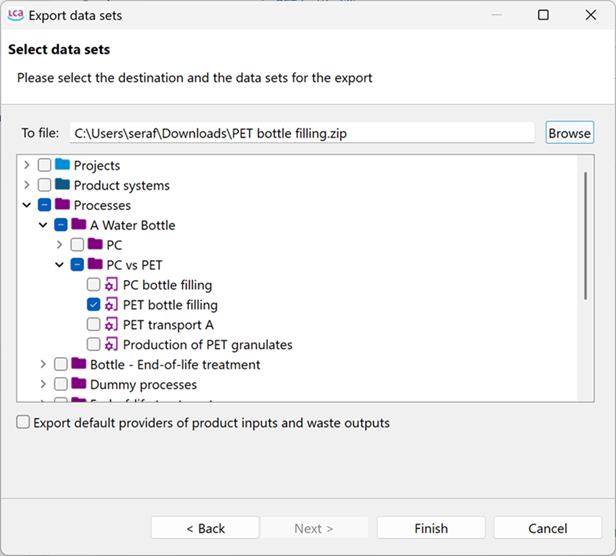
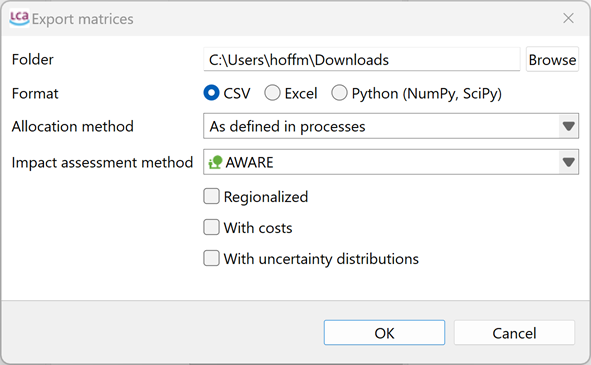
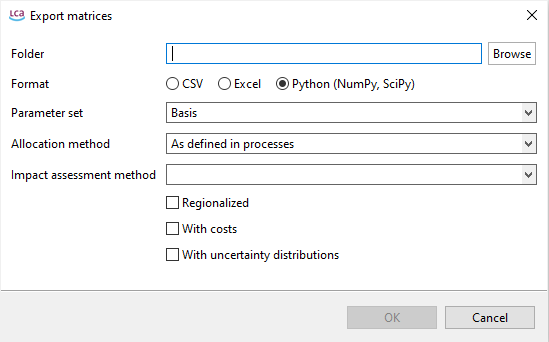
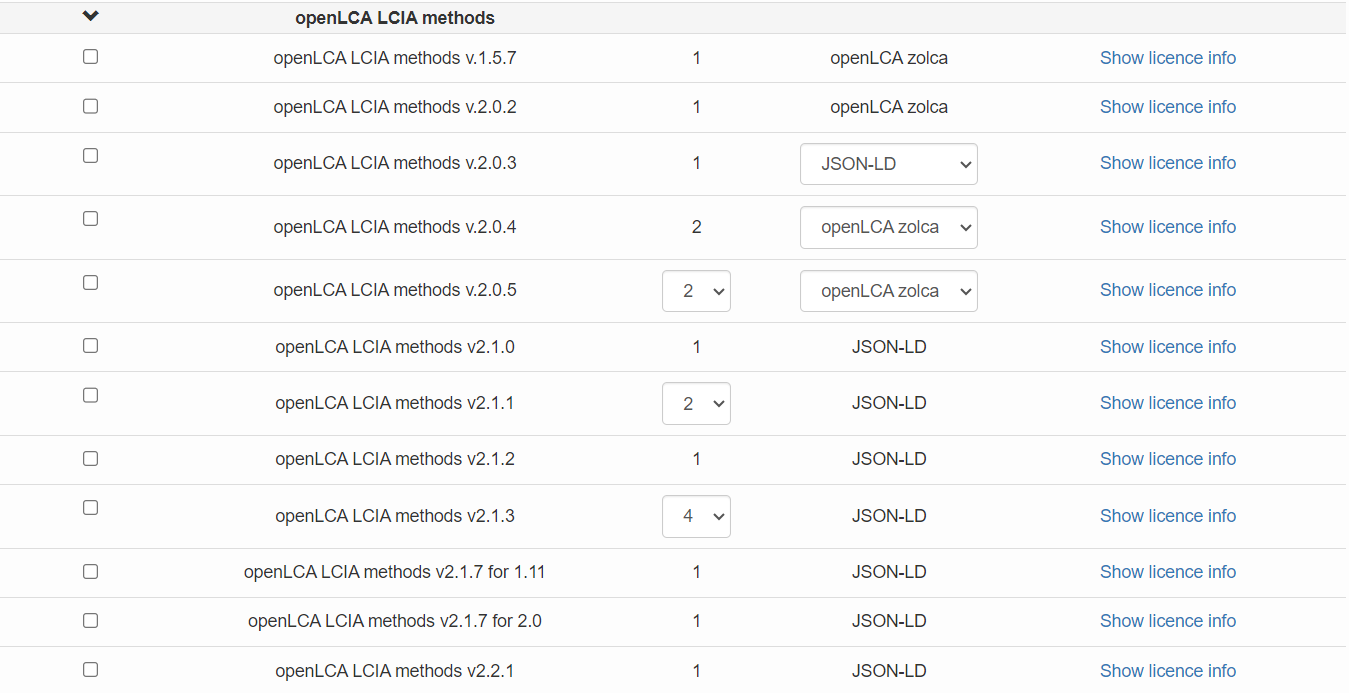

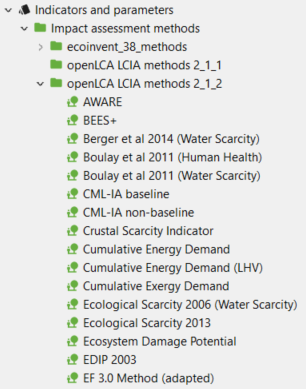
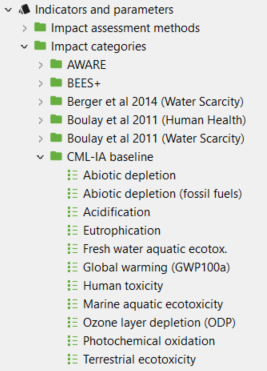
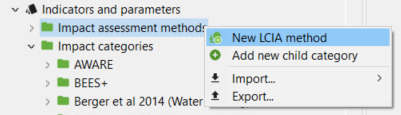
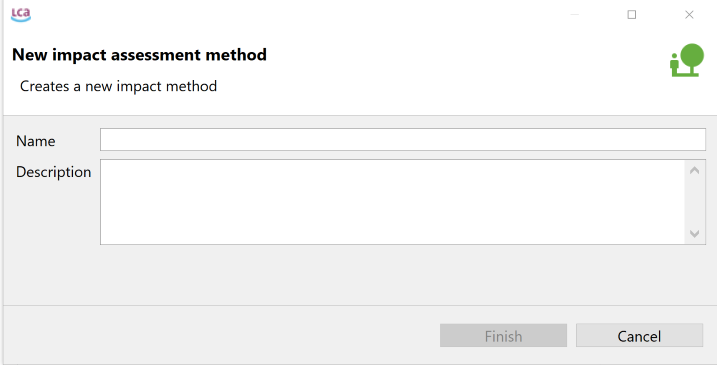
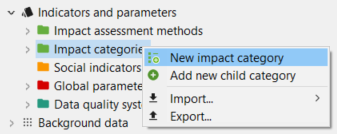
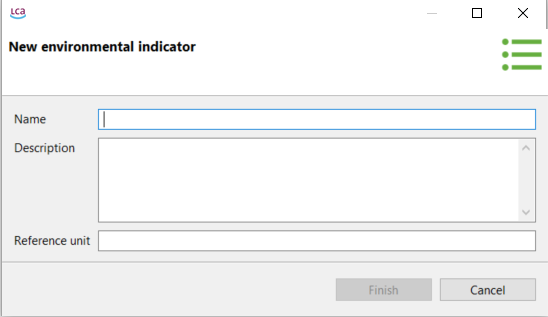
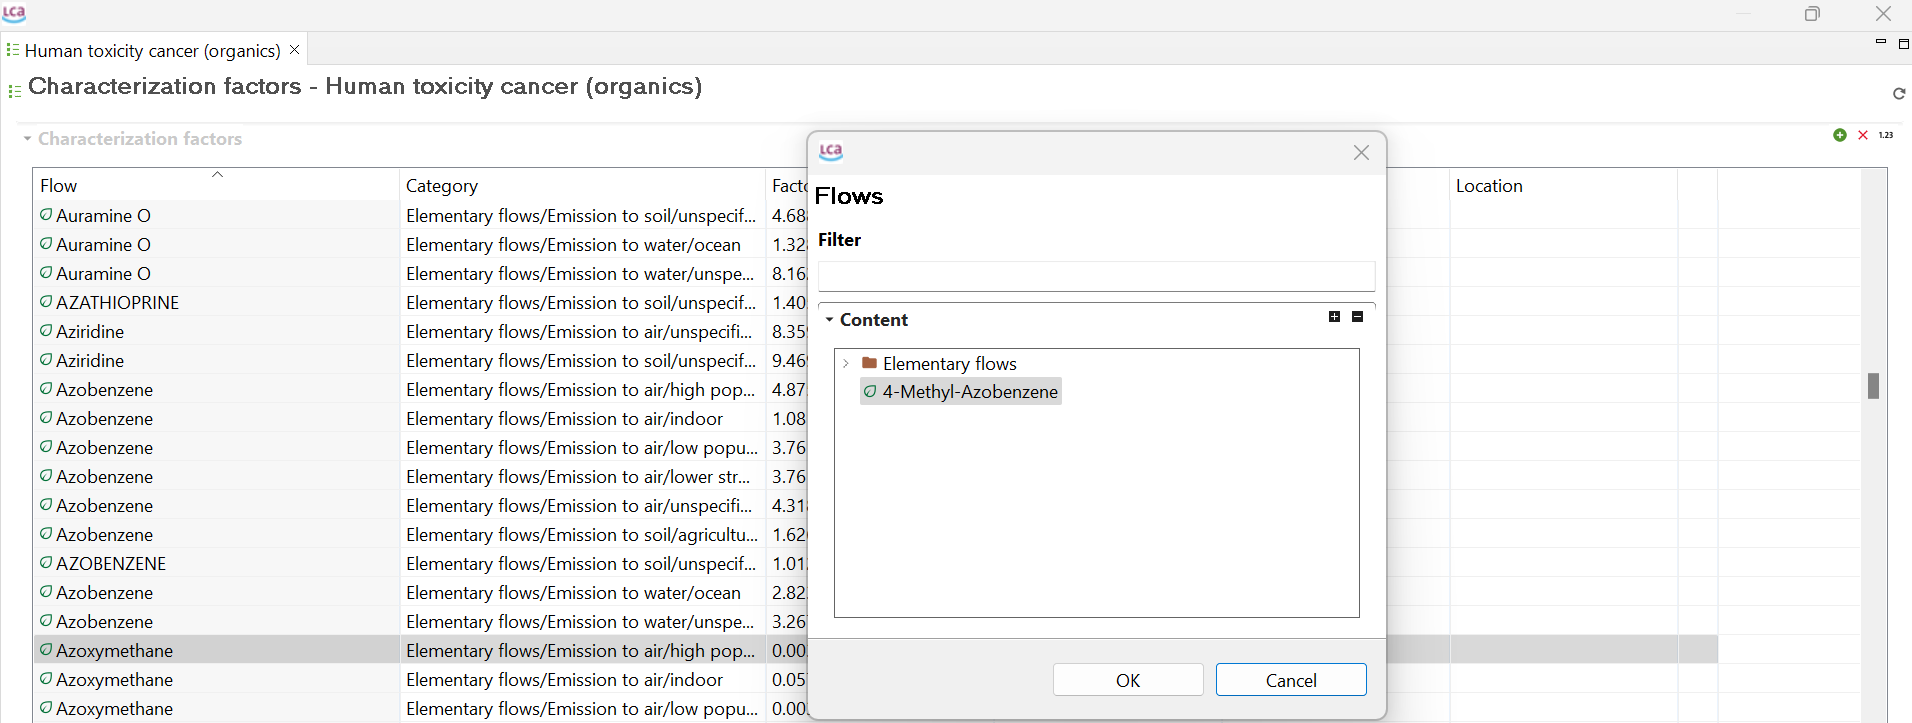
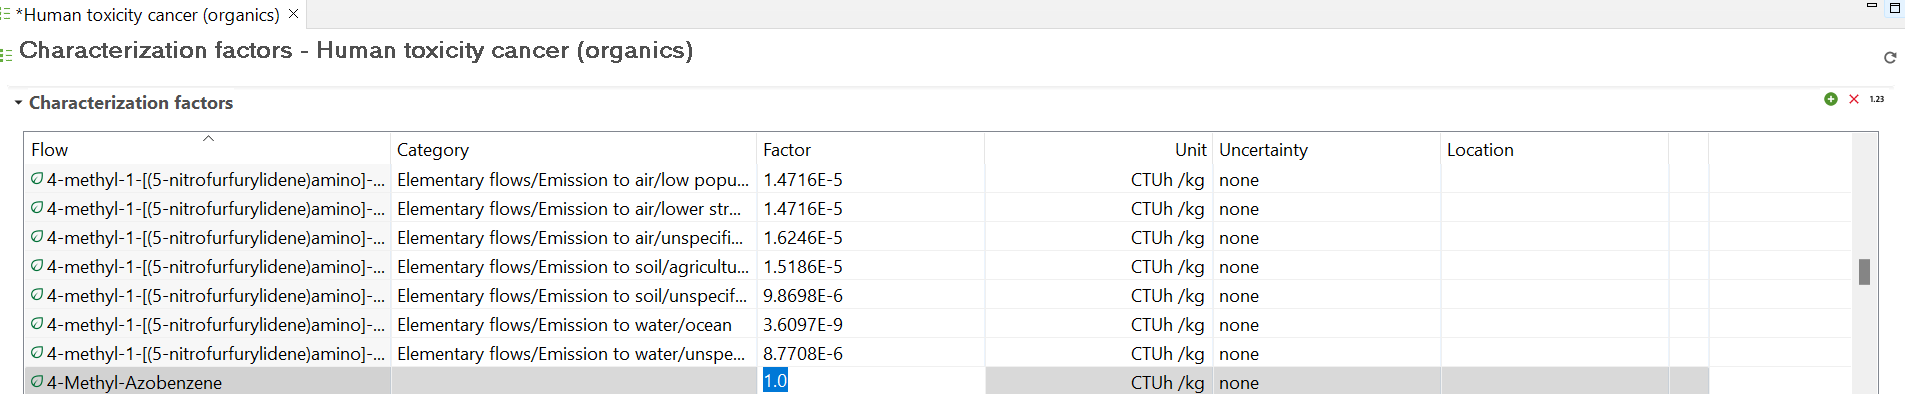
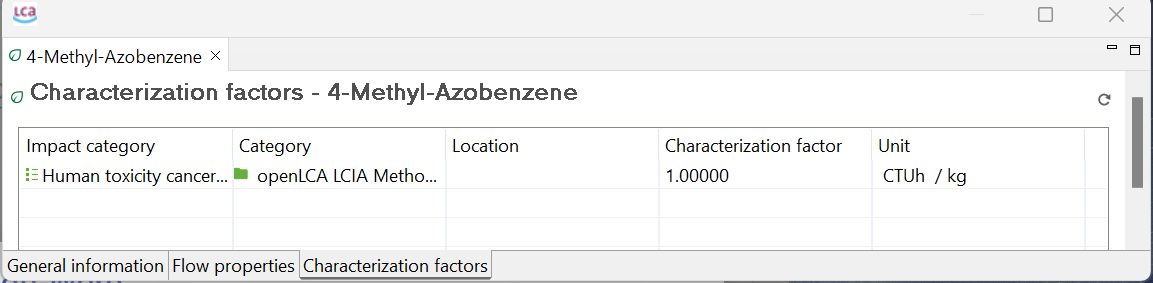
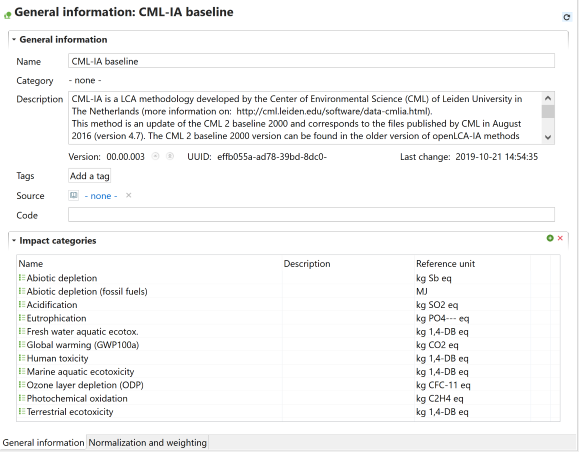
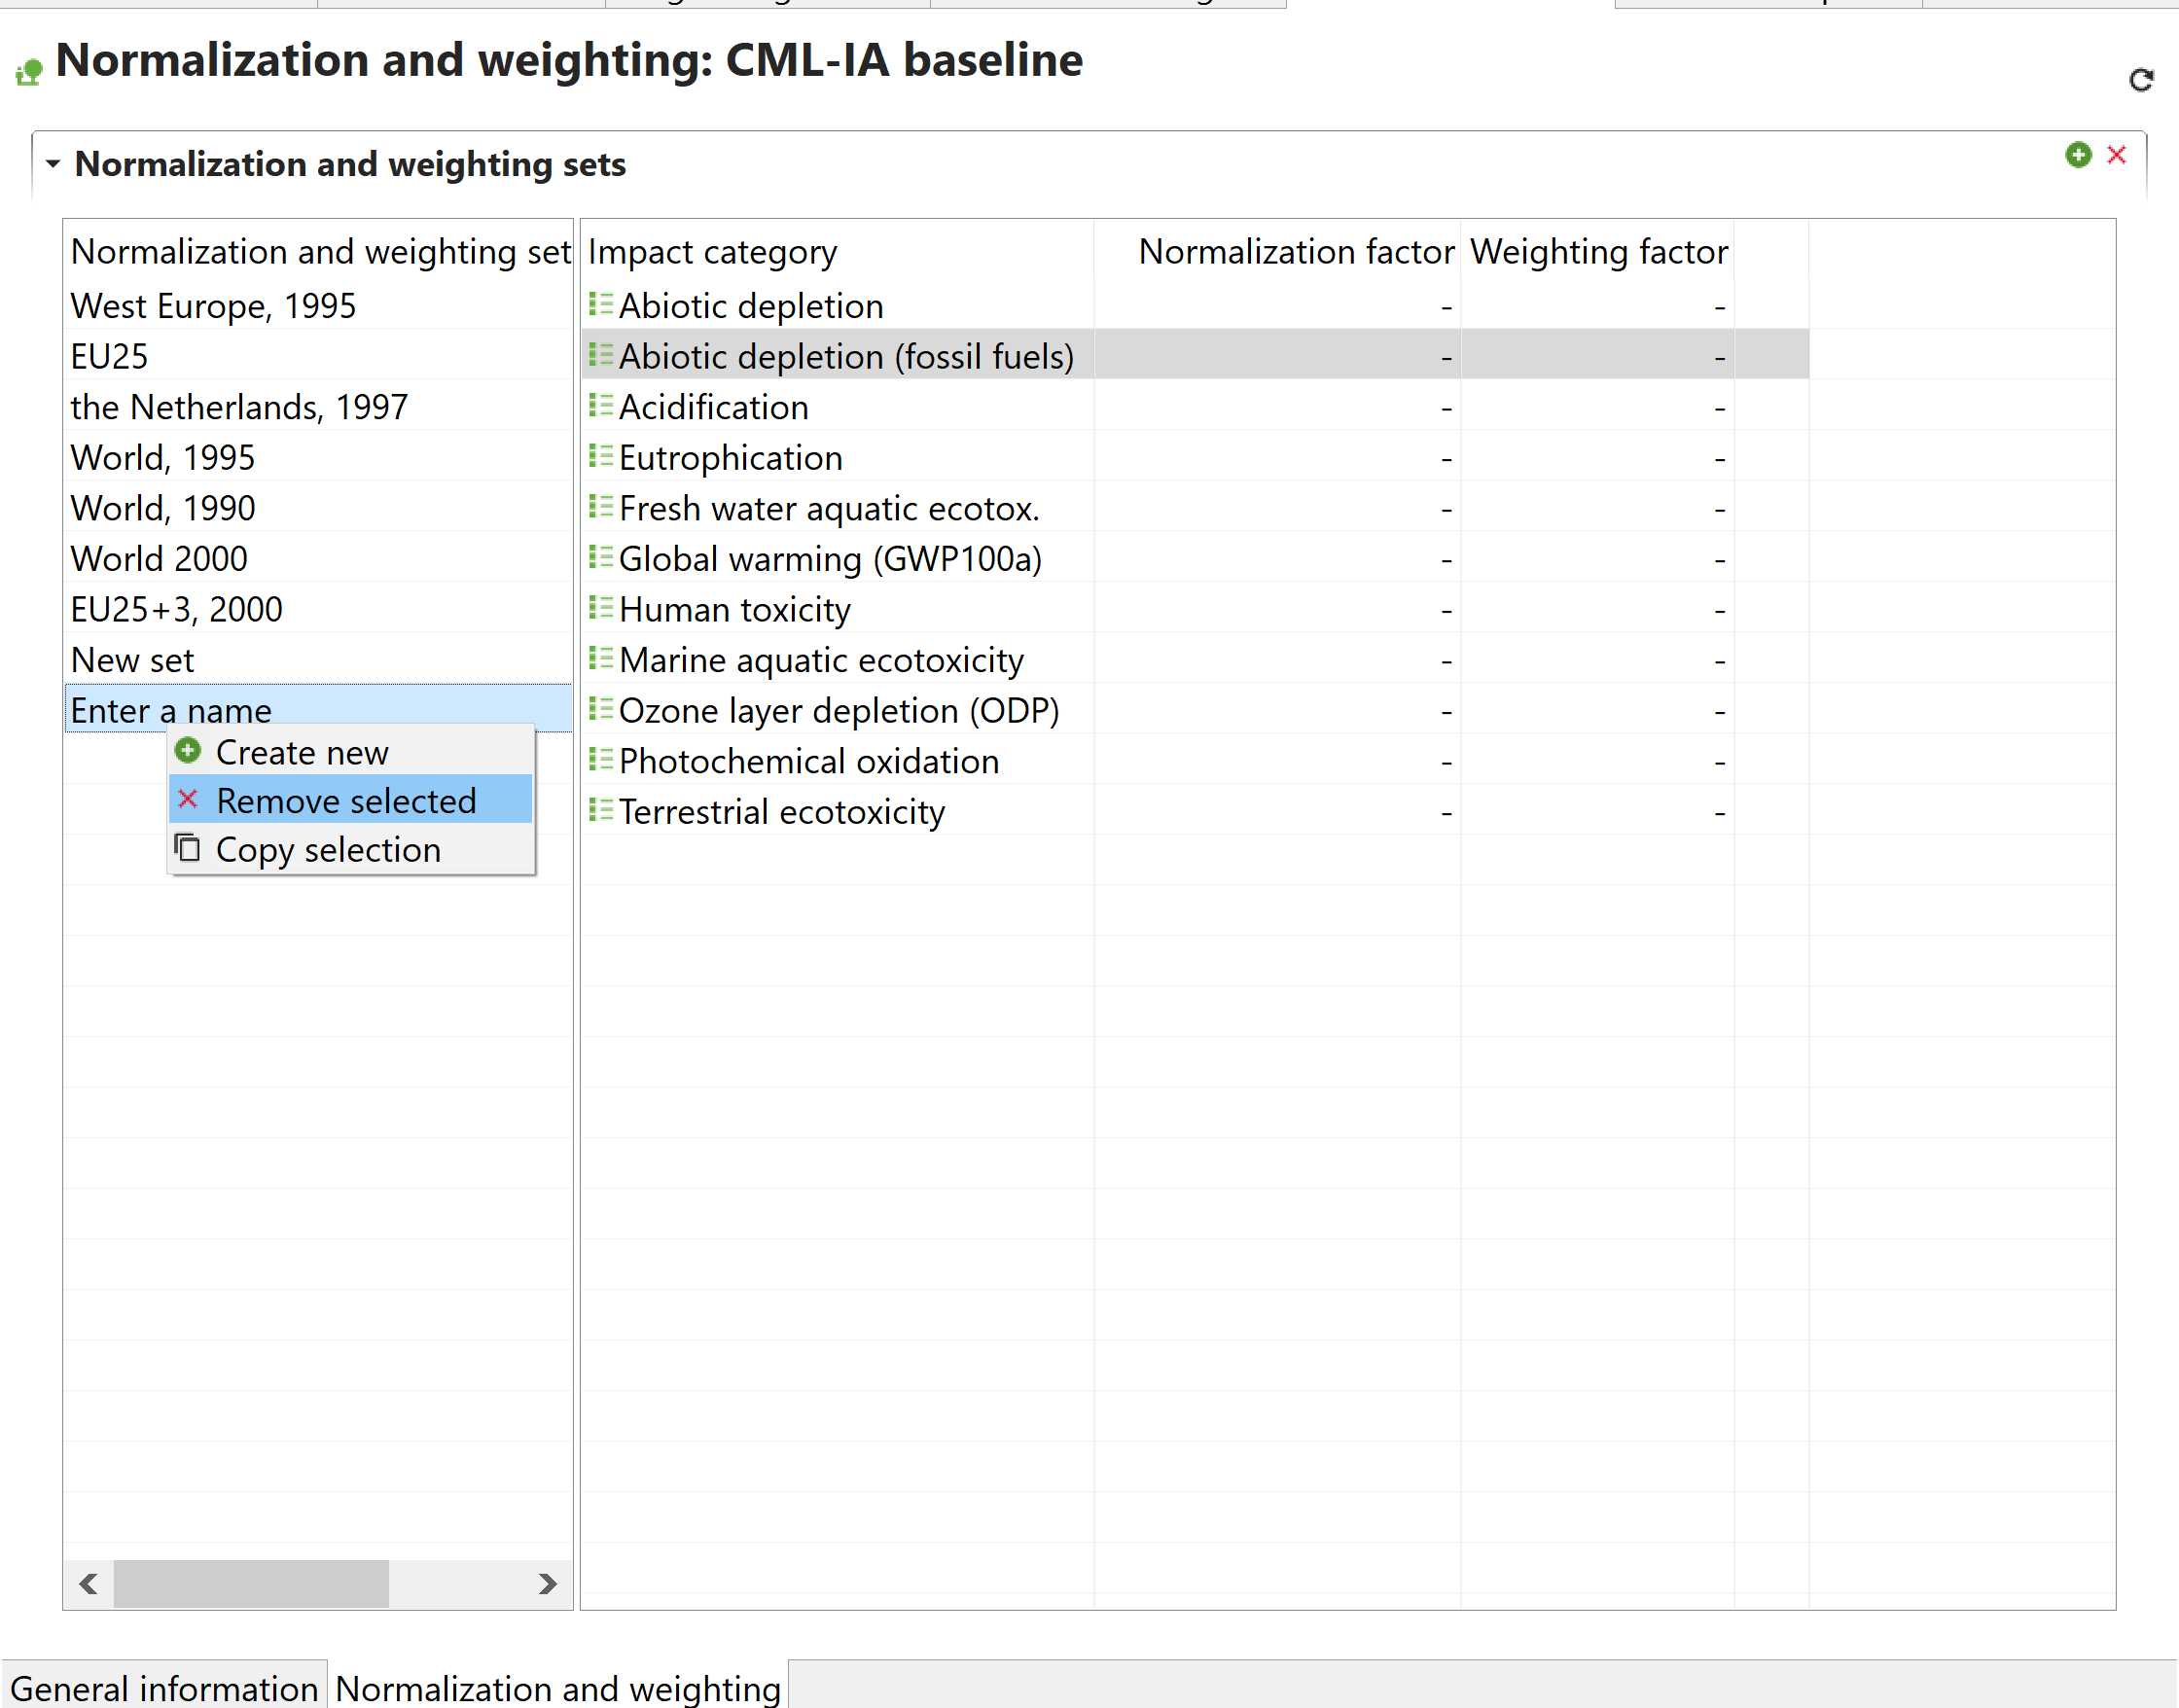
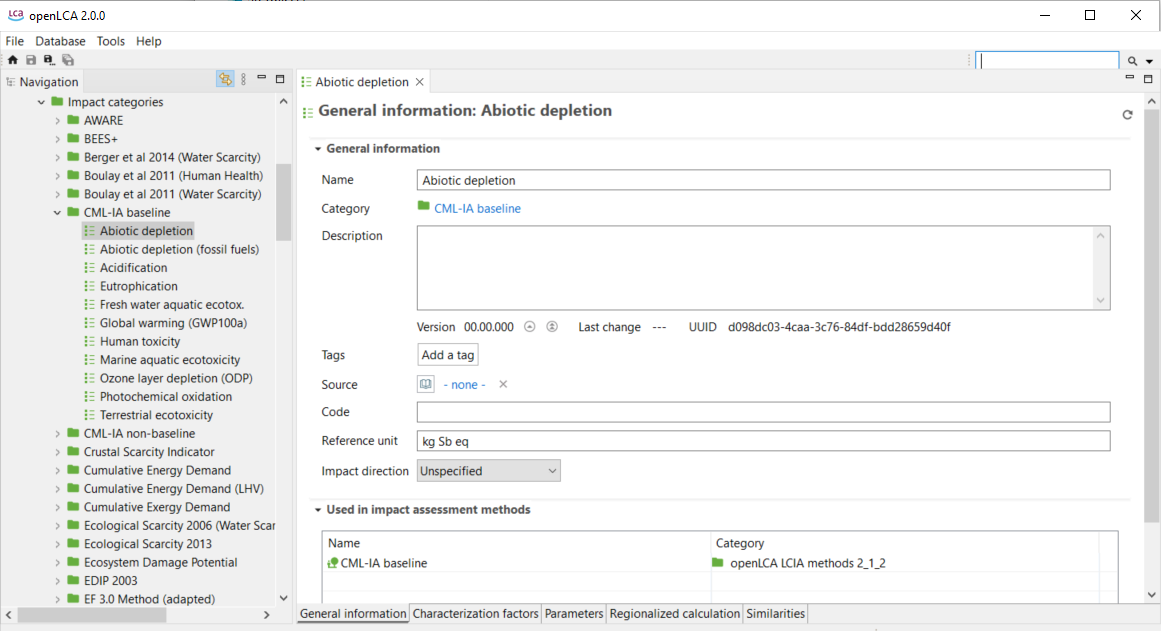
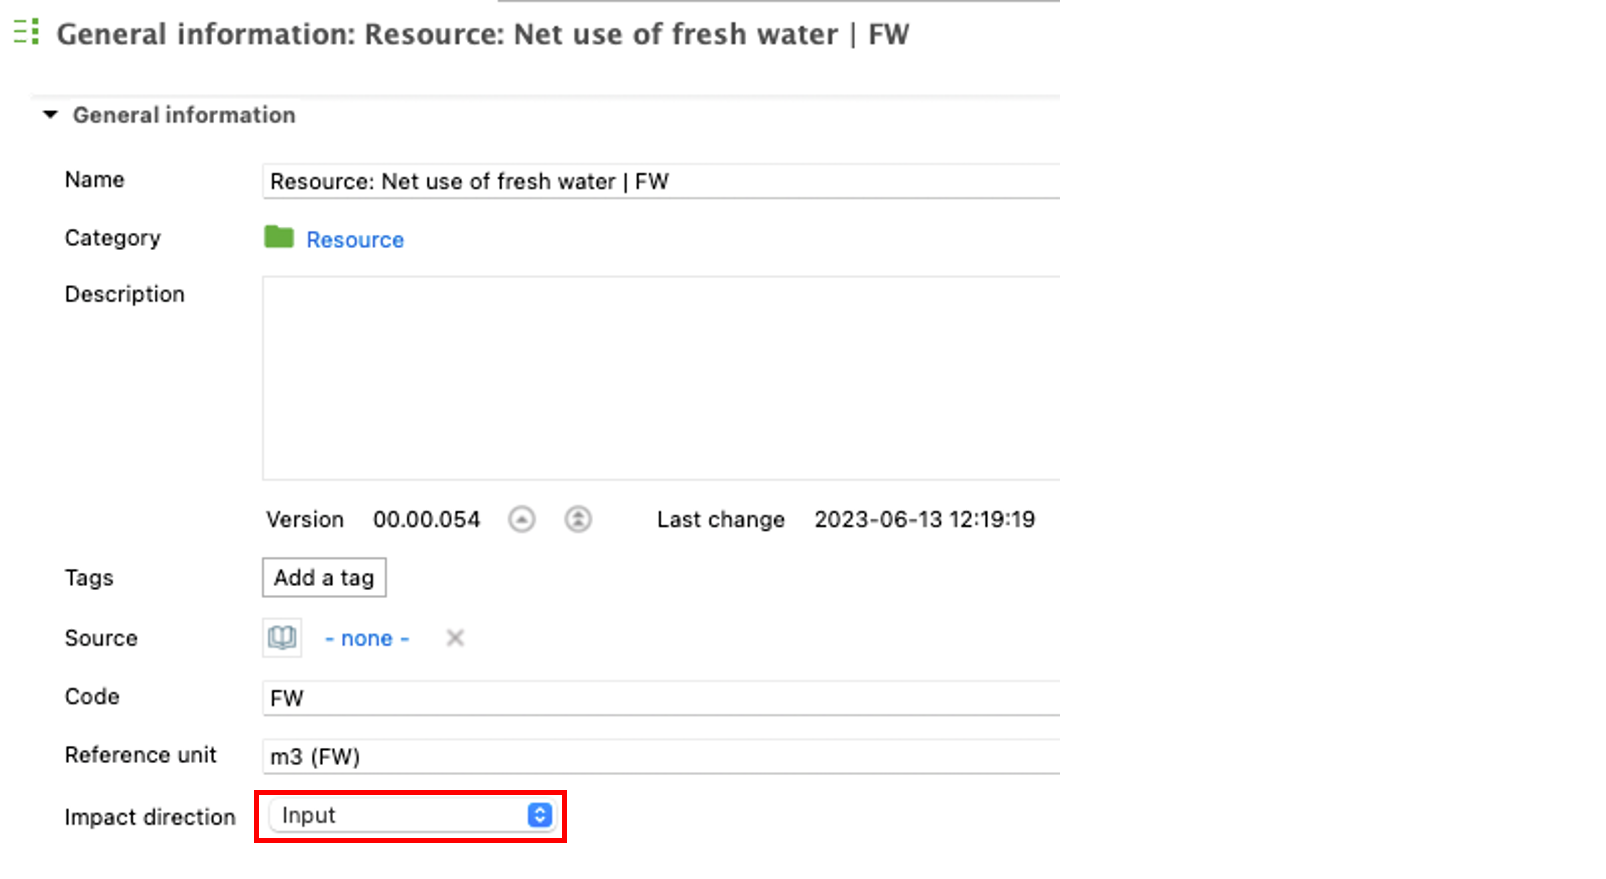
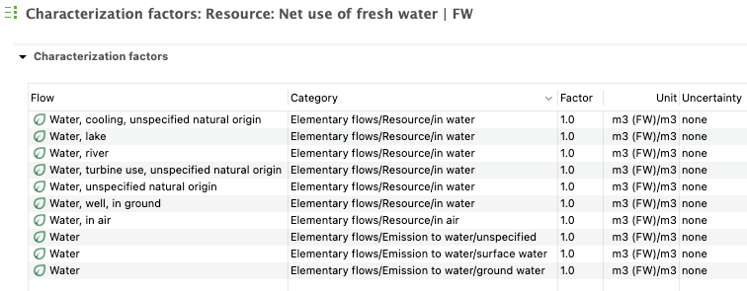
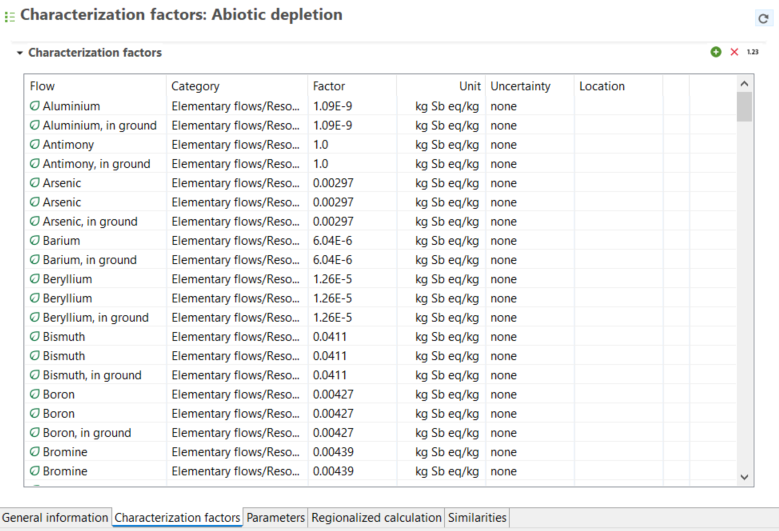 "Characterization factors" tab
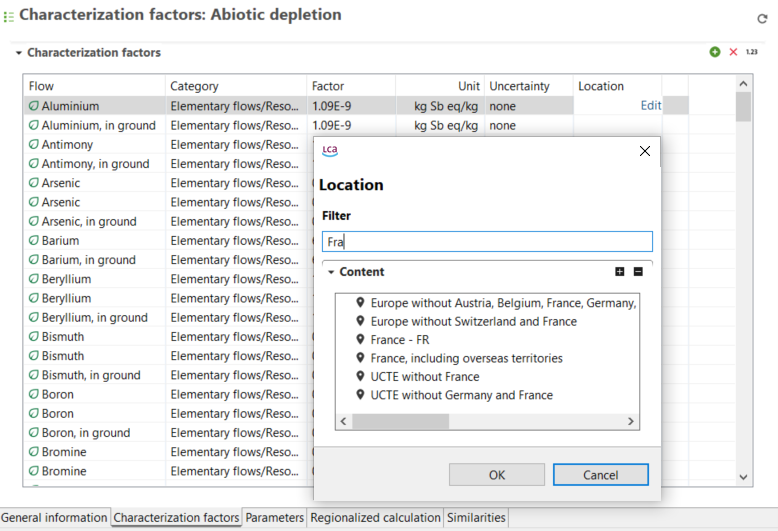
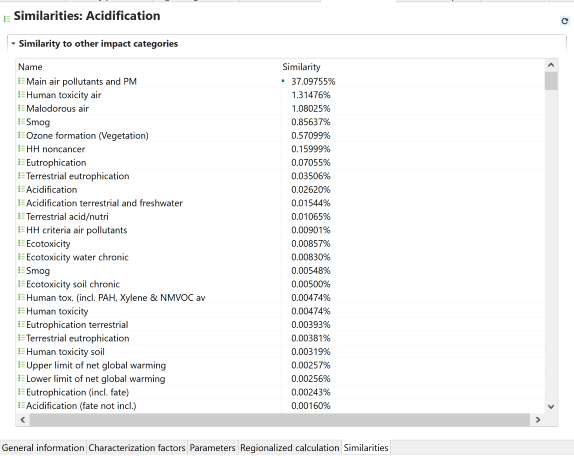

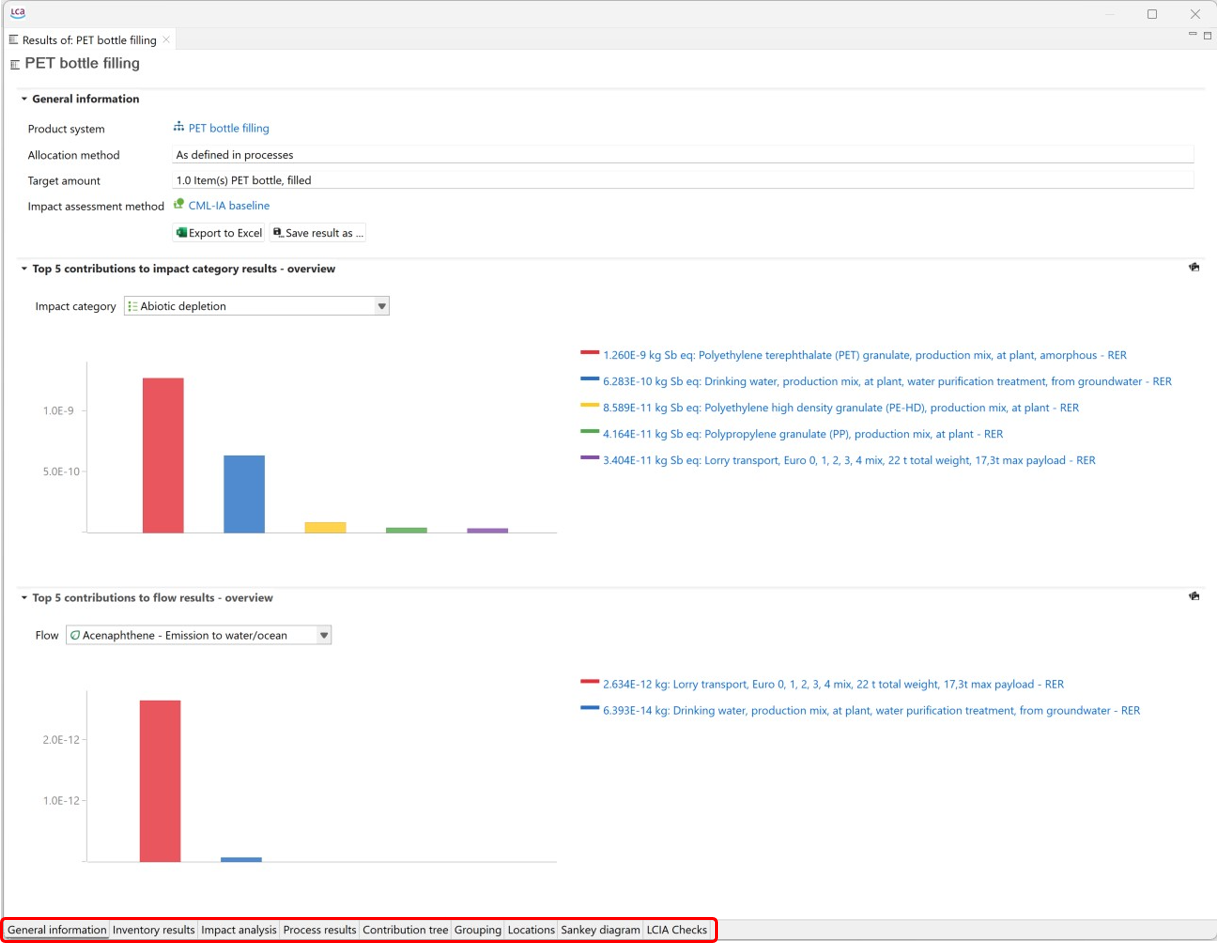
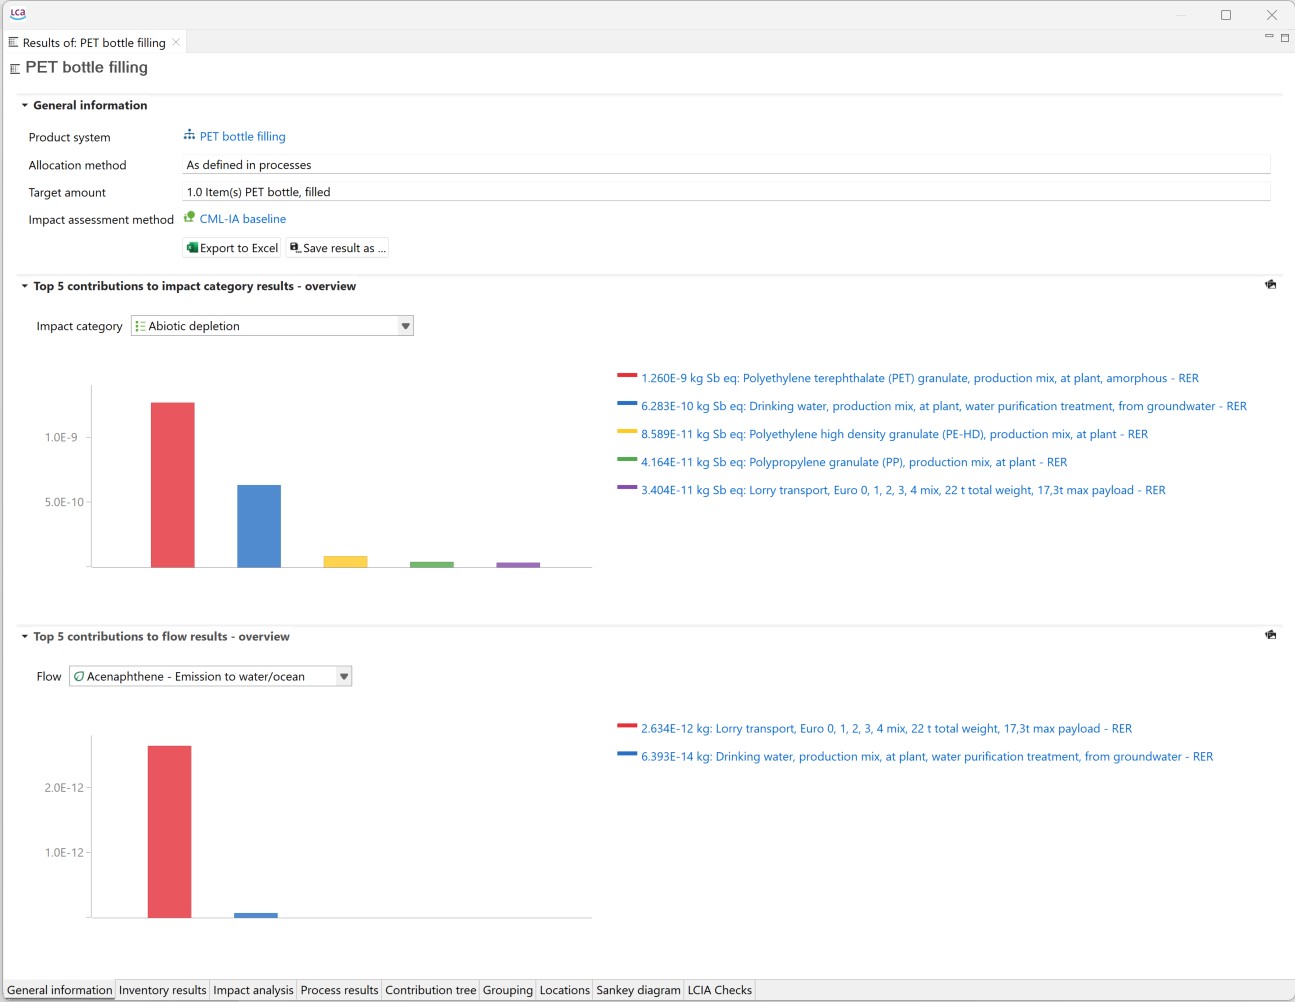
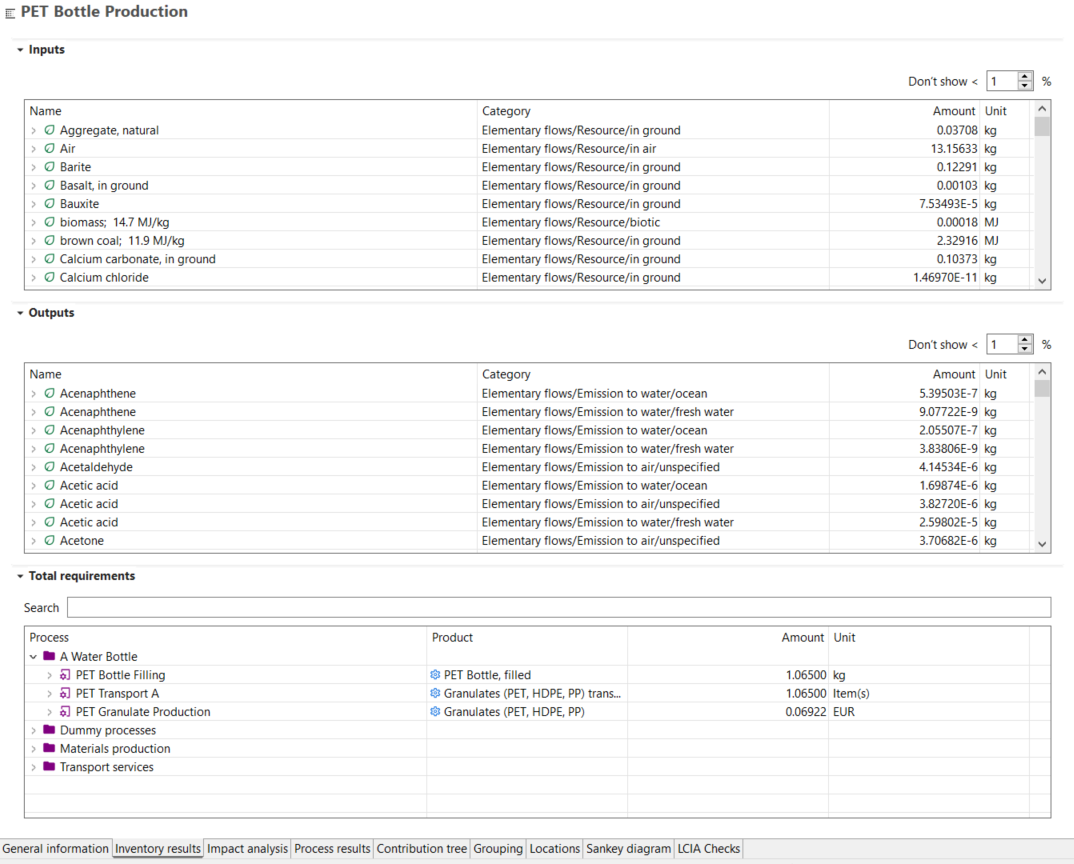
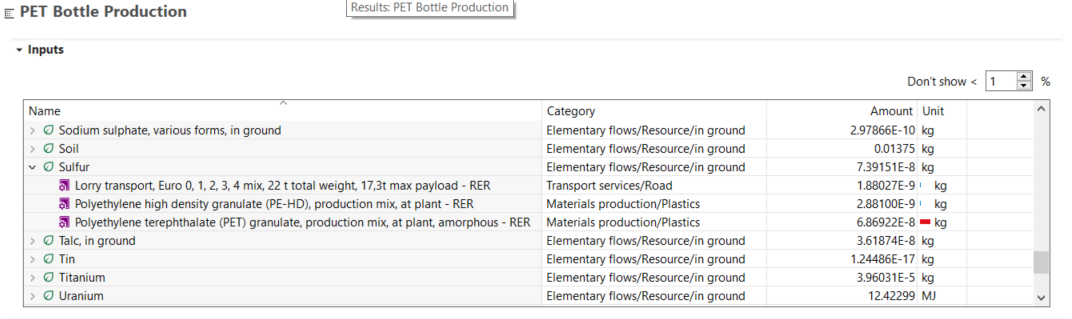
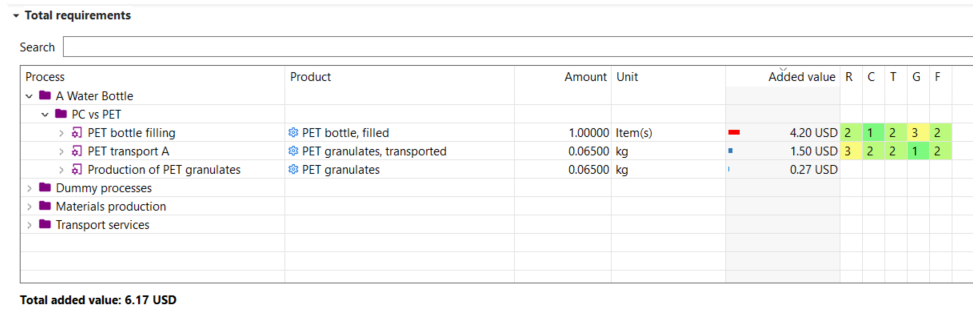
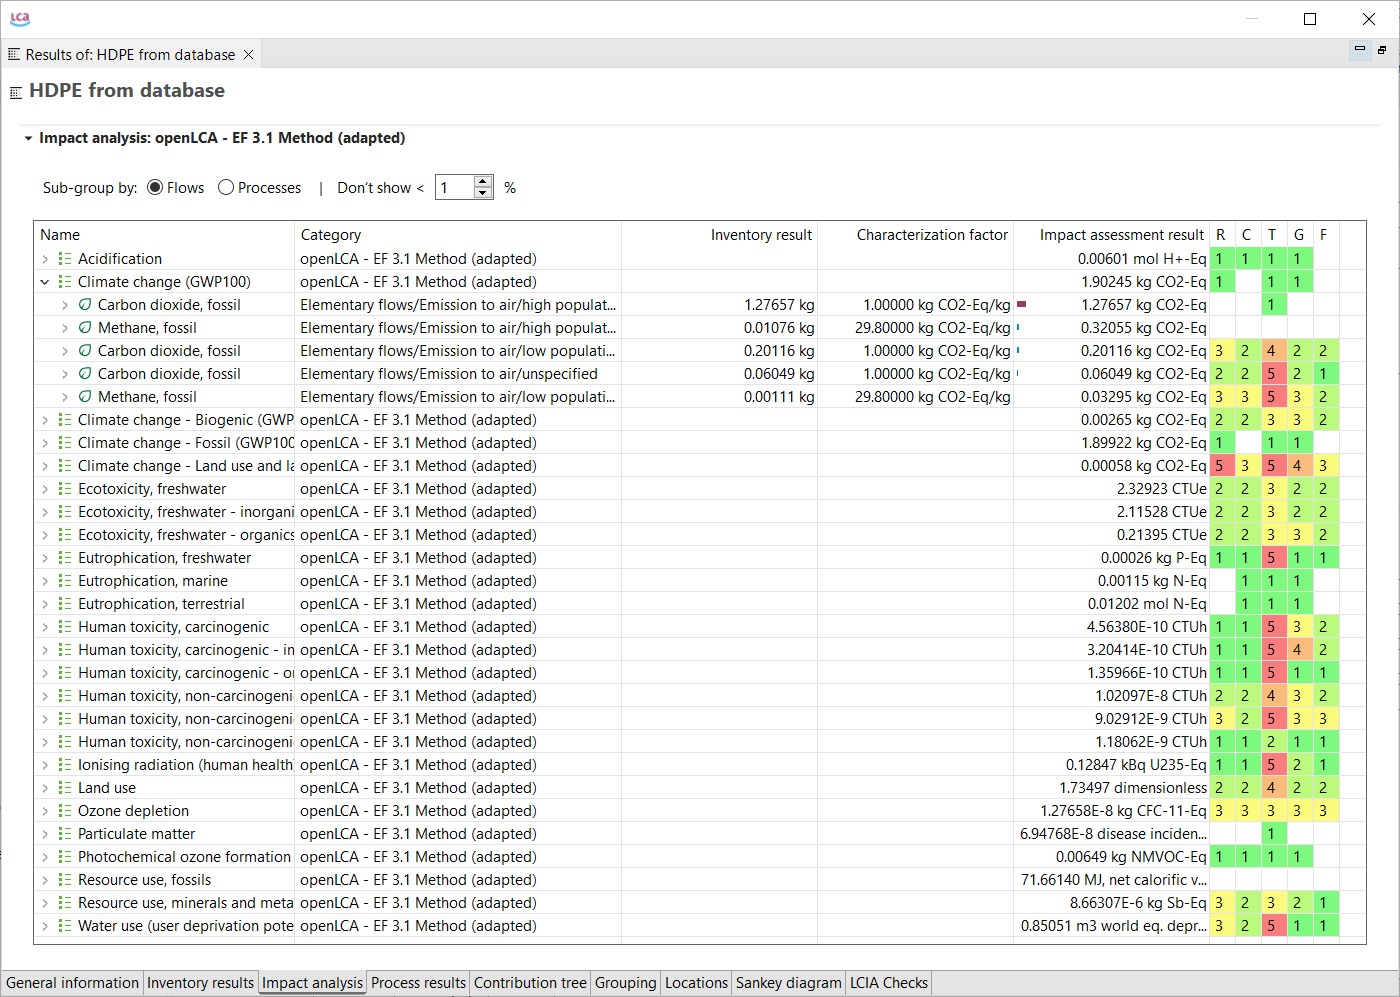
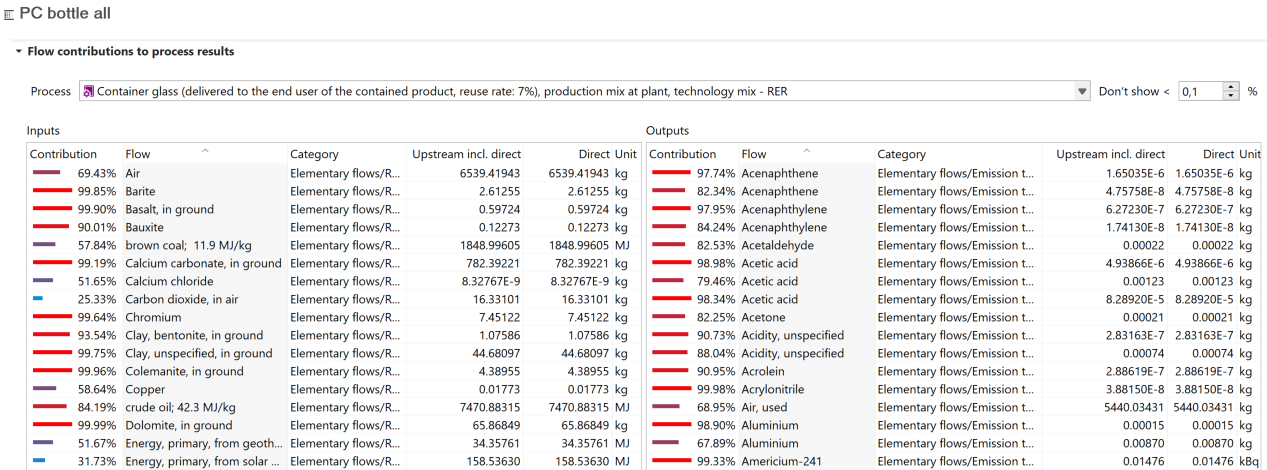
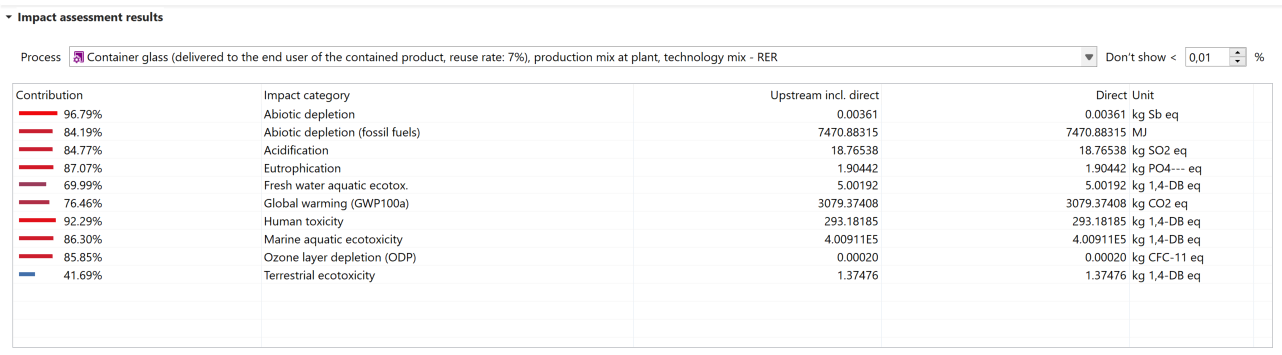
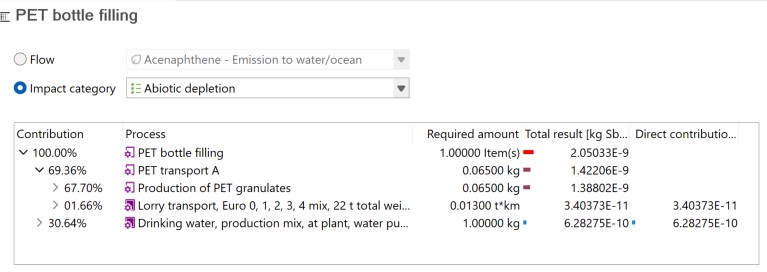
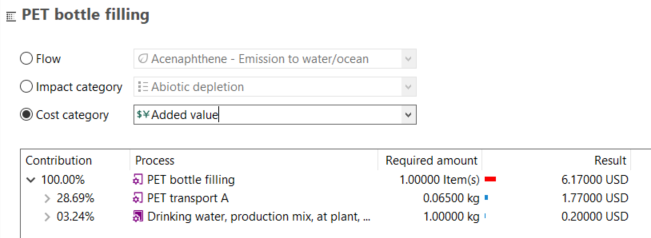
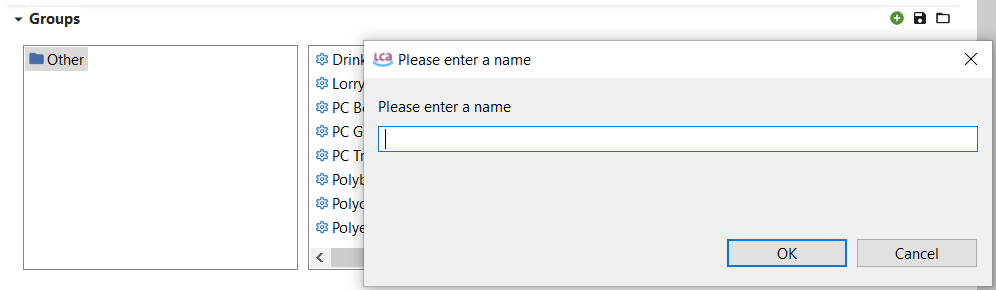
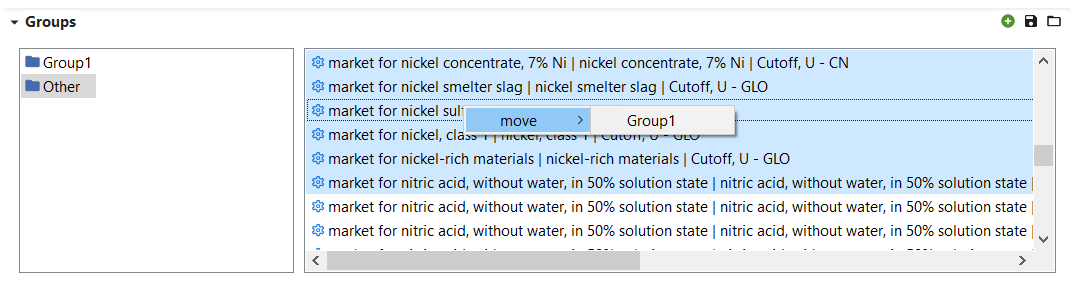
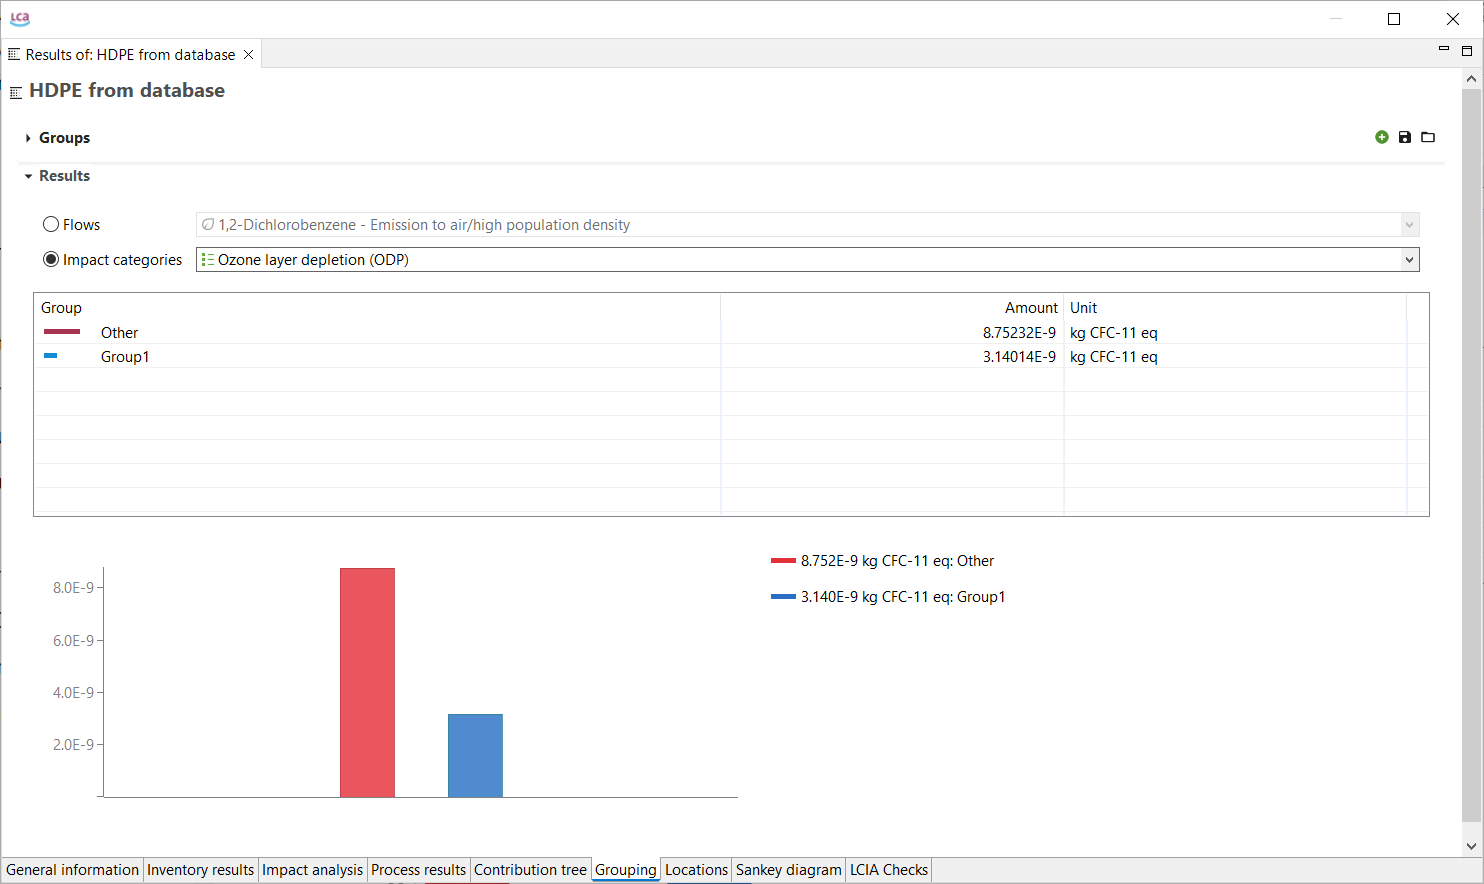
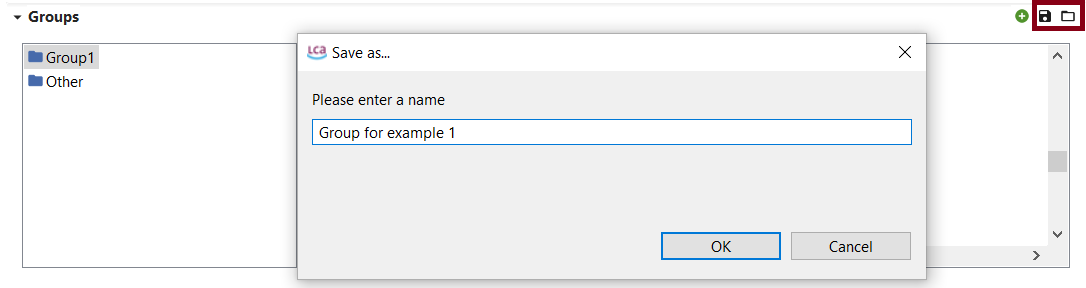
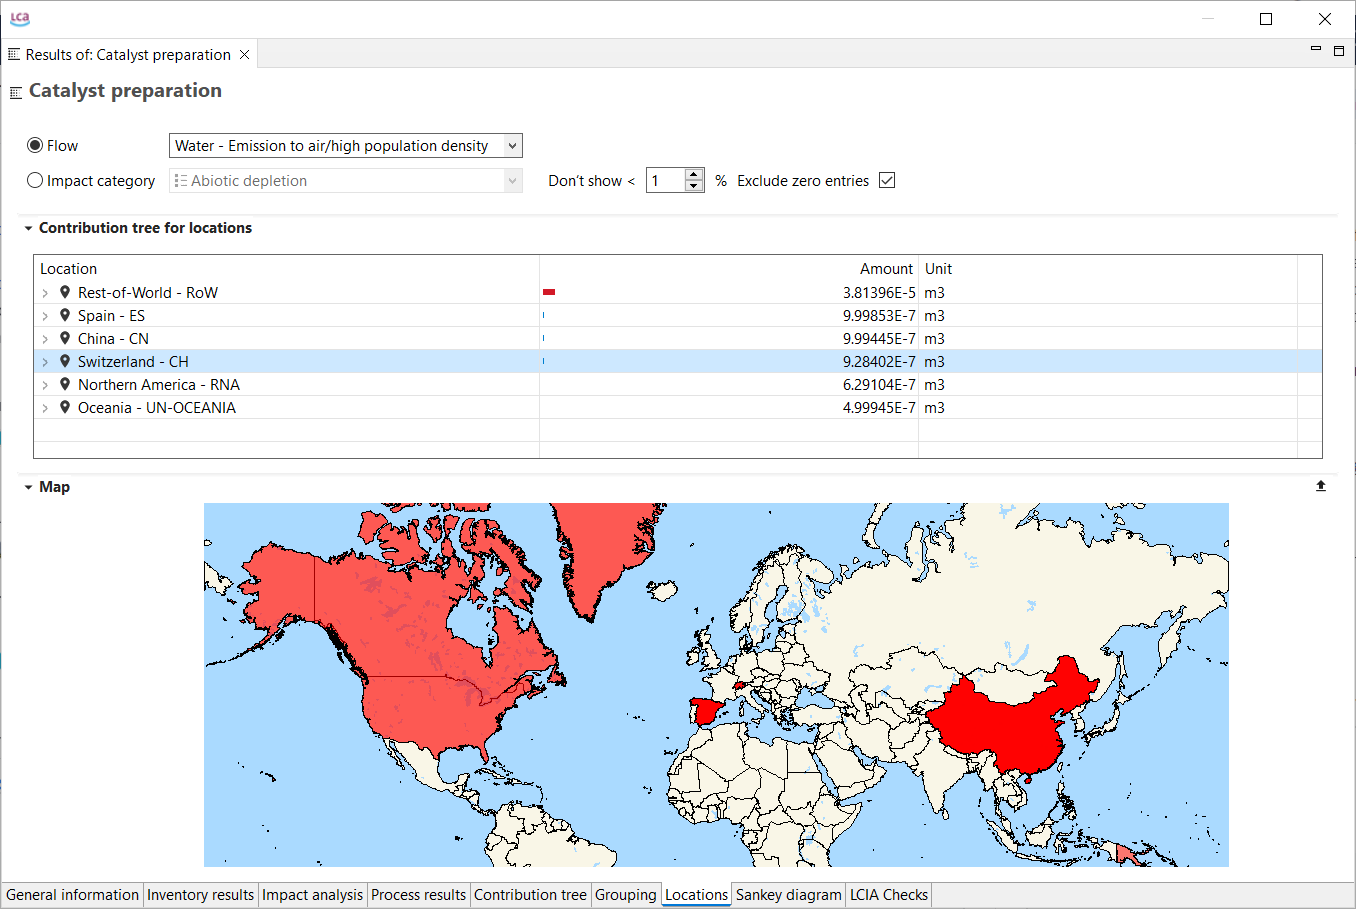
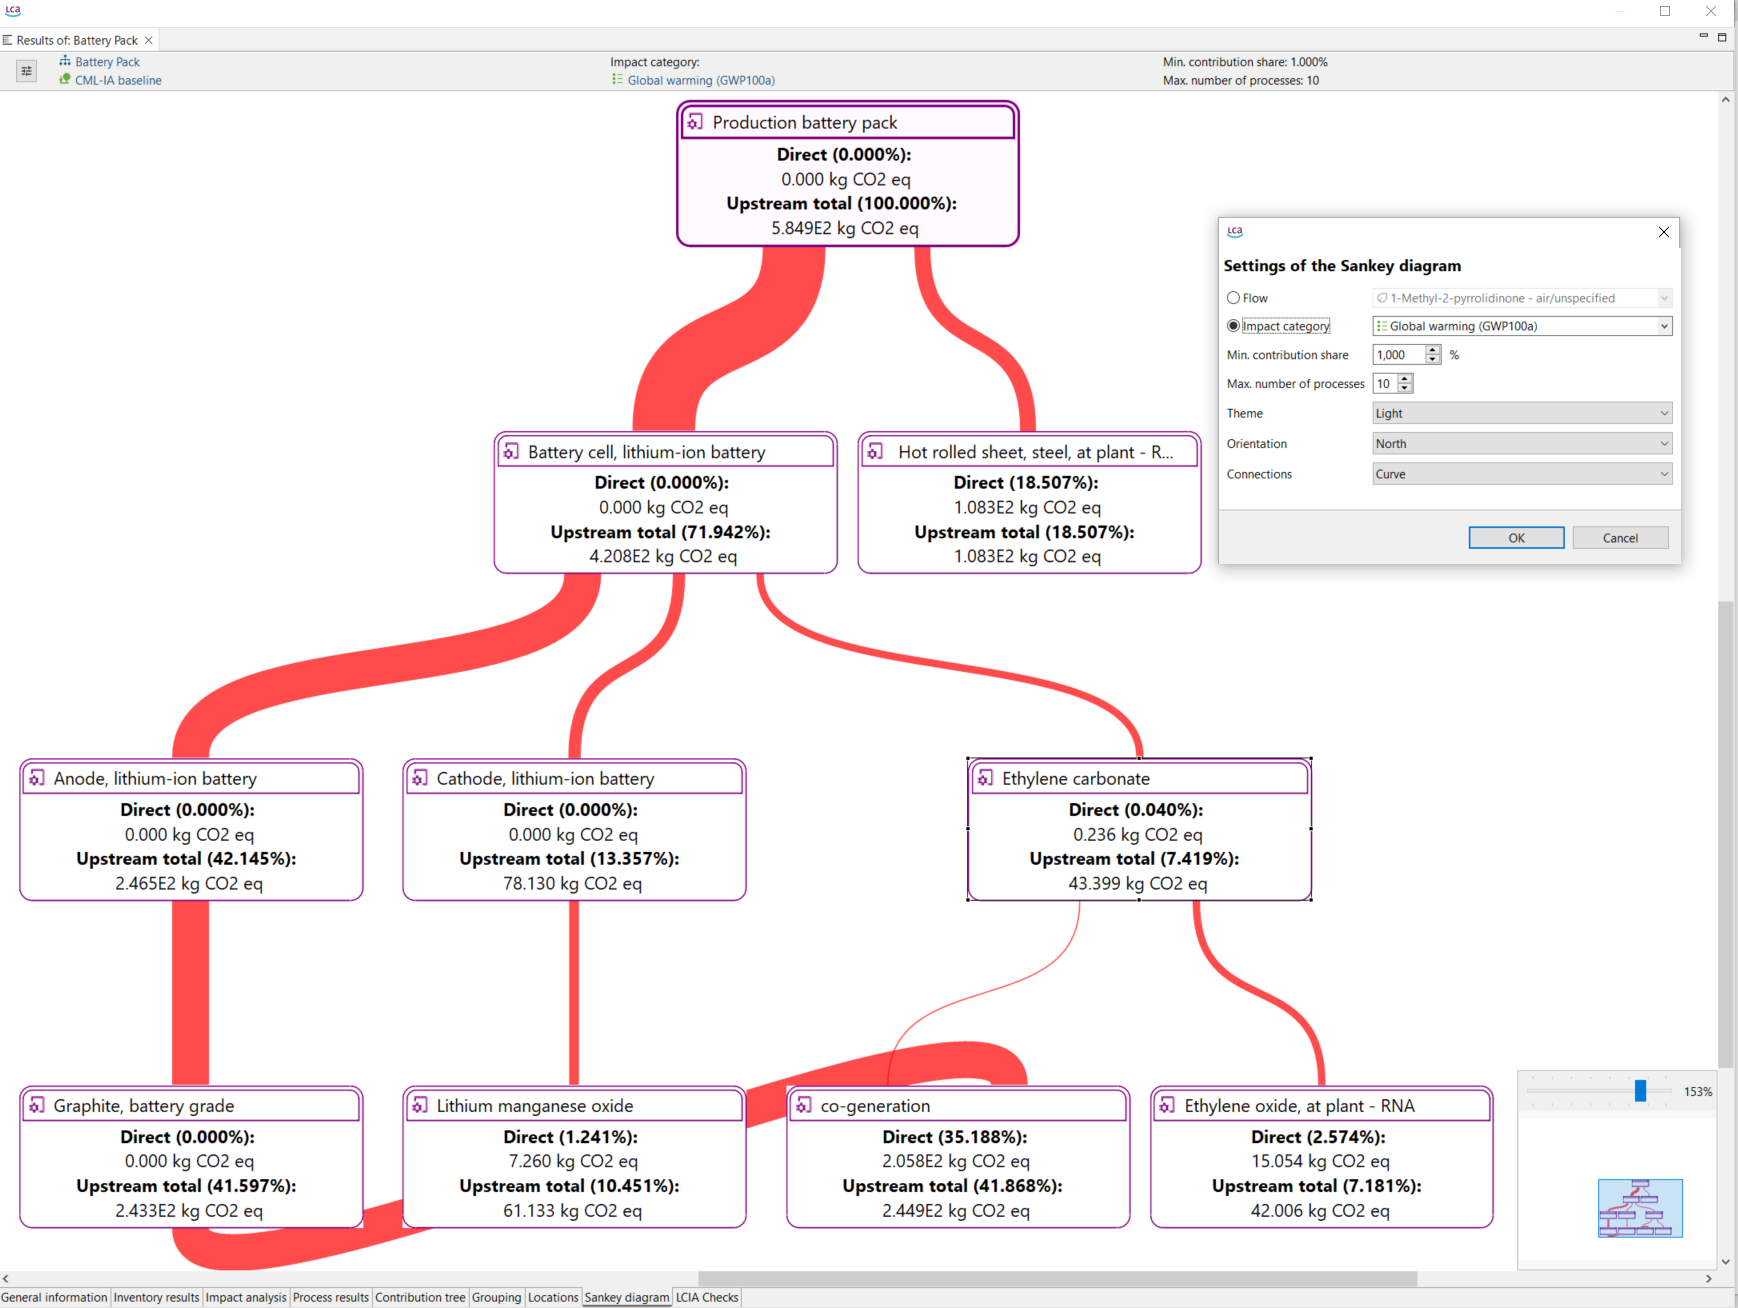
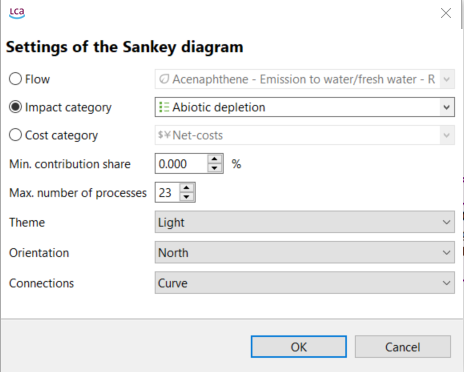


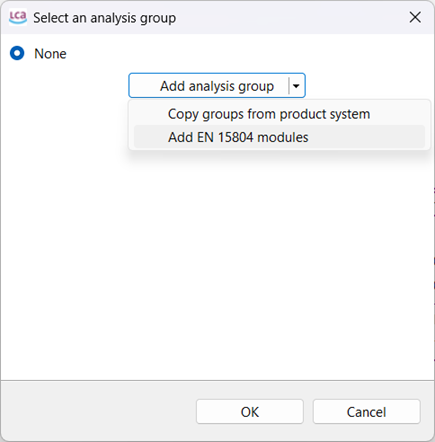
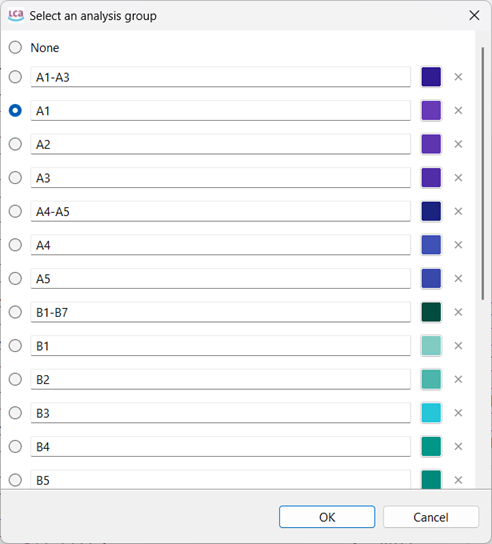
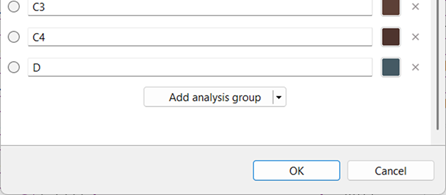


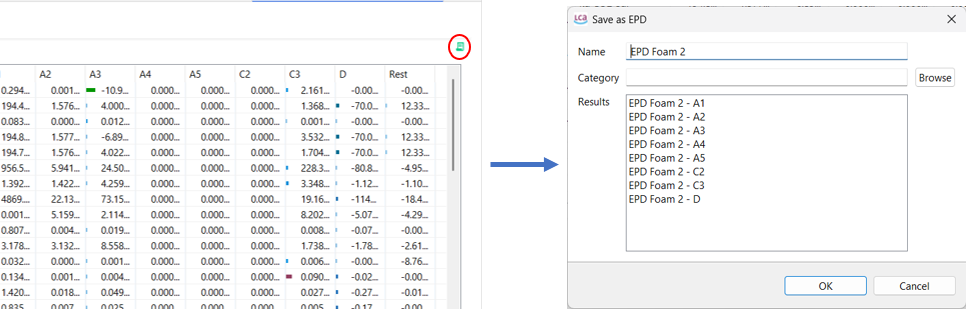
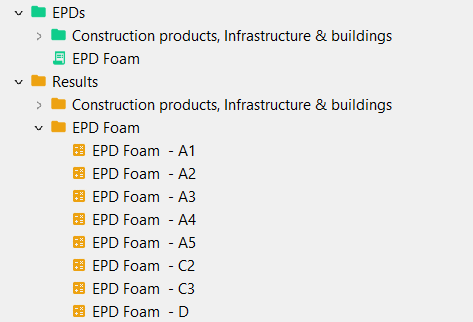
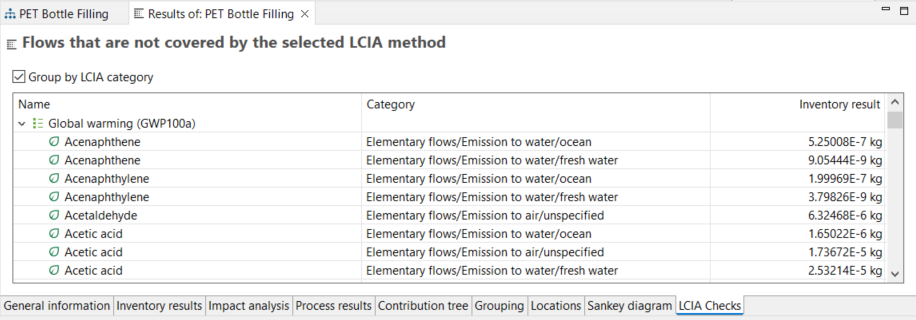

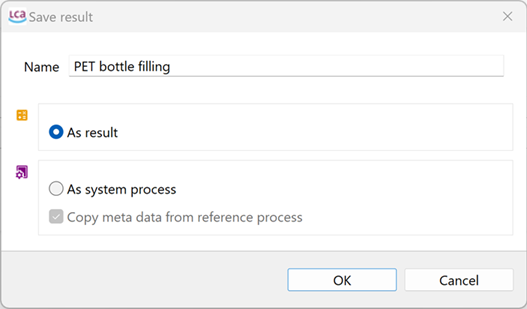

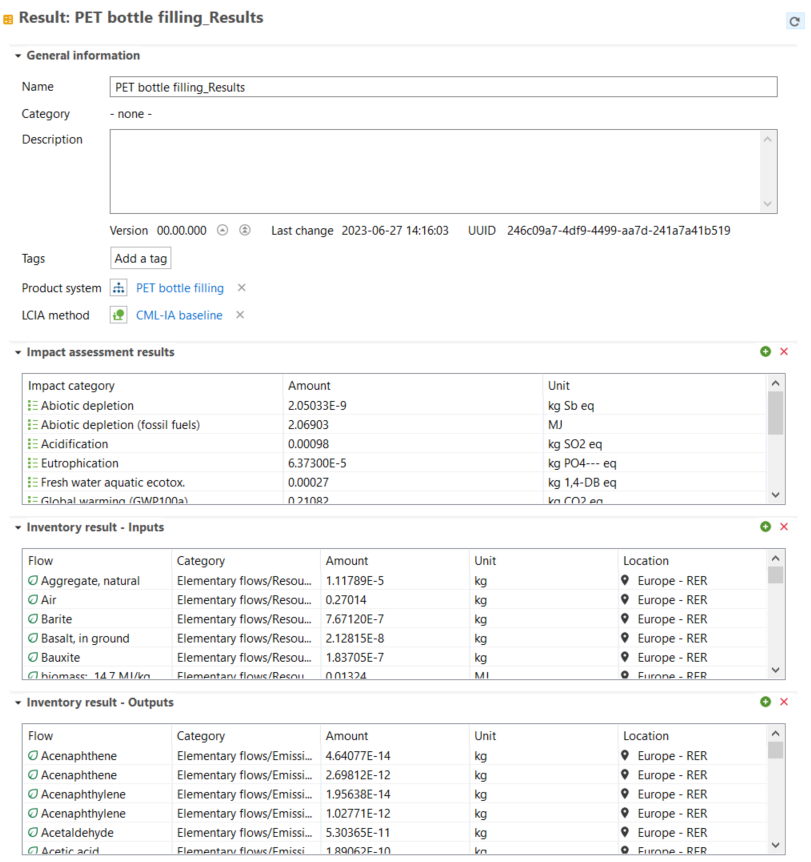


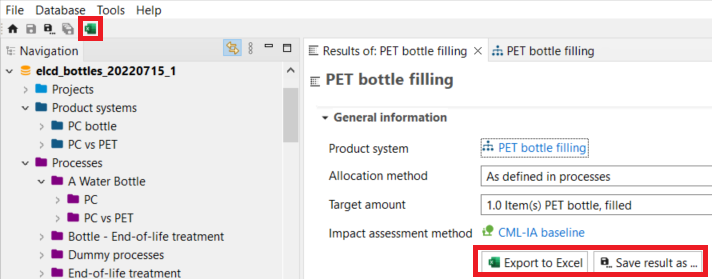

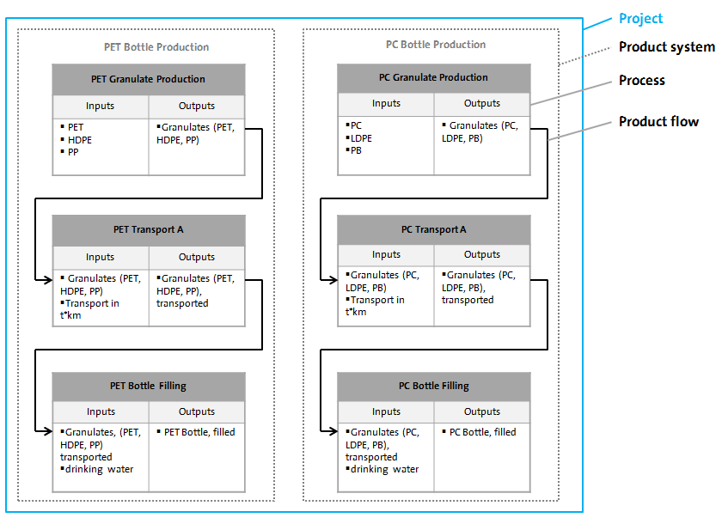
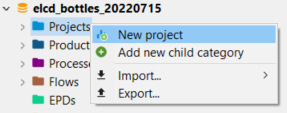
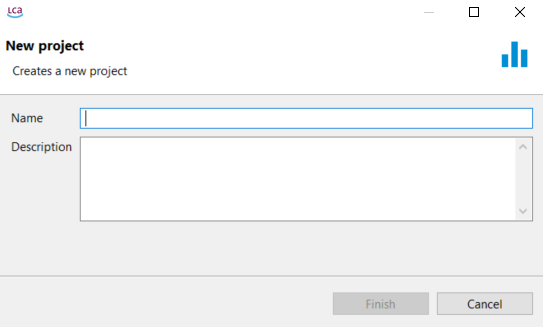
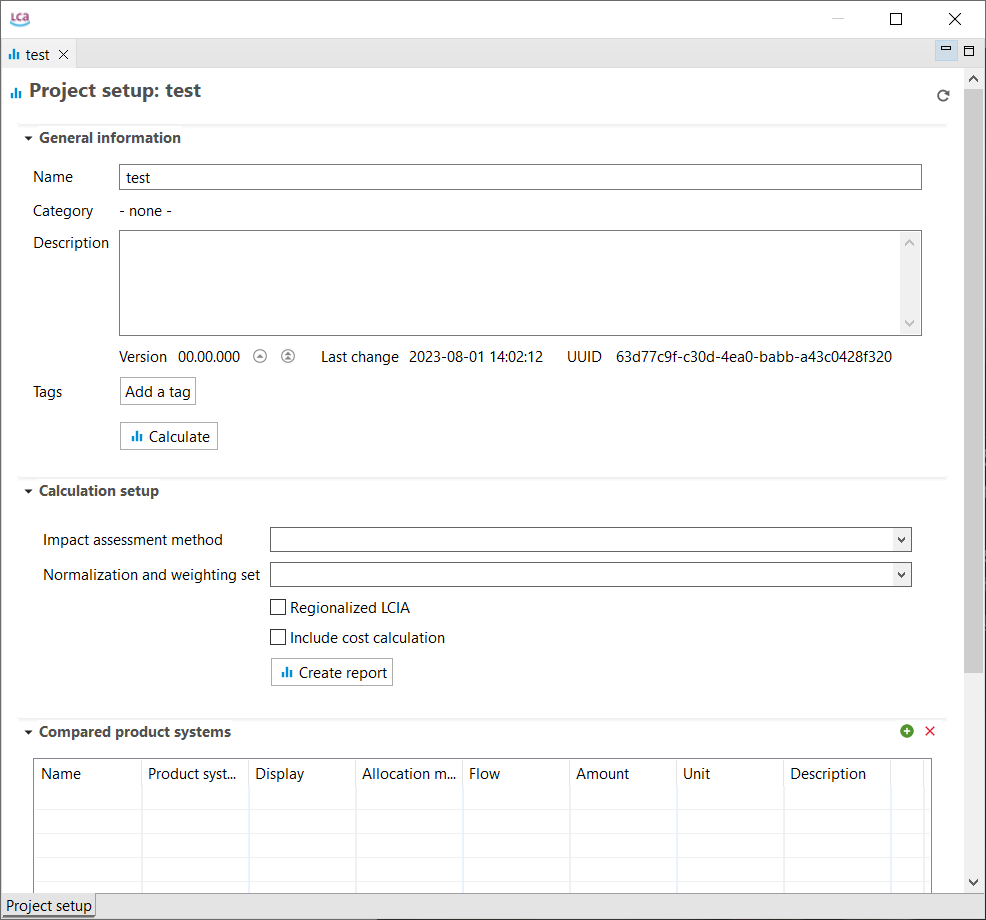
 Project setup, Calculation setup
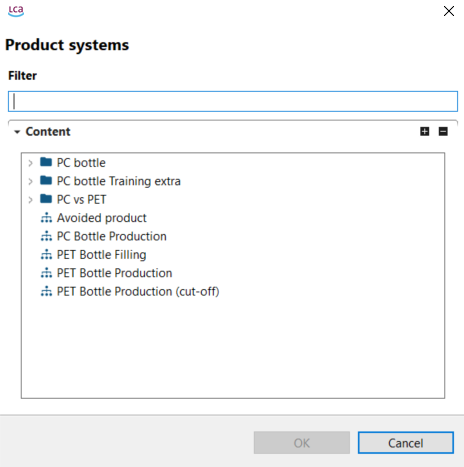
 Project setup, Variants
 Project setup, Parameters
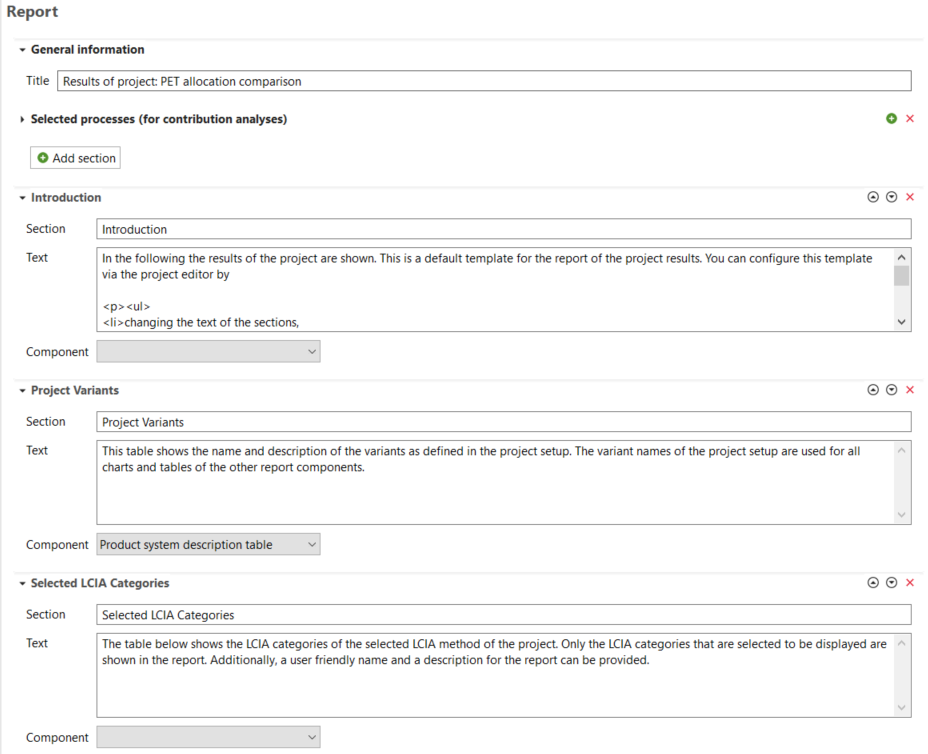
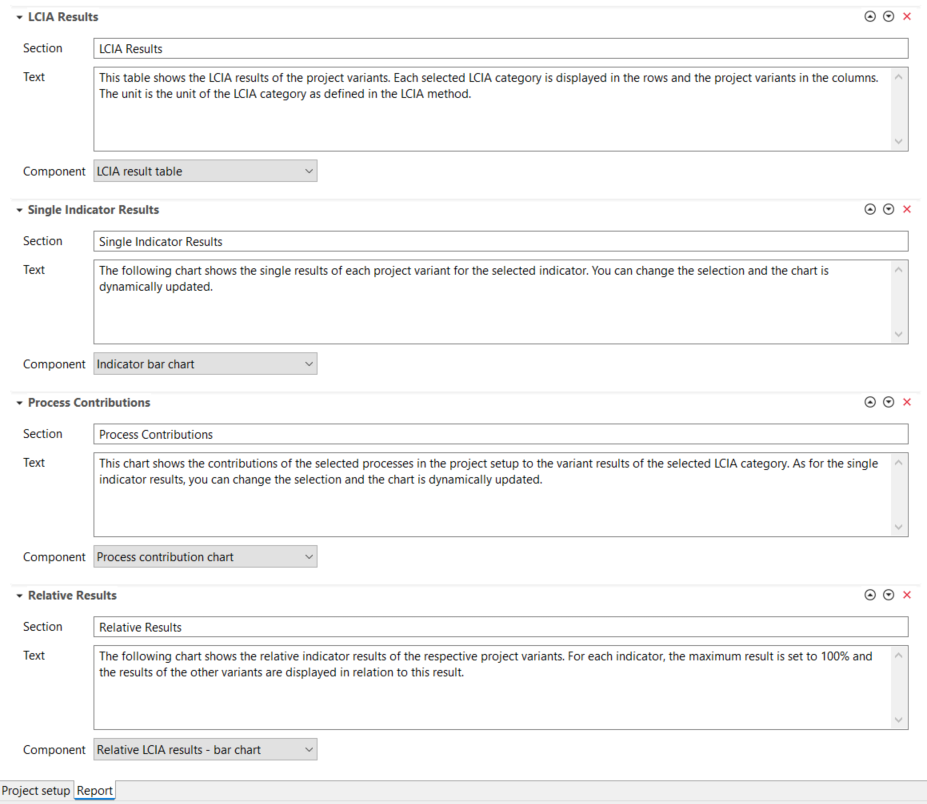
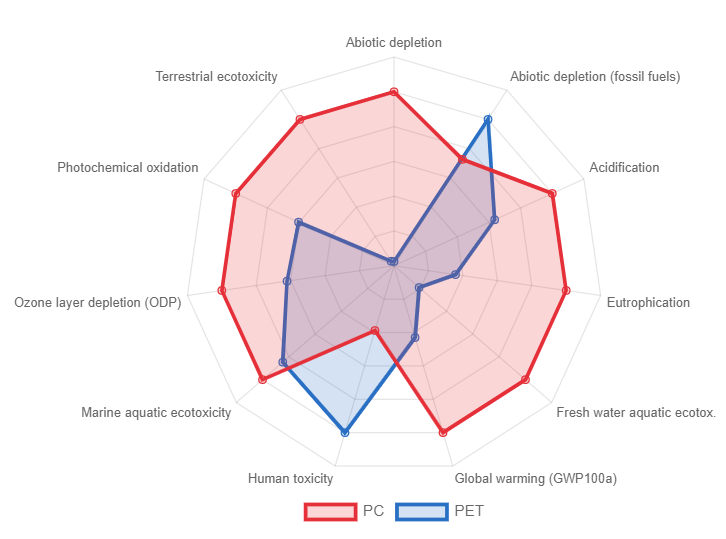
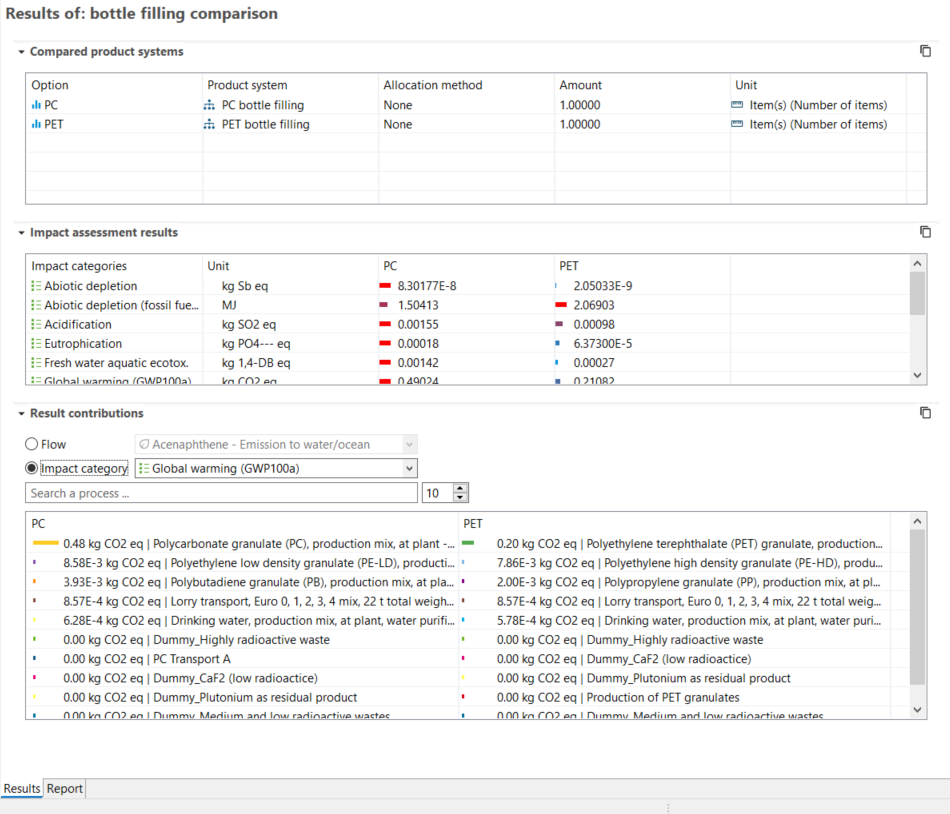
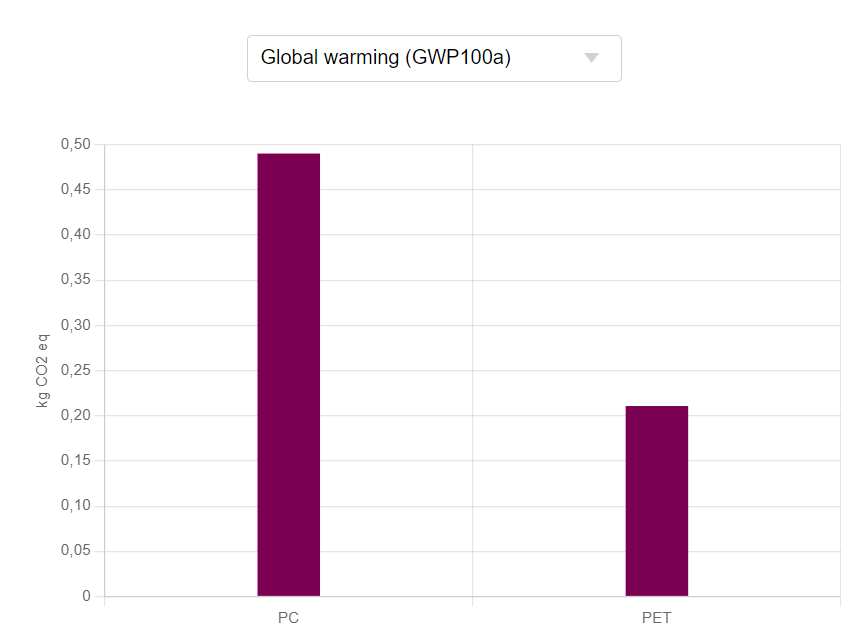 GWP single indicator PC vs. PET
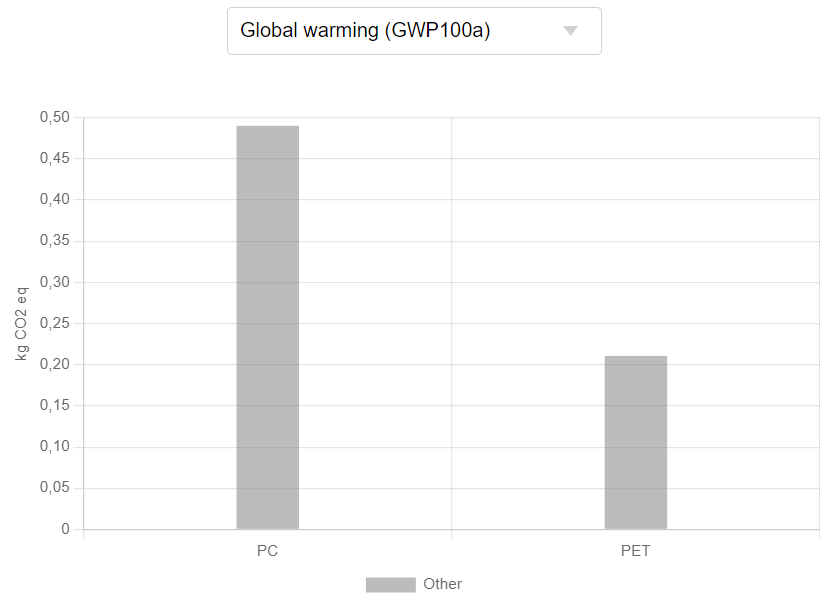 GWP process contributions PC vs. PET
 All impact chosen impact categories for PC vs. PET
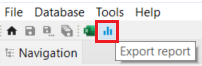
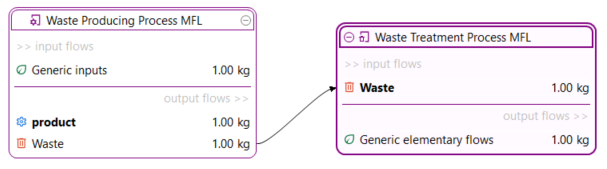
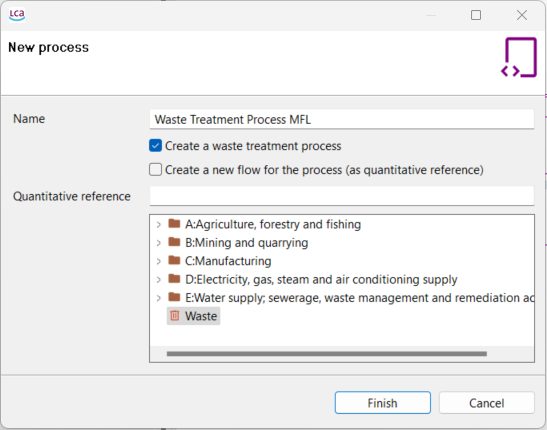
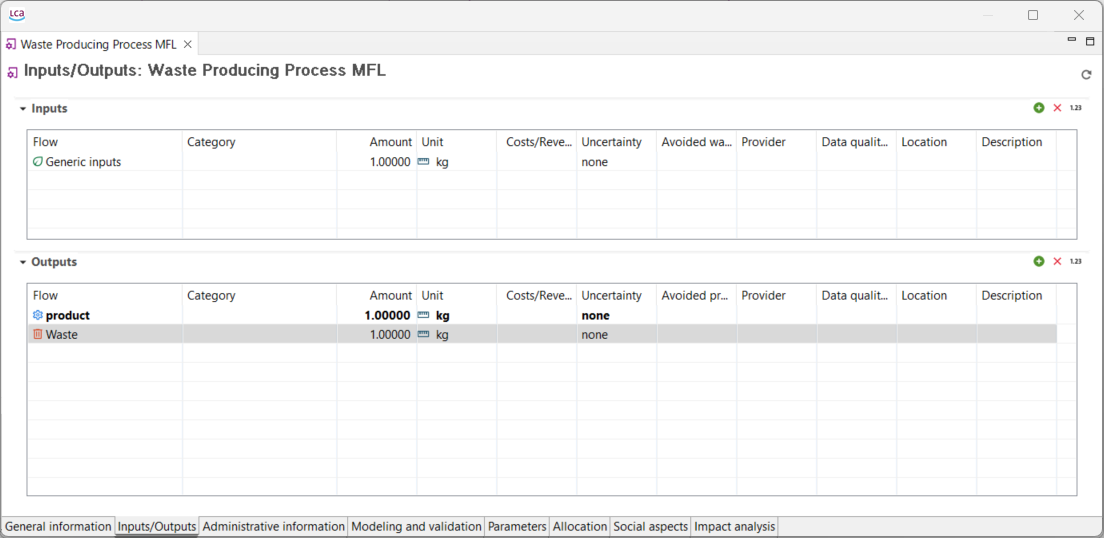
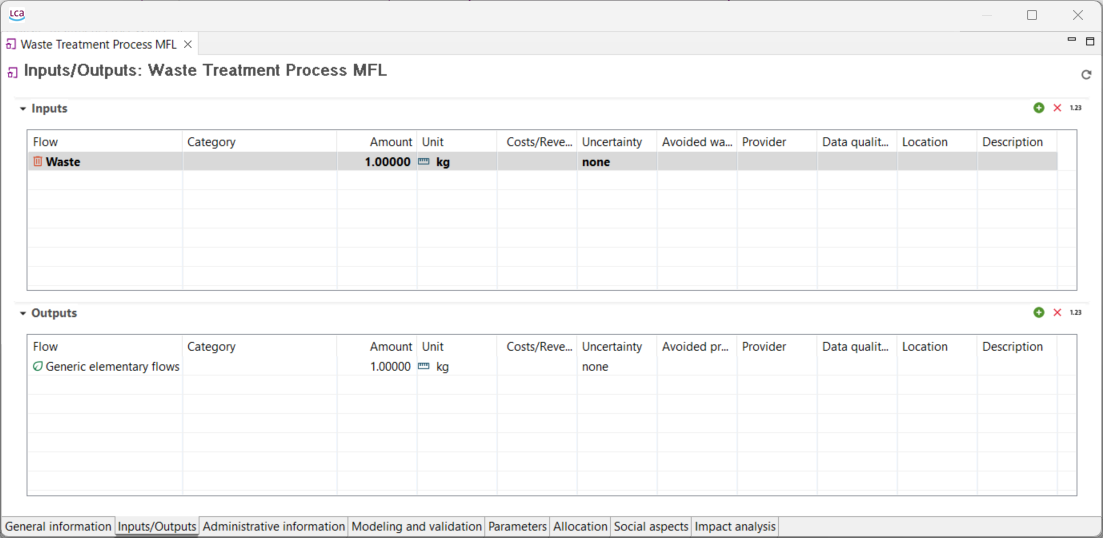
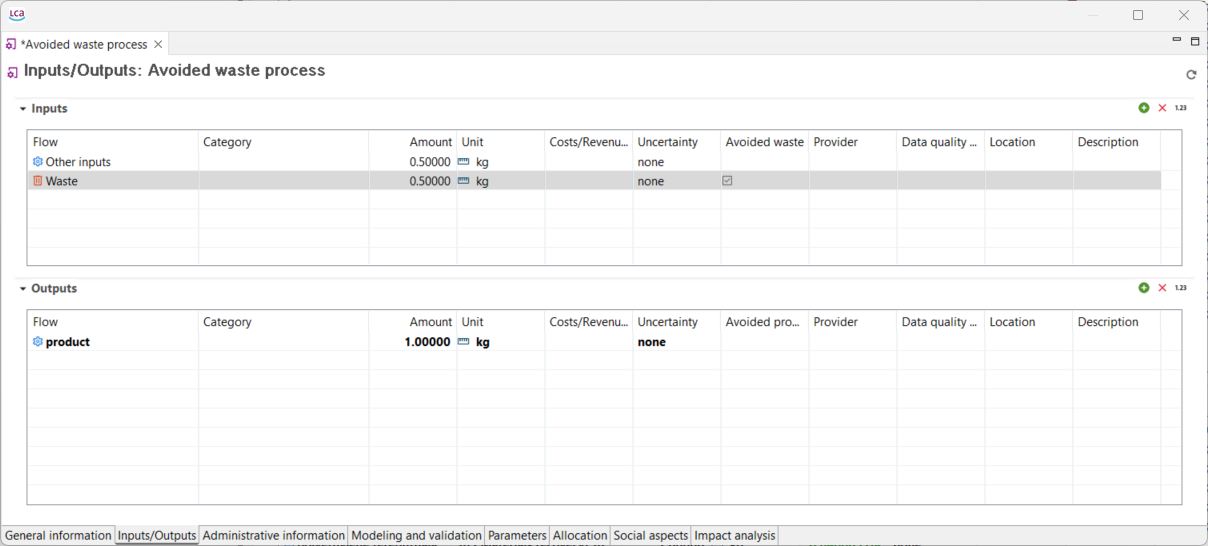
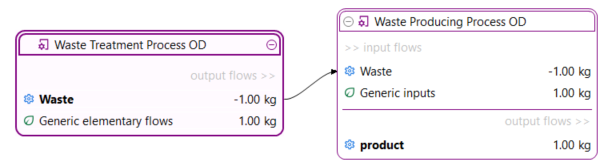
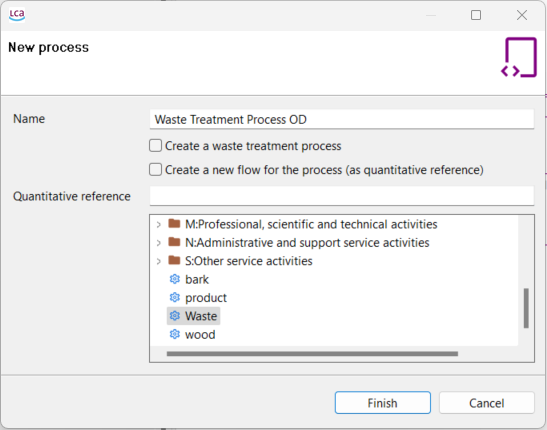
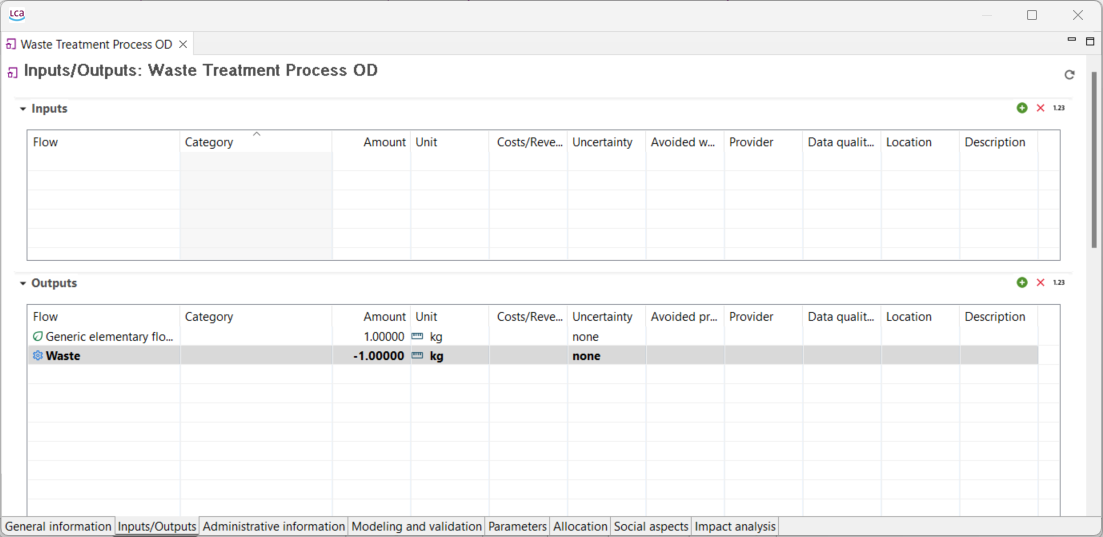
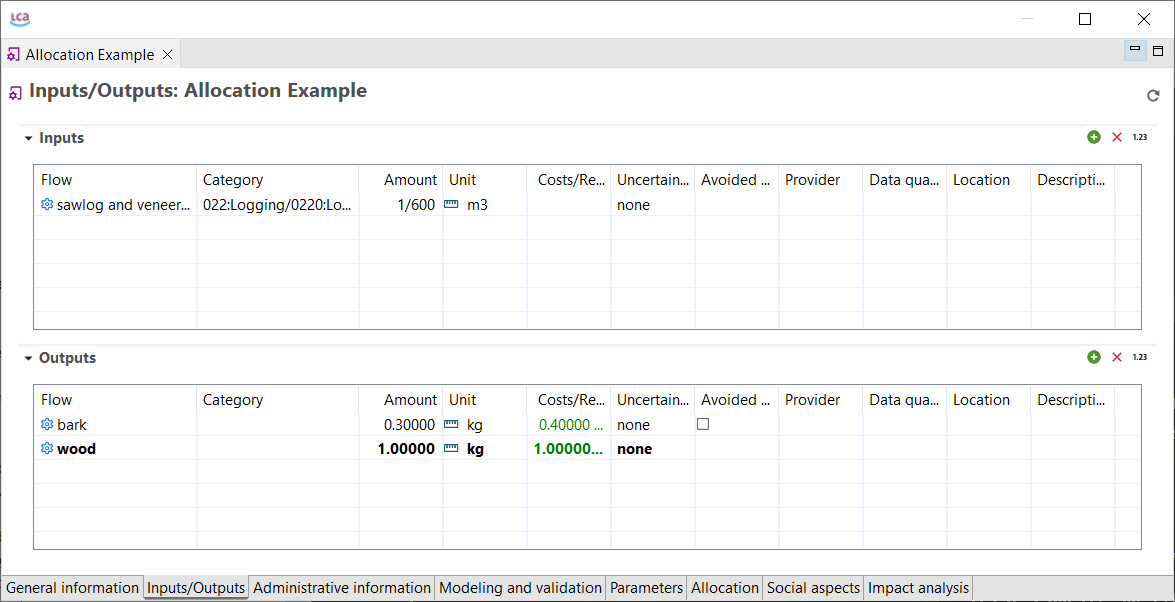
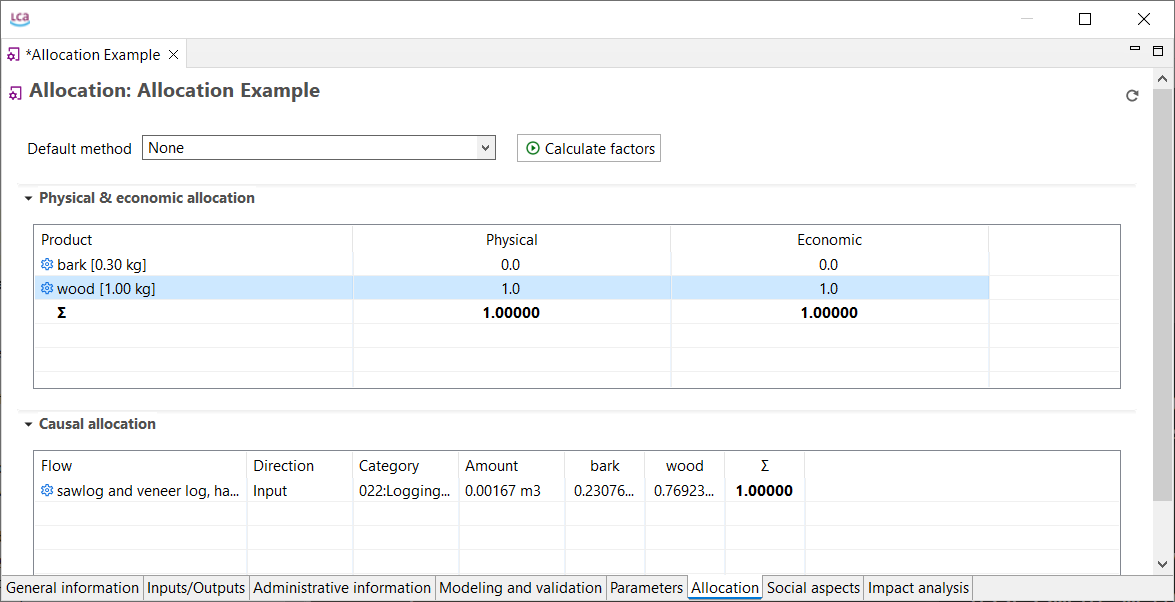
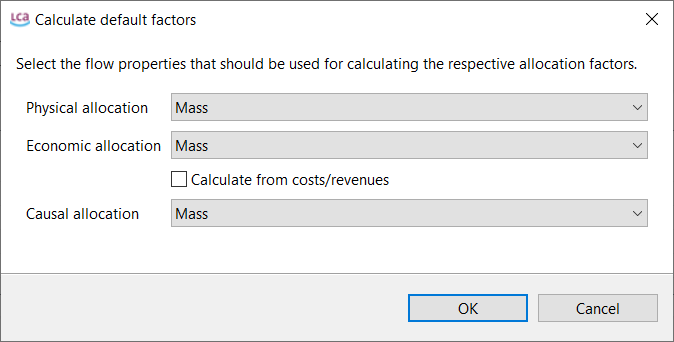
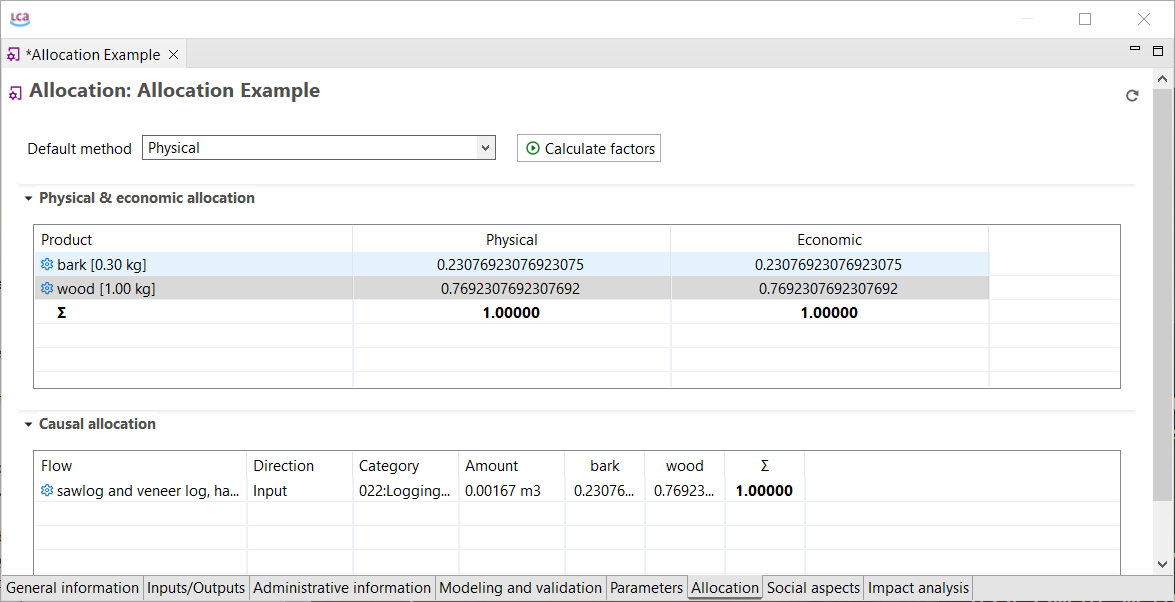
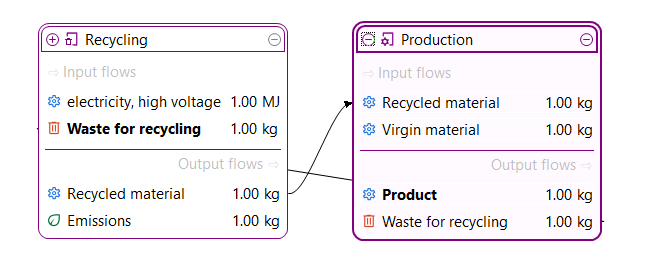
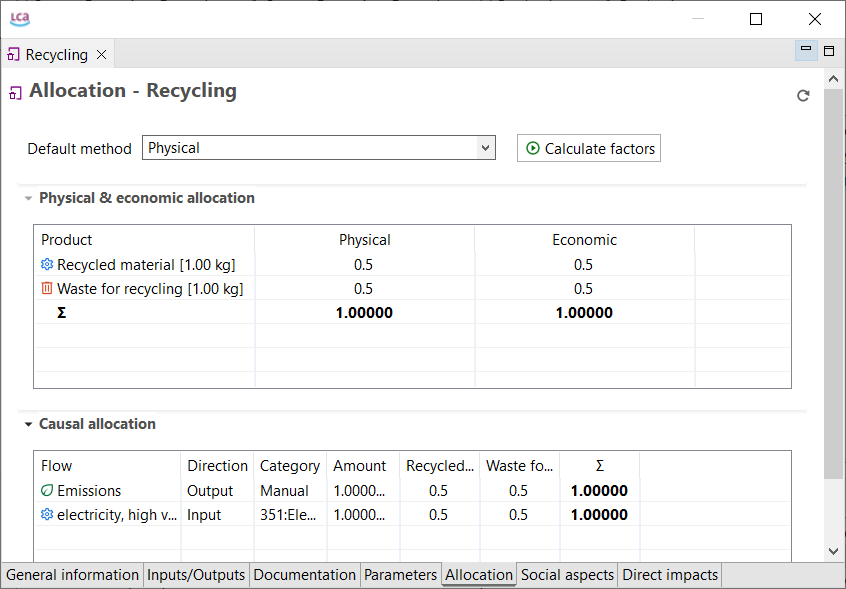
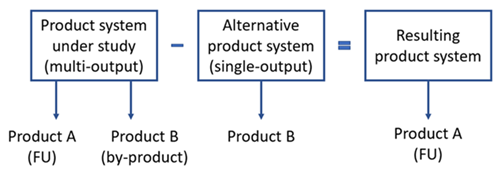
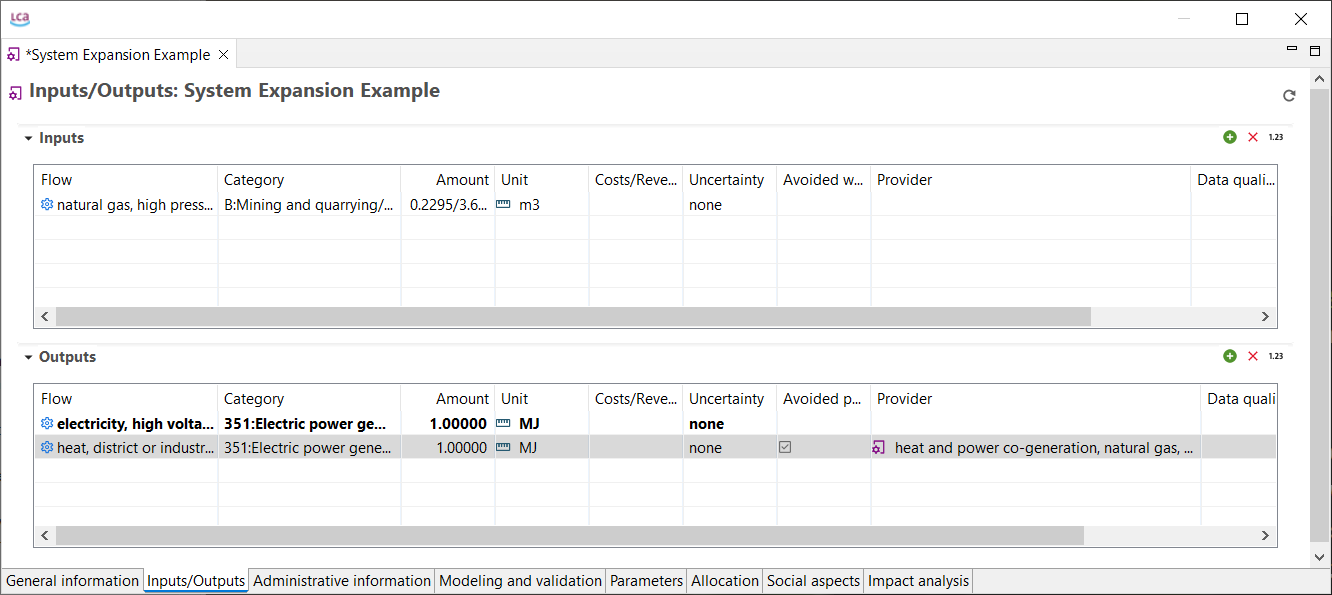
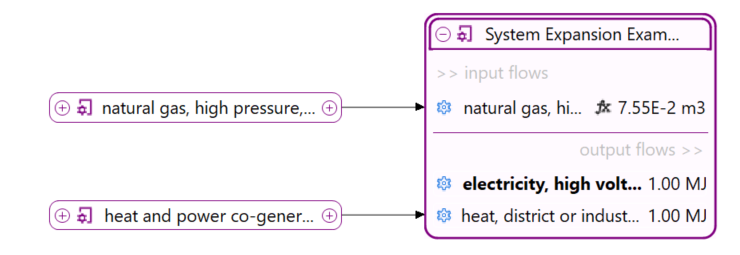
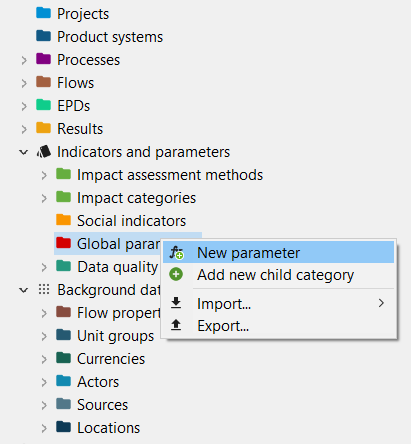
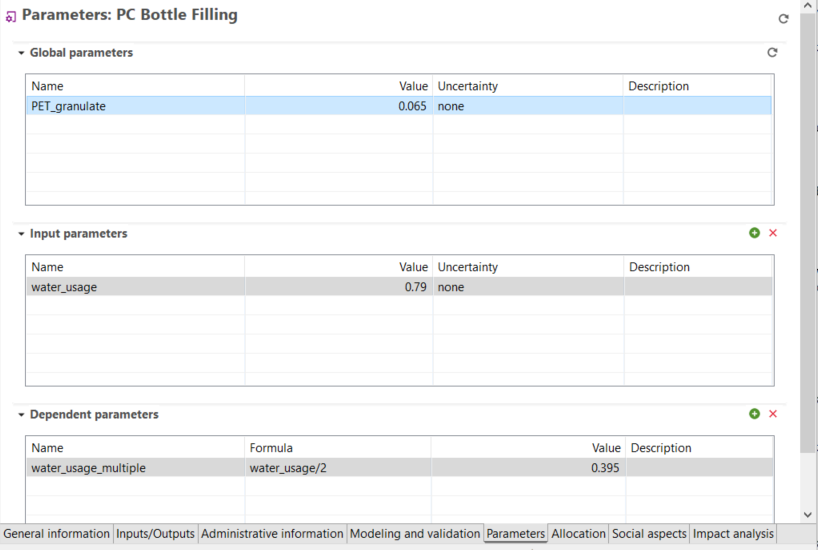
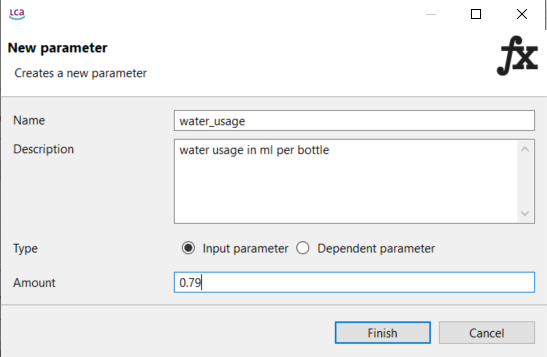
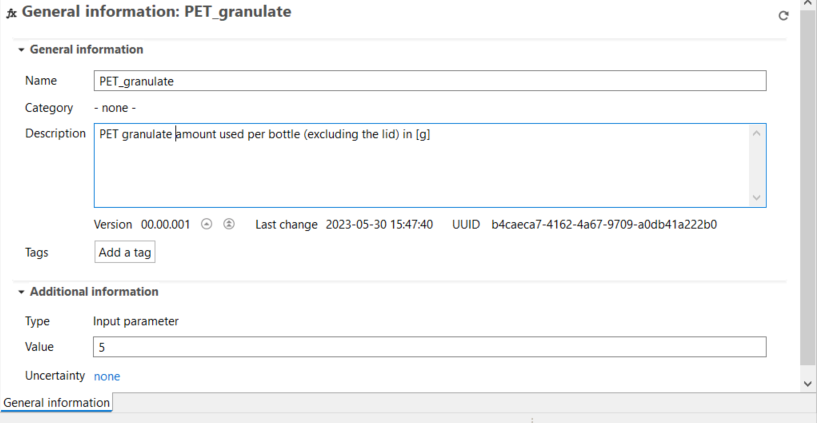
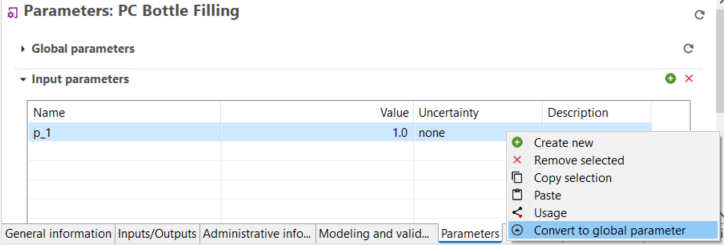 Conversion of an input/dependent parameter into a global parameter
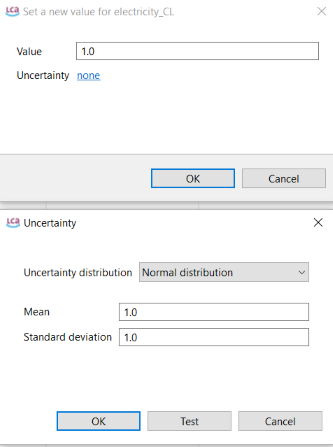
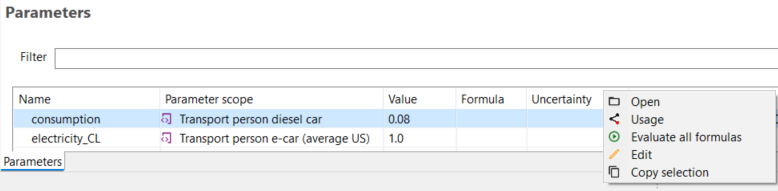 View and edit Parameters under Database → Content
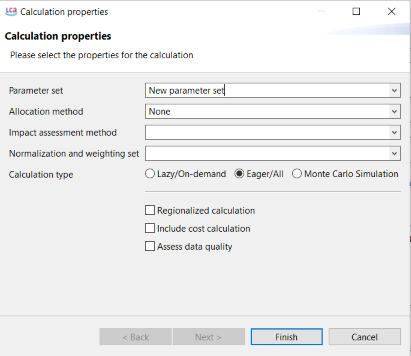
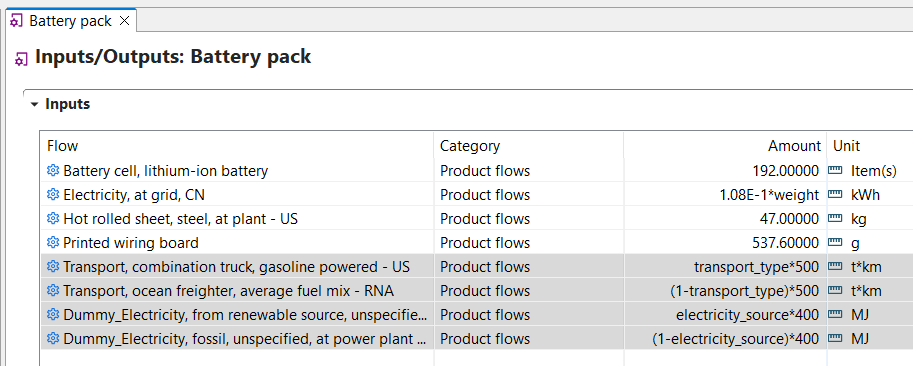 Product system - Parameter use
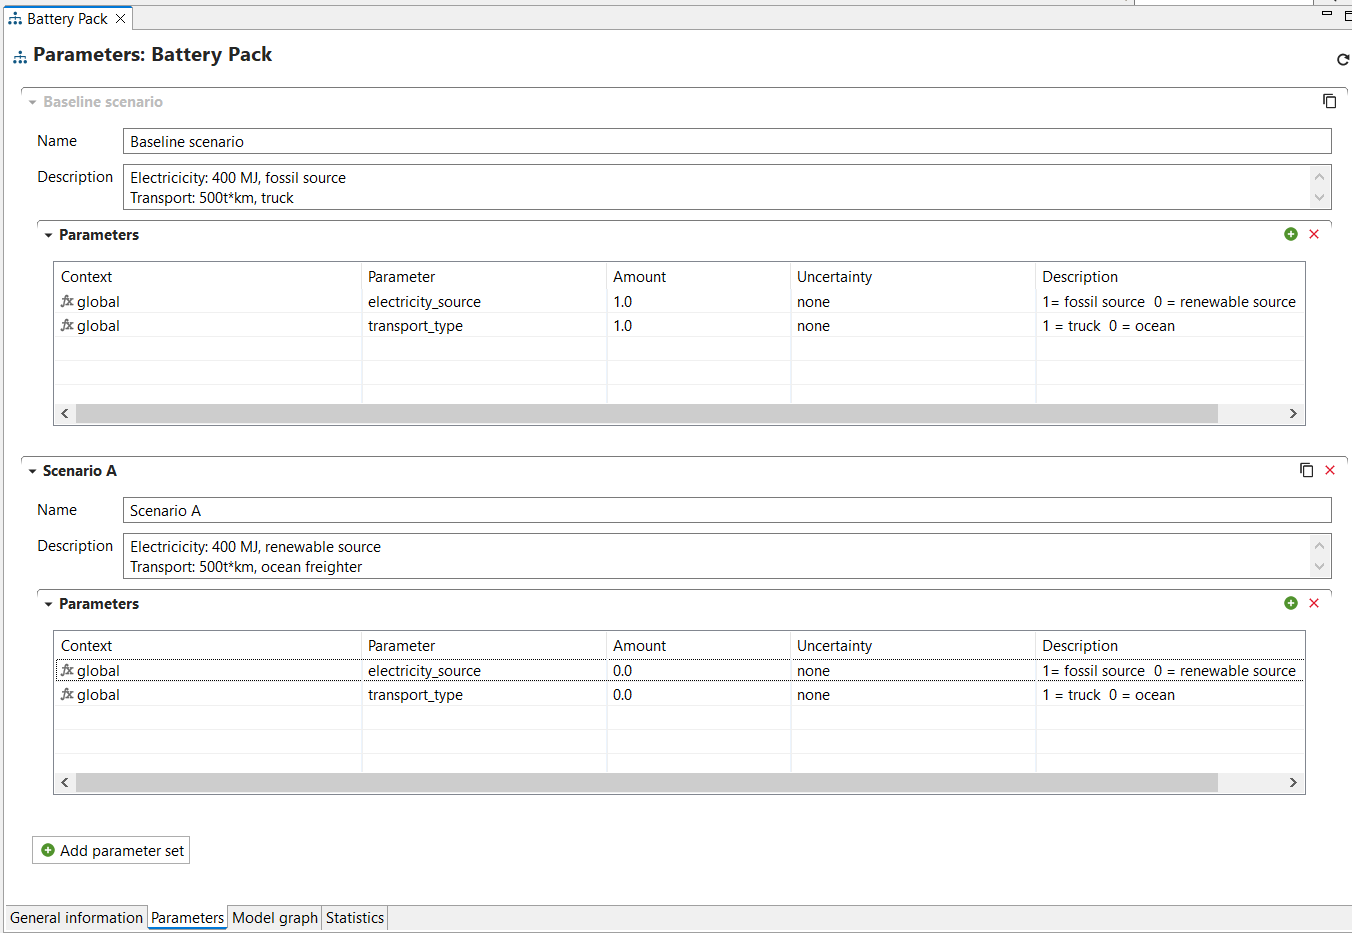 Product system - Choosing a parameter set
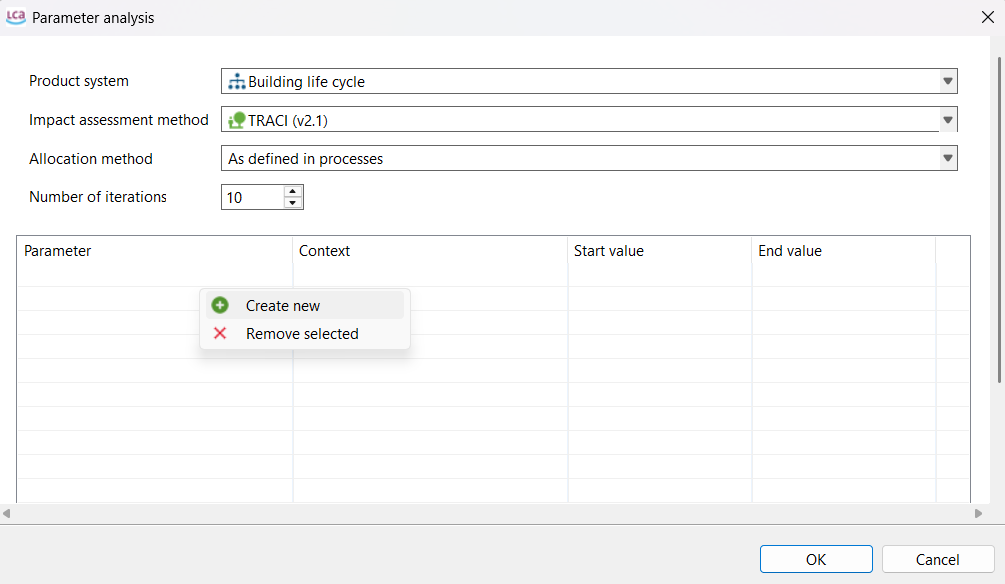
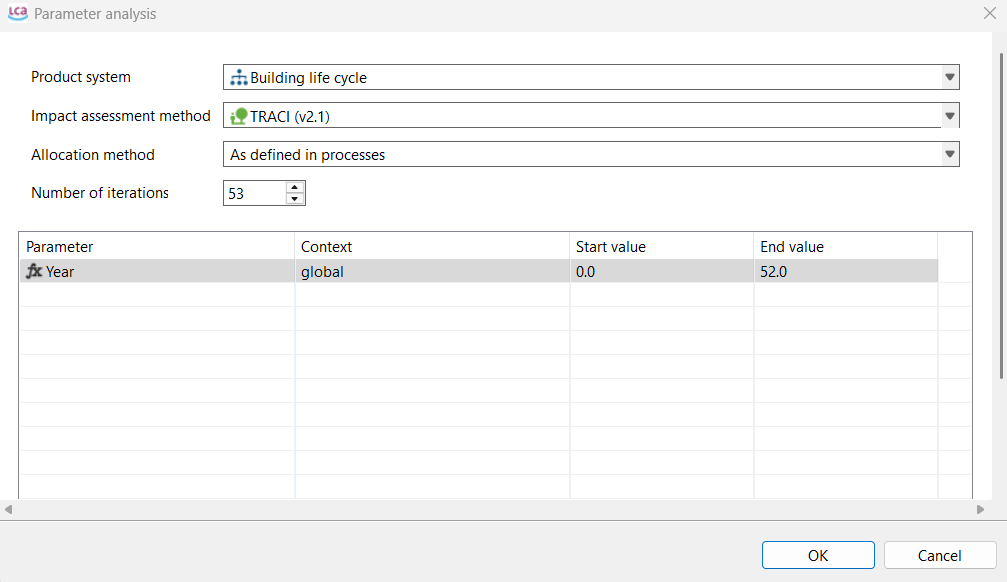
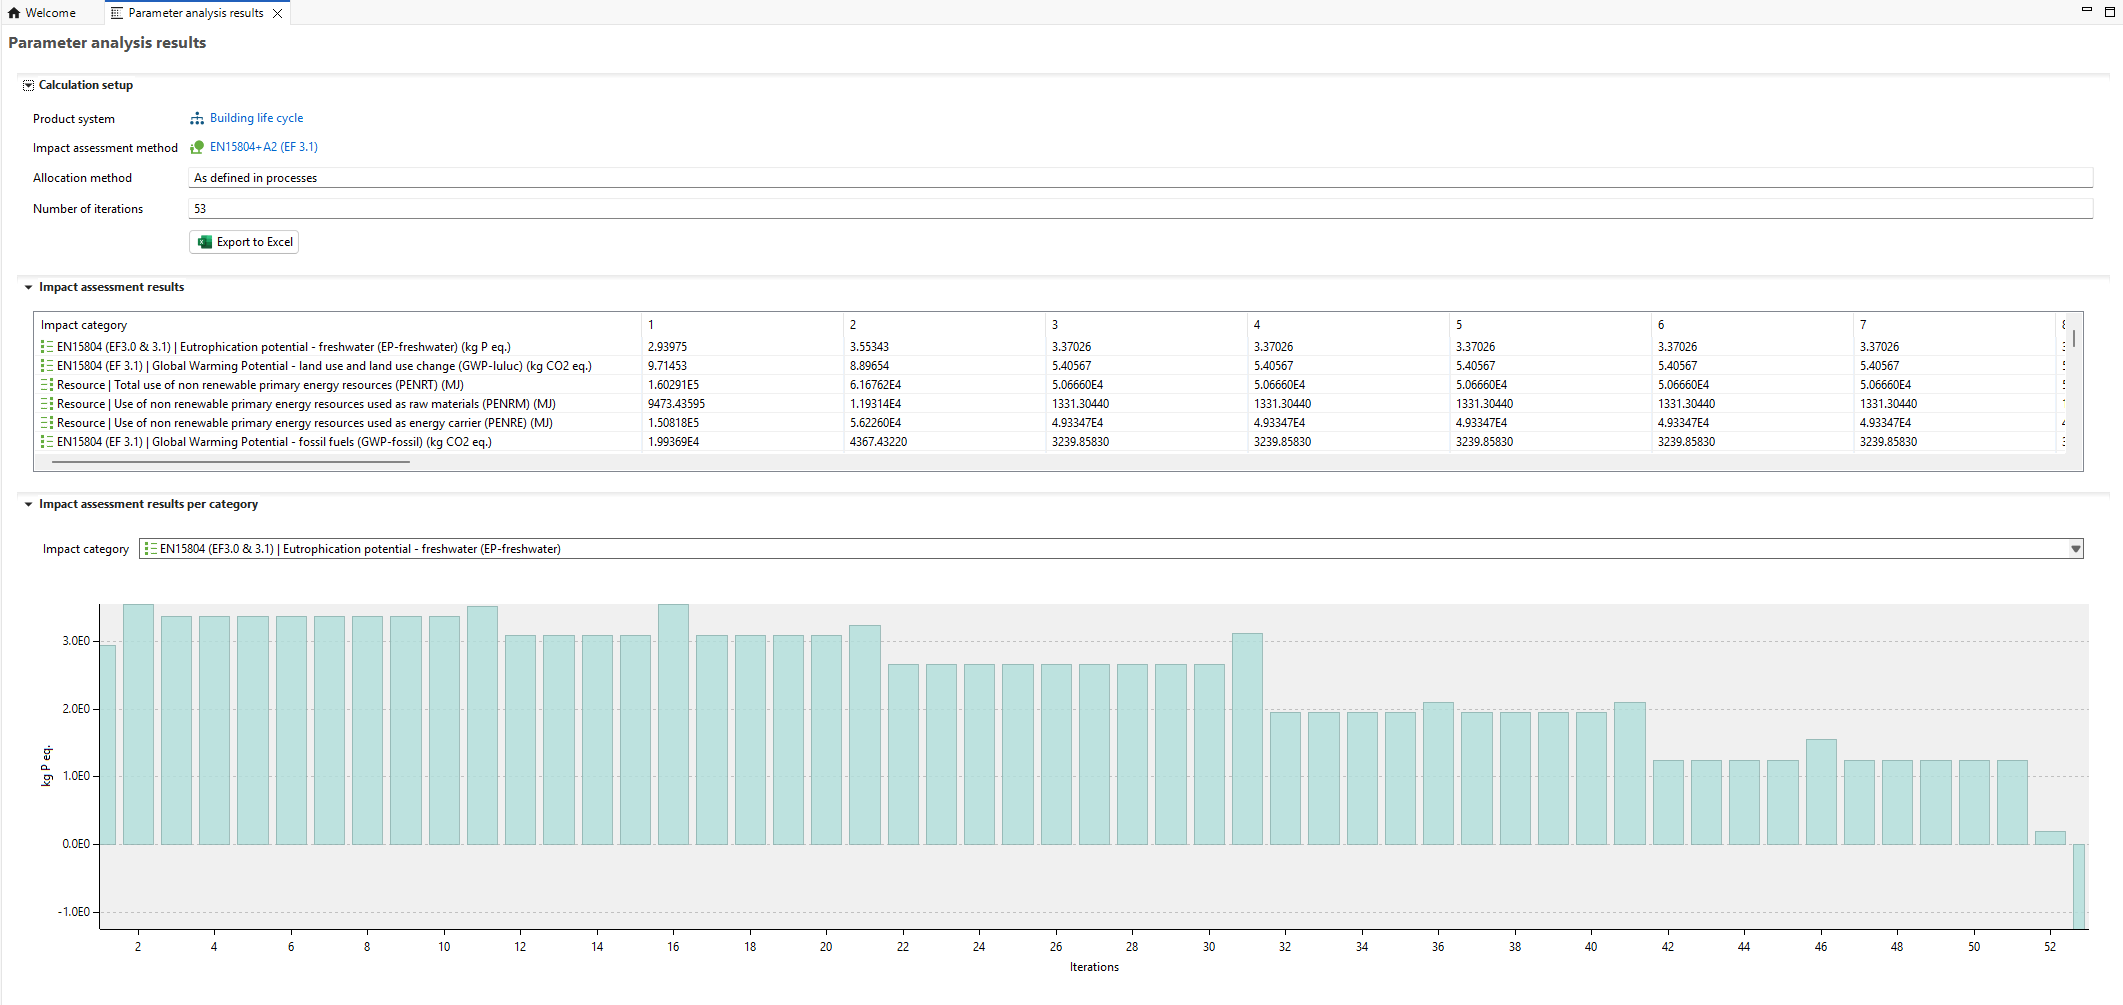
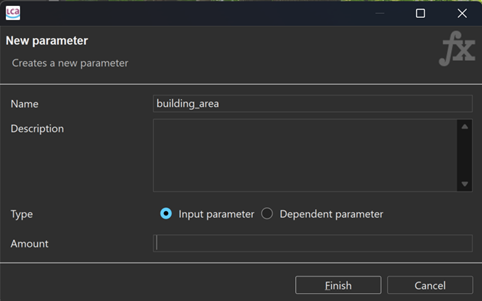
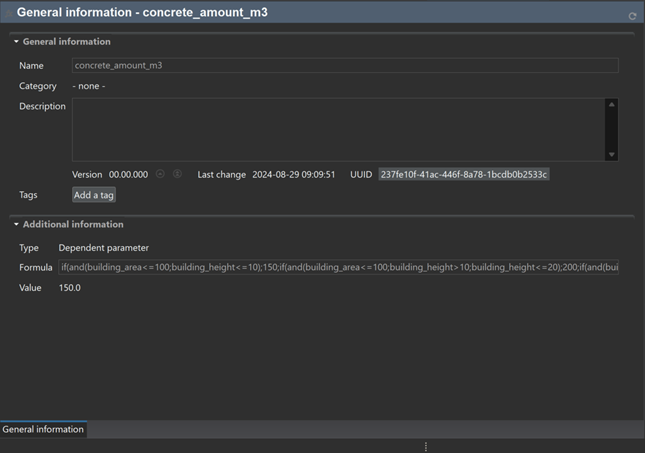
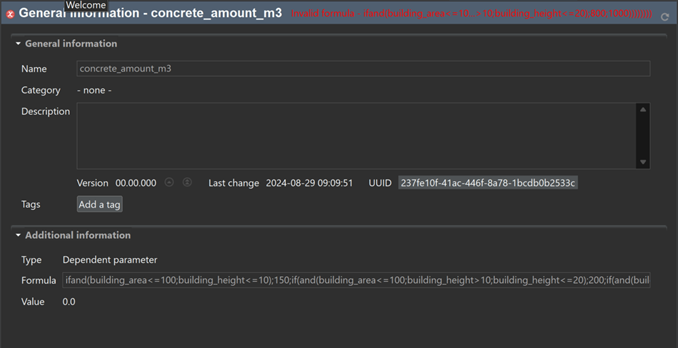
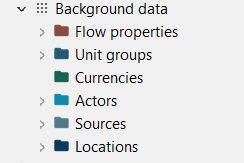
 Example of how locations are shown in openLCA
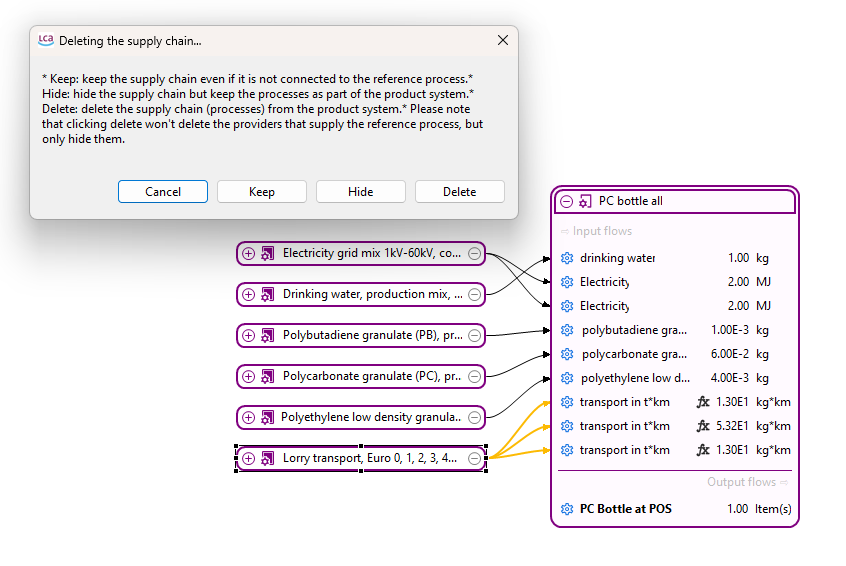
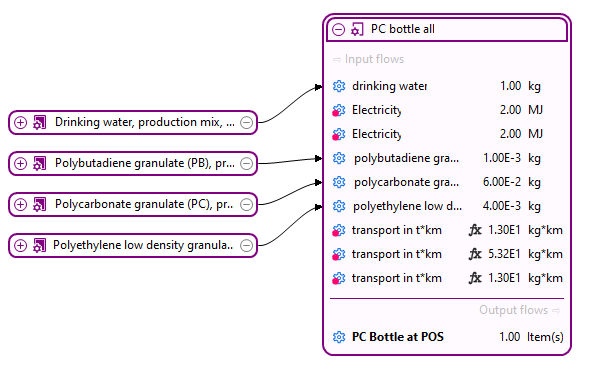
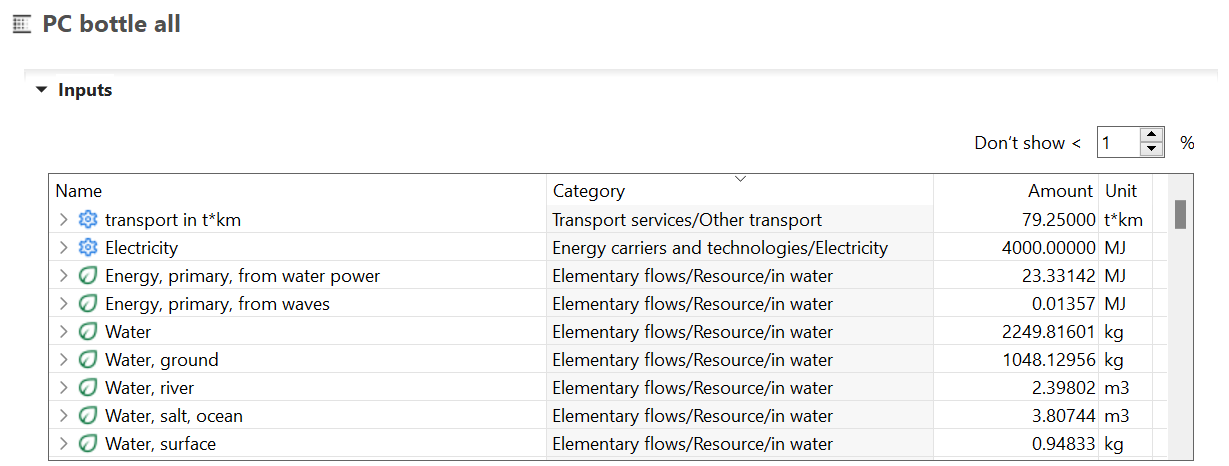
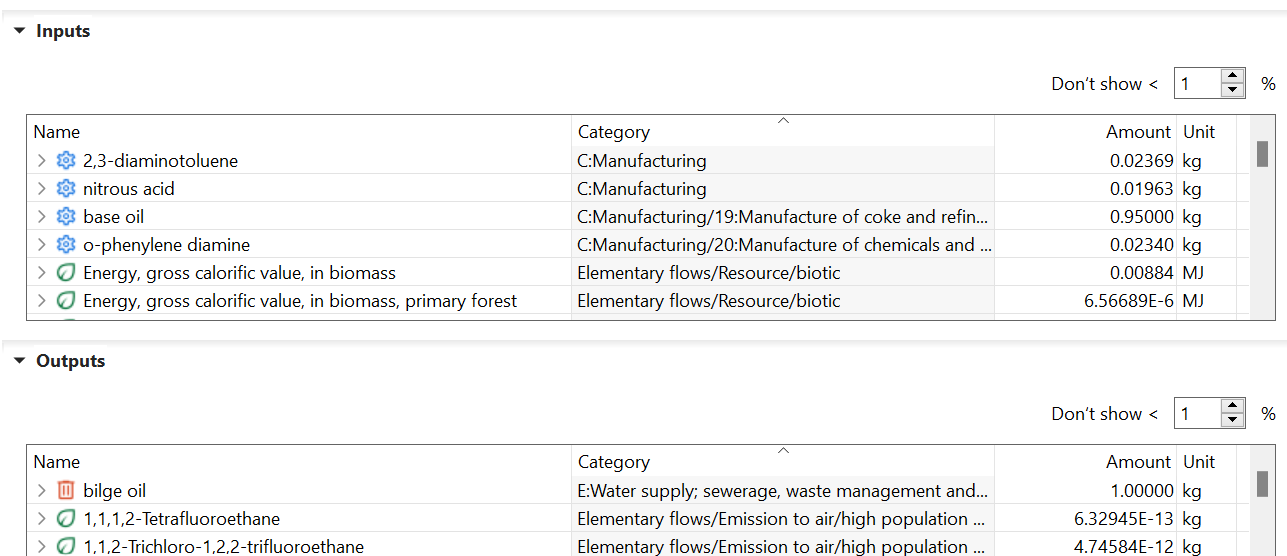

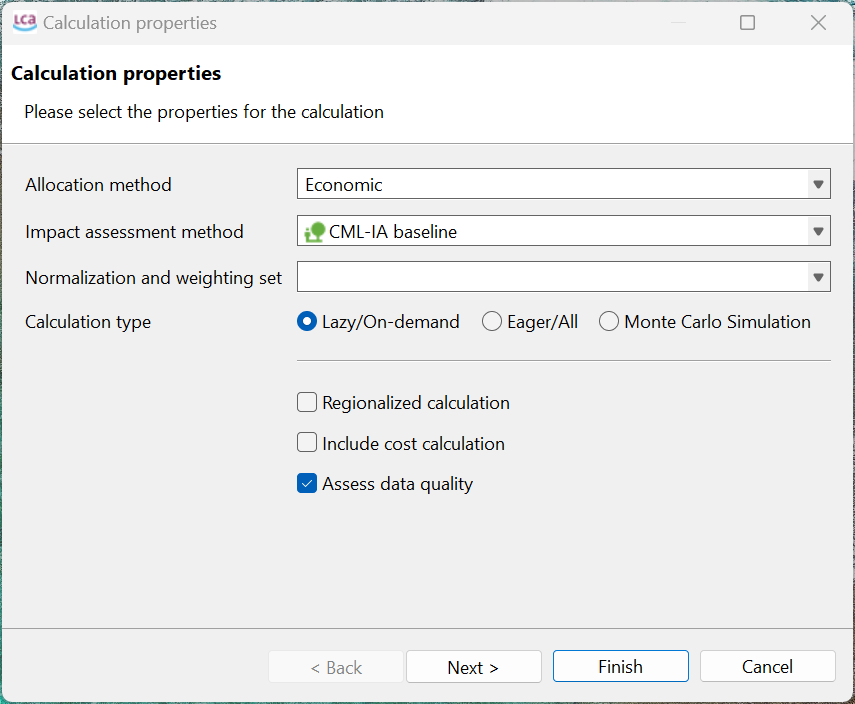
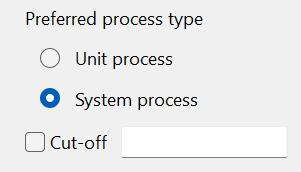

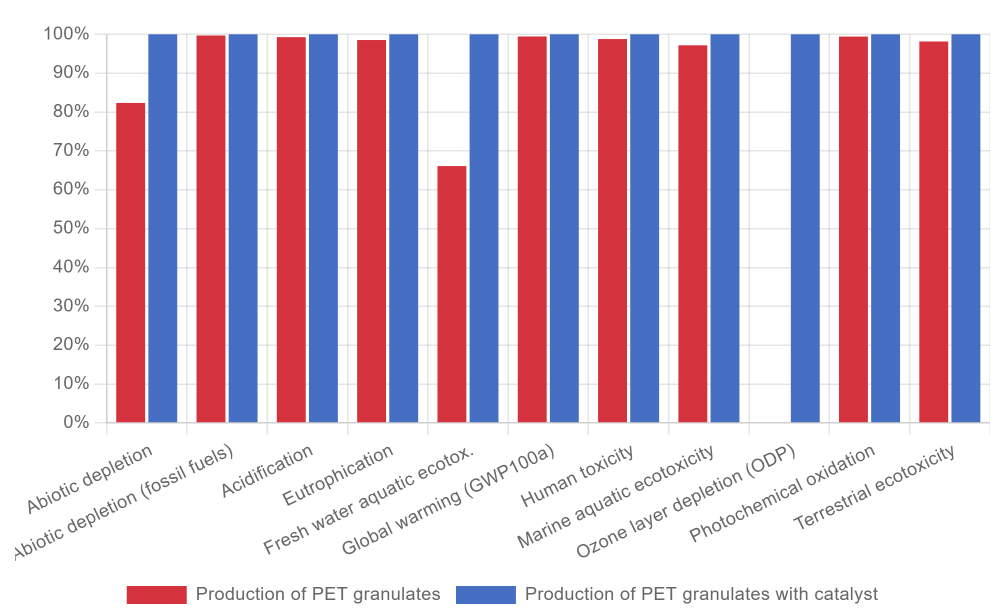
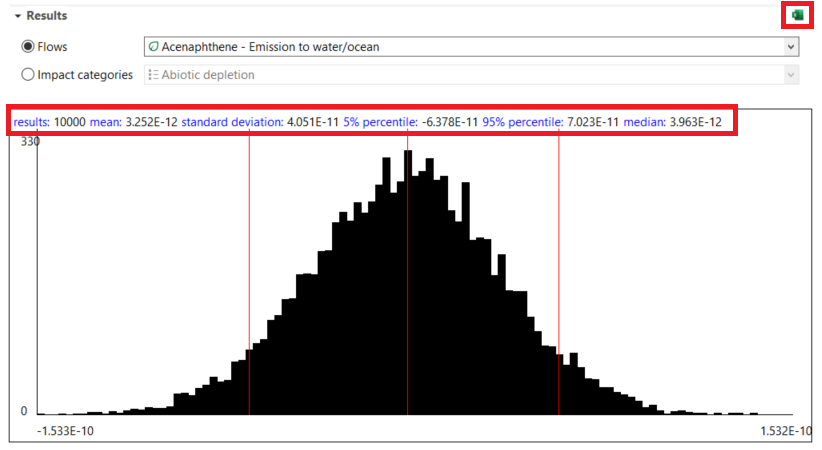
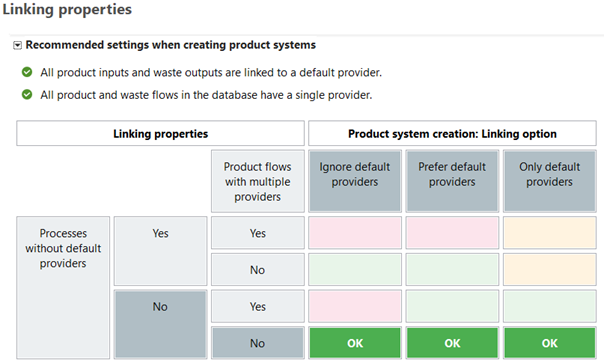


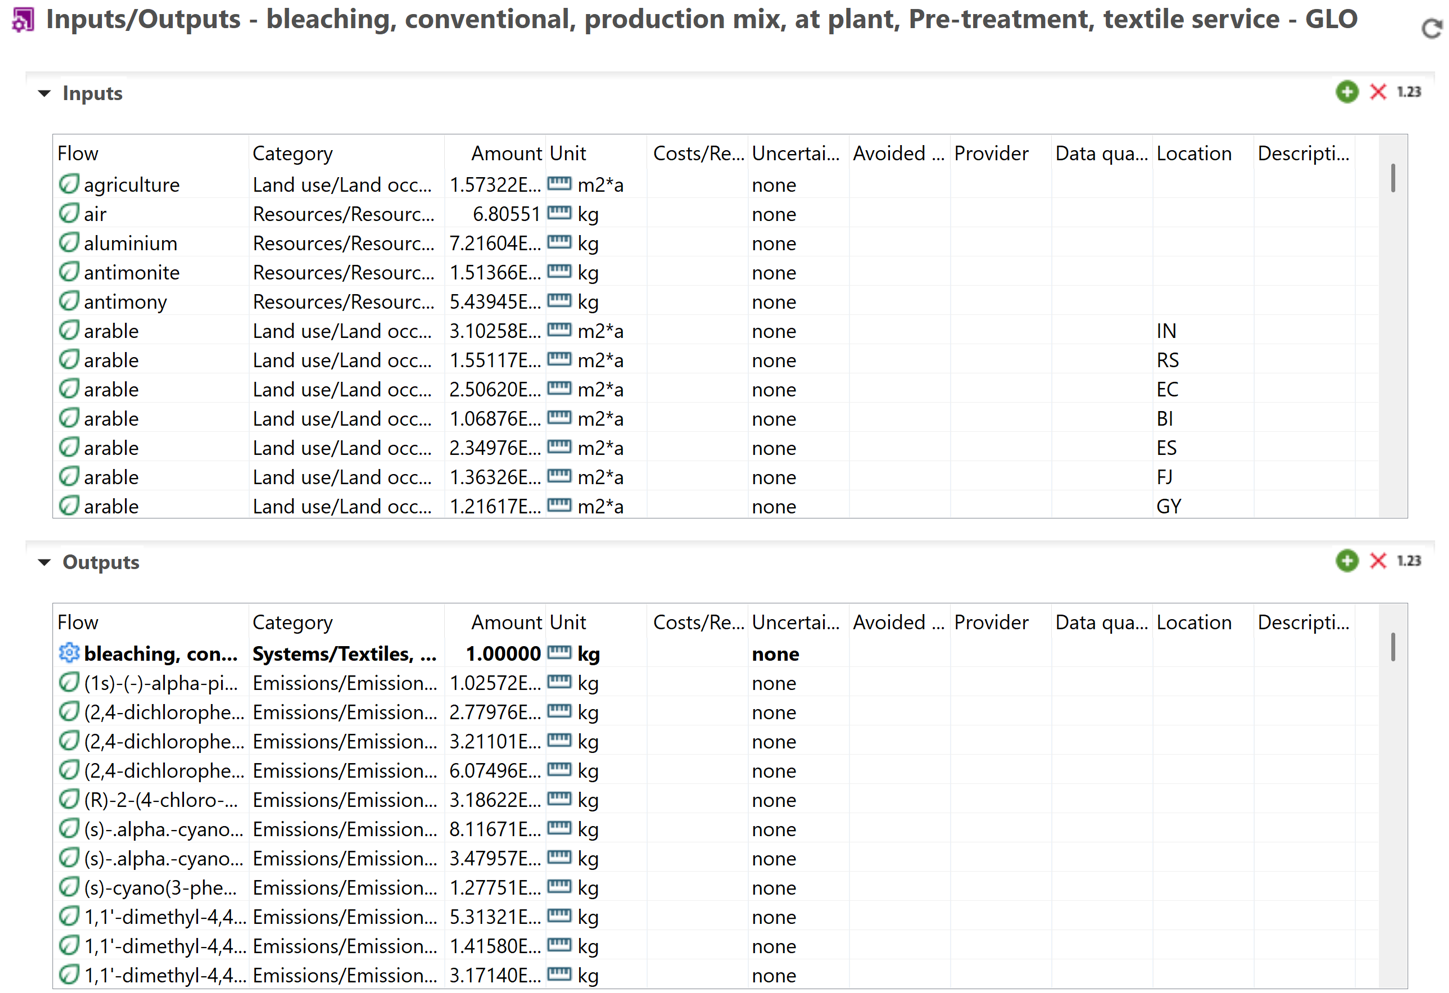 Screenshot from openLCA showing fully terminated process (system process)
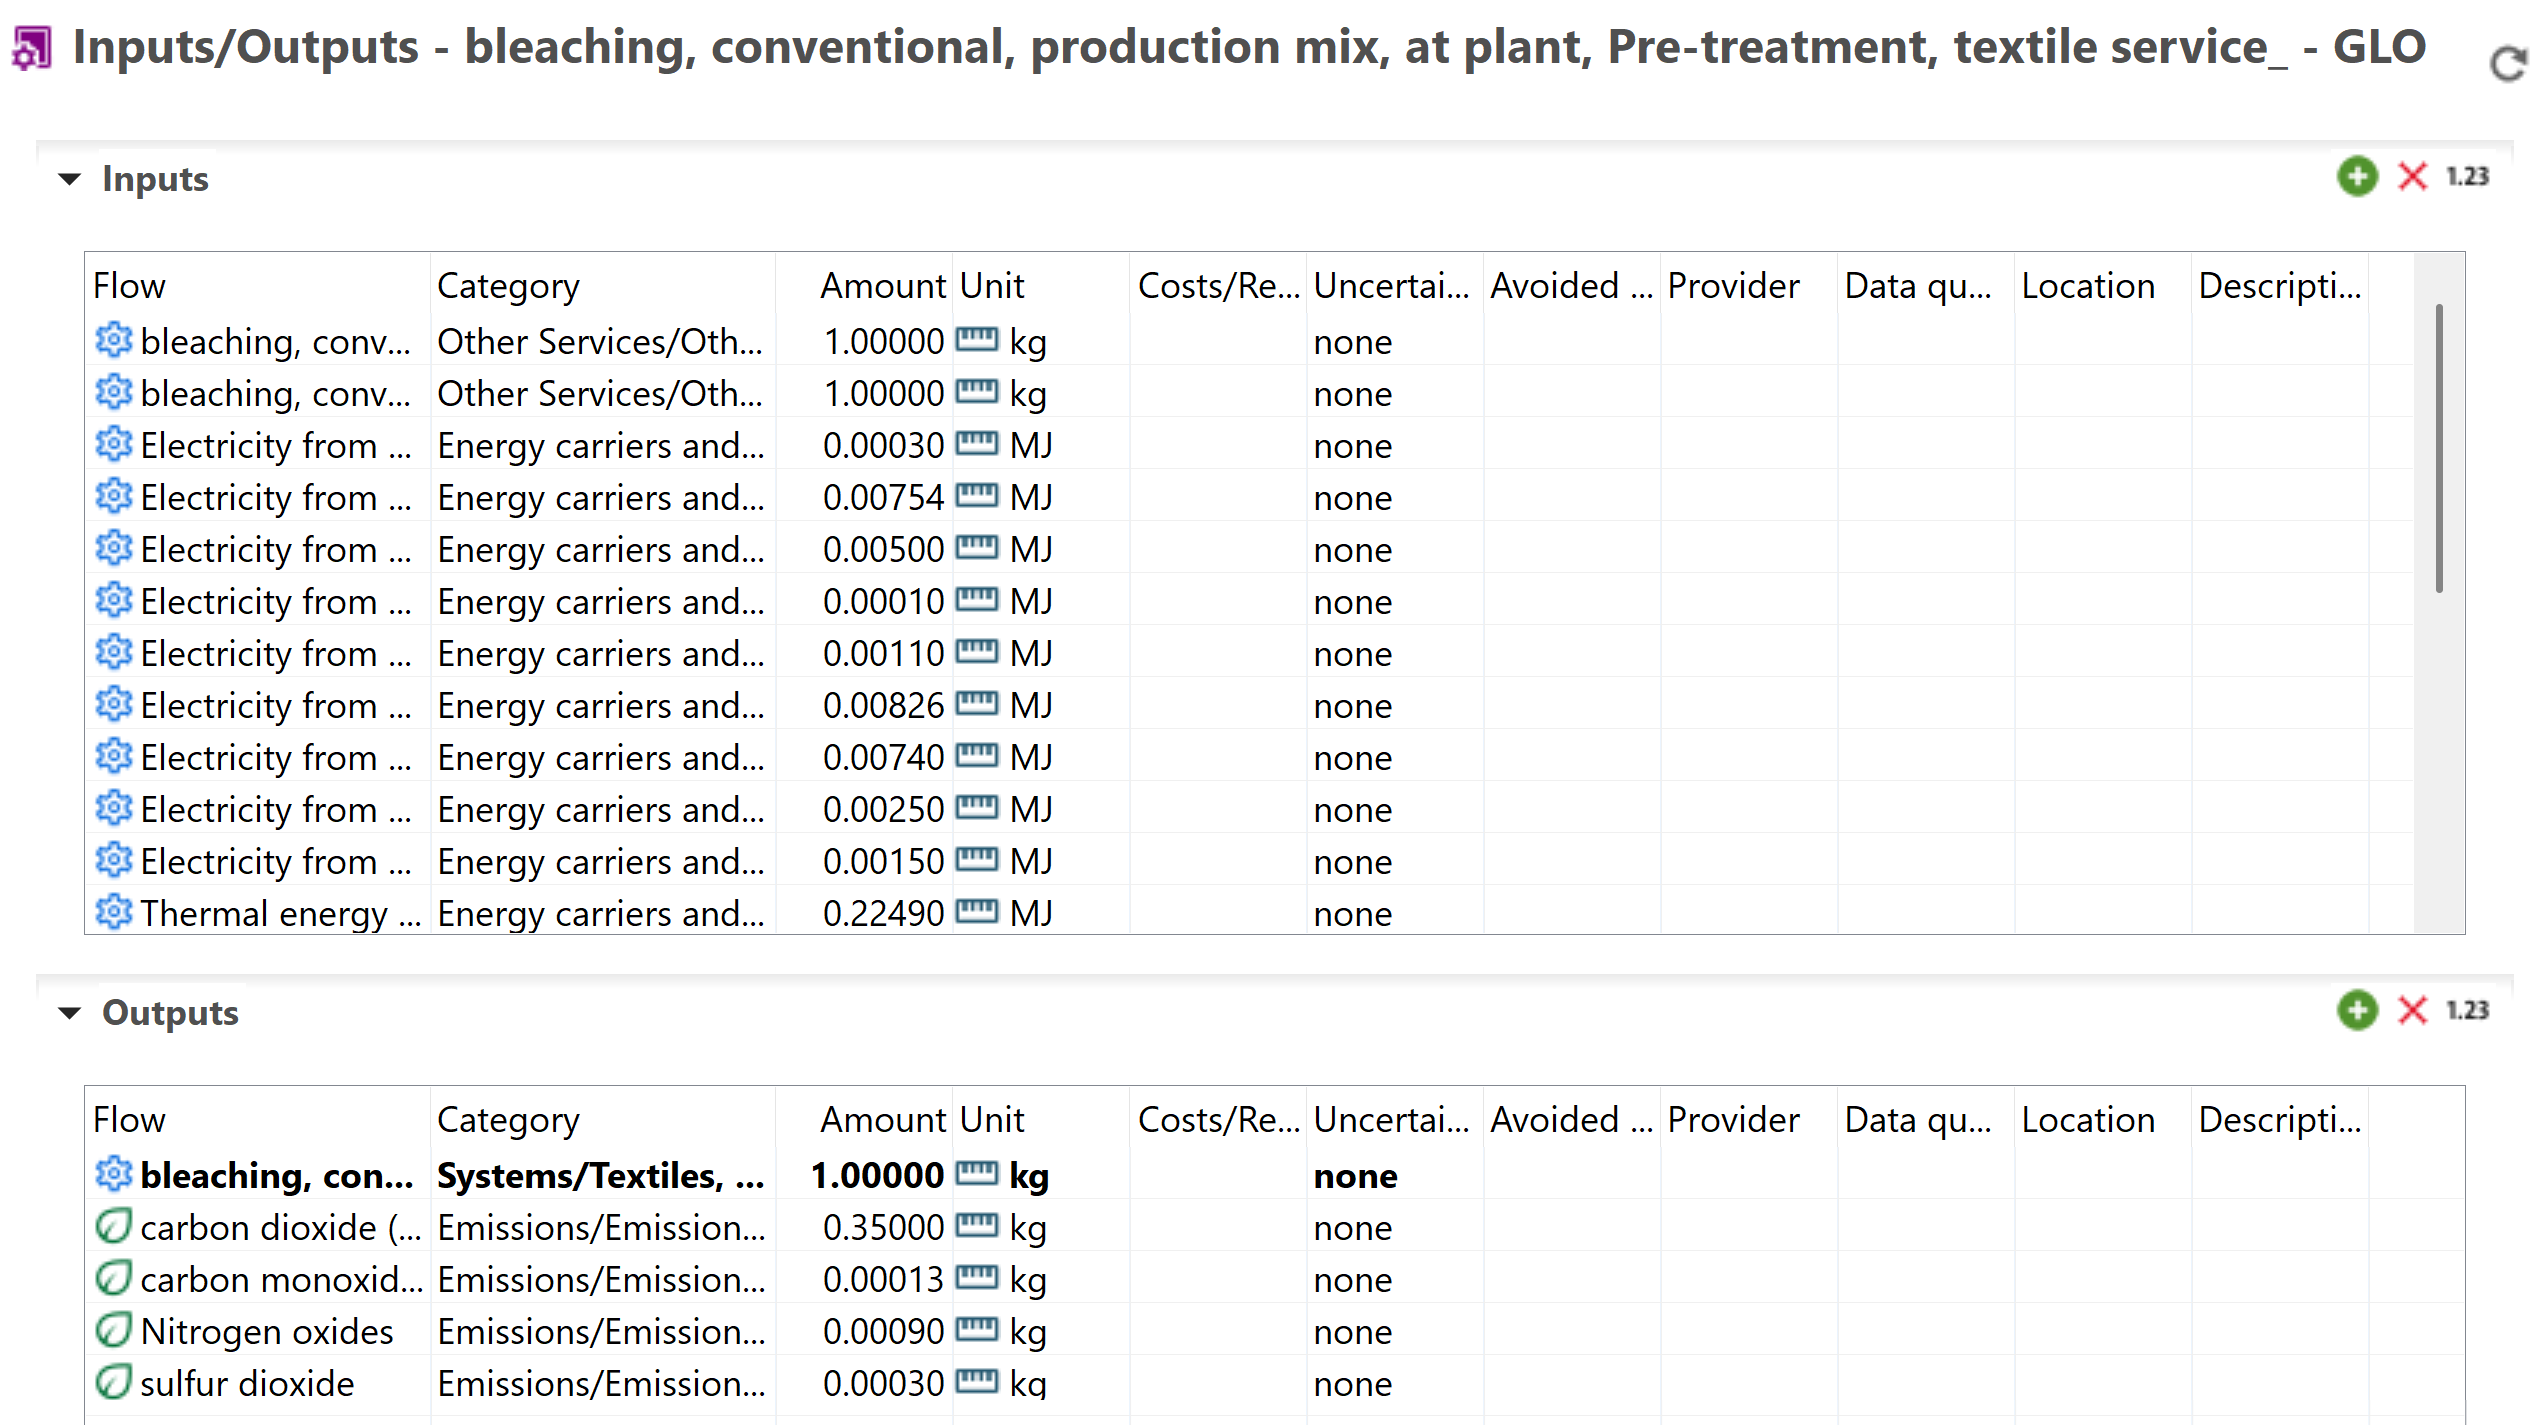

 Location-based regionalization
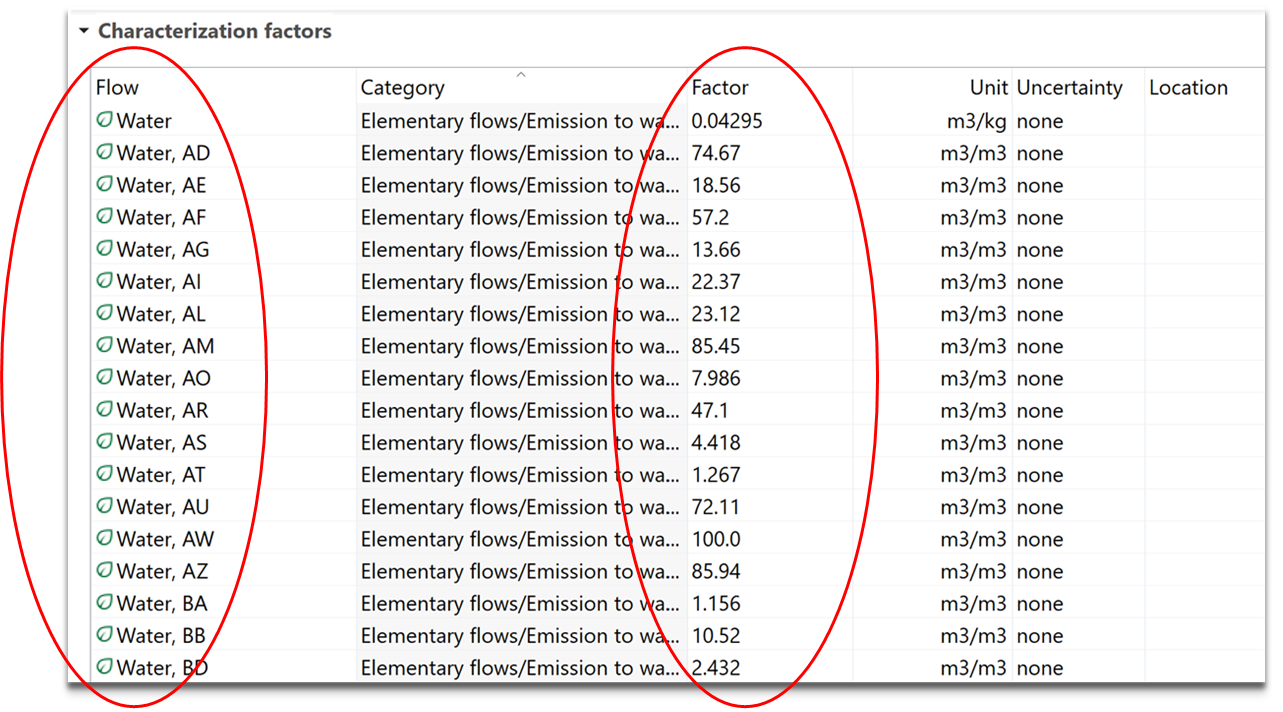 Flow-based regionalization
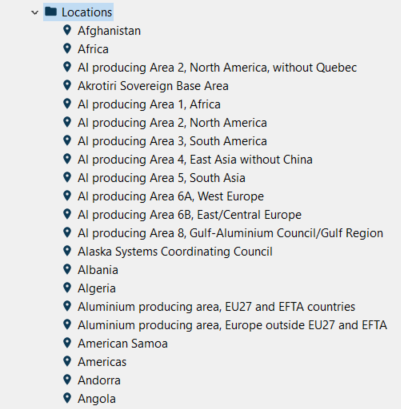
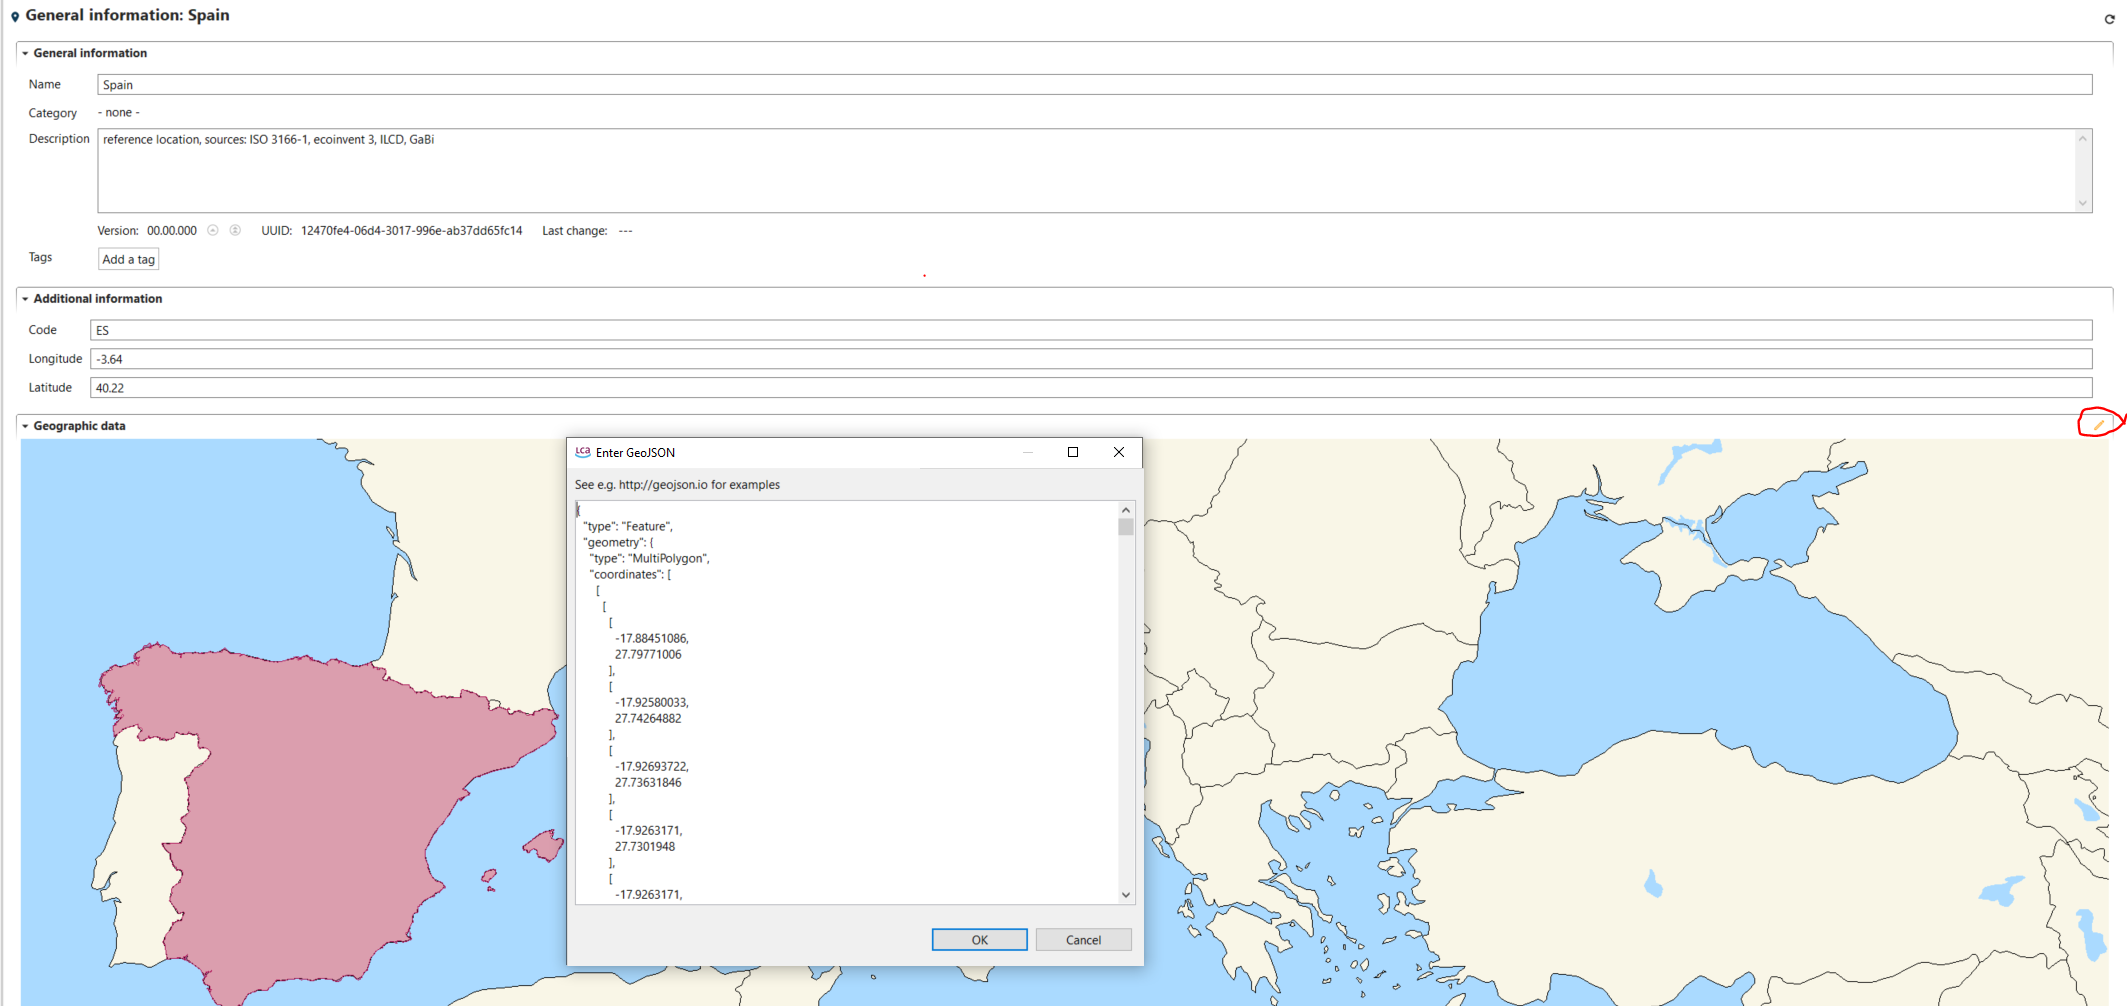
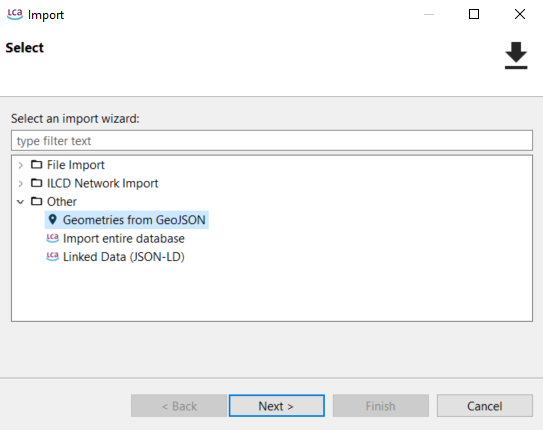
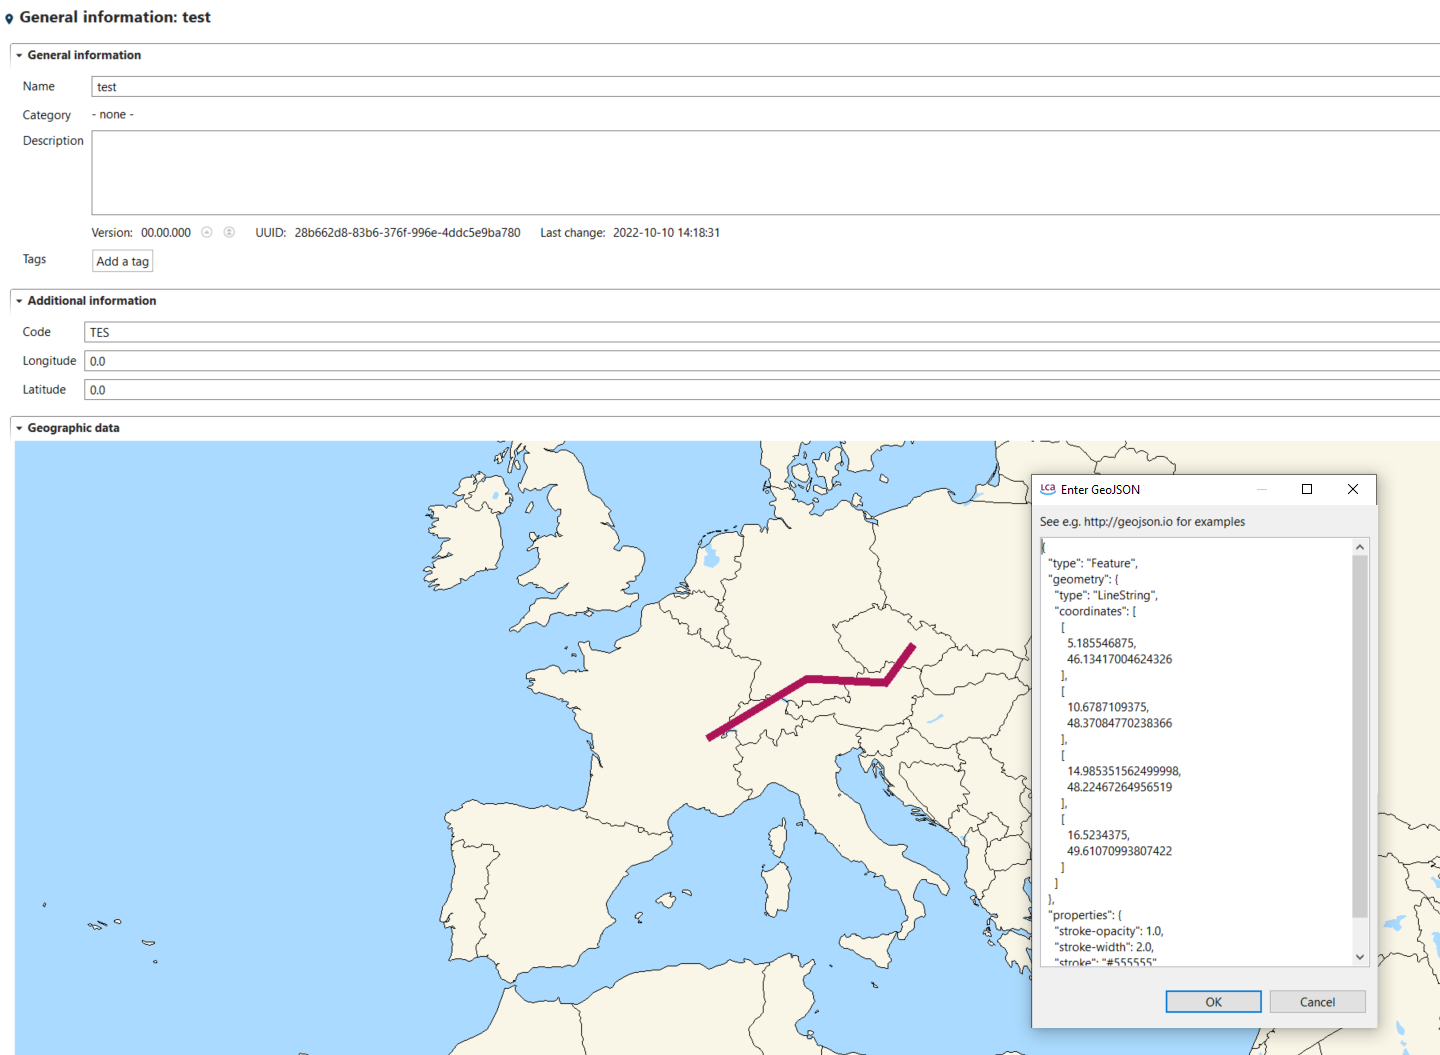
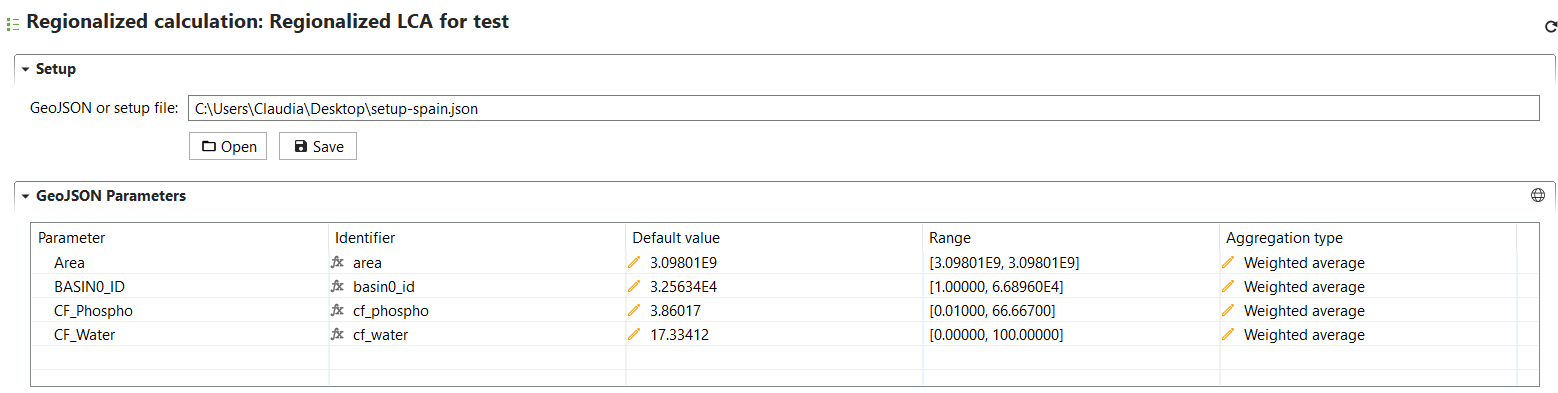
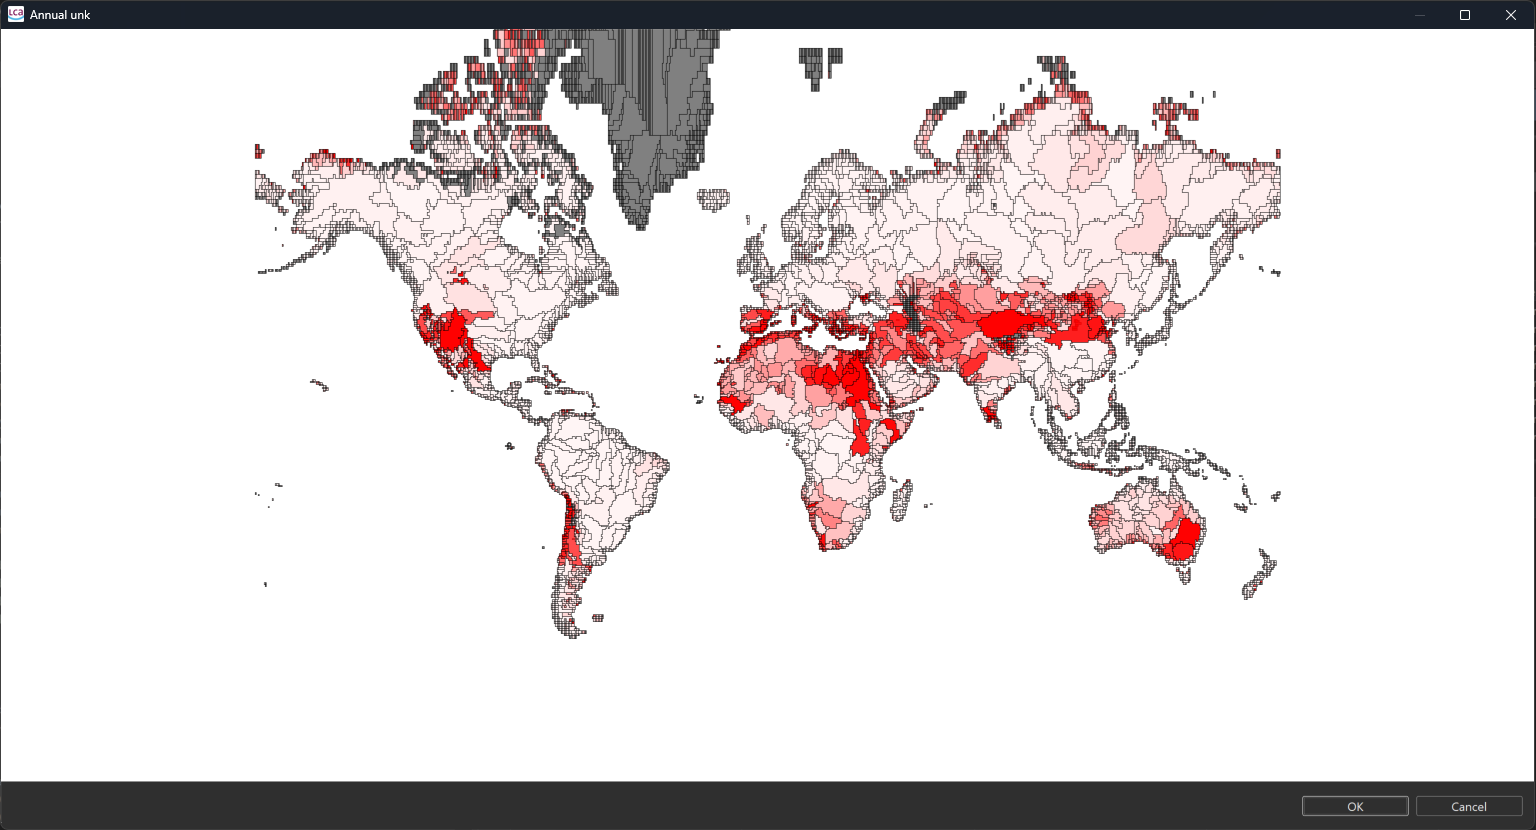
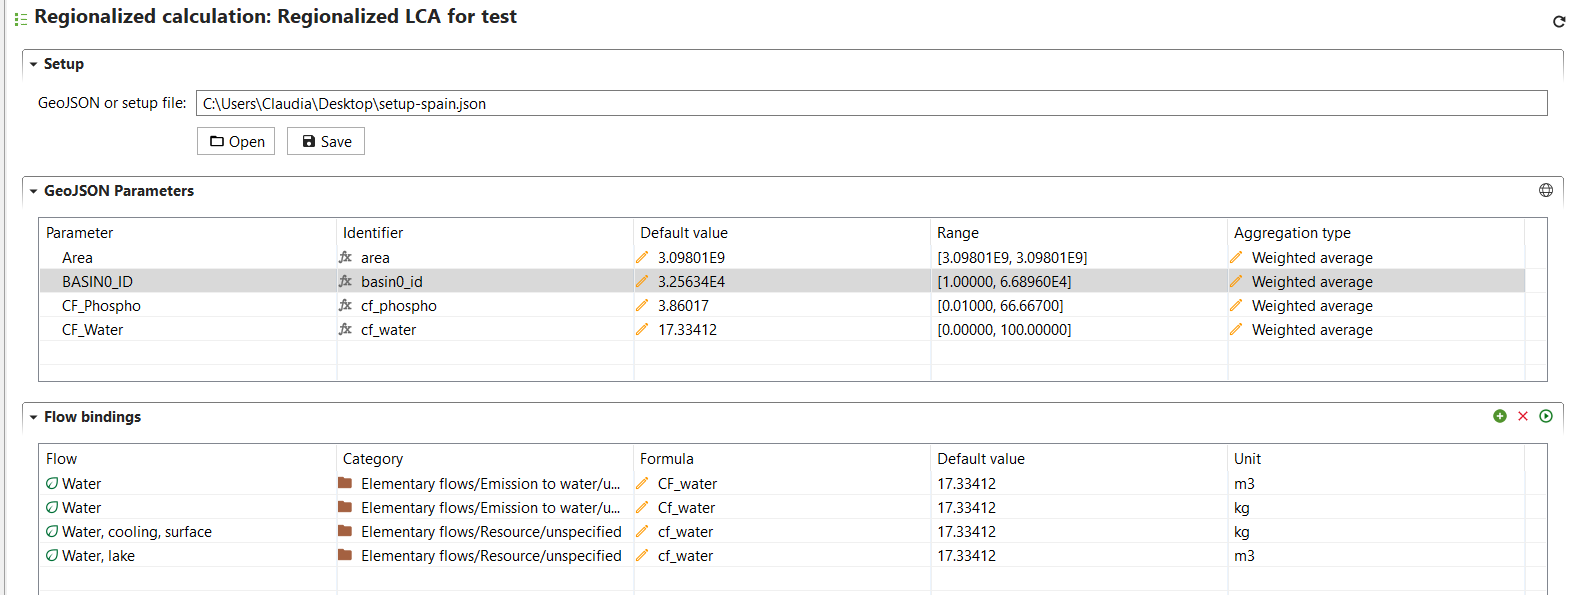
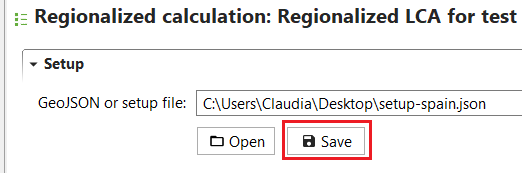
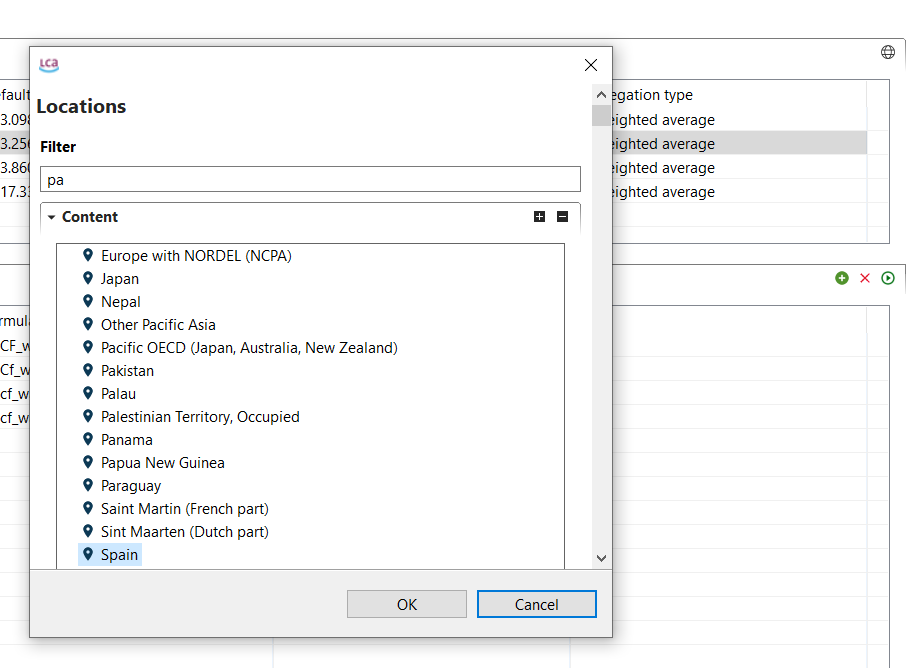
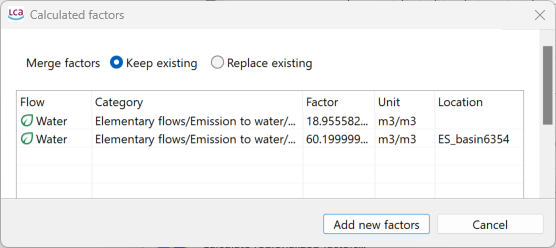
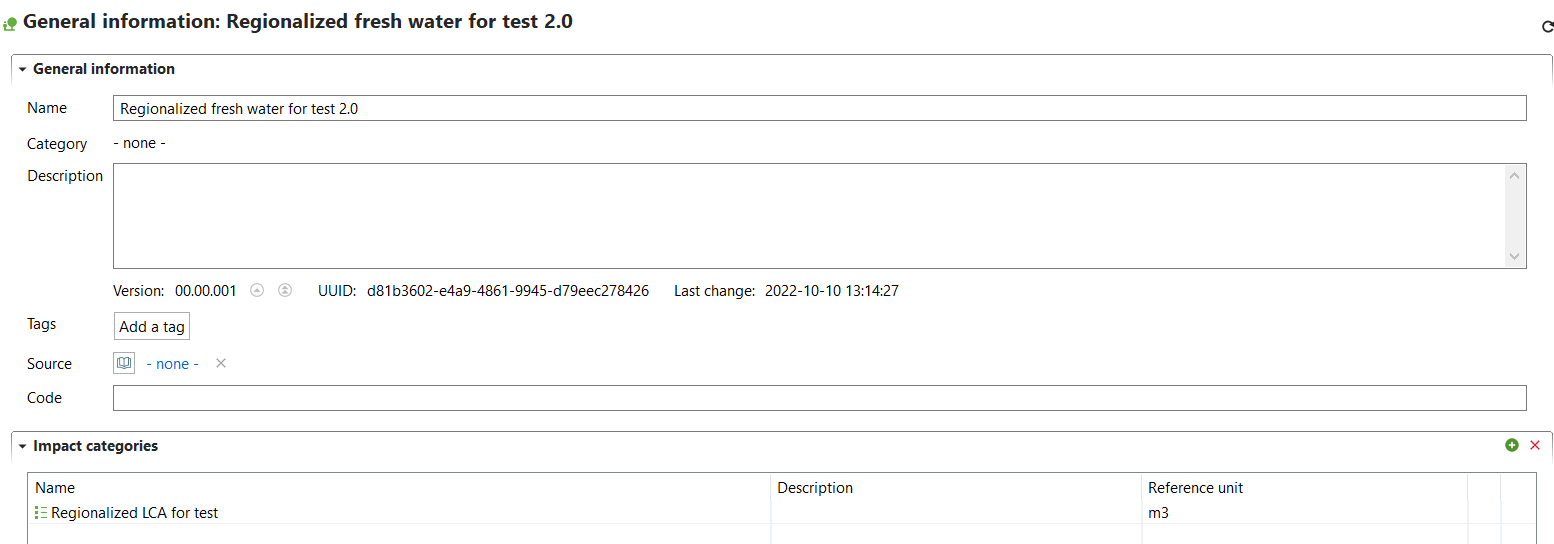
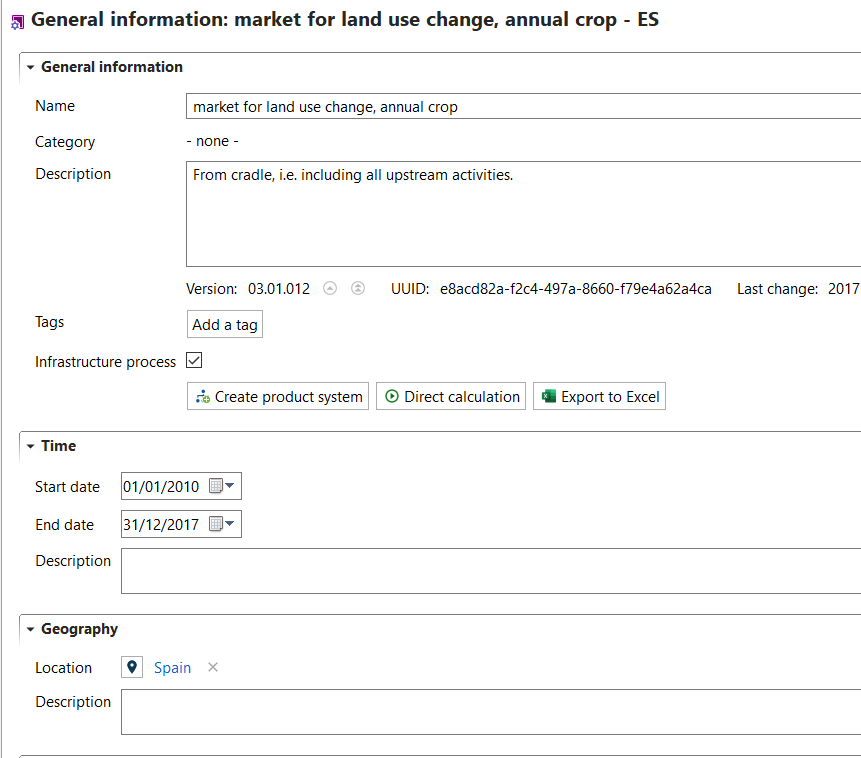

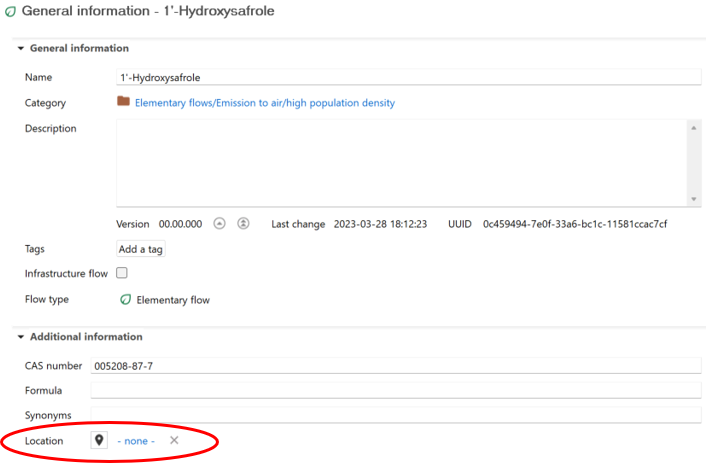
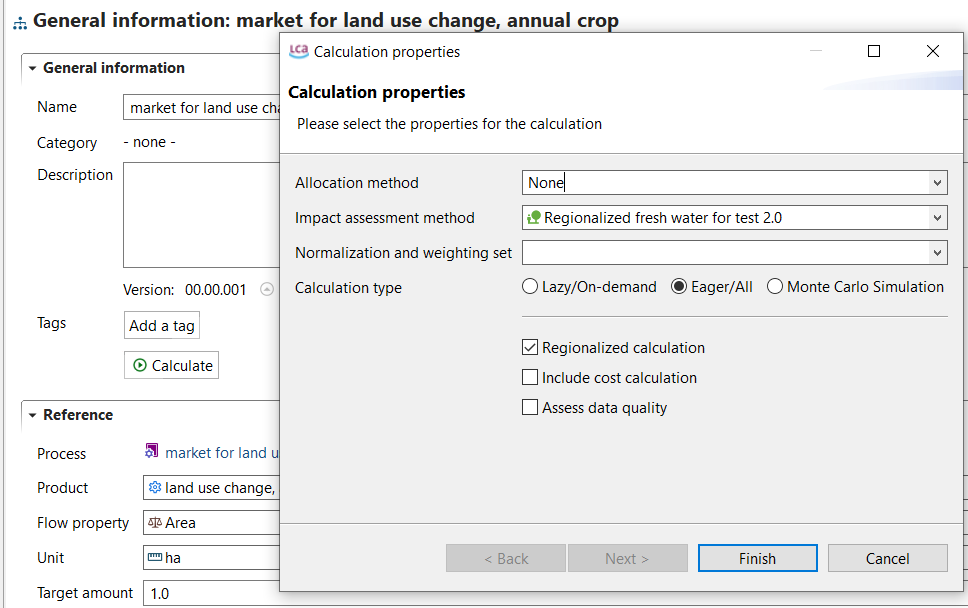

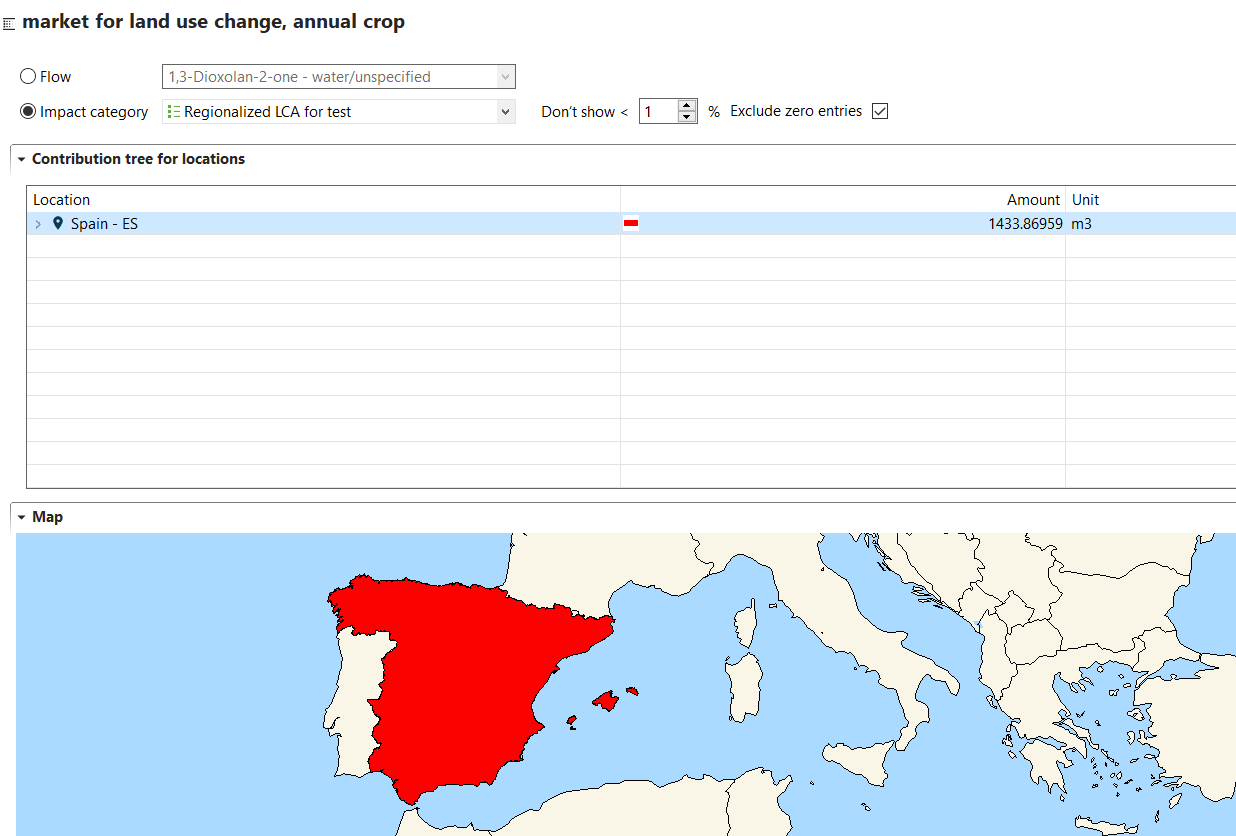
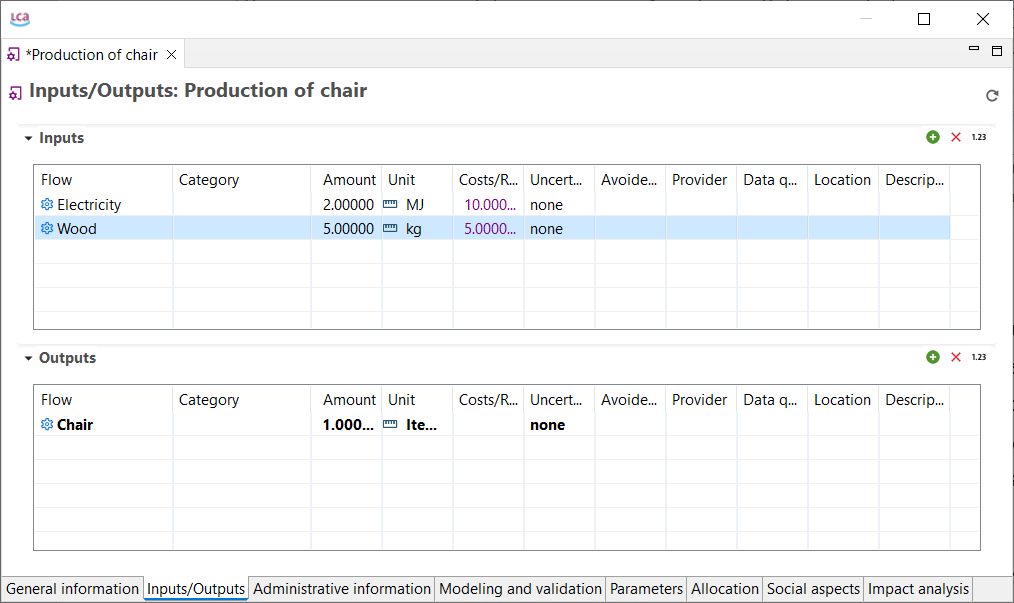 Costs and revenues for flows in a process
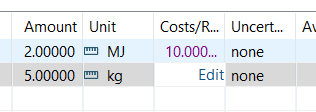
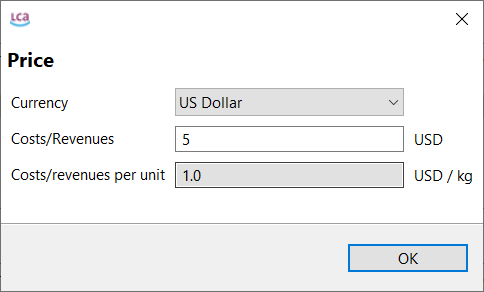
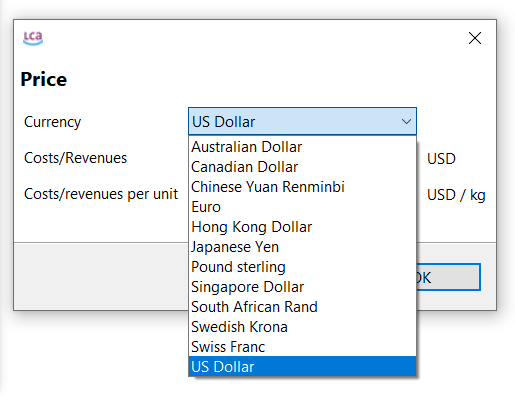
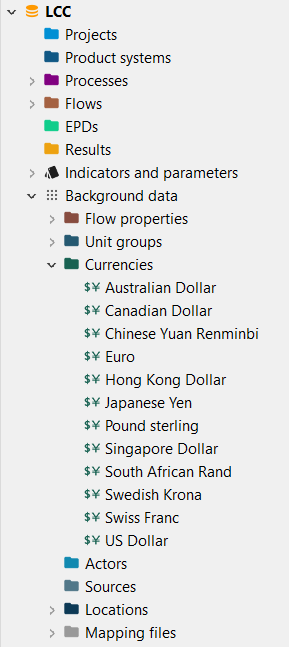
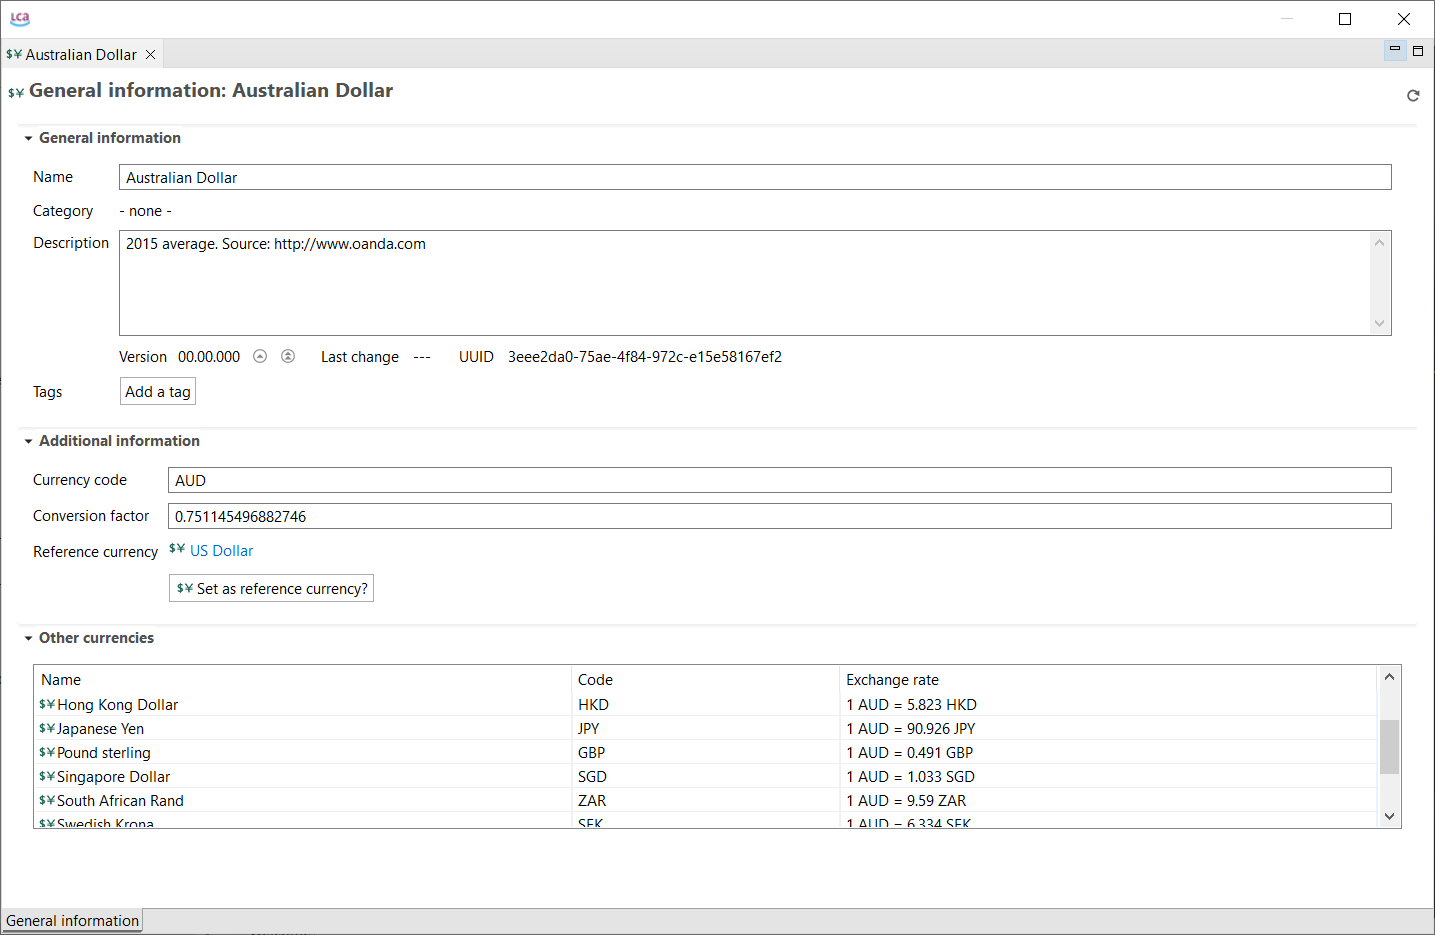
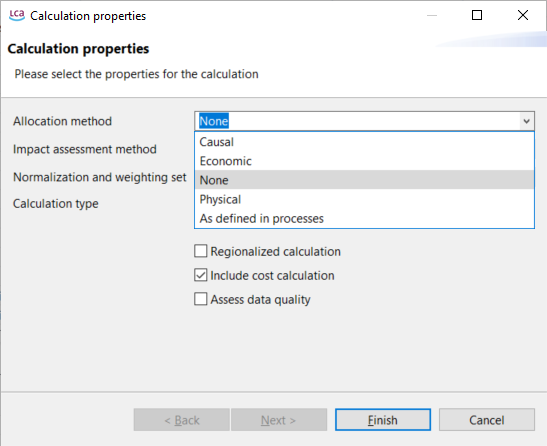
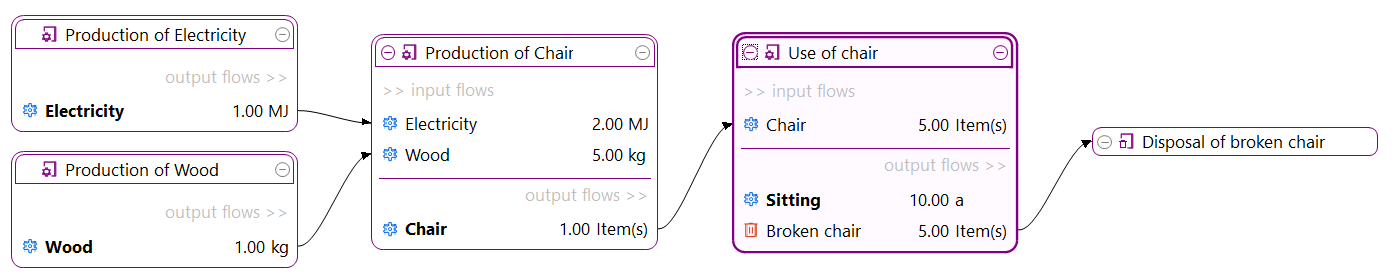 The created product system in the model graph in openLCA
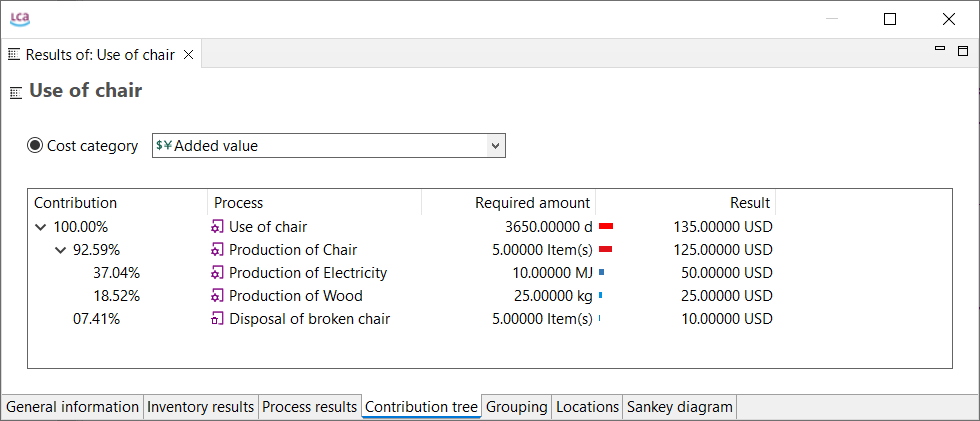
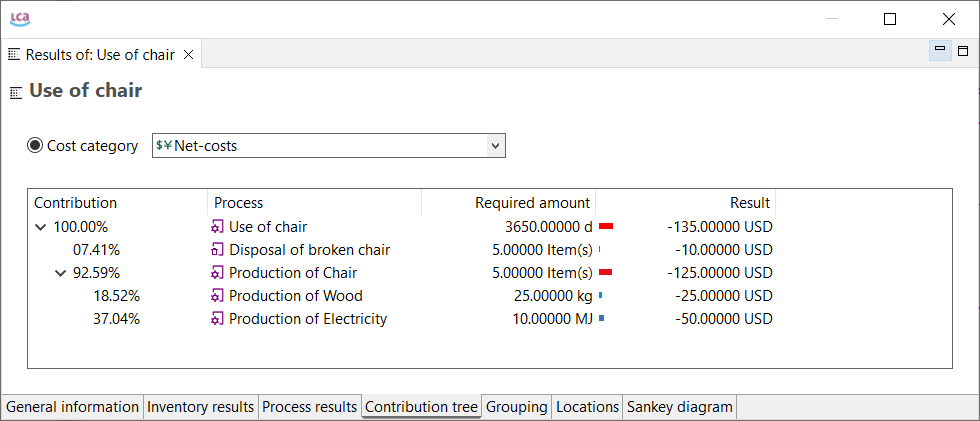
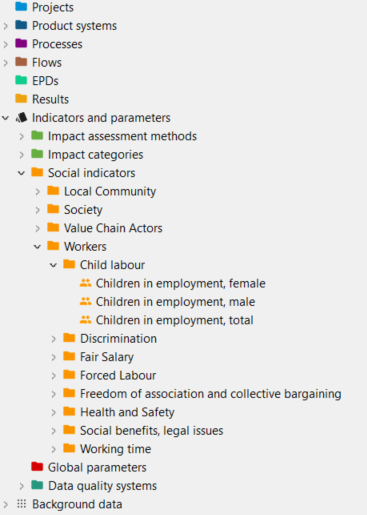
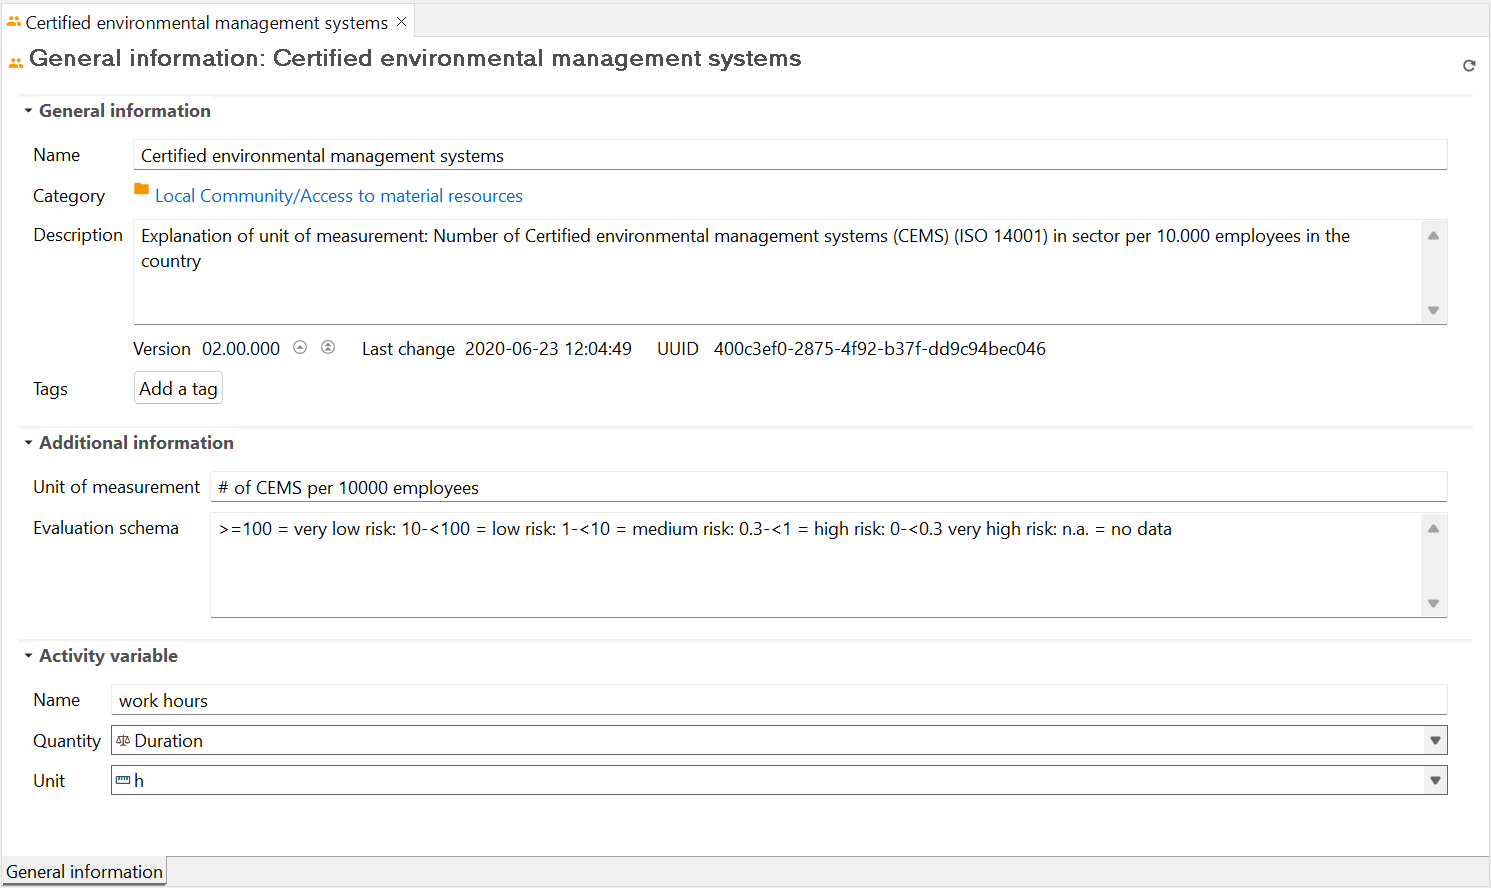
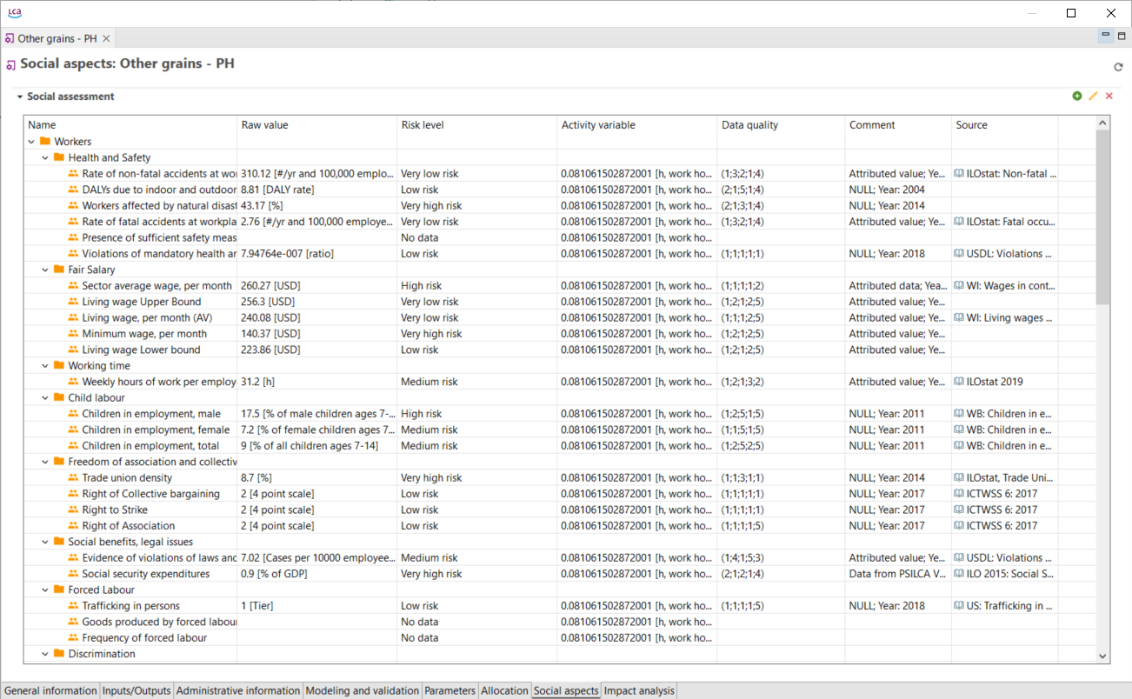
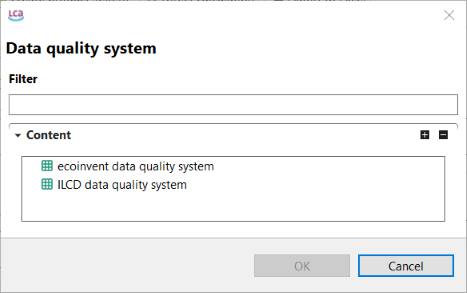
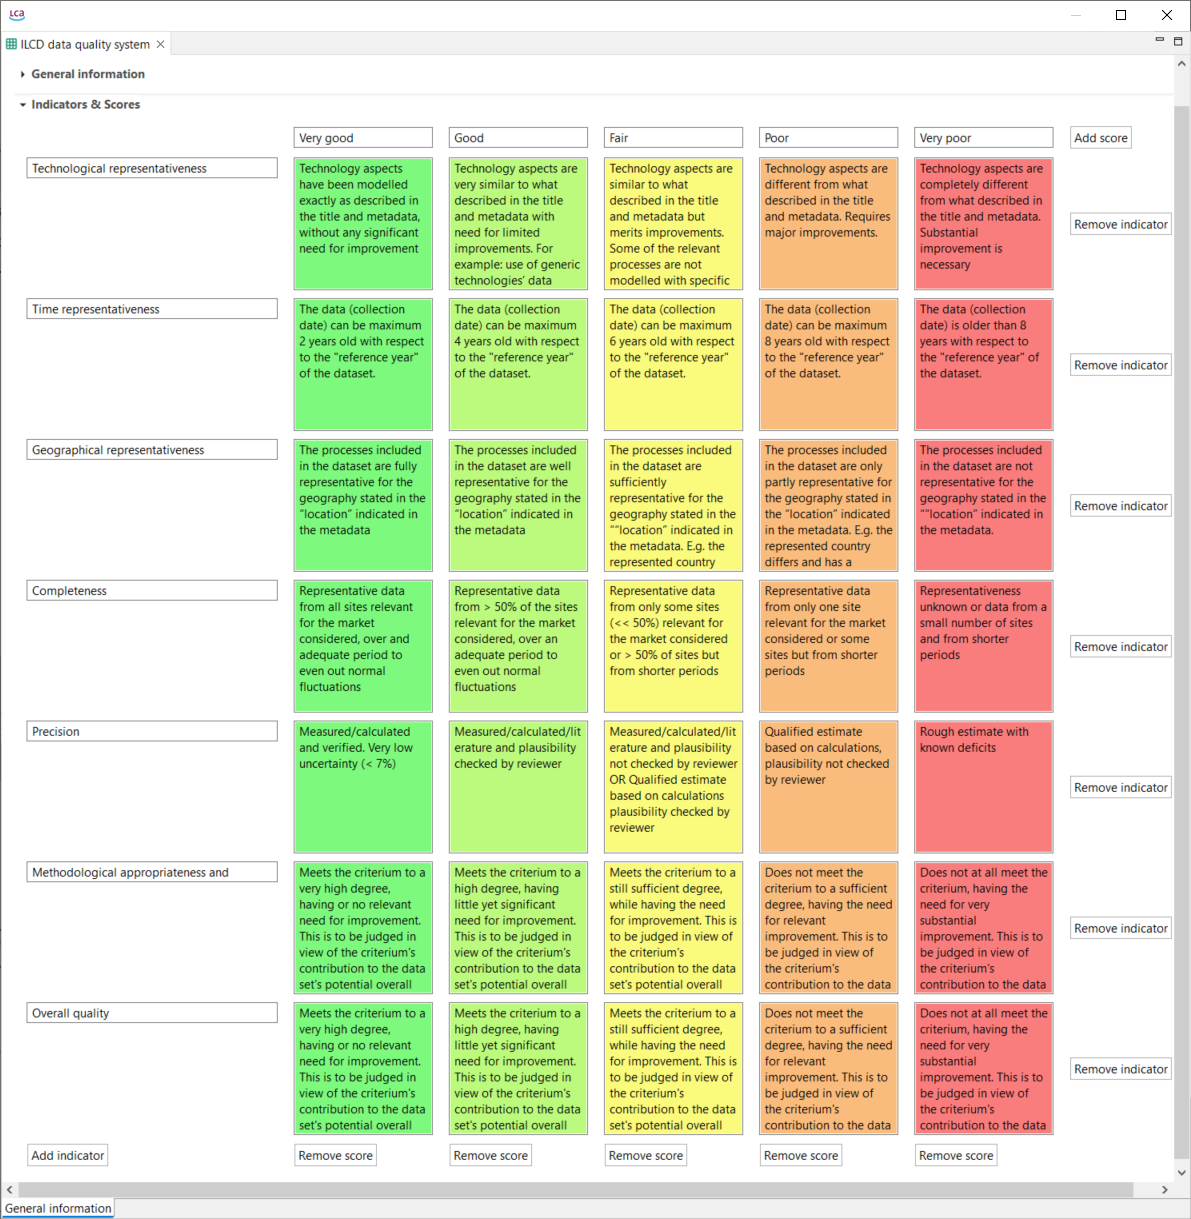
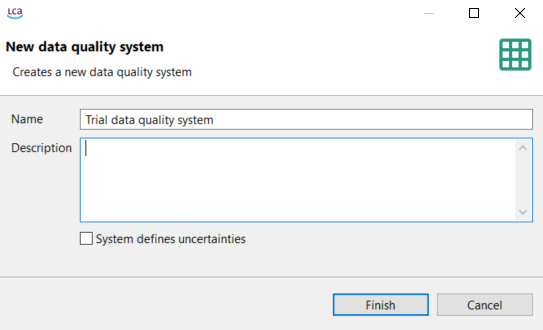
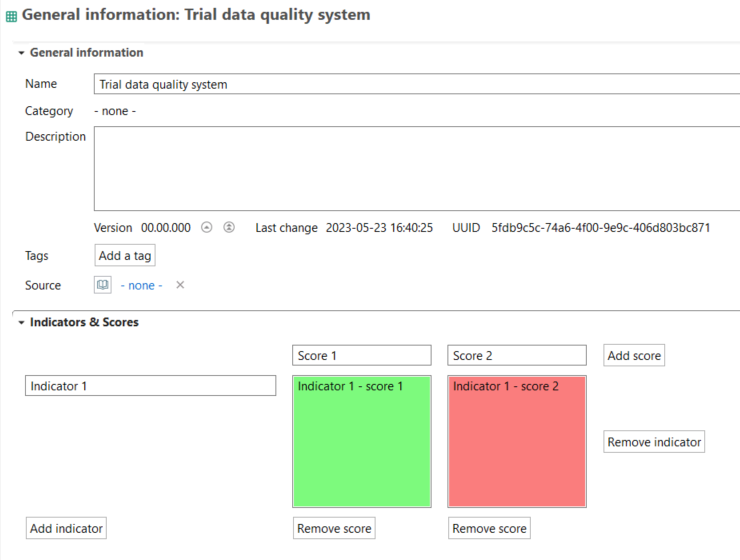
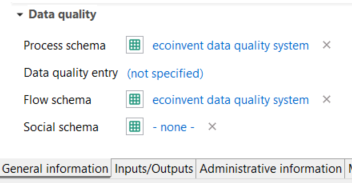
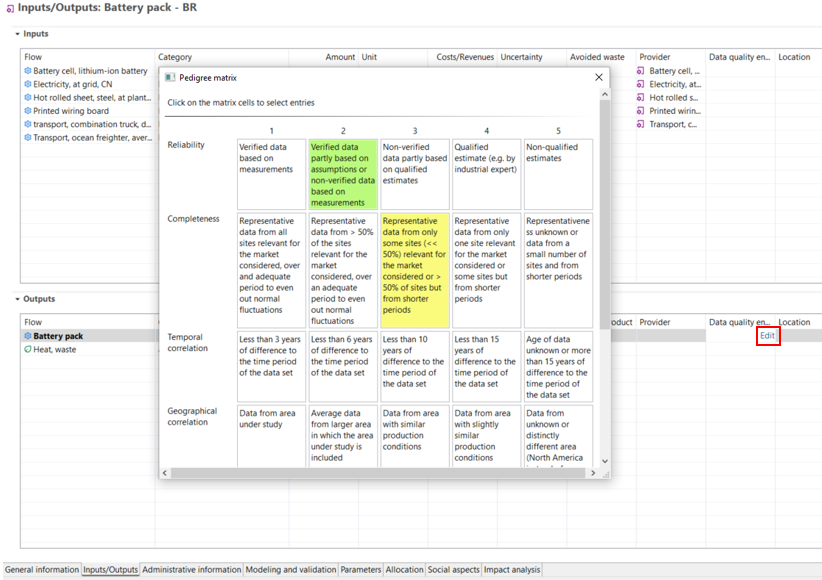
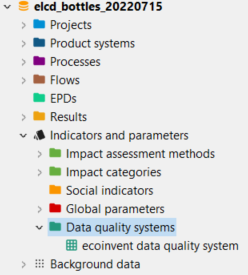
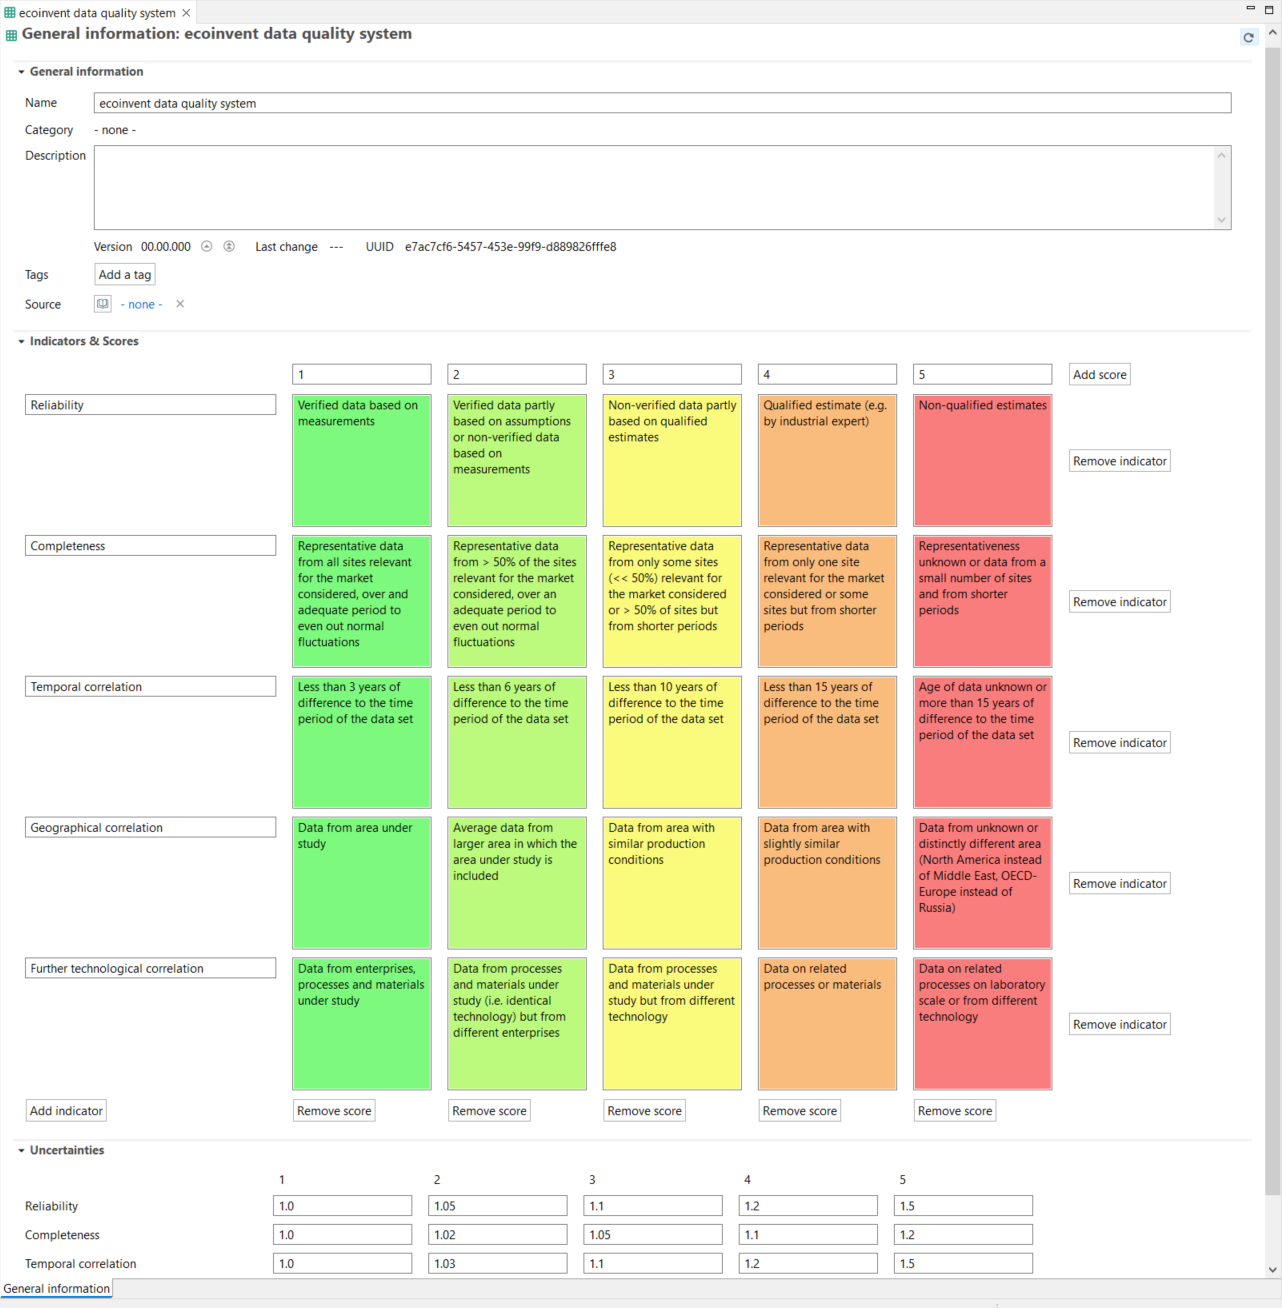
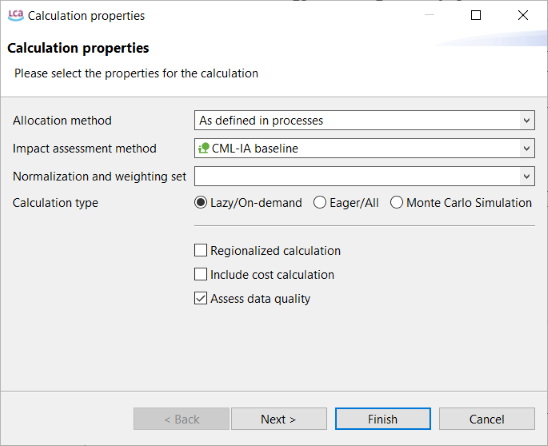
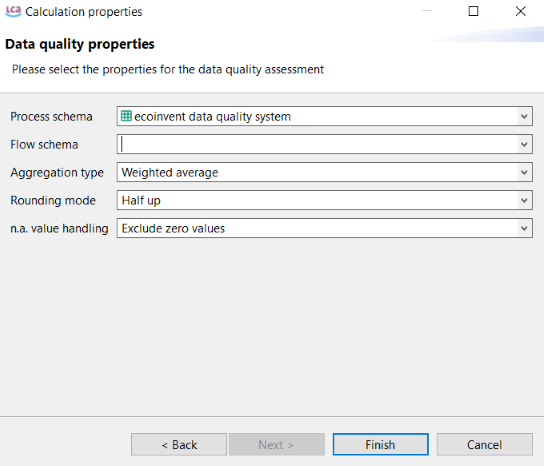

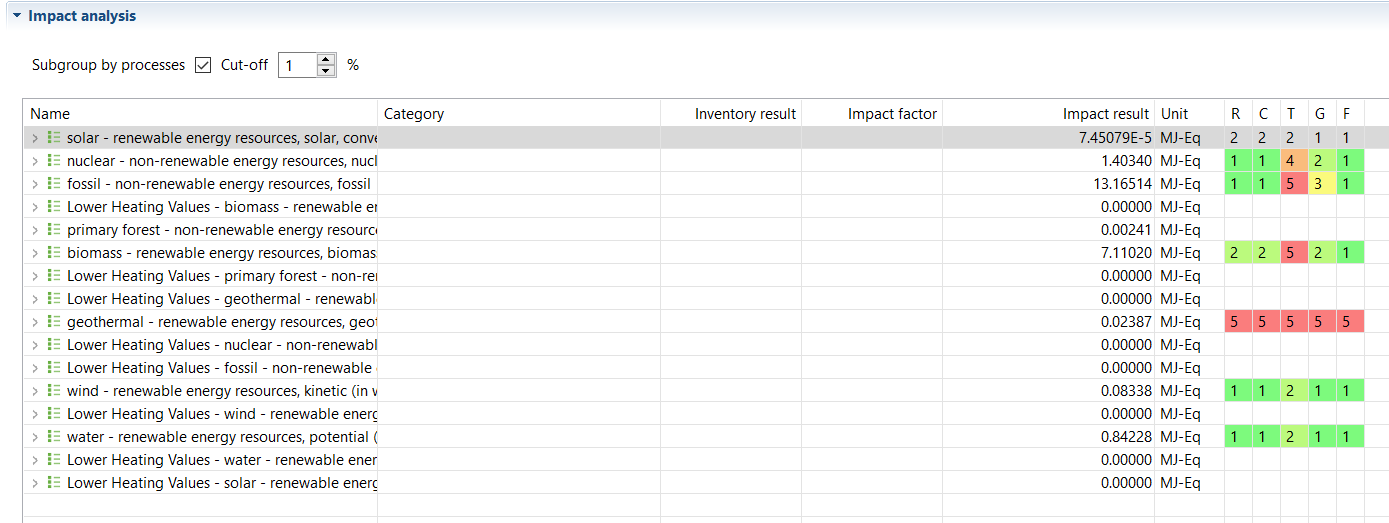

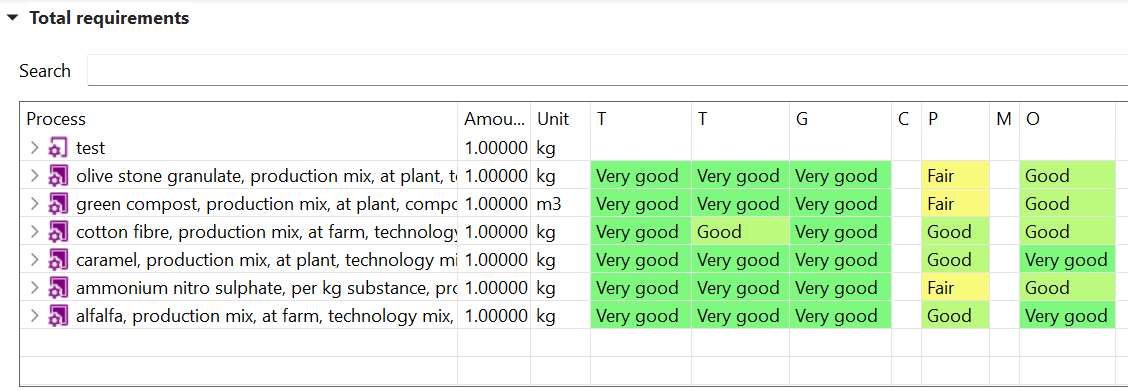
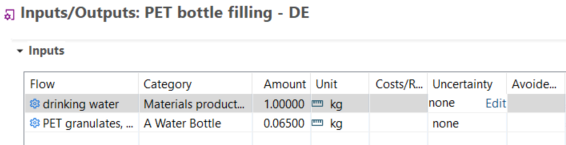
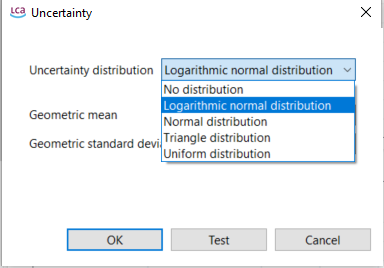
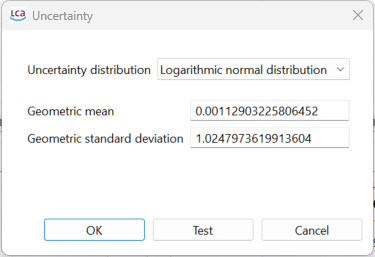
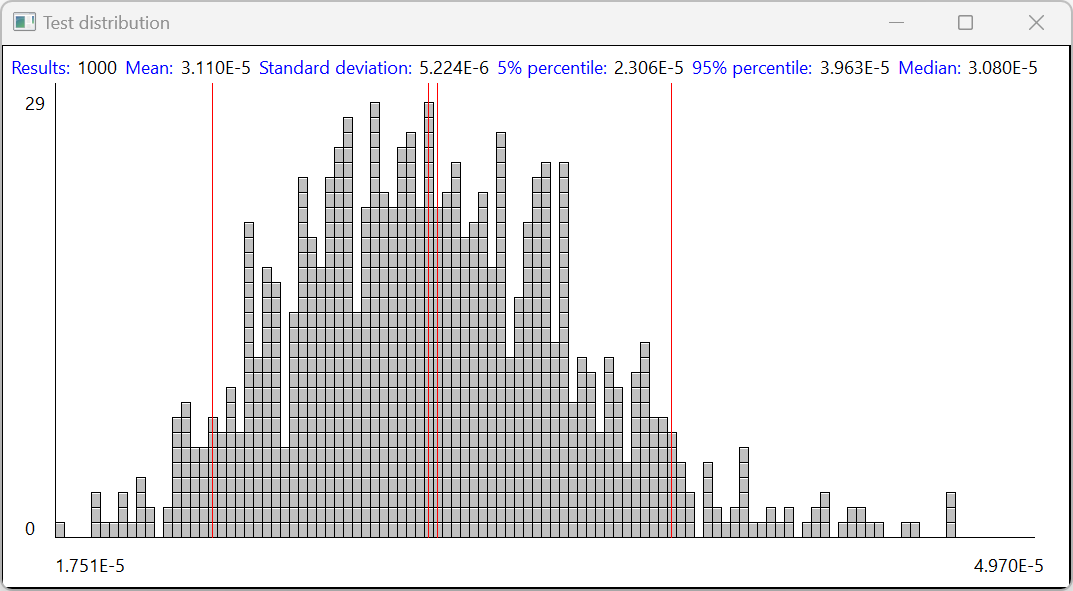
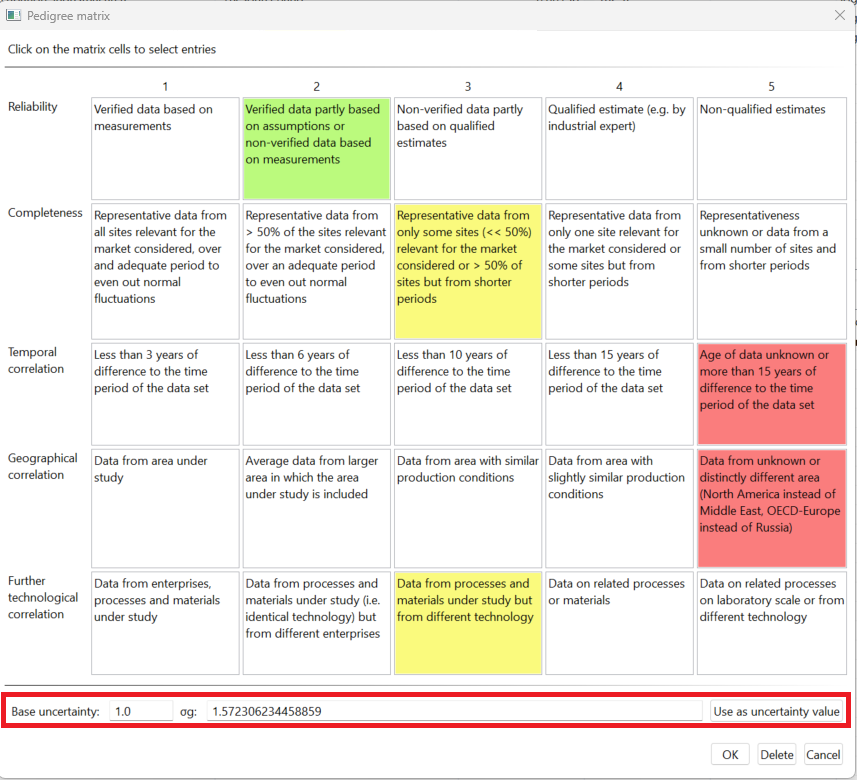
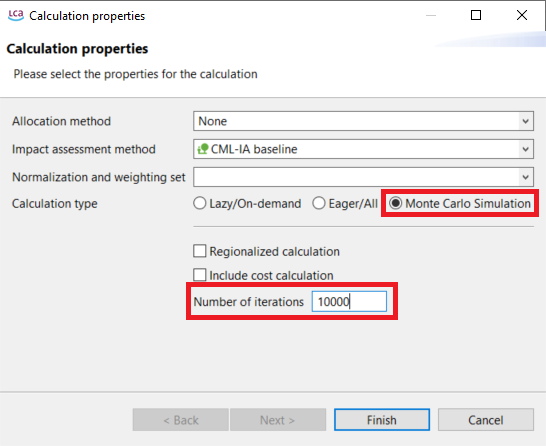
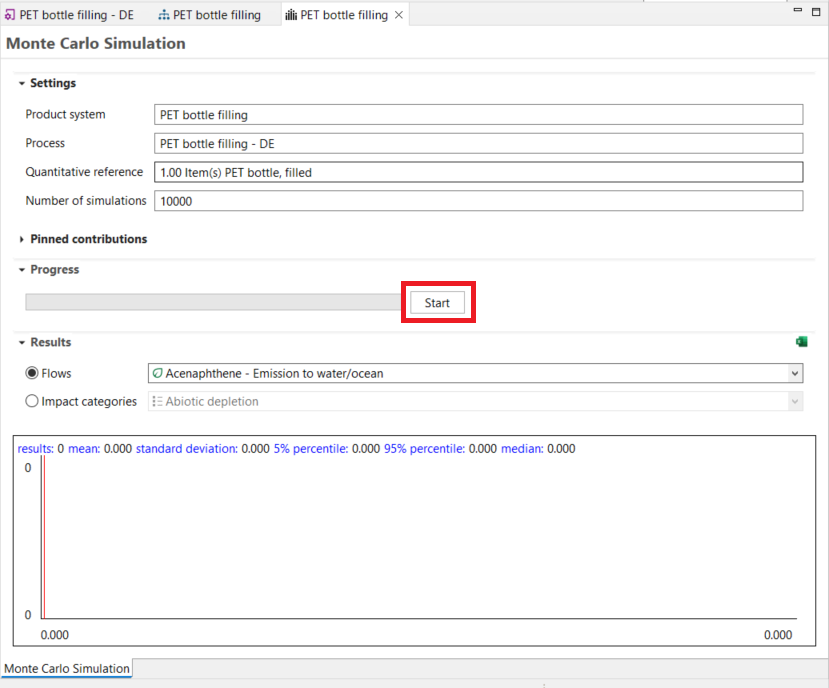


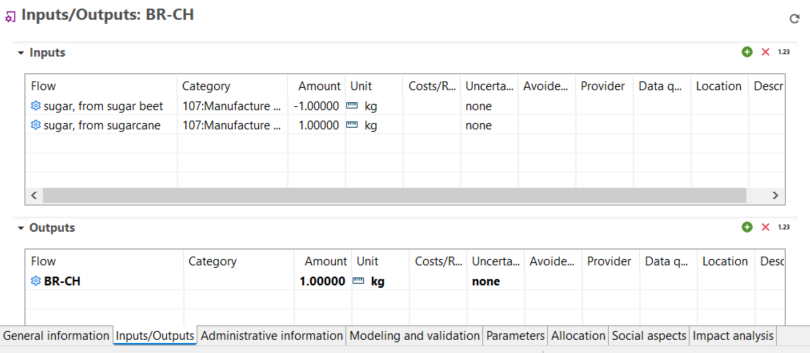
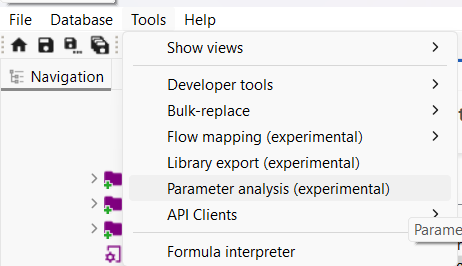


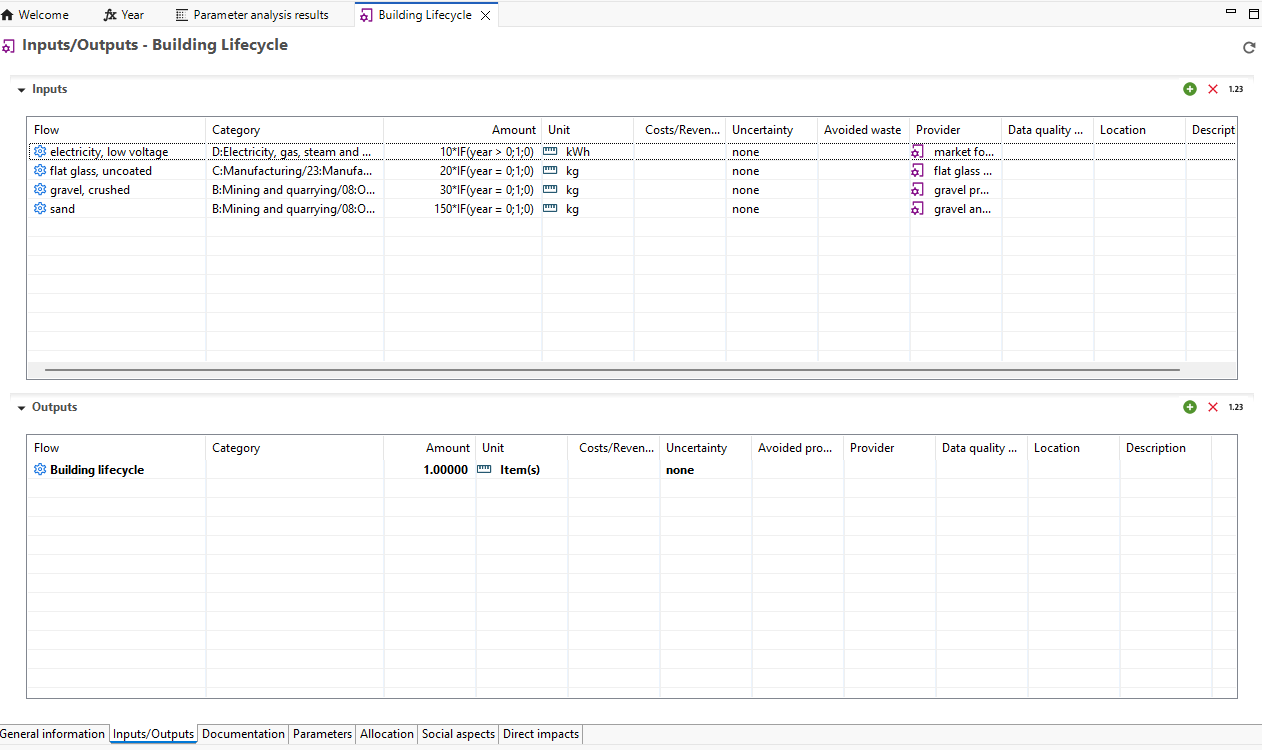
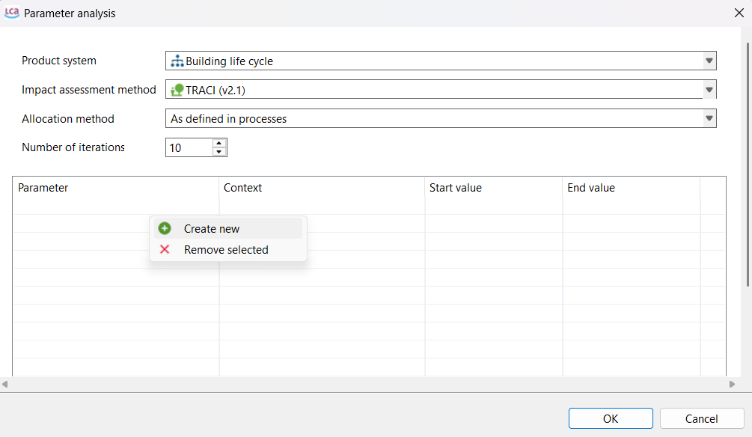
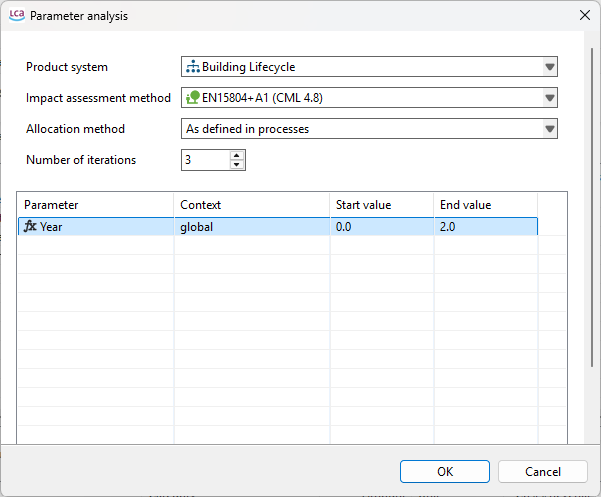

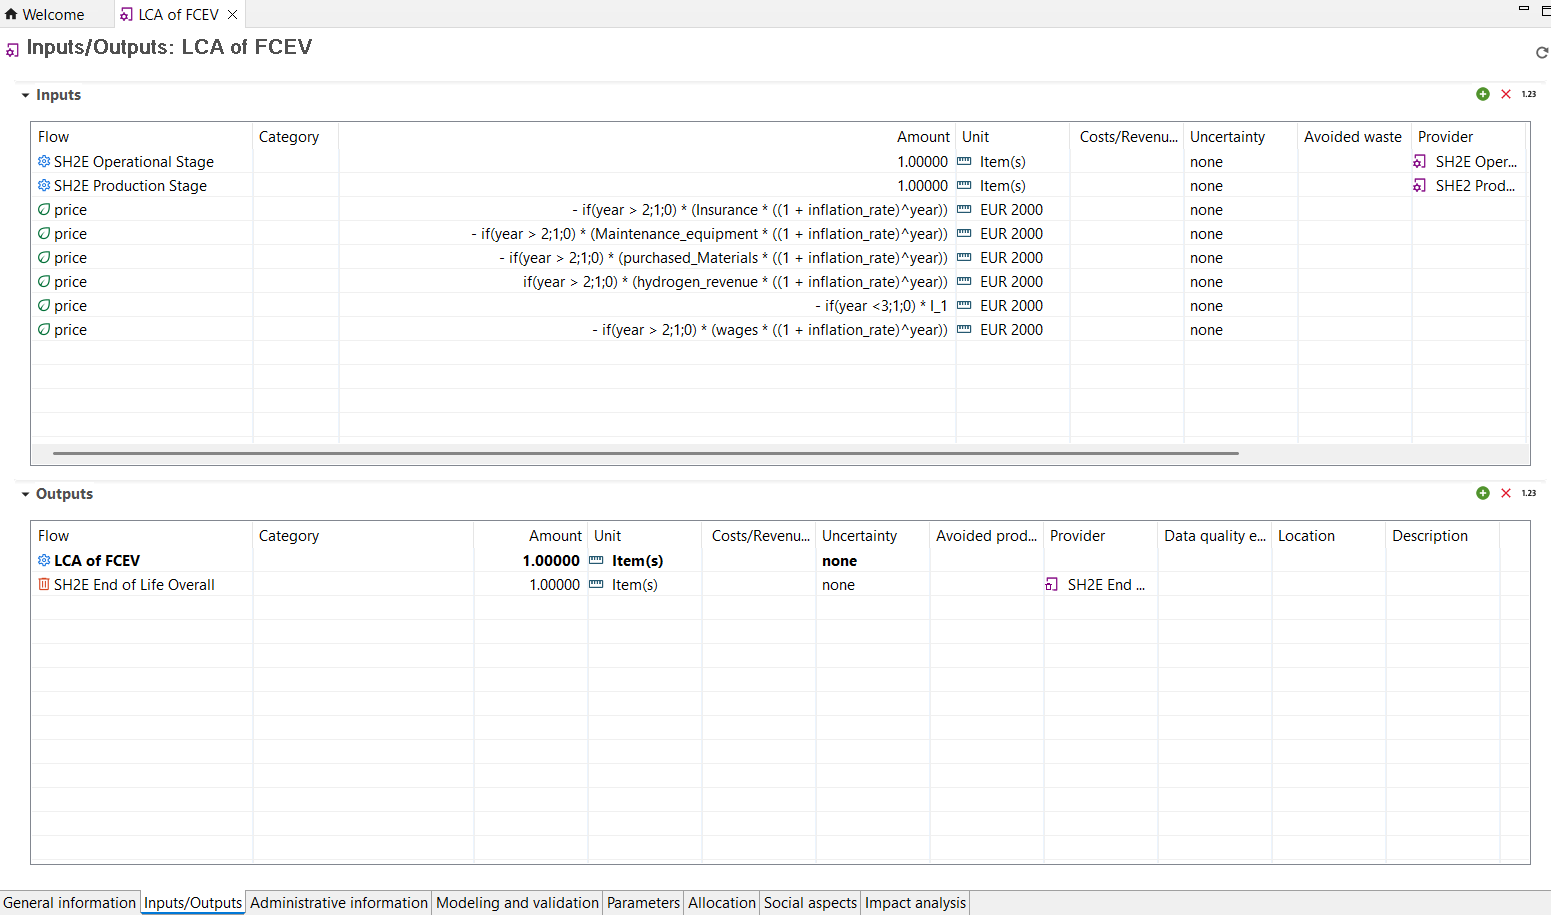
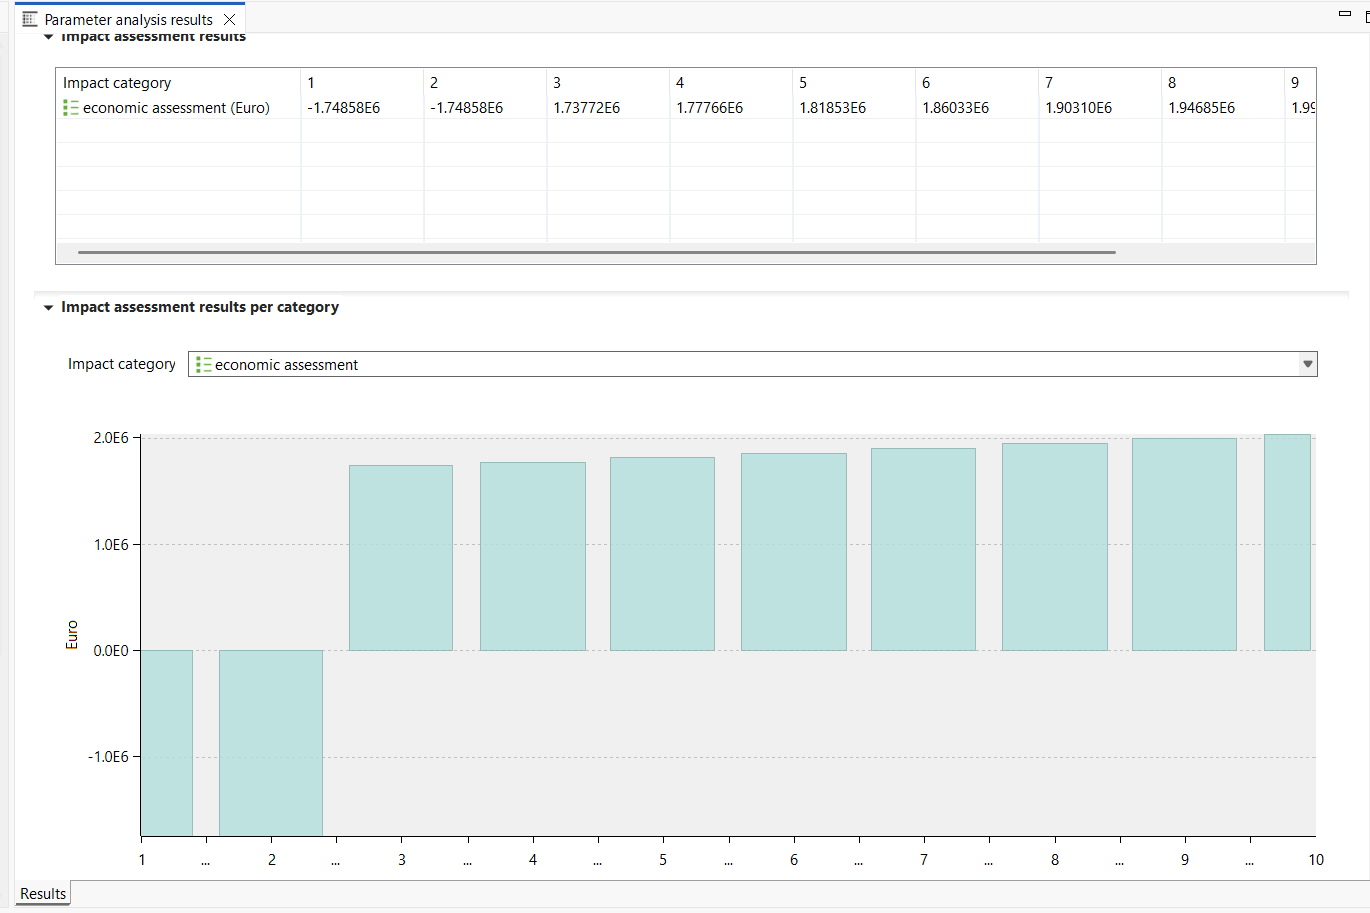
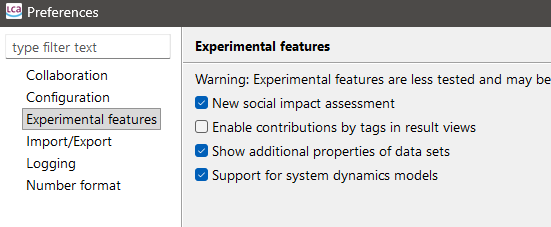
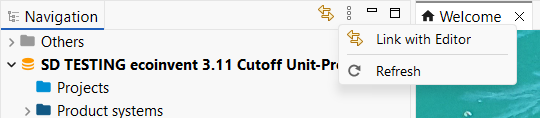
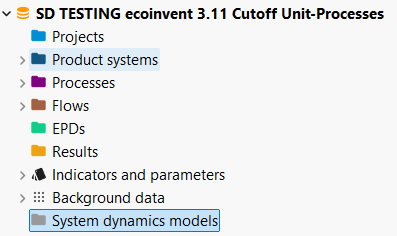
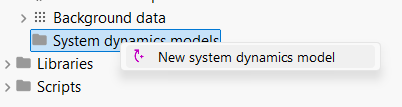
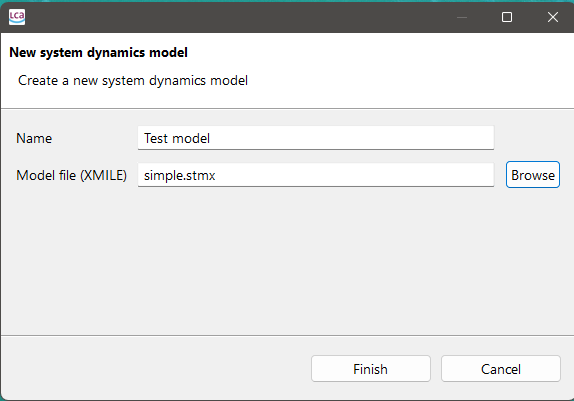
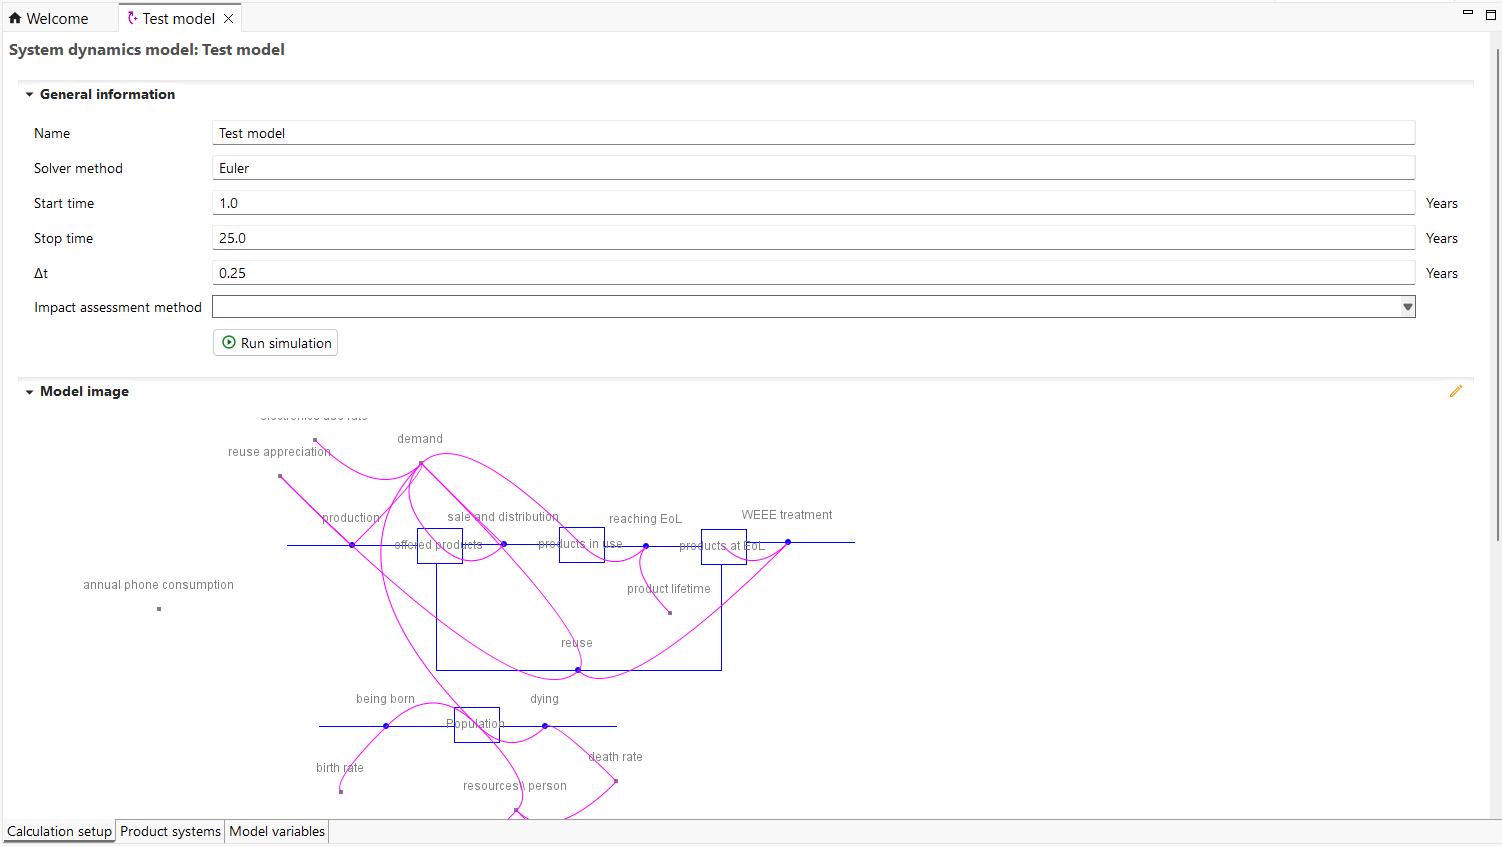
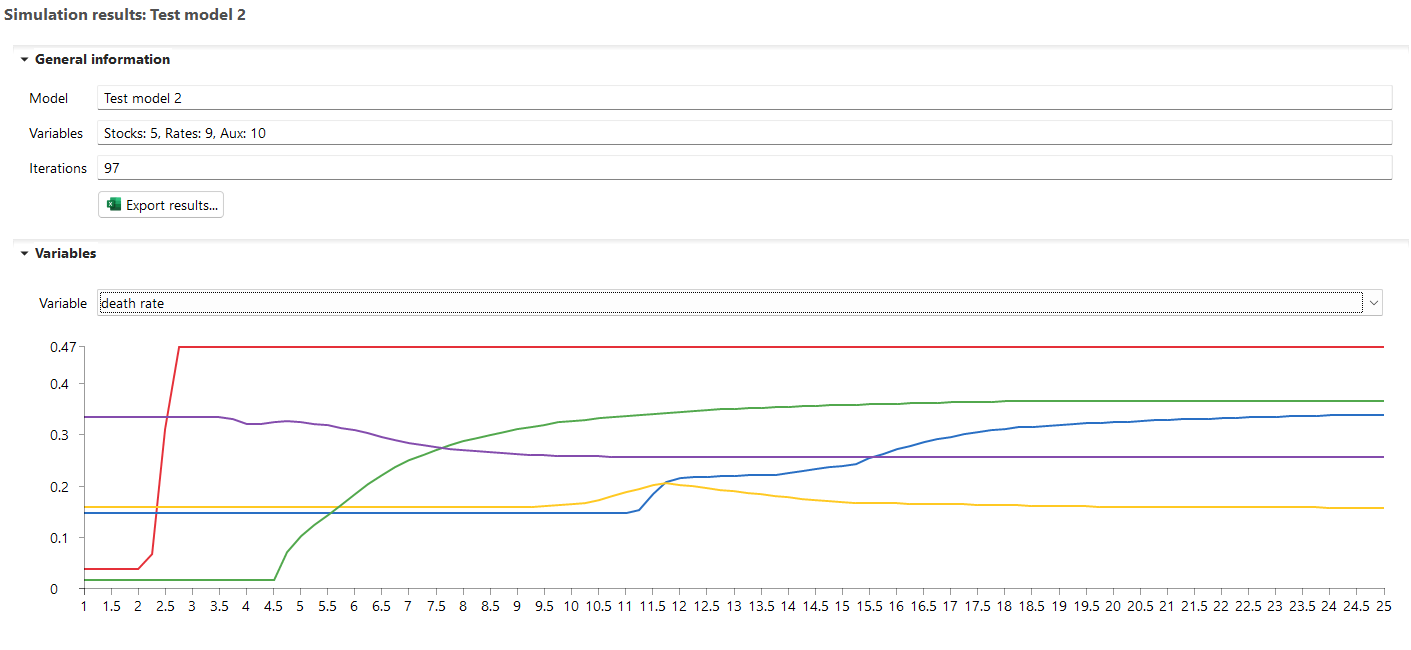

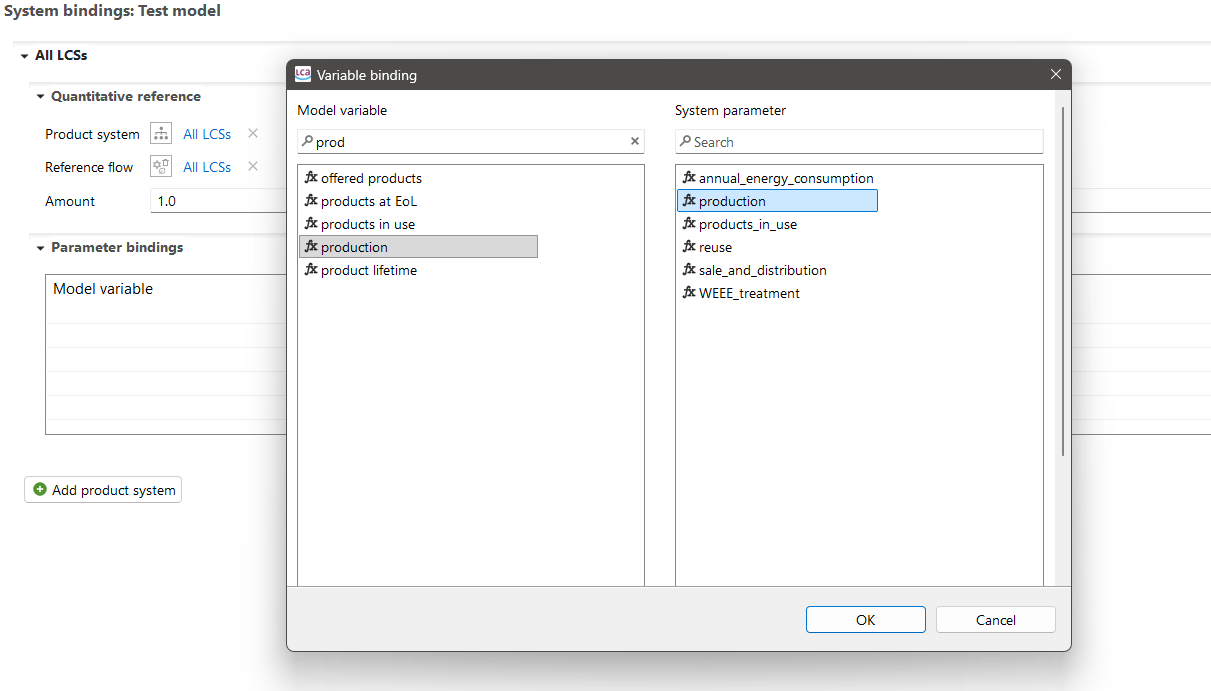
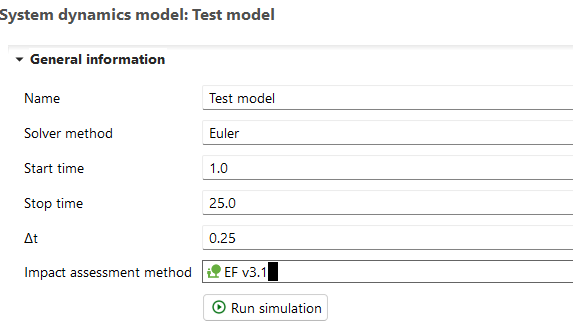

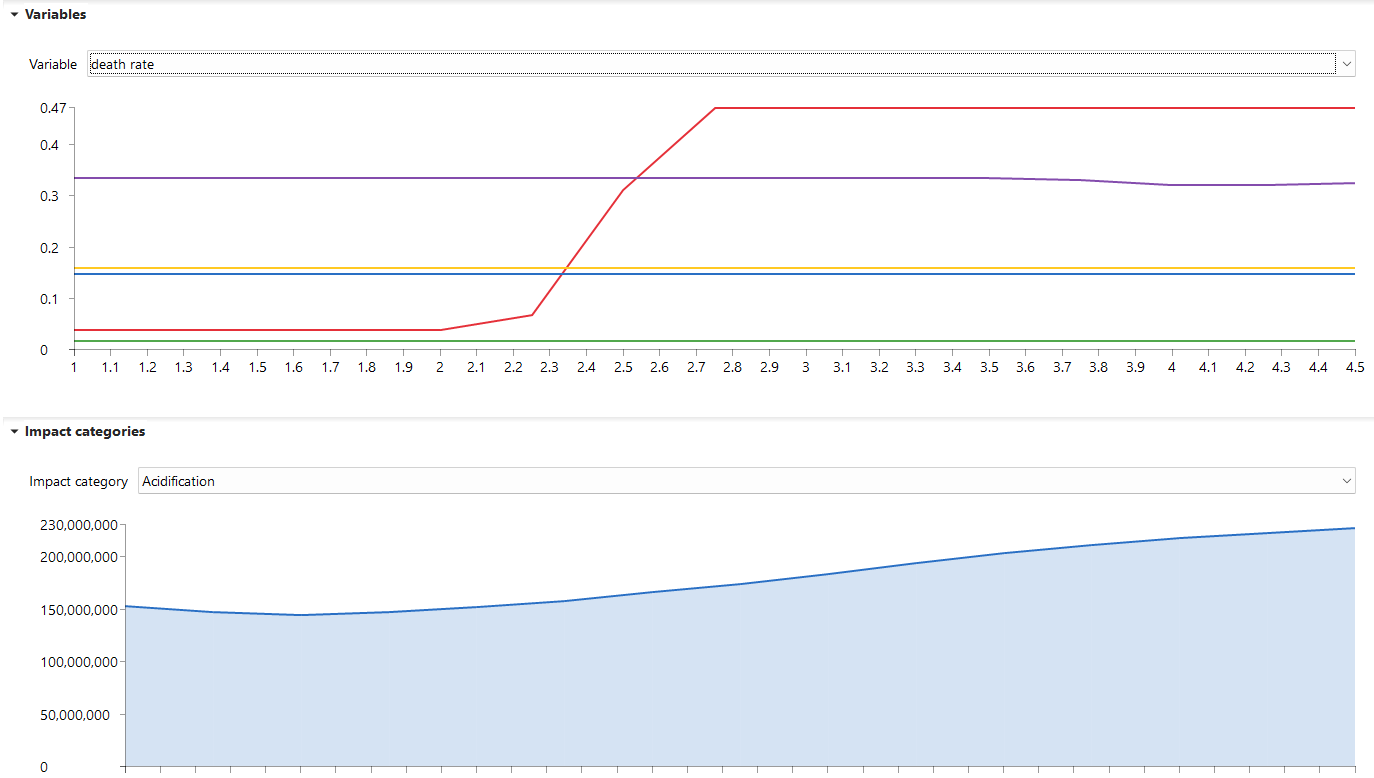
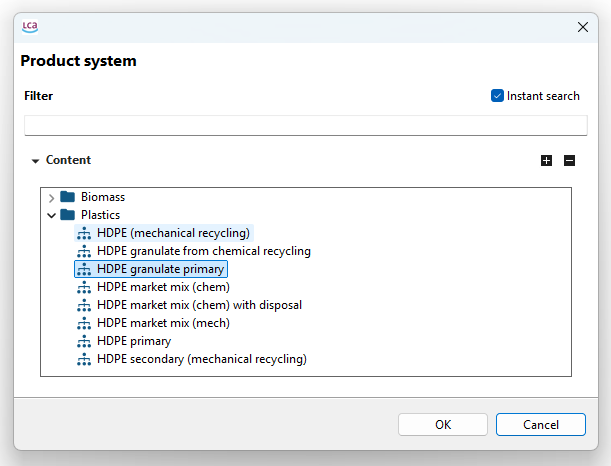
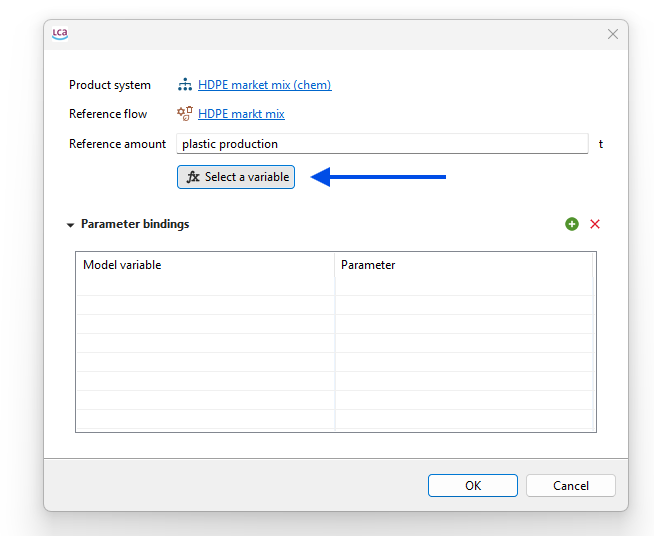
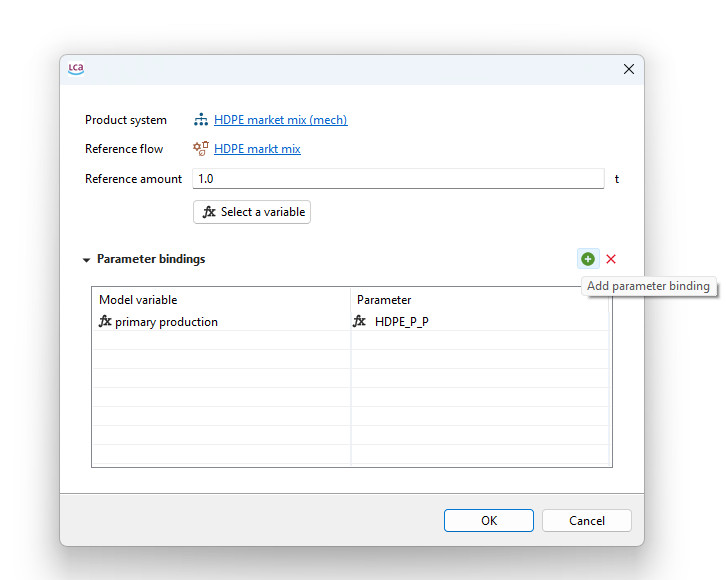
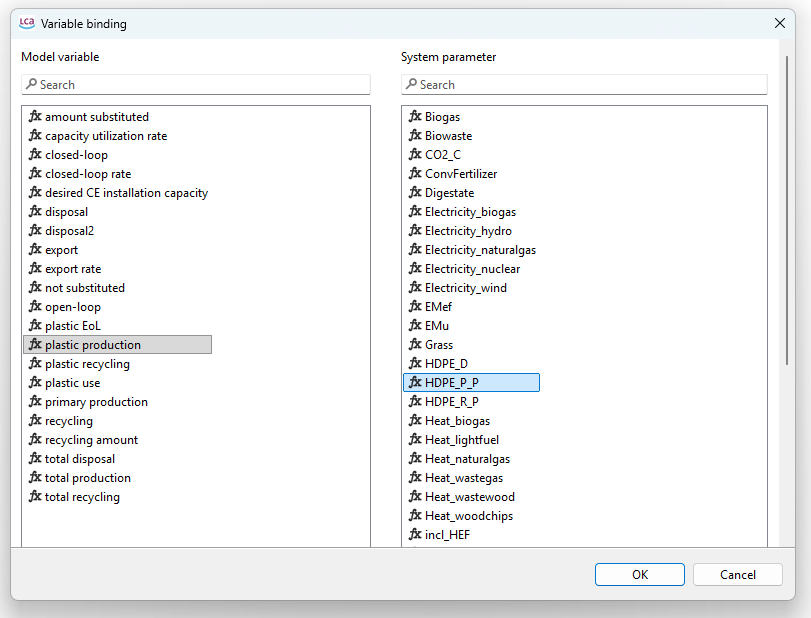
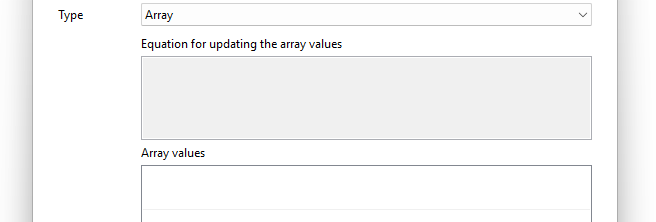


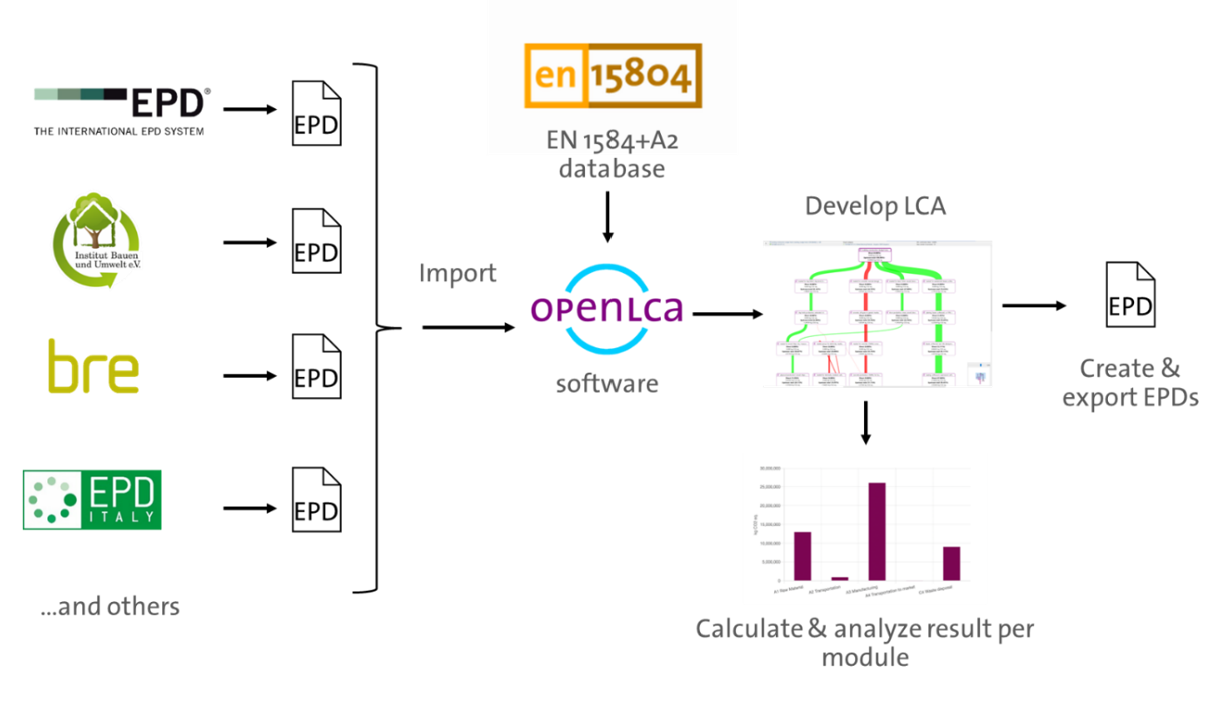
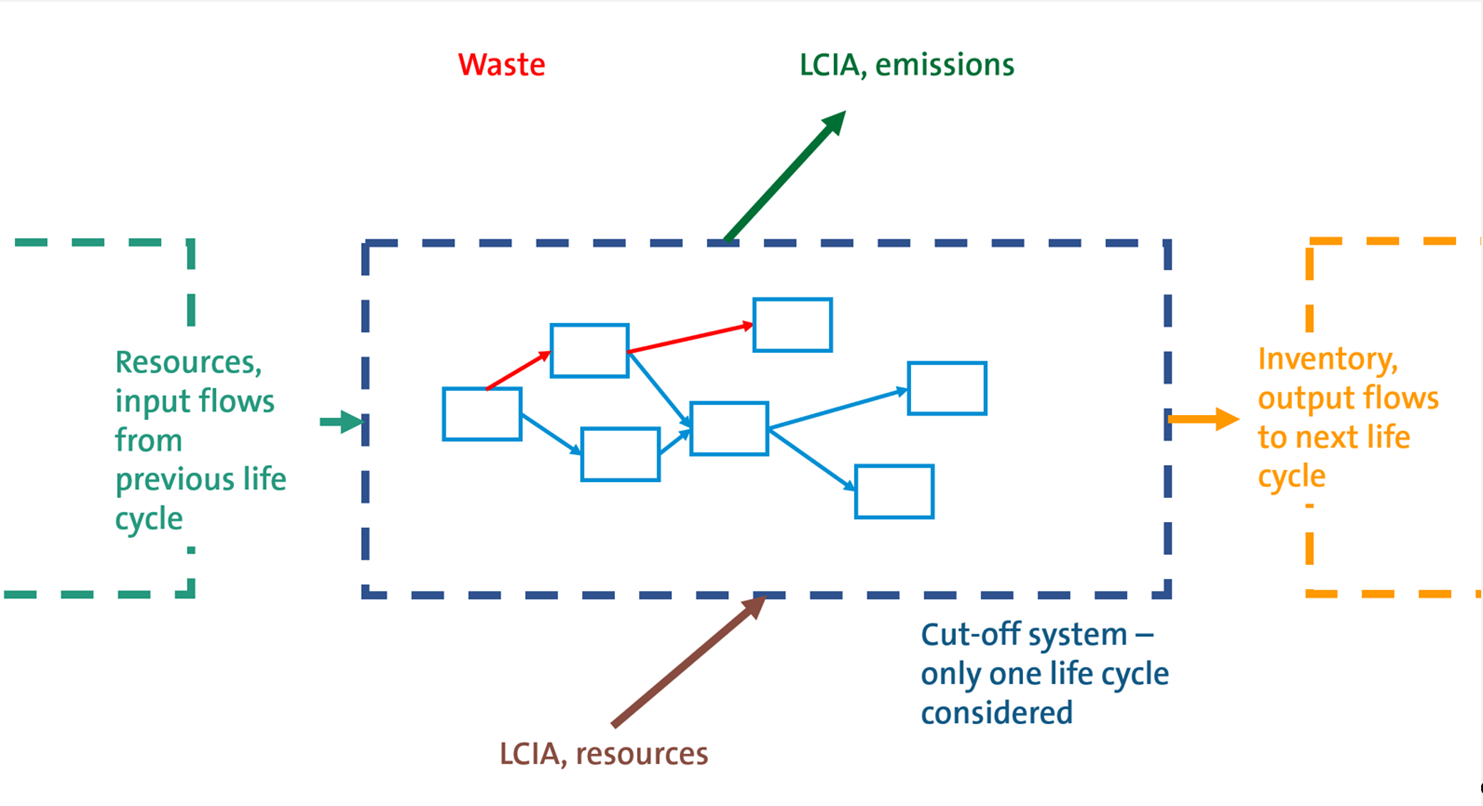
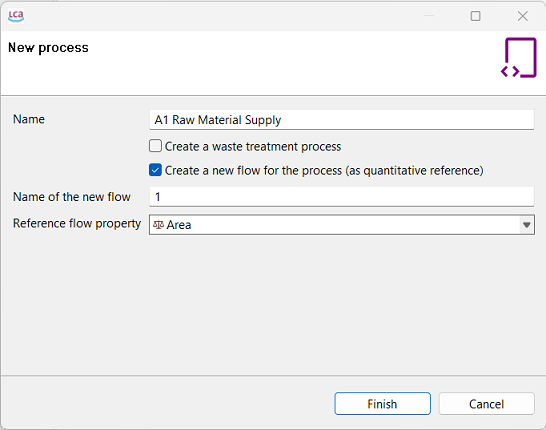
 Created and saved processes for an EPD
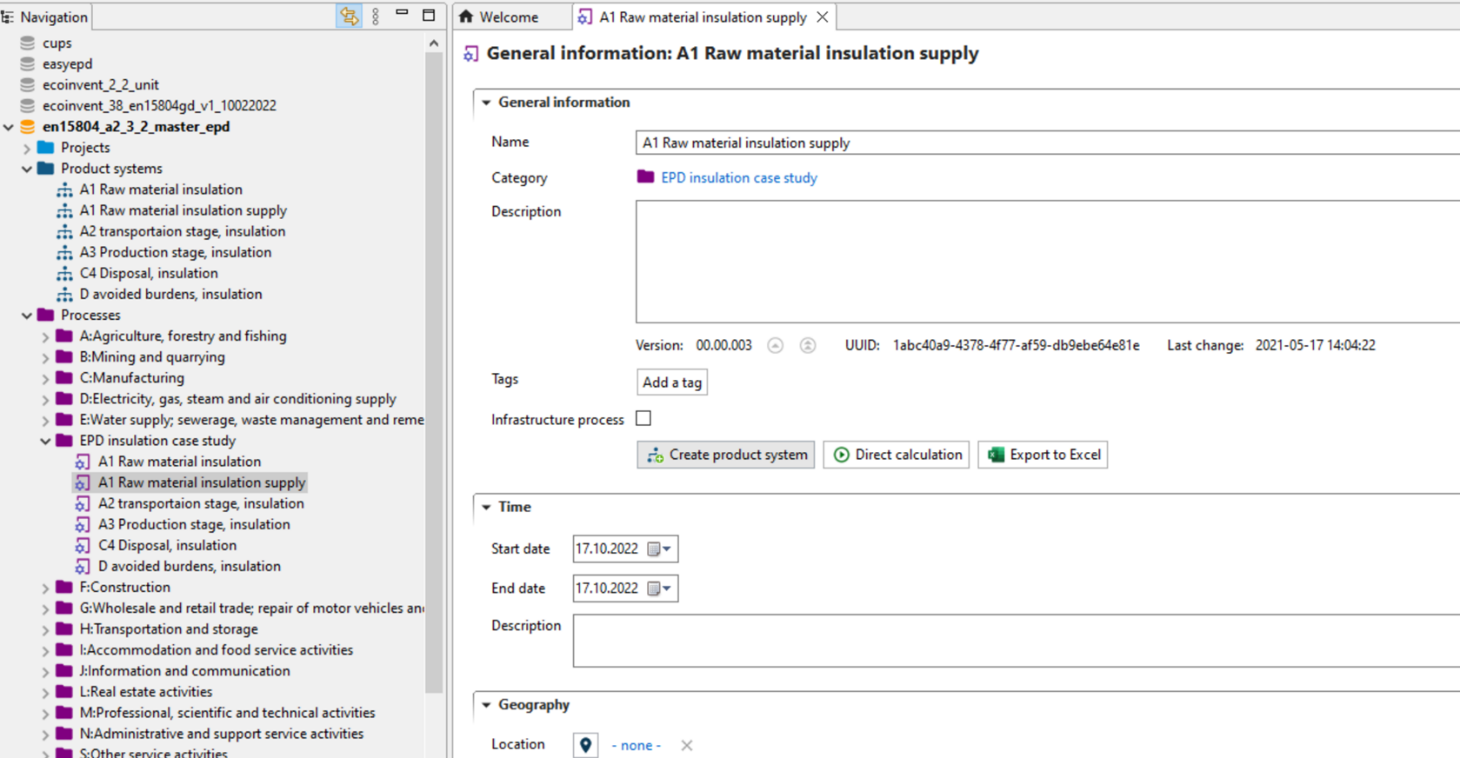 "General information" tab of a process
 "General information" tab of product system
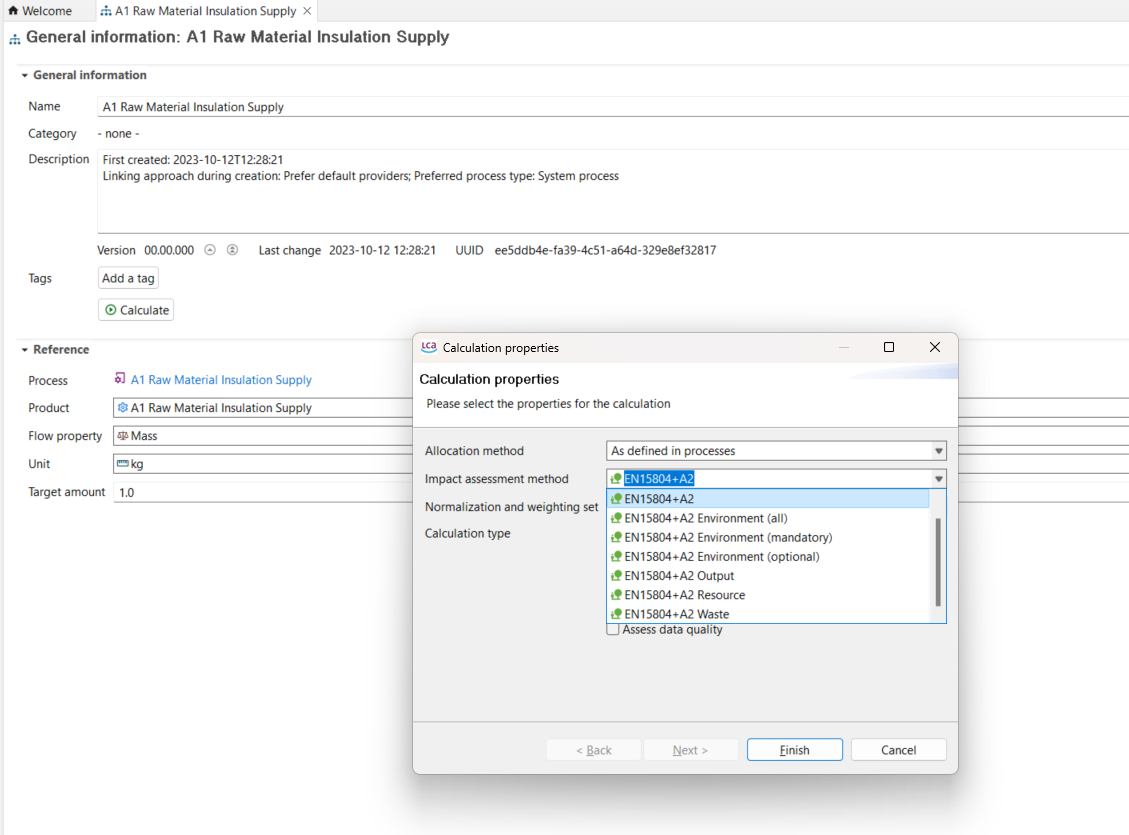 Selection of Impact Assessment Methods in the calculation of a product system
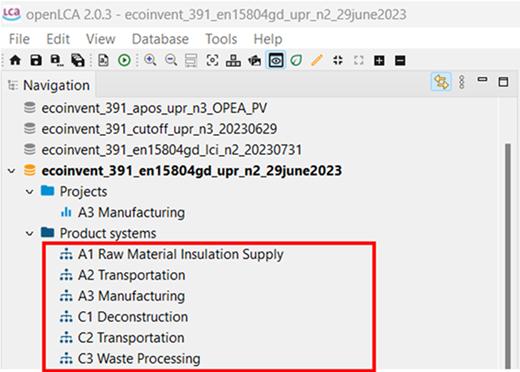
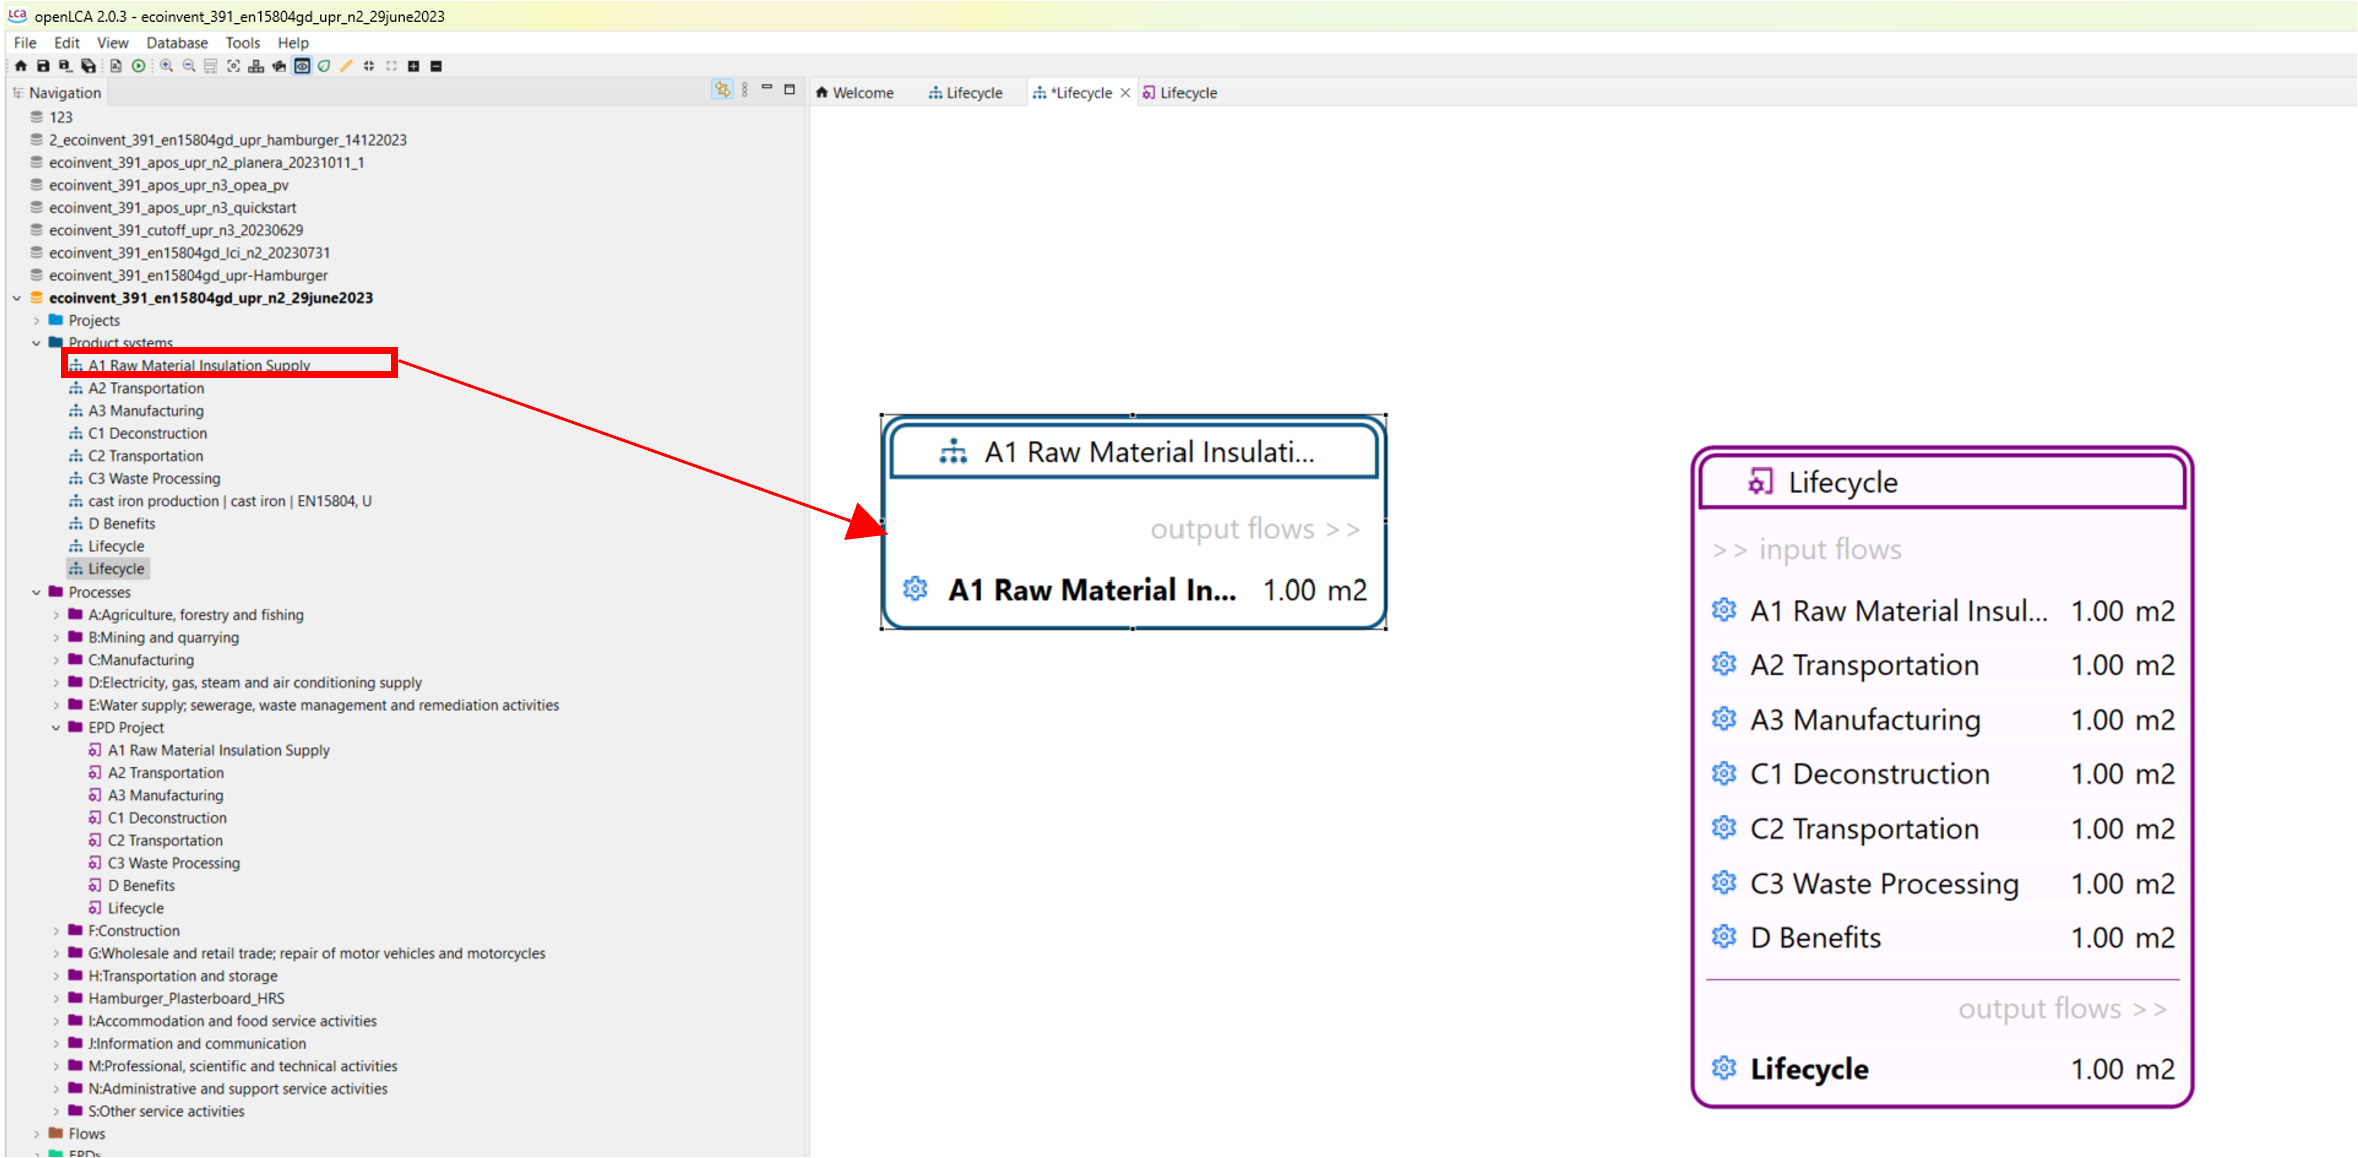
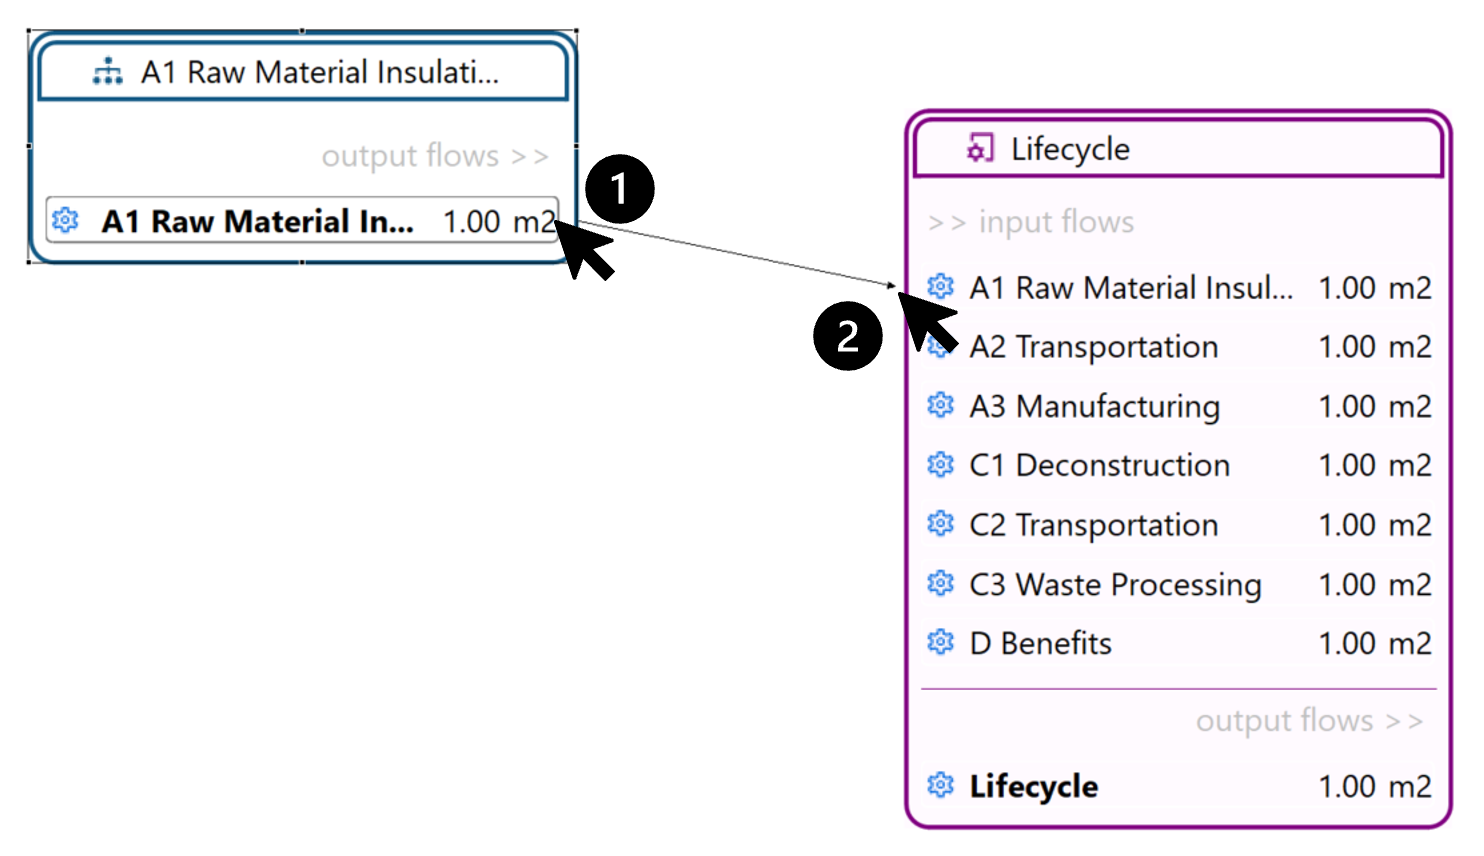

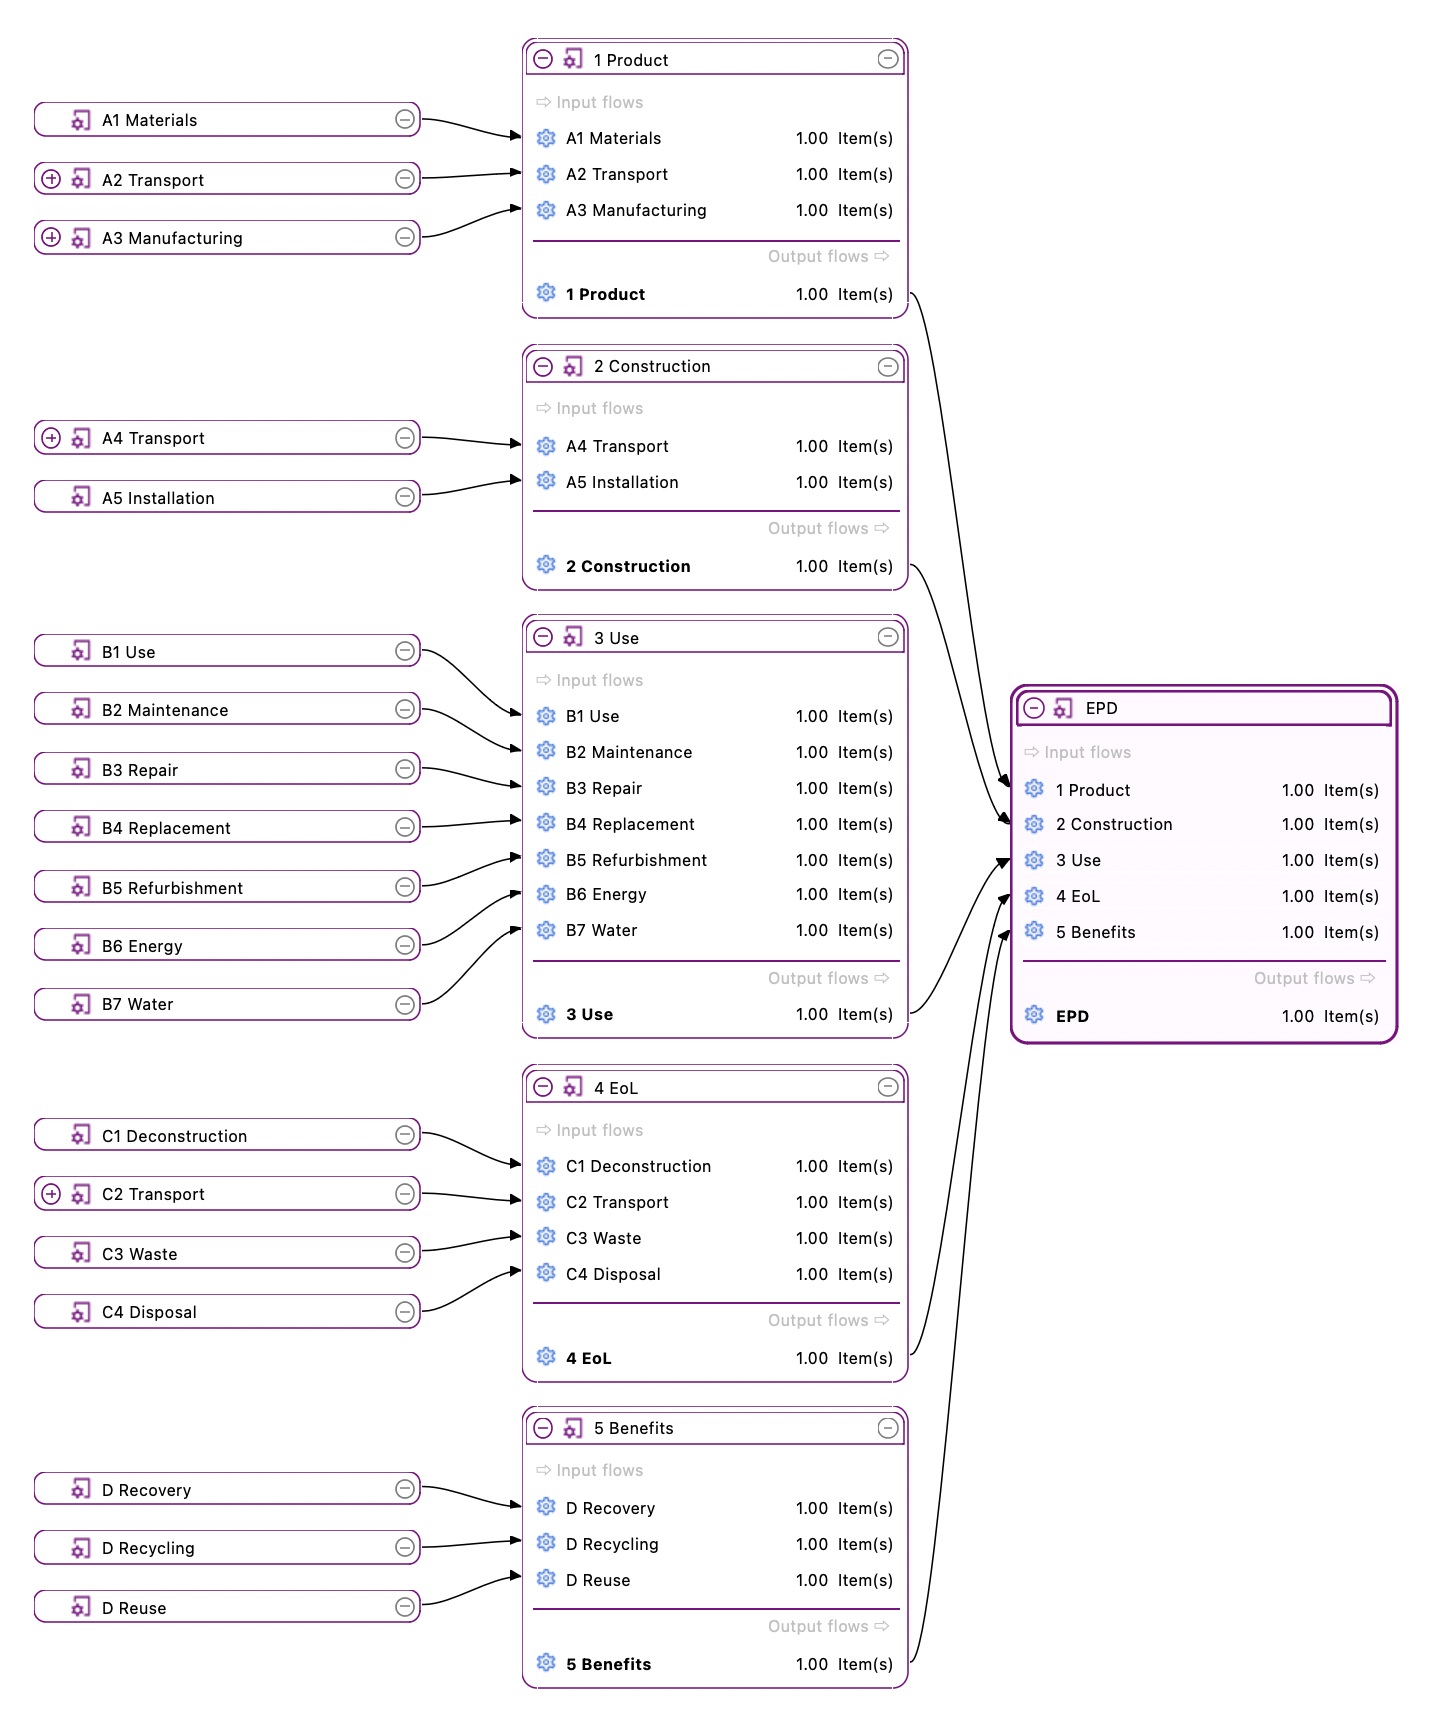
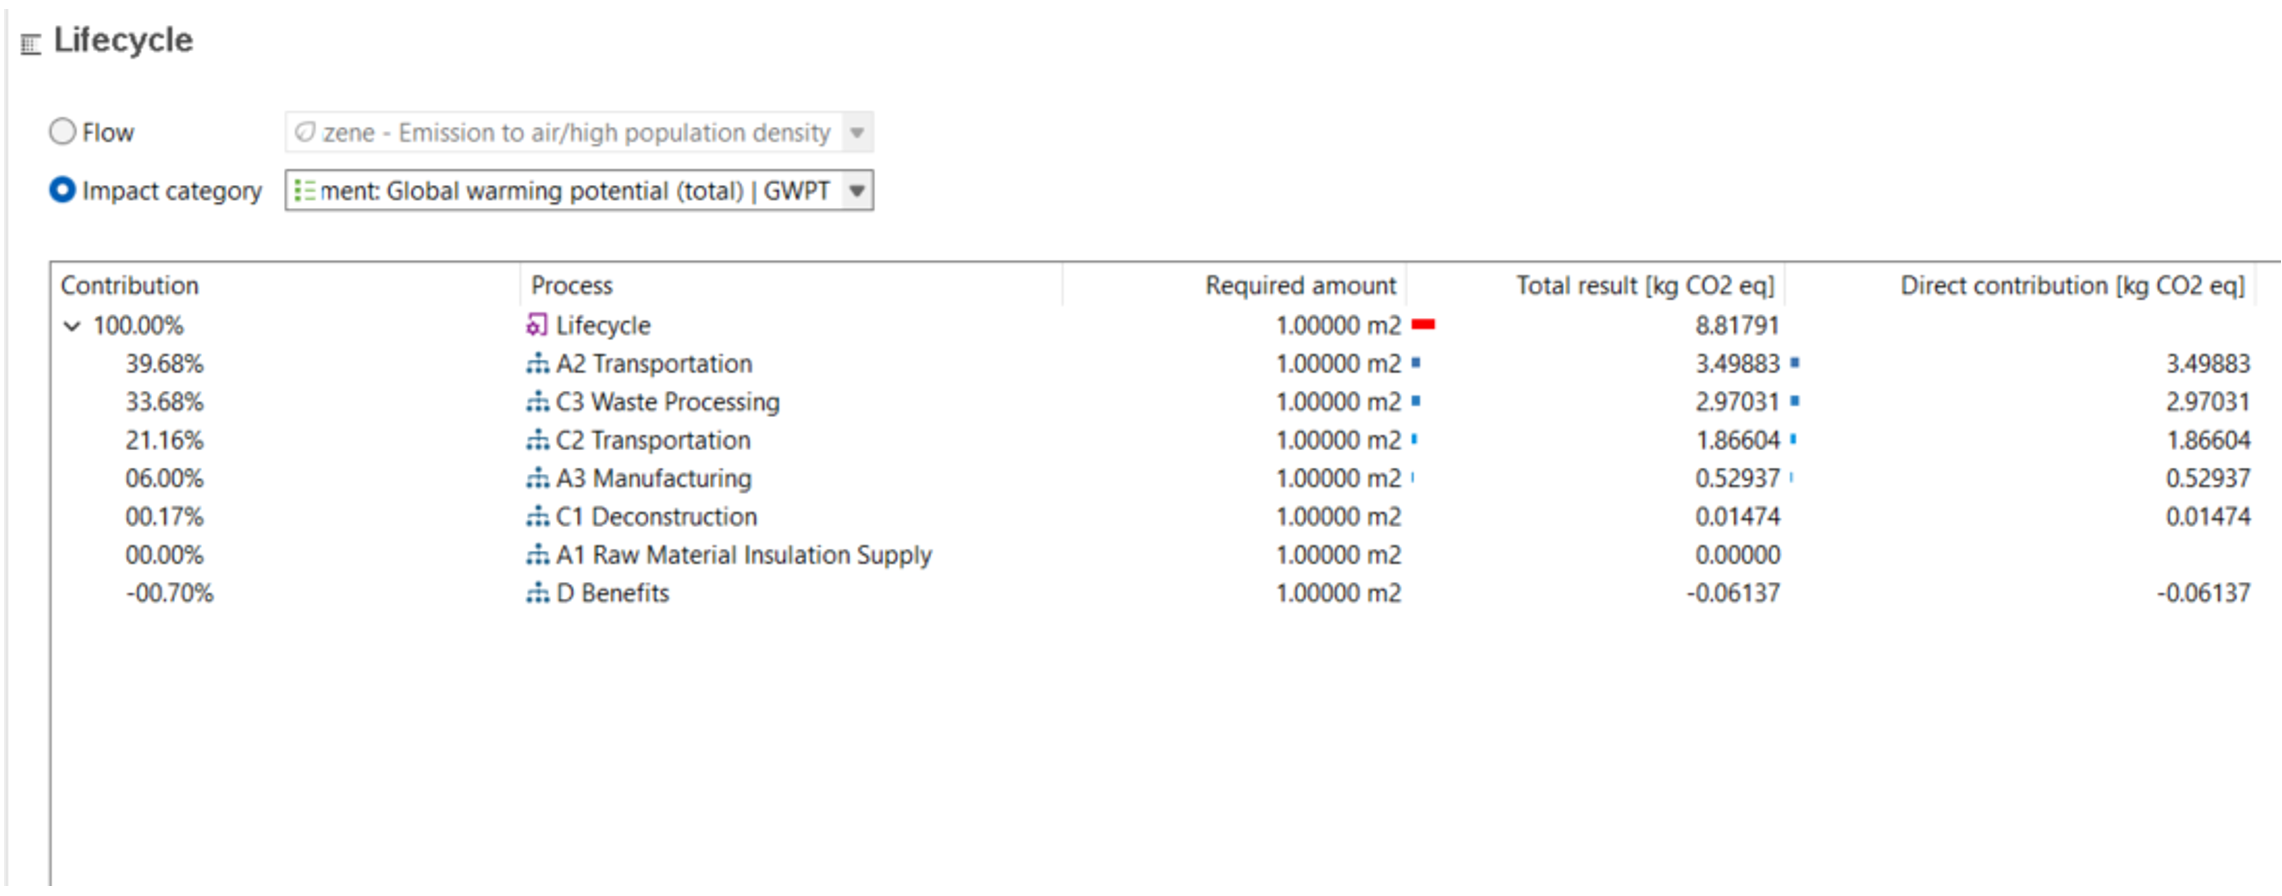
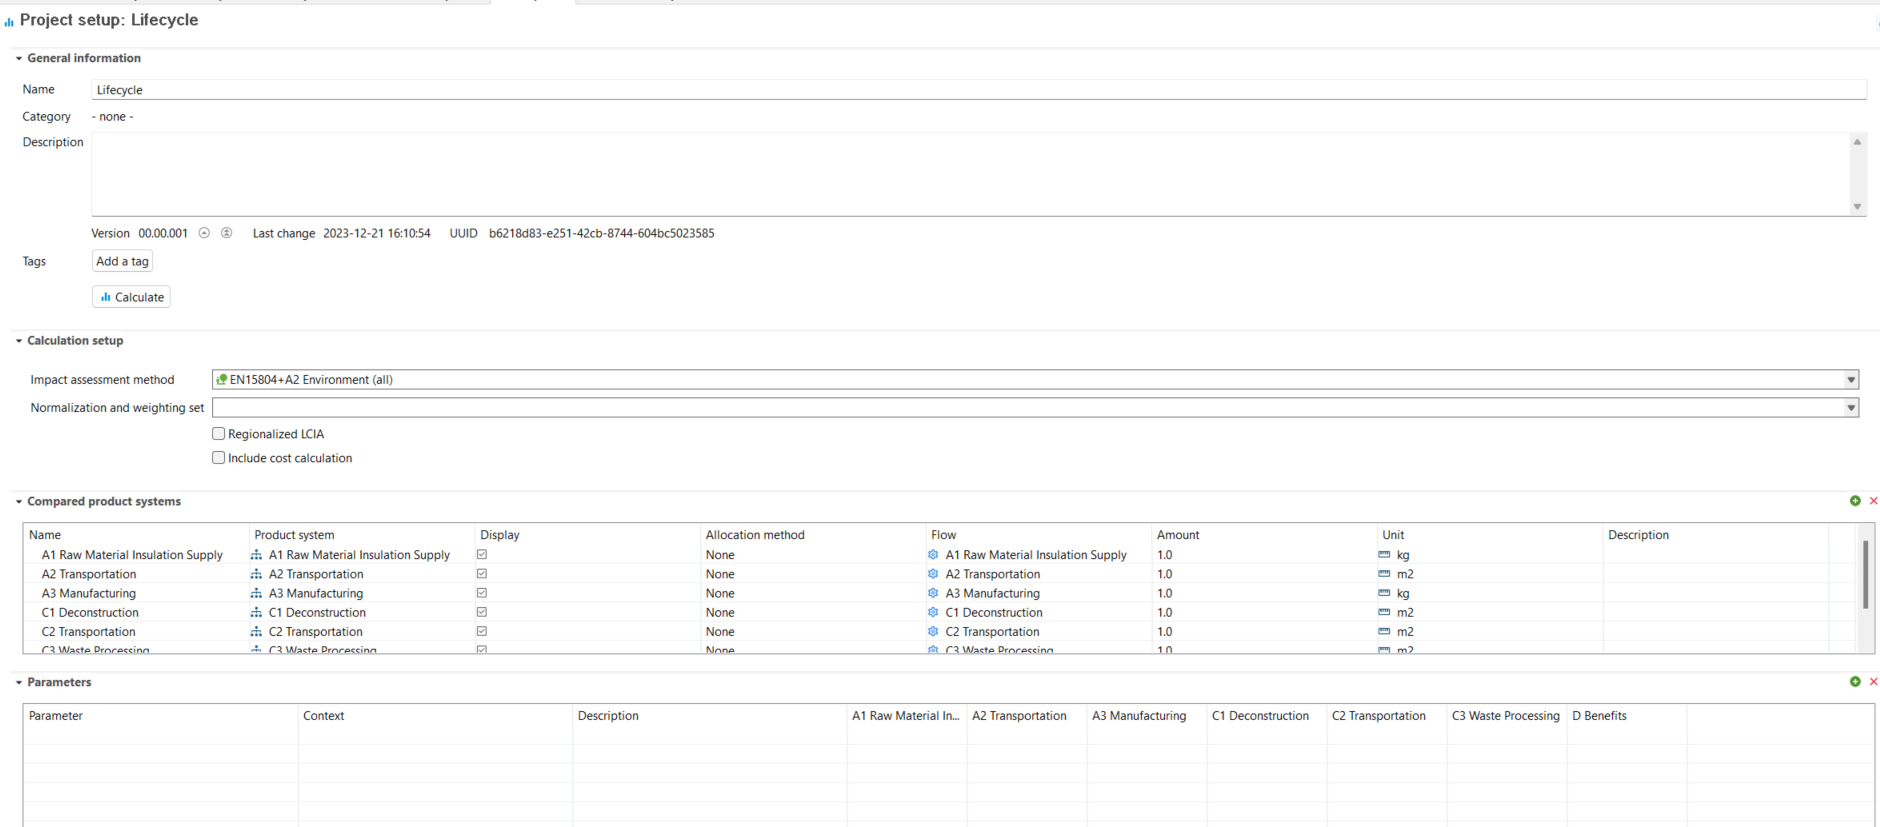
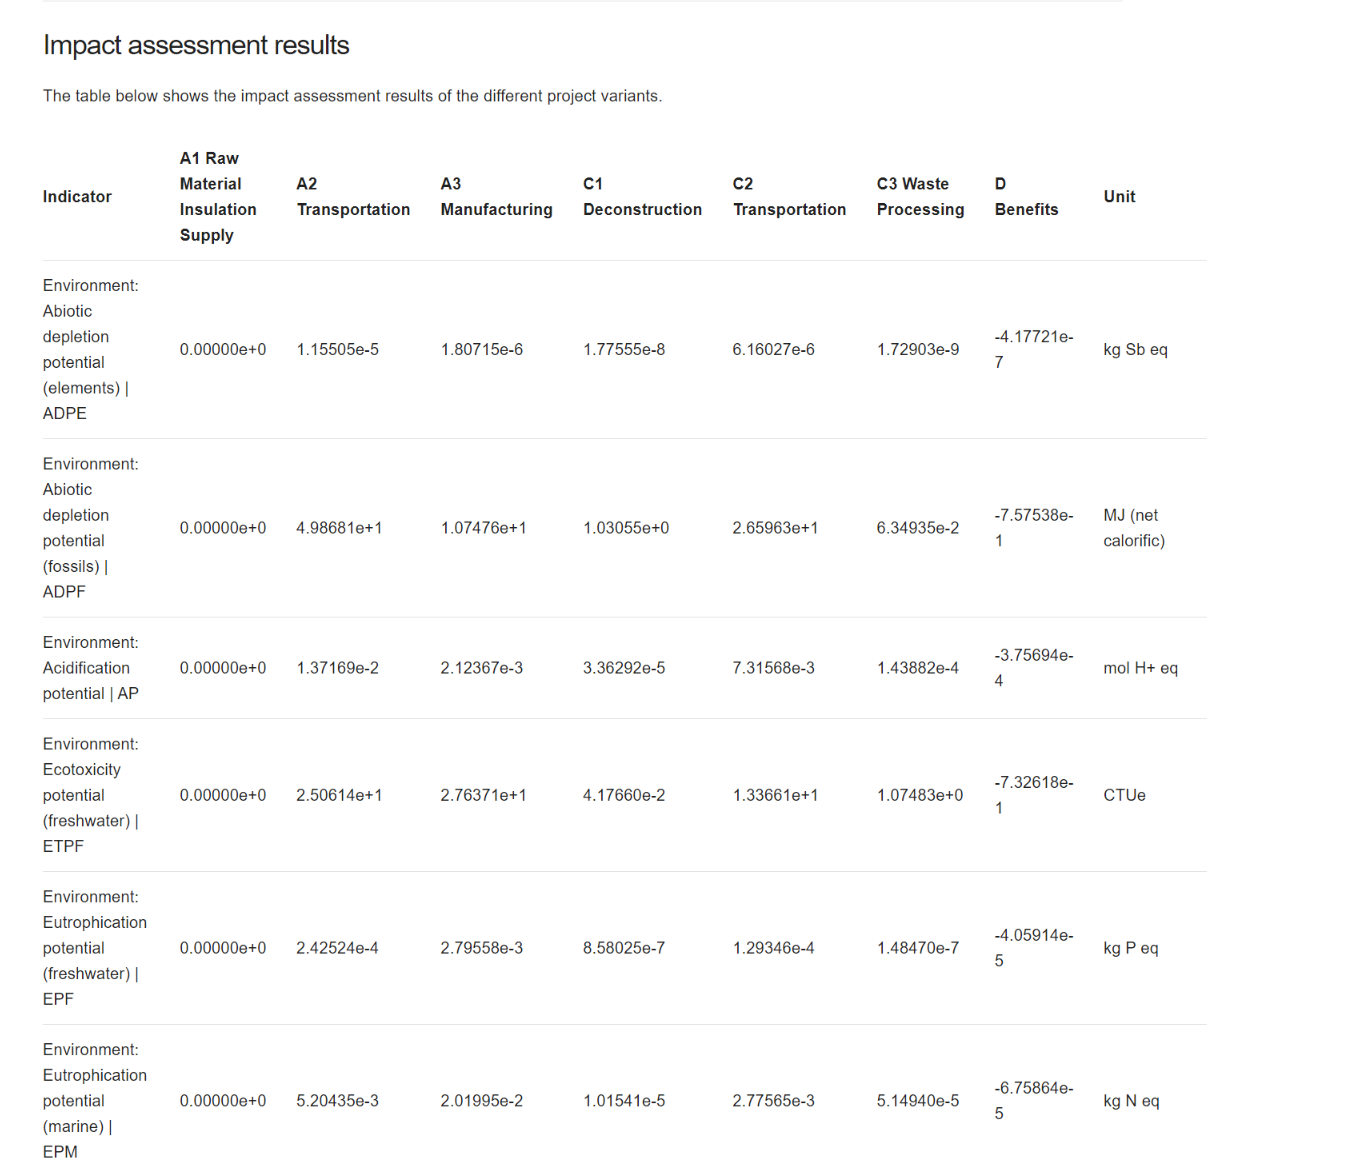
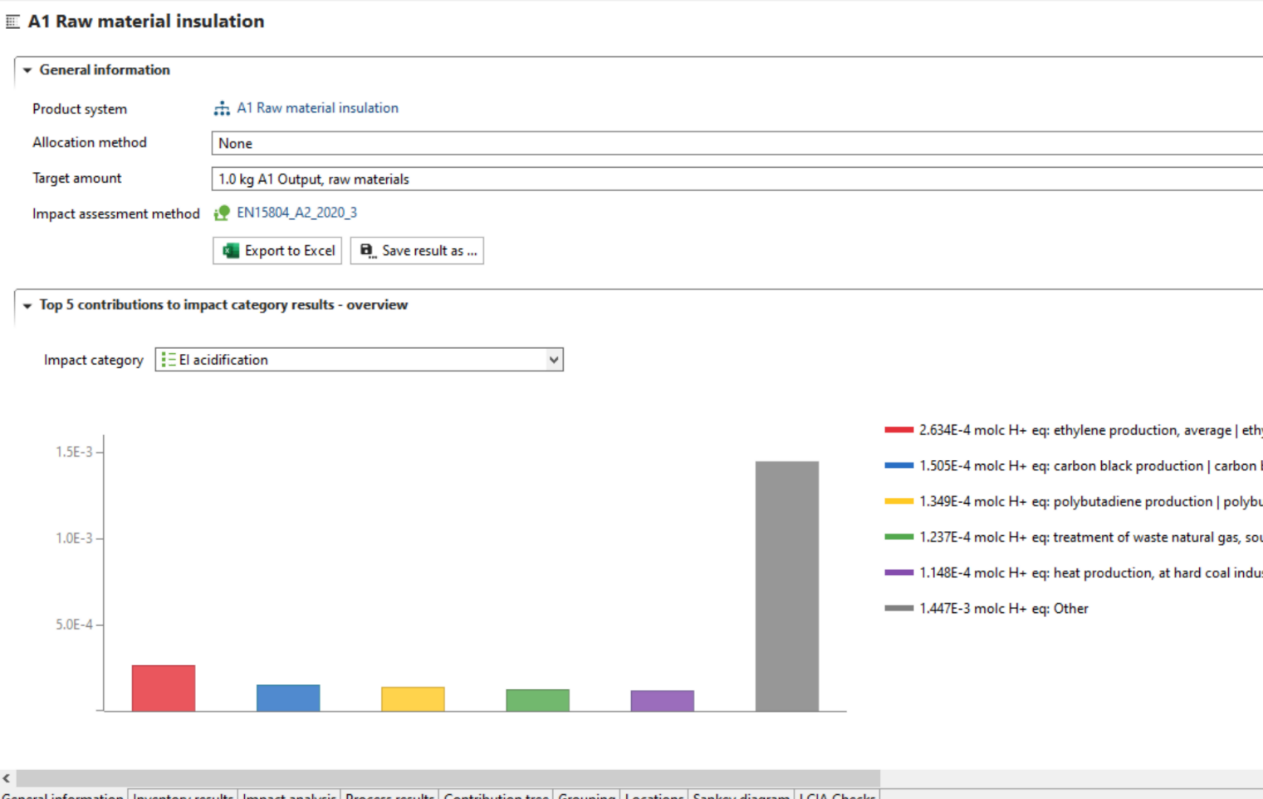 "General information" tab of a result
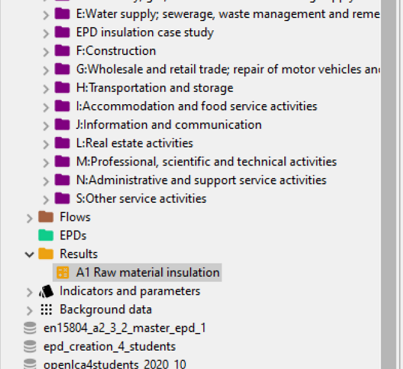
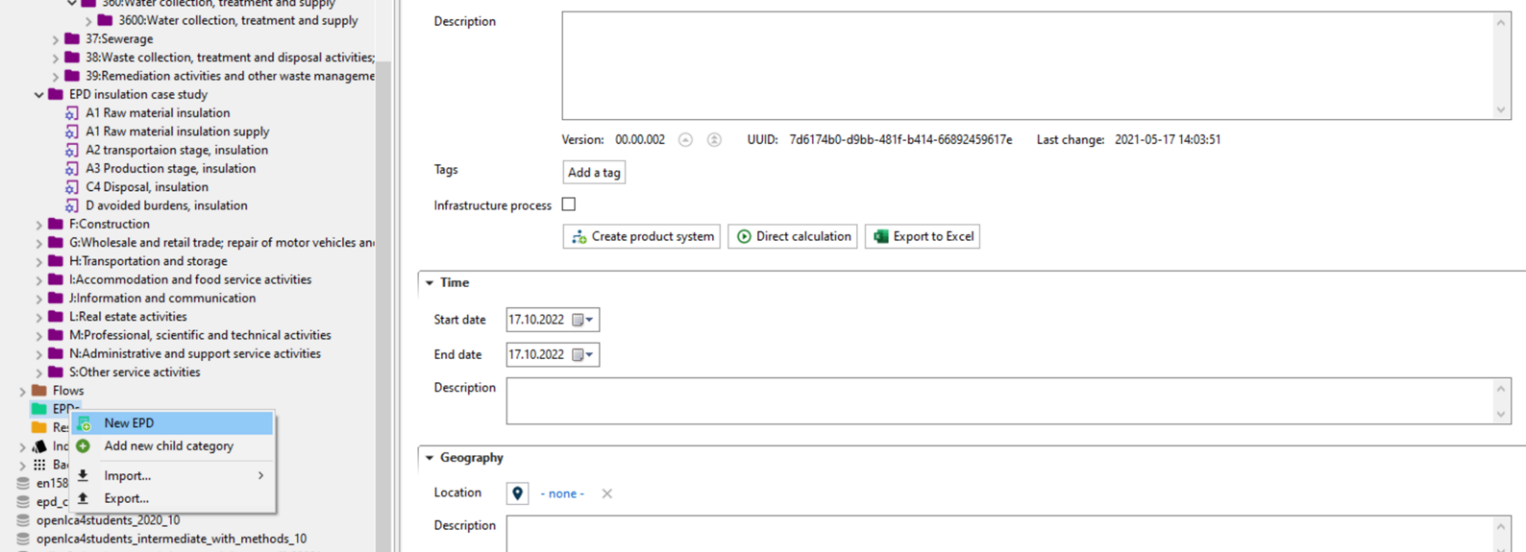 Creating a new EPD
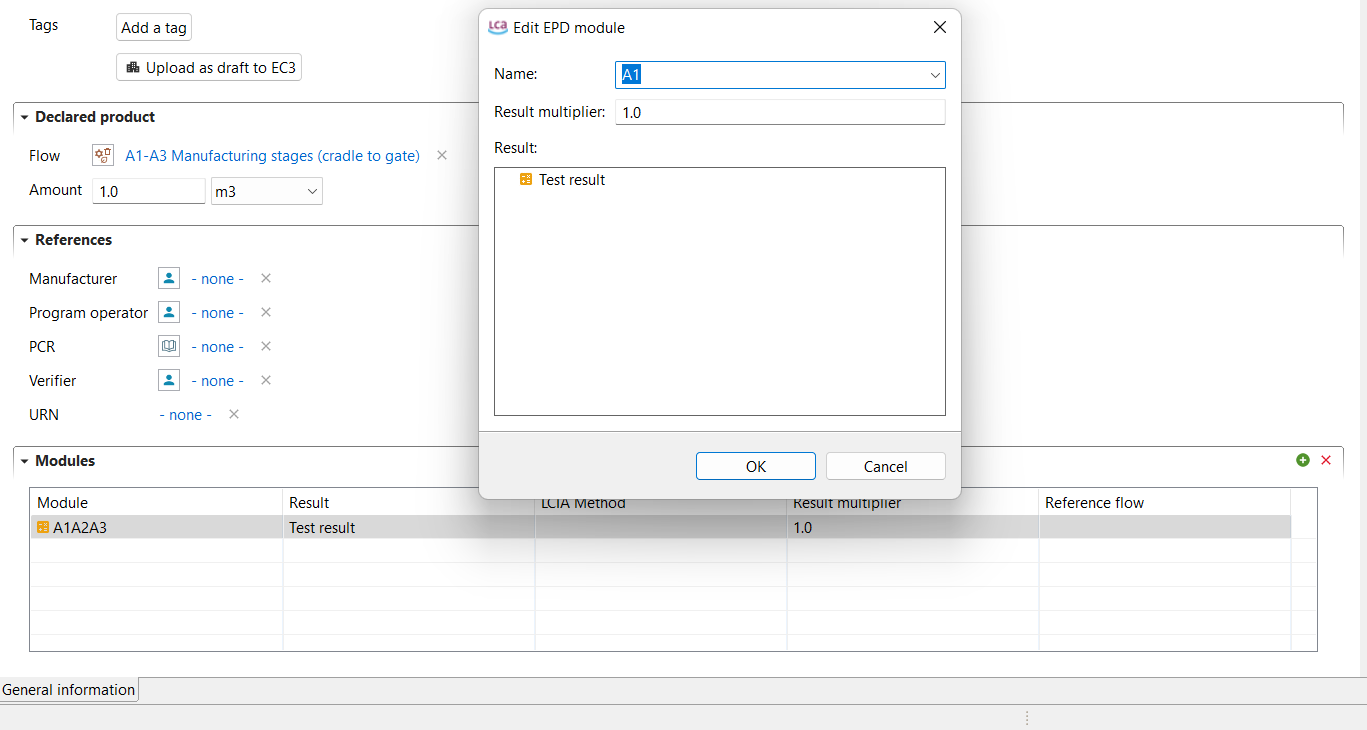 "Modules" section in an EPD
 EPD example
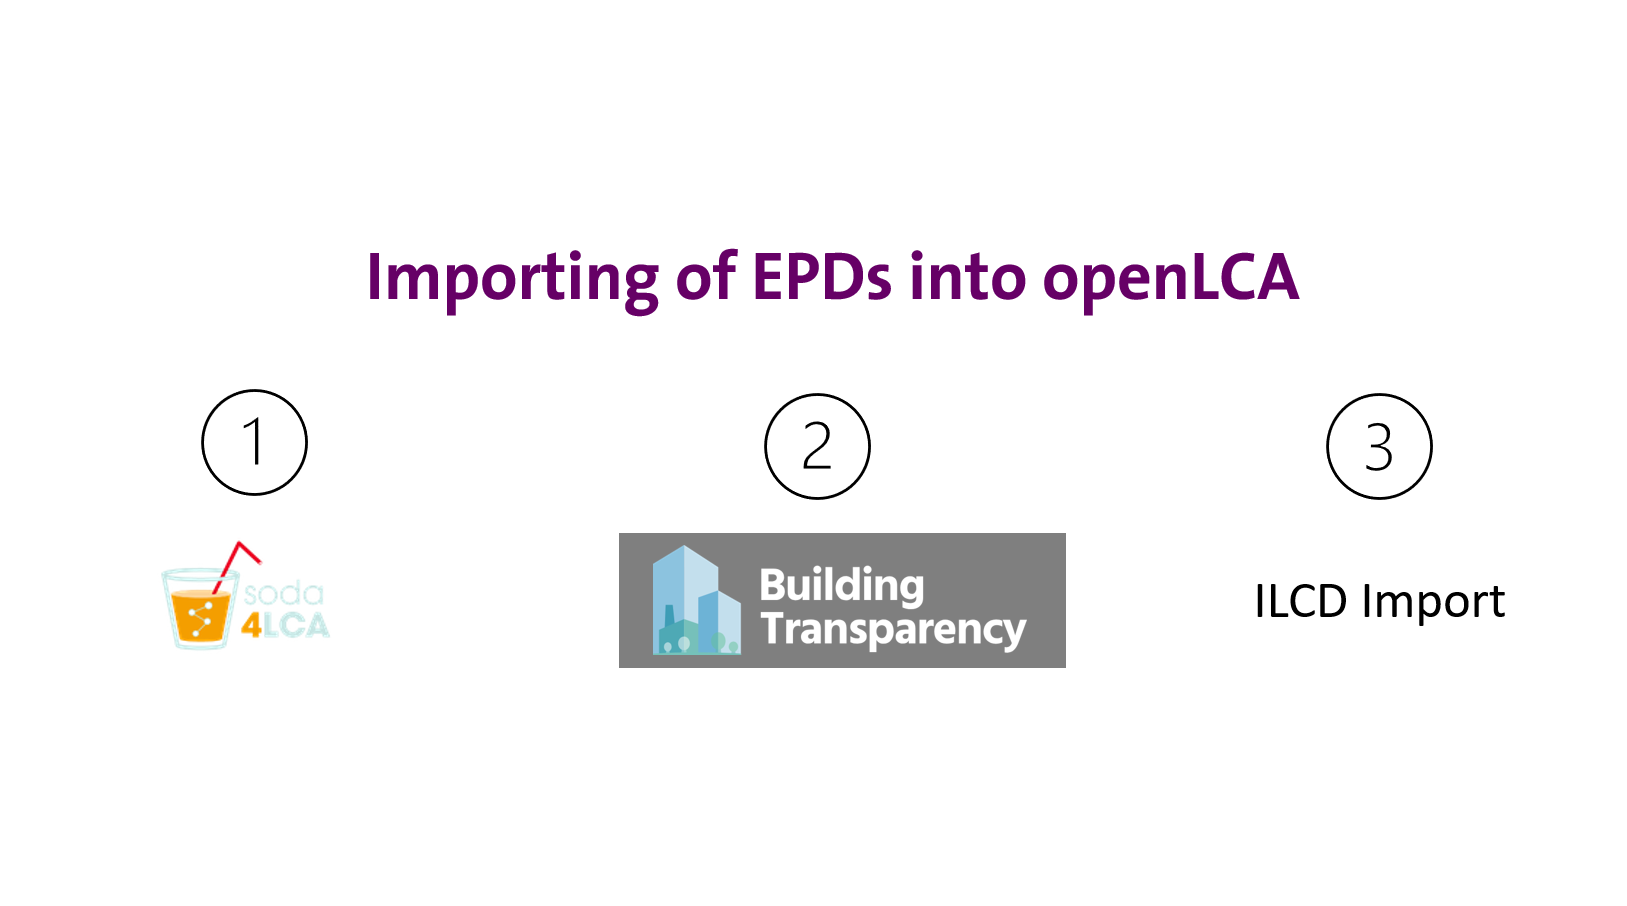
 Creation of the result example
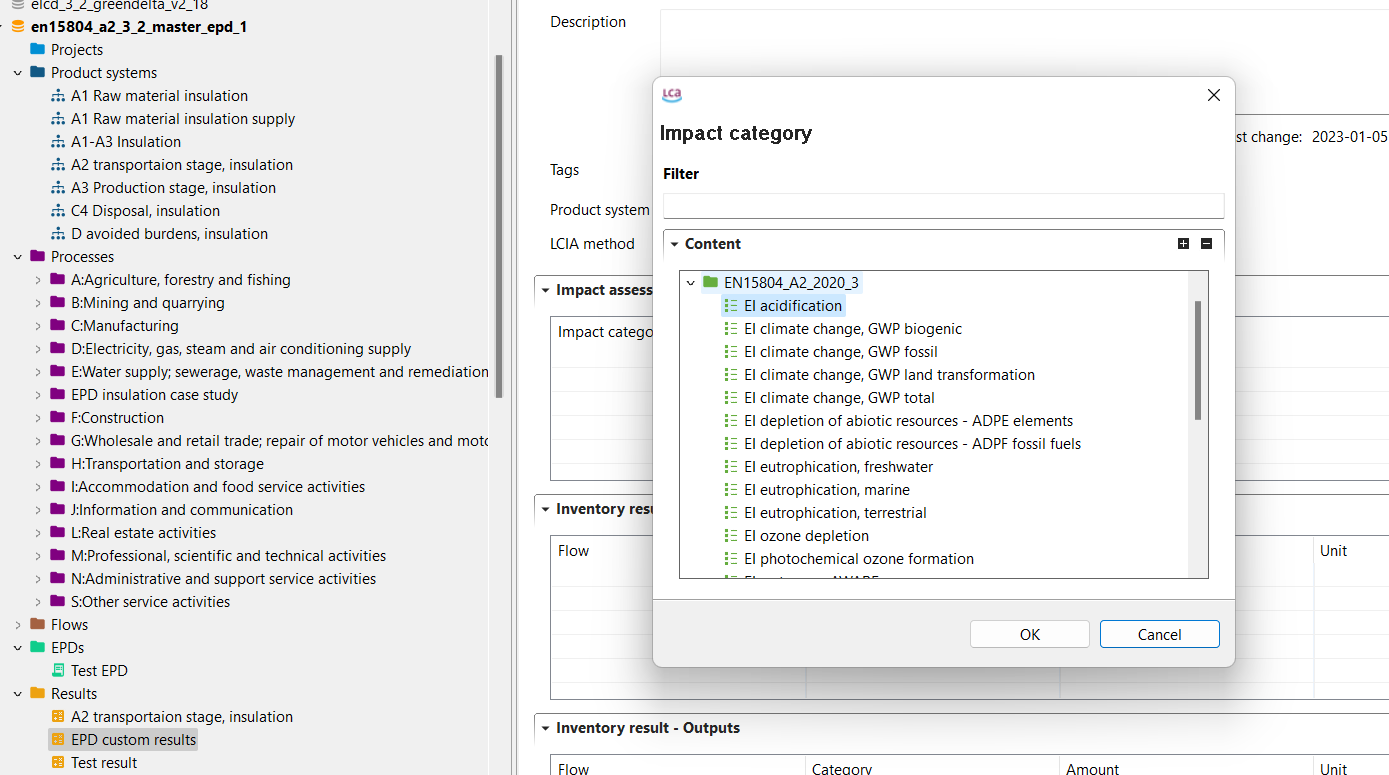 Adding results to an impact category
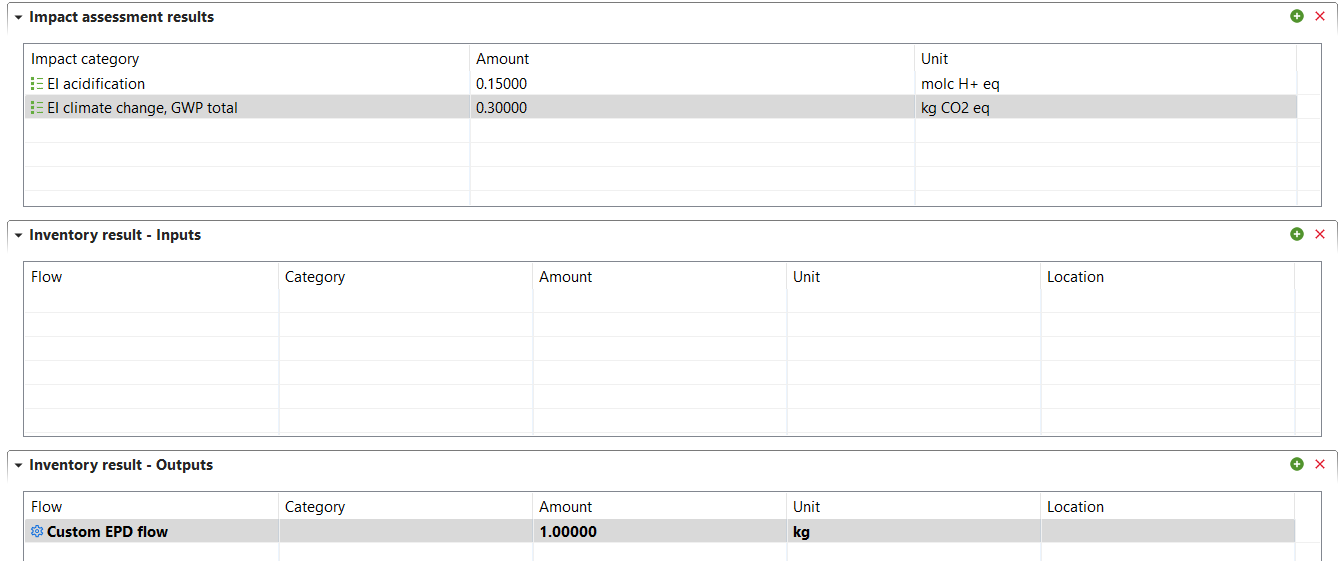 The finished results
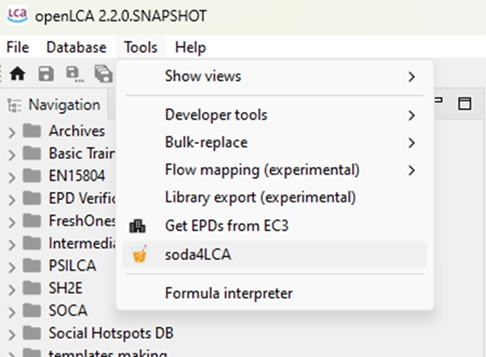
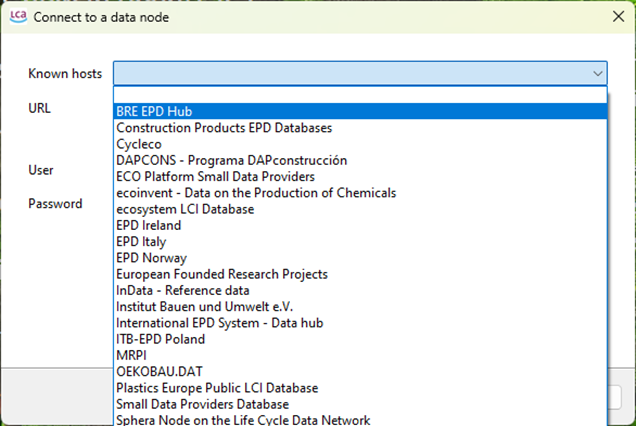
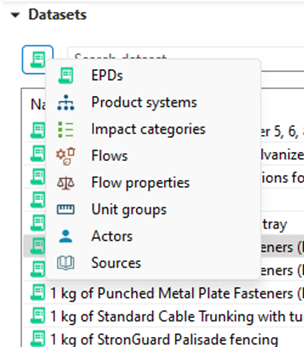
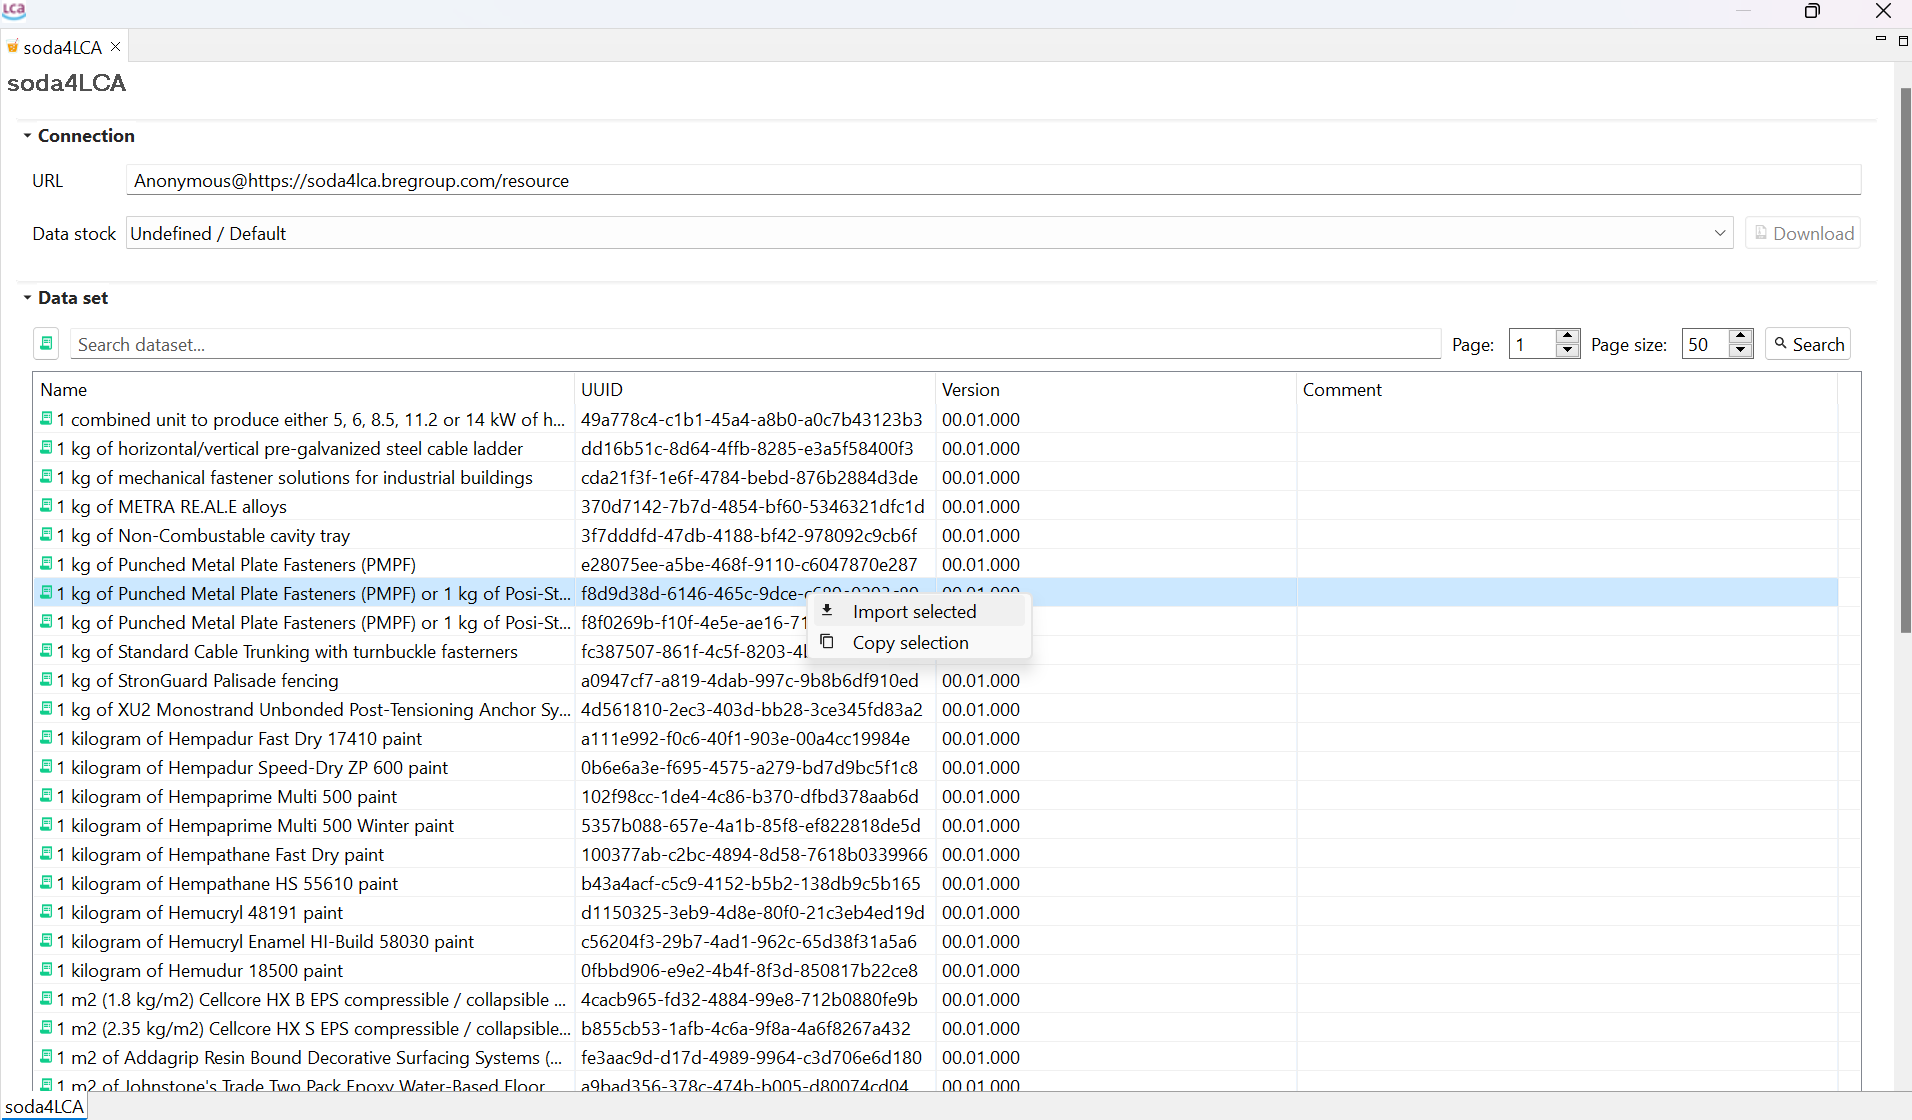
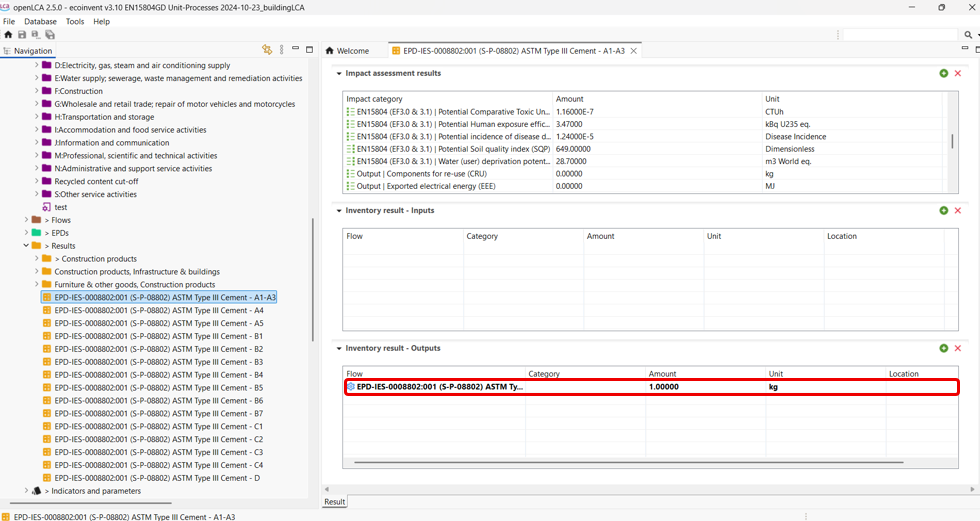
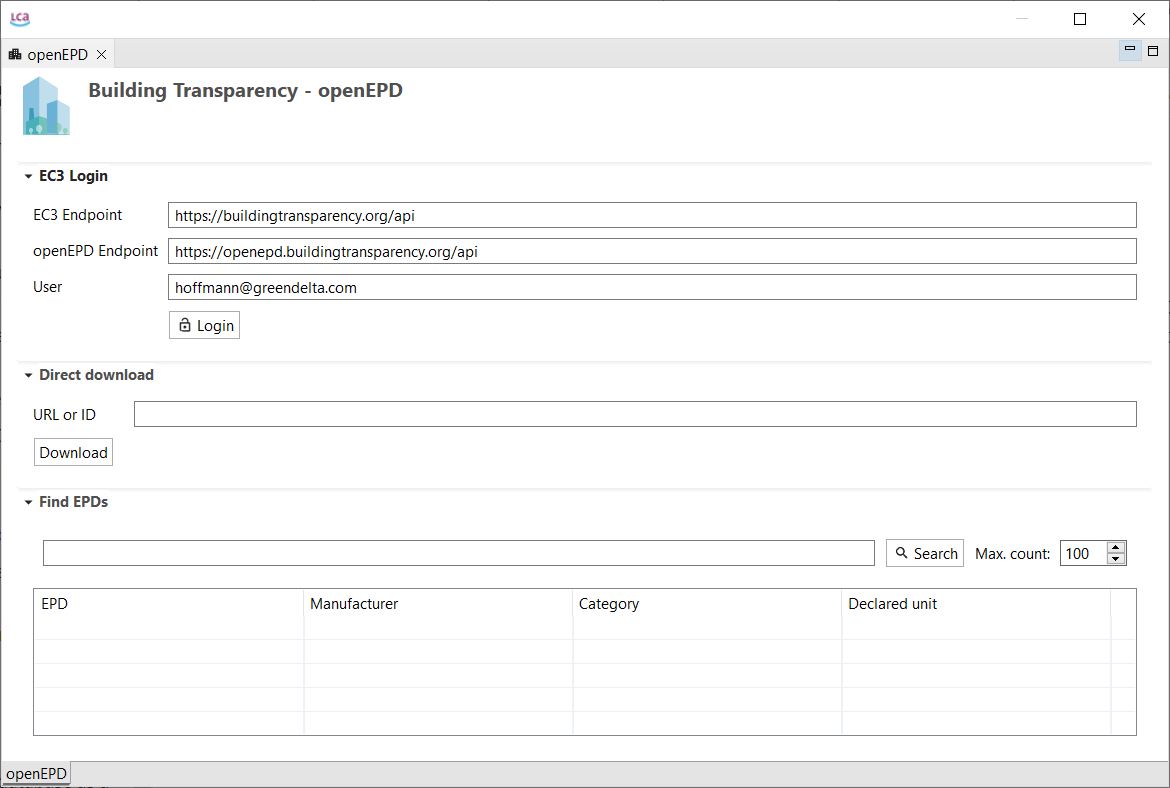
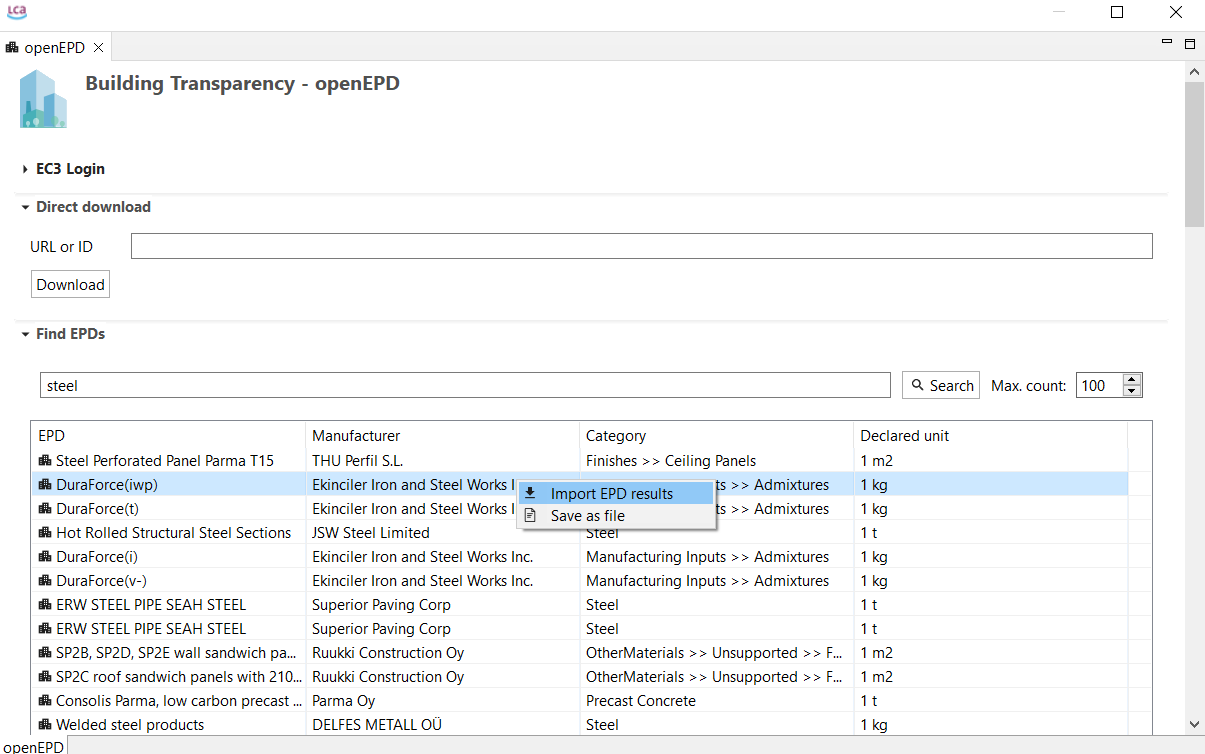
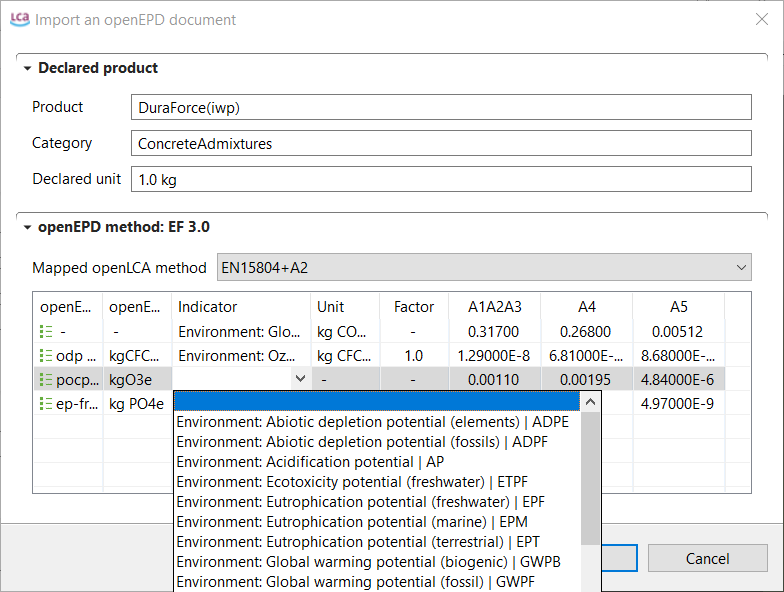
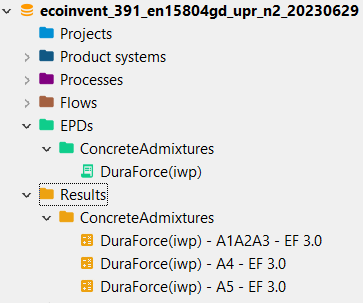
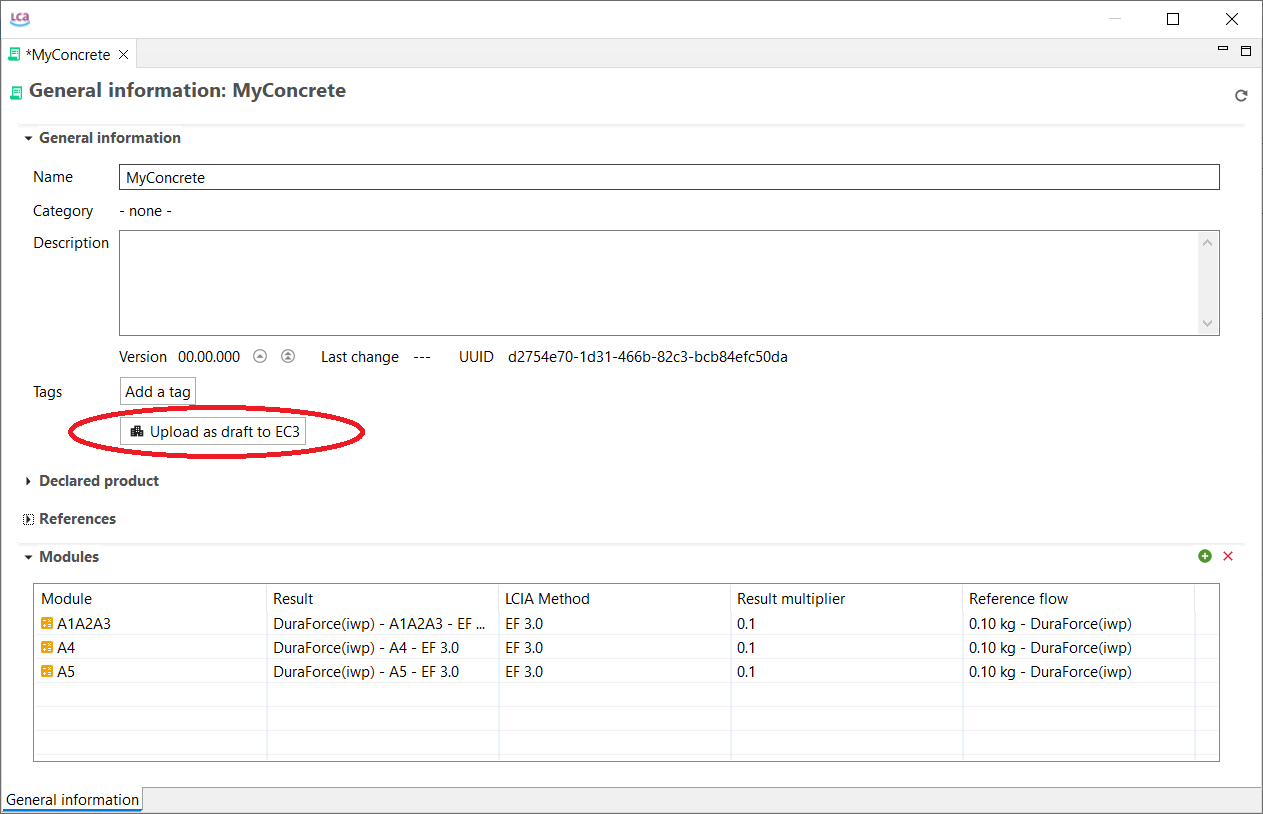
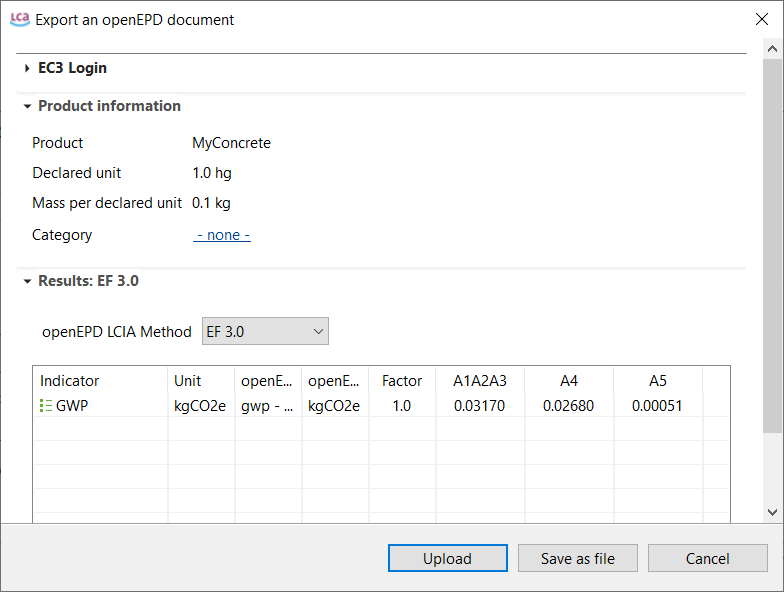
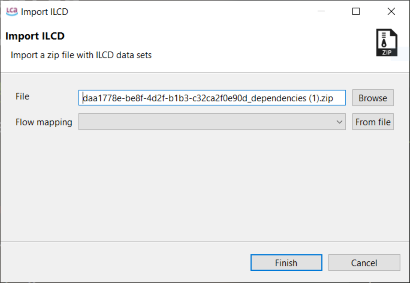


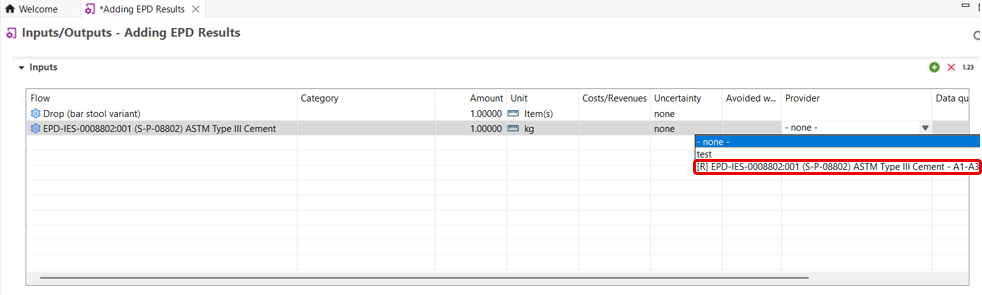
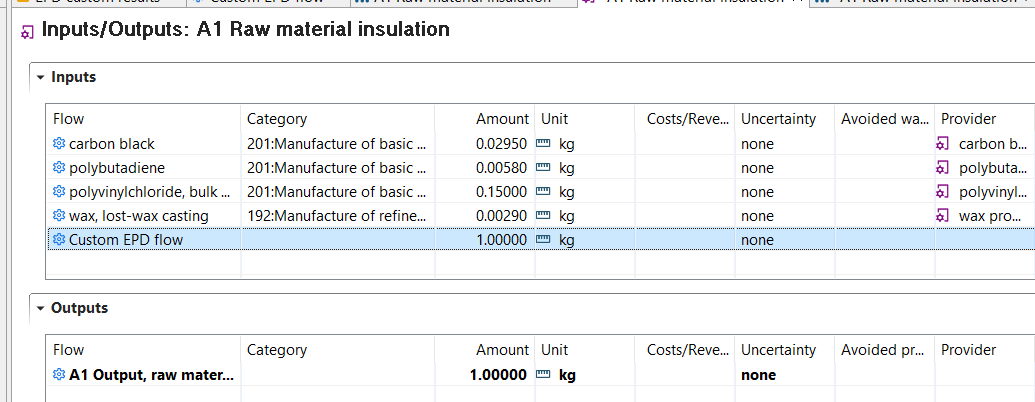 Linking the impacts with an inventory
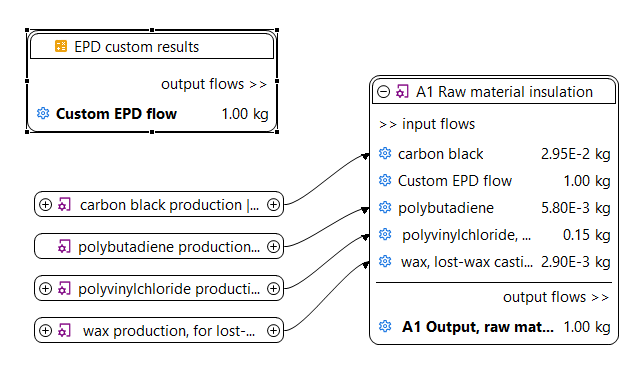
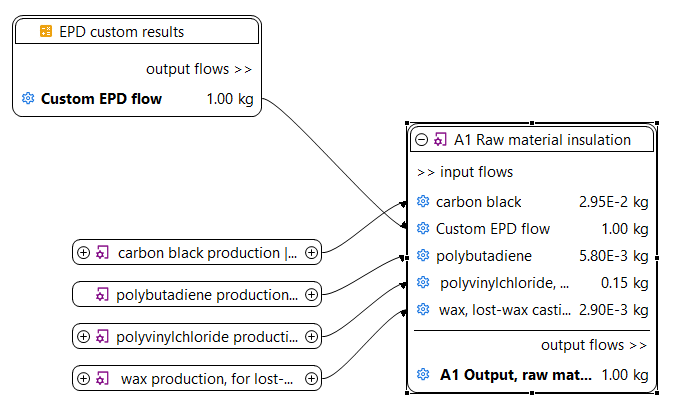
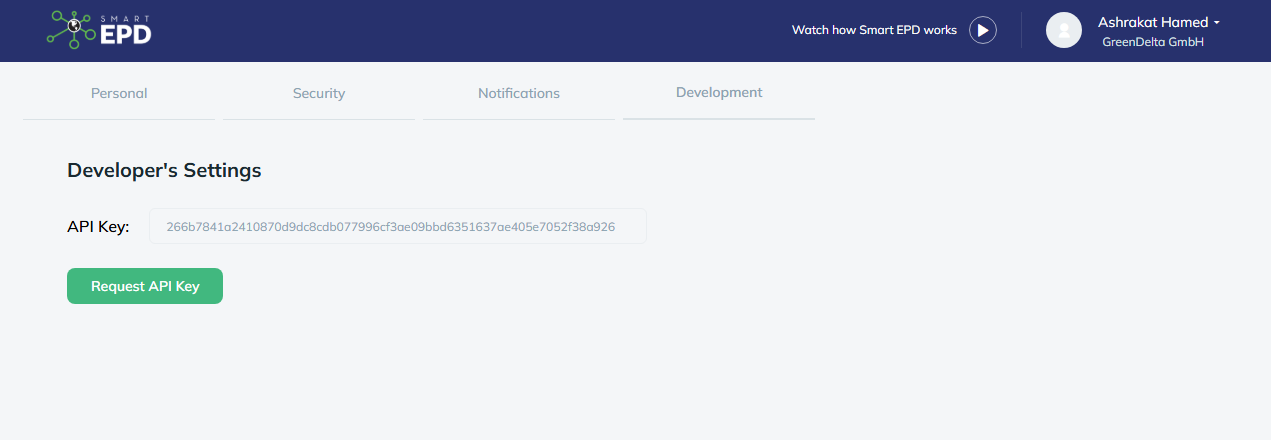
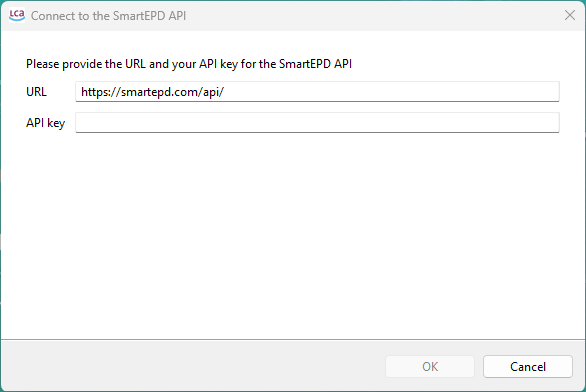
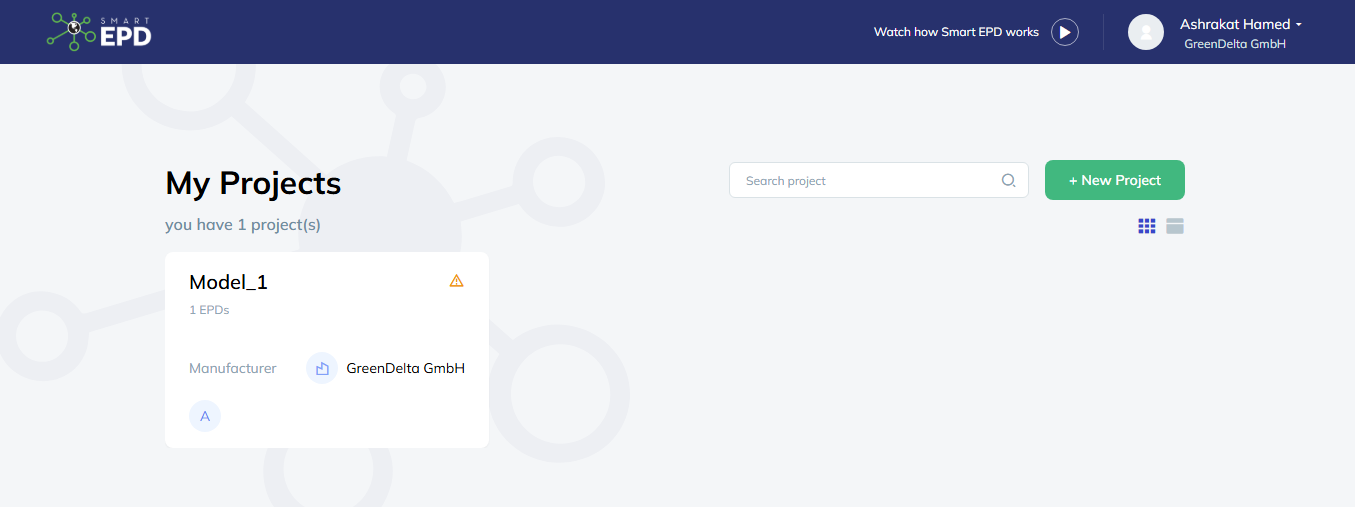
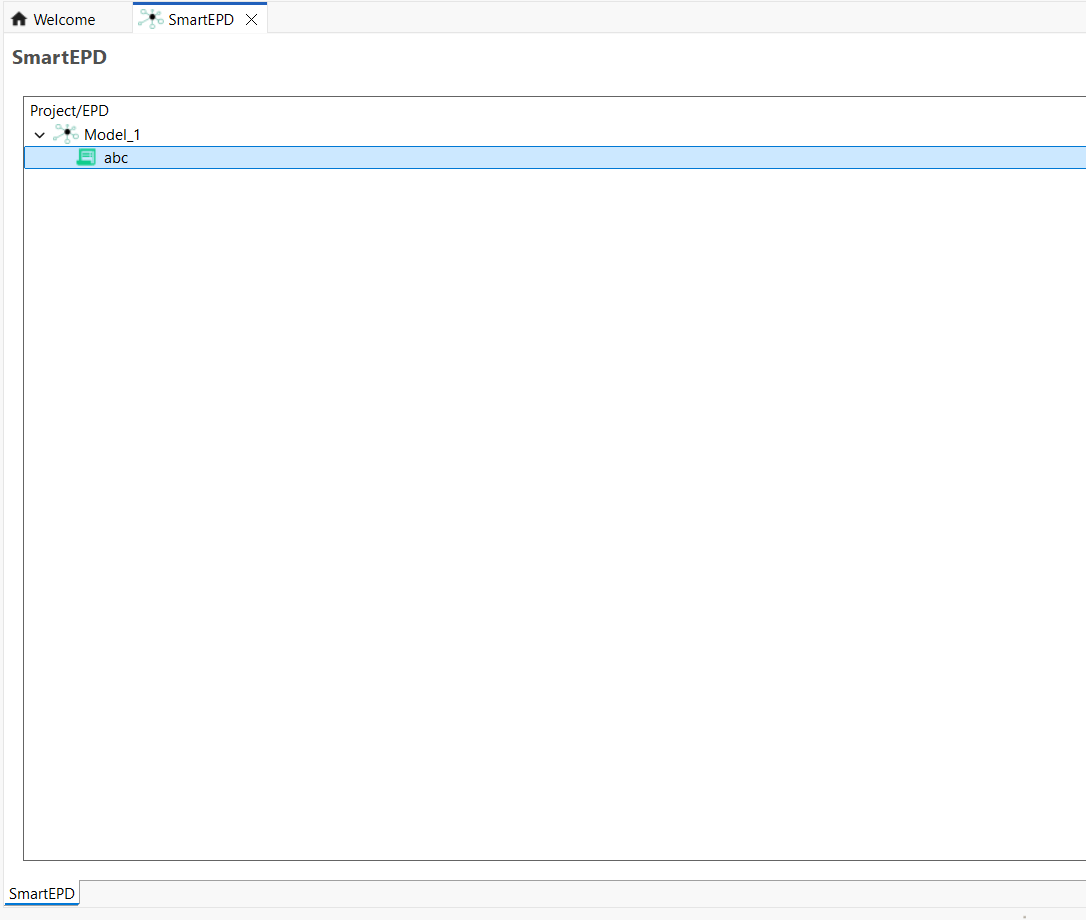
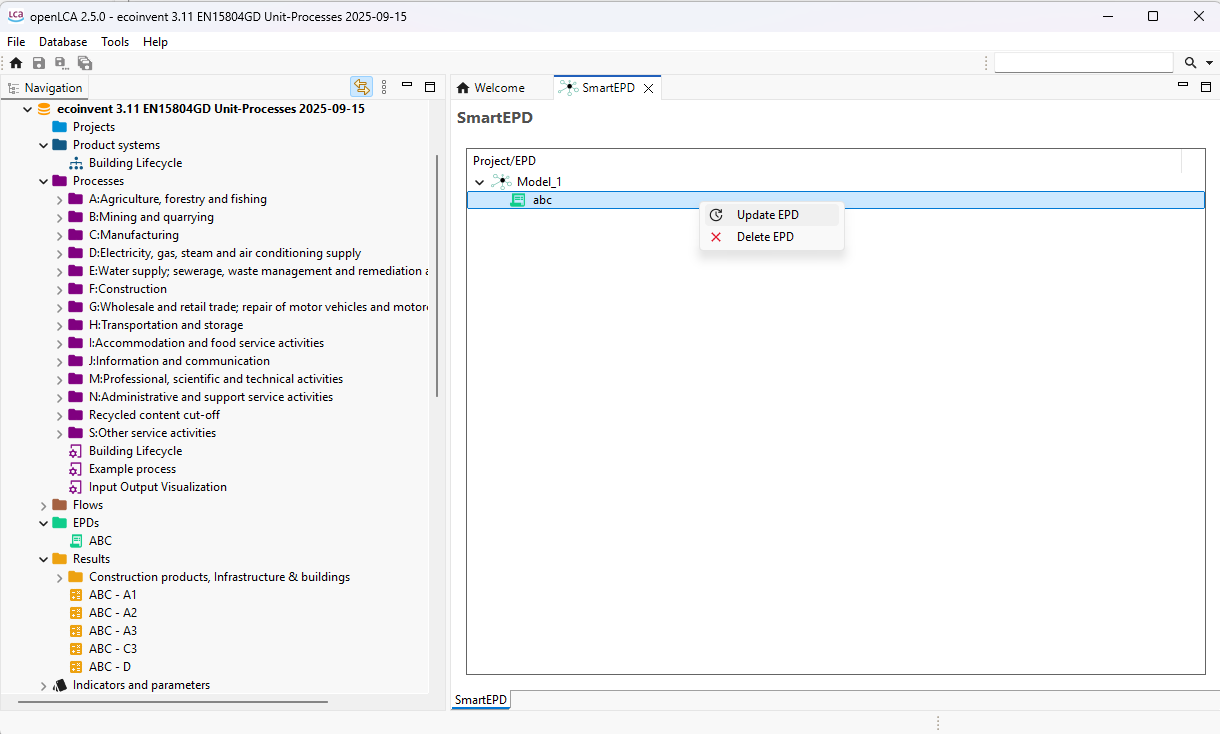
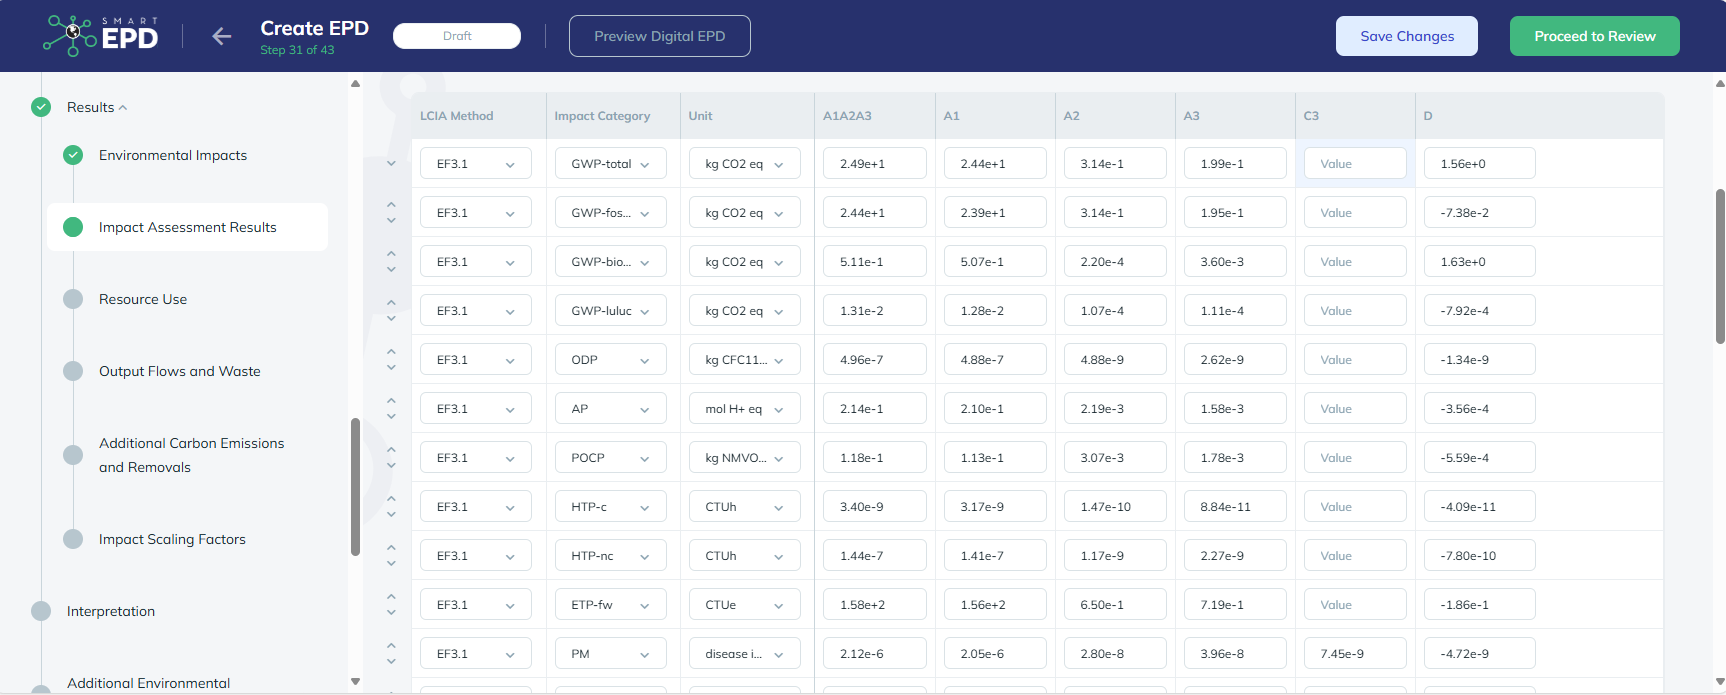
 Example of a library product system displayed in the graphical editor of openLCA 2.0